Dillinger Labs Aquarius User manual

Aquarius
owner’s manual
Developed in Canada
built to survive a moose stomp
SKAA® wireless
speakers

1. Introduction
Thanks for choosing Dillinger Labs. You're now the proud
owner of Aquarius - Our flagship speaker system, complete
with SKAA wireless technology.
SKAA prides itself on ease of use and flexibility. Combine
these values with Dillinger Labs’ commitment to audio
quality and you get Aquarius. Truly great speakers.
We know you are eager to fire up your new speakers and we
don’t want to keep you waiting. Refer to 3. Quick Start
Guide to have your speakers up and running in no time.
Once you’re moving and grooving, come back and learn all
about your new gear.
A few important bytes of information
Have you seen this icon before?
The SKAA Compatible Badge
certifies that this Product has
been tested and is fully
compliant with all of the
requirements of the SKAA
Standard and has been granted
SKAA Certification. This Product will work seamlessly with all
other products sporting the SKAA Compatible Badge.
If your transmitter is capable of SKAA Pro, so is Aquarius!
SKAA Pro reduces the latency of SKAA from 36ms to 19ms.
Check out our video on SKAA Pro here.
For more information on the SKAA Standard, please visit SKAA.com.
The SKAA® name as well as its associated marks, logos, and icons are
trademarks or registered trademarks of Eleven Engineering Inc.
2. One and Done.
Your Aquarius speakers feature a single control that
combines the SKAA Bond Button and a rotary knob for
volume control.
Embrace the knob. Become one with the knob.
3. Quick Start Guide
Step 3: Press n’ hold the power switch for 1 second.
Aquarius will instantly Bond to the Transmitter
and the Bond Indicator will shine solid Amber.
You should now hear audio playing.
Step 1: Connect your chosen SKAA Transmitter to
an audio source and if required, turn the
Transmitter on.
Step 2: Play audio on your device.
Step 4: Adjust the volume by rotating these knobs.
Note: The output volume of your source
device will affect the volume from Aquarius.
If the Bond Indicator stays dim Amber and there is no
audio, Factory Reset by clicking the Bond Button 6 times.
The Bond Indicator will flash Red if the reset is successful.
Bonus Links :
SKAA Wireless Audio Beginner's Guide
SKAA YouTube Channel
Ursula and Cassandra PC Users:
Mac OS: Navigate to System Preferences > Sound, and
set the output device to SKAA Transmitter.
Microsoft OS: Navigate to Sound Settings and select
SKAA Transmitter as your output device.

6. Digital Signal Processing (DSP)
Analog Devices is a world leader in Digital Signal Processing
technology making their DSP Chip the perfect choice for
your speakers. The DSP commits one channel to the woofer
and one channel to the tweeter, preserving audio fidelity in
the process. We’ve programmed the DSP to supply a flat EQ
to give you a listening experience akin to that of a recording
studio. Analog Devices and SKAA have allowed Aquarius to
boldly go where no speaker has gone before. Where high
fidelity wireless solutions reign supreme.
7. Class-D Amplifier
At the heart of Aquarius is its MerusTM amplifier - Infineon’s
most efficient audio amp. Merus boasts a stellar 92%
efficiency, meaning that more of your battery’s power is
converted into sound and not into heat. More power savings
means more hours of music giving Aquarius its 36+hour
battery life at normal listening levels.
8. Film Capacitors
Film capacitors are an audio engineer's
best friend! When an amplifier demands
power, not all capacitors are capable of
supplying an instantaneous flow of
charge; this is where a film capacitor
comes to the rescue. Next time you hear
a kick drum in your Aquarius speakers,
remember the film capacitor makes it
happen with an extra punch.
4. GinsengTM
SKAA technology is known for robustness and reliability. This
was possible by taking a ground-up approach to design a
chip to meet strict performance goals. We present to you
GinsengTM by Eleven Engineering.
Unlike alternatives that utilize task switching architecture,
Ginseng utilizes multithread architecture to process audio
data. The ability to run multiple tasks simultaneously is the
key to SKAA’s superior audio quality.
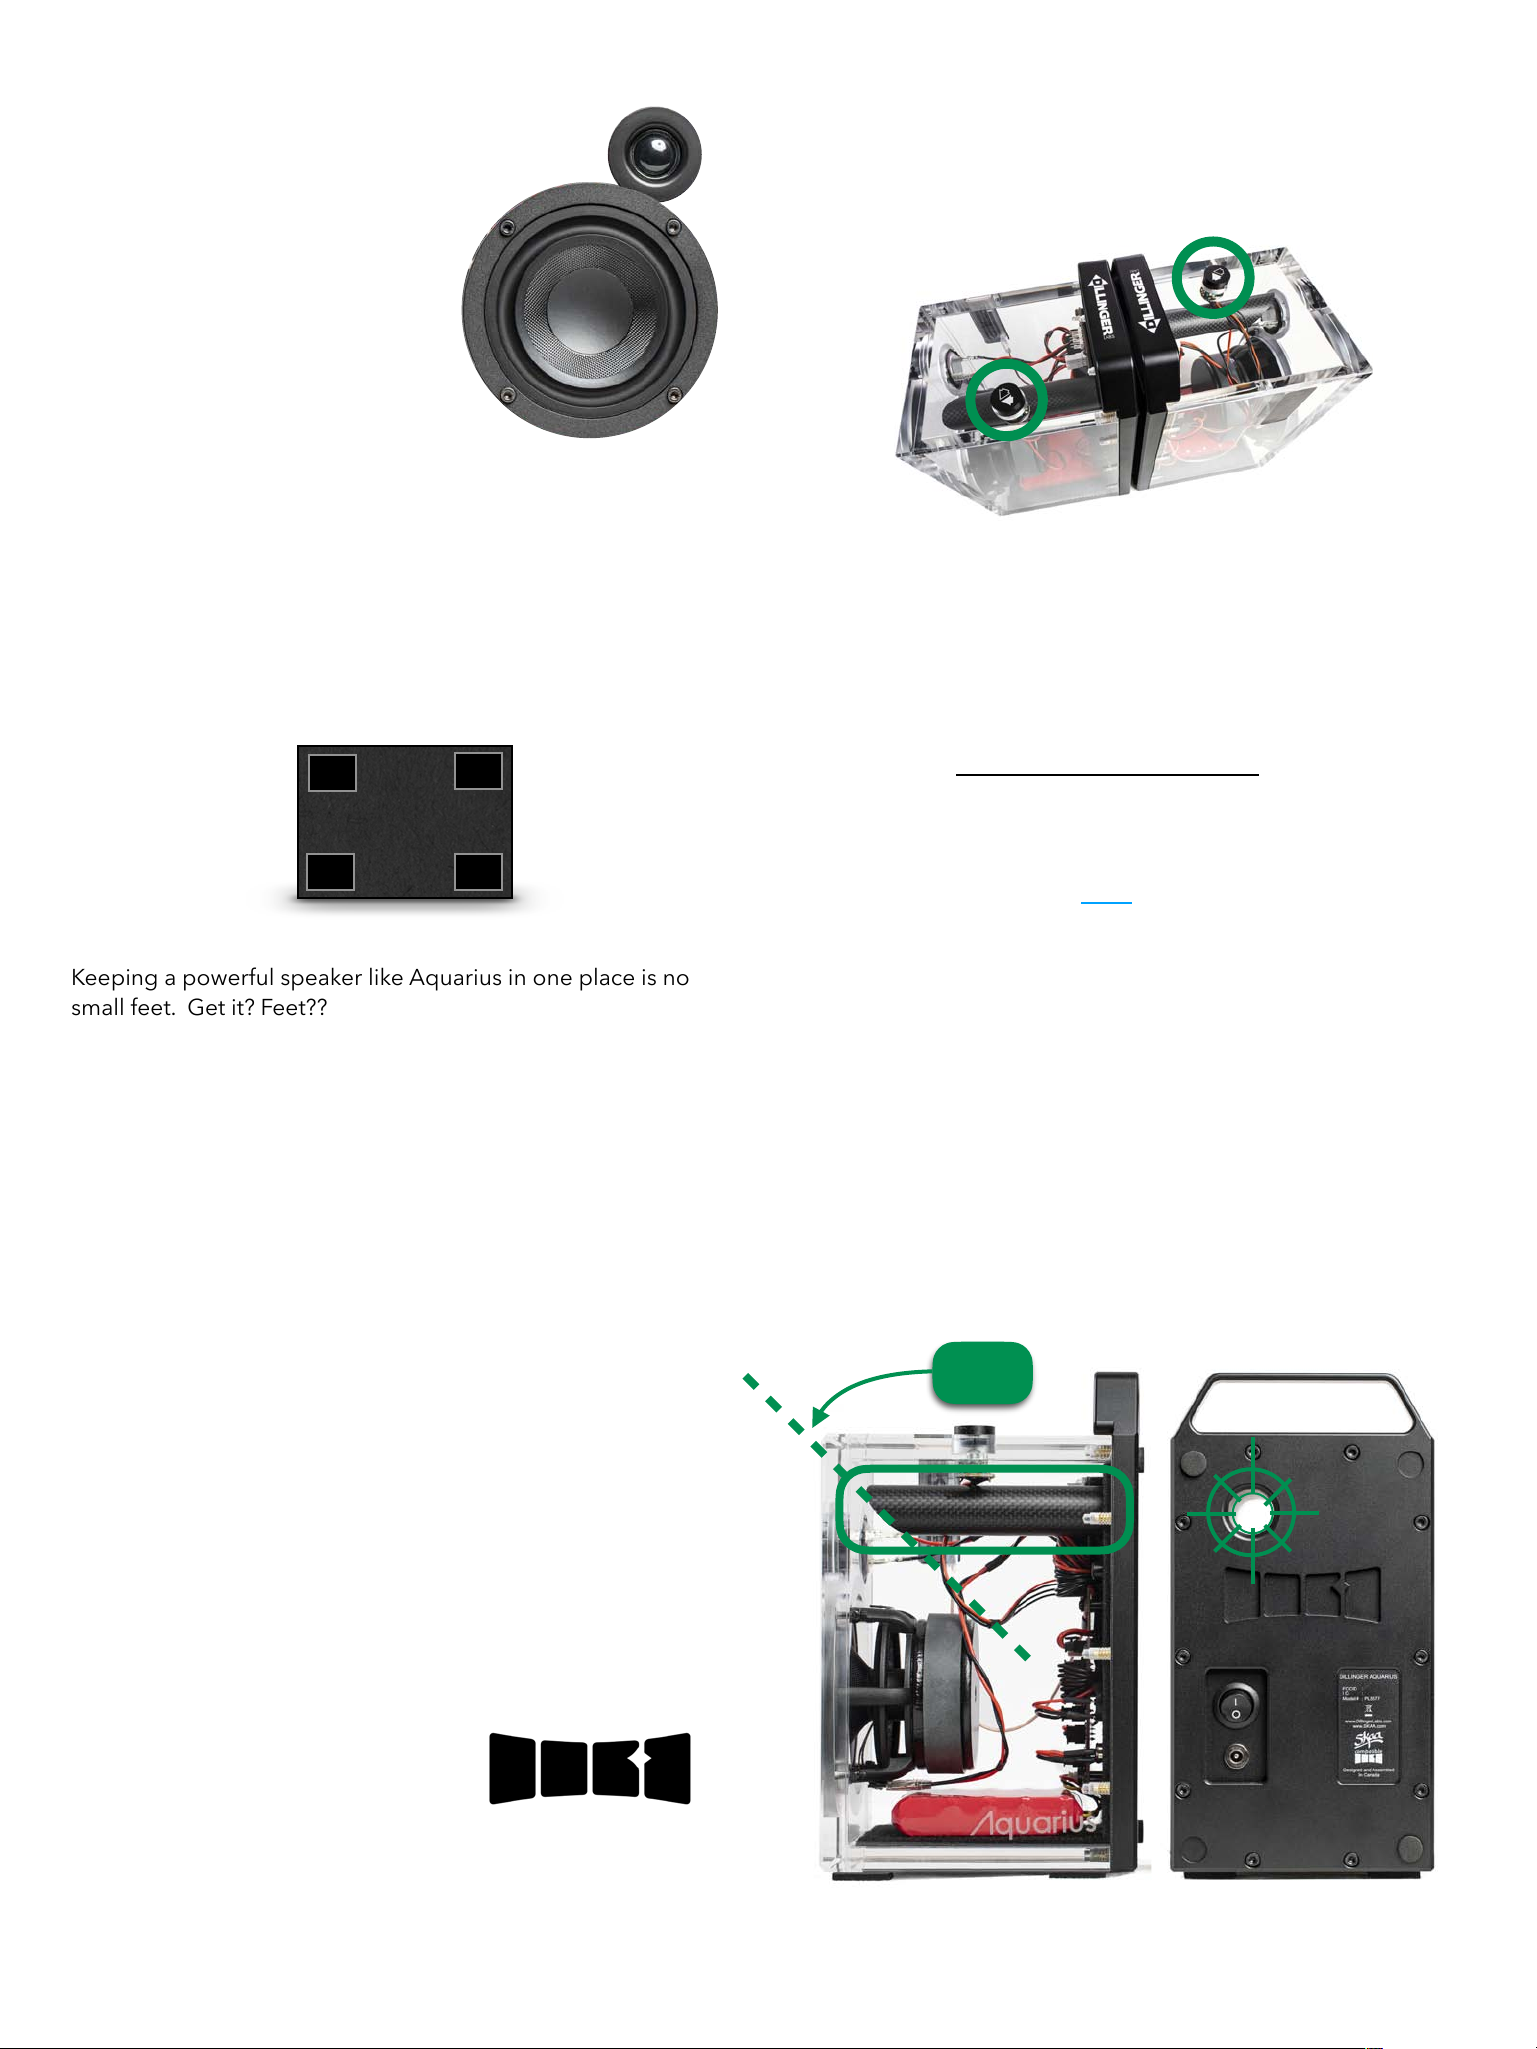
5. Flush External (FE) Antenna
Wireless range is just as important as computing power.
Ginseng is connected to an in-house engineered, artisanal
farm-to-table, non-GMO, class-leading antenna. Brace
yourself - here comes the antenna hype...
Look carefully at the location of your Aquarius' internal
antenna. Follow the copper cable from the PCB to the black
emblem on the side of the speaker. This is the antenna. We
have done everything in our power to put it in the ideal
position - elevated and away from metal and electronics. We
went so far as to put it on the OUTSIDE of the speaker.
Choices like this enable your Aquarius to achieve a 50-meter
wireless range when paired with a transmitter capable of that
same range.
Antenna hype complete.
Green Technology
Top Acrylic
FE Antenna
45O
12. One Control
The Bond Button/Knob gives you full control of your
speakers with a push and twist.
Want to change the volume?
— rotate the knob.
Want to search the Green List for your favourite Transmitters?
— single click the Bond Button.
Want to play audio from a new Transmitter?
— double-click the Bond Button.
Check out the SKAA Receiver’s User Guide later in this
manual for a complete list of SKAA commands.
Power users: check out our video diving deep into the Bond
Button and the Green List here.
13. The Tuned Port
The Port of Aquarius has a few seemingly unremarkable traits
that make it quite remarkable, indeed. We’ve made it as long
as possible with a 45° slice inside the speaker which leads to
a gentle flare on the back plate; choices that achieve four
important goals:
1. Improve bass performance — all the way down to 55Hz
2. Minimize resonant frequencies
3. Near-perfect elimination of chuffing
4. Port turbulence prevention
9. Drivers: Woofer/Tweeter
We have selected the drivers
for Aquarius with great care.
The woofer’s frame is a cast
aluminium basket with a
carbon fibre cone. The ceramic
core screams “attitude” with a
punchy, dynamic and clean sound.
The tweeter, on the other hand,
provides a smooth, mellow response from its silk dome.
Besides the superior material quality of the woofer and tweeter,
the mounting location of the tweeter plays an important role. To
widen the stereo image delivered by Aquarius, the tweeters are
pushed to the extreme left and right in their respective speaker.
10. Feet
Keeping a powerful speaker like Aquarius in one place is no
small feet. Get it? Feet??
Take a moment and gaze upon Aquarius’ Feet. Whatever
surface you place these speakers on, the Feet will never allow
the speaker to creep. Aquarius speakers will stay exactly where
you want them even at maximum volume.
11. The Back Plate
The back plate serves as the backbone of Aquarius - holding it
all together and looking good while doing it.
Aquarius’ back plate is manufactured by machining a large
block of aluminium into its final shape. This manufacturing
technique is deliberately chosen to achieve the rigid structure
required to endure the extensive vibration your speakers will
experience through their long lifetime.
The back plate acts as a two-pound aluminium heatsink for the
electronics — especially the Class-D Amplifier. Thanks to the
large surface contact between the amp and the backplate, any
heat dissipated is effortlessly diverted into the aluminium.
Excellent heat transfer ability allows us to drive the amp at its
maximum power level indefinitely.
The backplate also sports the
SKAA icon. When you see this,
you know good things are coming.

15. The Gravity LockTM
Gravity LockTM allows you to conveniently carry a pair of
Aquarius speakers in one hand. Simply interlock two
speakers back to back as shown in the image below.
As you bring the two speakers together, notice the bumpers
align with pockets on the opposite backplate (circled in the
image). Once they interlock, they stay firmly in place while
you comfortably carry your speakers.
14. Charging
Aquarius has a phenomenal 36+ hour battery life at normal
listening volumes, but eventually, you’ll need to charge them
back up. Each speaker is shipped with a 24VDC 65W
charging adapter:
The charging jack is located on the backplate, below the
power switch as shown here:
Charging jack
When the battery reaches 45 minutes of remaining run
time, an orange LED will begin flashing - it’s time to plug in
the charging adapter.
A full battery recharge will take 2 to 3 hours from empty.
An orange LED will stay on during charging and will turn
off once fully charged.
PRO TIP: leaving the charger plugged-in while music is
playing will allow Aquarius to play LOUDER.
If you keep your speakers plugged in full time, be
sure to unplug from power once a month and fully deplete
your batteries. Doing this will extend the battery life.

16. SKAA cmd App
SKAA cmd (“command”) is the app that you don’t really need.
Though, once you hear about what it can do, you’ll certainly
WANT it…
SKAA cmd provides a long list of additional features to your
SKAA setup. For use with Ursula, Cassandra, Diz and Gemma
transmitters - you can add custom names to Receivers, easily
mute all Receivers, adjust individual volumes, see which
Receivers are bonded to your Transmitter and so much more!
The SKAA cmd App is available for iOS, Android, Mac, and
Windows platforms. It can be downloaded from the Apple
App Store, Google Play Store, and at www.skaa.com/tlc/
skaa-cmd/
Check out www.skaa.com/tlc/support/ for the dedicated
SKAA cmd App user’s guide.
2. Local volume control. Move this slider to modify
the volume of each Receiver
3. Click “i” to see the App Info Screen. Here you
can view the app version and Transmitter version.
4. Global volume control. This slider changes
the volume on all Receivers simultaneously.
6. Transmitter Power Mode Customization
RED: Always ON
GREY: Always OFF
WHITE: ON only when there is audio
7. Customize the name of your Transmitter.
8. Audio Routing: The Green Bond Block lets you
choose whether a Receiver is playing left, right, or
both channels. From the factory, your Aquarius
speakers are configured with the left and right
speakers playing their respective channels.
—— PLEASE NOTE ——
If you only use one speaker to play audio, you
may want to set it to a Mono output.
9. Press to mute an individual Receiver.
Press again to unmute.
10. Give your speakers a snappy nickname like
“Aquarius Almighty”
…or something better. Or worse. You do you…
1
2
3
4
5
6
7
8
9
10
5. Once pressed, this triangle will summon a
fearsome to all volumes to zero.
Fear not, it's just a global mute button. Press each
Receiver’s speaker icon to unmute.
ZAP
LAZER
1. Your transmitter has 4 bays and you can park a
receiver or Cluster (see no.17) in each bay

Step 4: While the master speaker is flashing red, turn ON
the slave (right) speaker. You should now see the Bond
Indicator on the Slave and Master speakers both flashing
red. Wait 10 seconds.
Step 5: Once the Bond Indicators turn solid red, turn OFF
and ON both speakers.
Congratulations, you have made a Cluster of two speakers!
Step 6: When you connect the master speaker to the
SKAA cmd app, you will see a window similar to the one
shown below. Notice how a SKAA cluster is made using
two speakers with the left speaker as the master.
You can cluster up to 4 receivers of the same type. Check
out our YouTube Guide on Clusters here.
17. Clusters
Clustering is a power user feature that allows you to take a
group of SKAA speakers and make them act as a single unit.
Check out our YouTube video explaining the Clustering
feature here.
The following Cluster example sets up the Left Aquarius as a
master and the Right Aquarius as a slave.
Step 1: Place two Aquarius speakers near each other
and ensure both of them are turned OFF.
Step 2: Using the Master (left) speaker, hold down the
Bond Button, then turn the speaker ON
Step 3: After a few moments the Bond Indicator will flash
Red, release the Bond Button
Right
Left
press ON
press n’ hold
release

18. Specifications
Cabinet construction
Crystal clear acrylic, solid aluminium back plate
Battery capacity
48.1 Wh
Battery life
18.5 to 36+ hours dependant on listening level
Charge time
2.75 Hours
Amplifier power
60 W RMS
Amplifier type
High efficiency class D
Woofer spec
40W Max
4’’ diameter with 1” voice coil - concave rubber surround
Tweeter spec
20W Max
0.76’’ diameter - silk cap and cone
Woofer impedance
8Ω
Tweeter impedance
6Ω
Tuned port
0.862” ID (21.9 mm), carbon fiber construction
Frequency response (Bi-Amp Out)
37Hz - 22 kHz +/- 3 dB RE: 997 Hz at 1W, AES17 LPF
THD+N (Bi-Amp Out)
< 0.05 % @ 1W, 200 Hz – 20 kHz, AES17 LPF
SNR A-weighted (Bi-Amp Out)
> 82 dB Re: 997Hz at 1W, AES17 LPF
Digital resolution
48 kSamples/s, 16 bit
SKAA transport latency
36.72 +/- 1.5 samples
SKAA Pro transport latency
19.39 +/- 1.5 samples
Crossover frequency
3 kHz
Antenna type
FE Model B0
RF power
15 dBm
Dimensions (W*L*H)
12.8*15.2*24.8 cm
Weight (each)
4.5 kg
Power Supply Rating
(1 per Speaker)
24VDC 65W

19. Important Information
Please read the following information carefully. Failure to follow the safety guidelines may result in personal injury or user
dissatisfaction.
1. Do not poke woofer and tweeter cones. They don’t like it.
2. Never place anything into the tuned port on the back side of the speaker.
3. Only use the provided power adapter for charging.
4. Never store or operate speakers near a heat source.
5. Do not operate Aquarius speakers in rain. Contrary to their name, your speakers are not water-resistant.
6. Do not charge speakers during electrical storms.
7. Once fully charged, remove speakers from external power. This will lengthen their battery life.
8. Listening to speakers at maximum volume nearby may lead to partial hearing loss. To preserve your hearing, we do not
recommend listening to volumes beyond 90% within 3 meters of the speaker.
9. Not for use by those under the age of 12.
10. Any disassembly of the speakers will void your warranty.
11. The acrylic which makes Aquarius so unique is also quite fragile. Handle your speakers with great care.
12. Aquarius is not a sentient being capable of care and compassion. You will love them but they will not love you back.
Dillinger Labs advises the reader that this owner’s manual is being continuously updated to reflect the most up-to-date and
accurate information regarding Aquarius speakers. Please check our website periodically for the most recent version of this
manual.
Should you have any comments or questions about SKAA or Dillinger Labs products, we invite you to write to us here.
Check out our YouTube channel to familiarize yourself with an array of fantastic SKAA products.

SKAA®RECEIVER USER’S GUIDE
Each SKAA receiver uses a Green List to remember your favourite audio sources (SKAA
transmitters). A Green glowing Indicator on your receiver means you are listening to a favourite,
or hunting for one. You can also explore to find new transmitters—an Amber Indicator means you
are exploring for transmitters which are not on your Green List. The Bond Button on your
receiver lets you select which audio source (SKAA transmitter) you’re listening to.
Essentials
More Commands
Button
Command
Indicator
Hold!
a few seconds
Add / Delete Manually add / delete the current
transmitter to / from your Green List
-
Auto Add SKAA will automatically add the
current Amber transmitter to your Green List if
you listen to it for 30 minutes
1 Click
Green Mode Rotate through your list of
favourite transmitters (Green List) — when a
favourite transmitter is found, the search stops
and audio plays from that transmitter
2 Clicks
Amber Mode Explore for new, unknown
transmitters (ones which are not already on your
Green List)
to = Added
(flash) = Deleted
(dim) = Hunting
(bright) = Bonded
(dim) = Hunting
(flash) = Next one
(bright) = Bonded
to = Added!
Button
Command
Indicator
3 Clicks
Mute do again to Unmute; any Click command
will first Unmute and then do its function
4 Clicks
Red Mode If you have 2 or more transmitters
on your Green List, power on just the one you
want to hear and it plays automatically.
6 Clicks
Factory Reset Clear Green List. Start Over!
Hold during
power on!
!
!
!
!
!
!
!
!
Make a Cluster of Receivers:
1. Power off all transmitters and receivers
2. Power on the Master receiver while holding
down its Bond Button—hold the button
down until the Indicator begins to flash Red
3. With the remaining receivers within 3
meters of the Master receiver, power on the
first one, wait for its Indicator to flash Red
and then power on the second one;
continue until all of them are powered on
4. Once all of the Indicators stop flashing (turn
solid Red), power off all of the receivers
, or = Muted!
(slow flash)
(flash) = Receiver has
entered ‘Cluster
Up’ mode
(bright) = The Cluster has
been
successfully
made!
(flash) = Reset Done
(dim) = Hunting
(bright) = Bonded

QUESTIONS AND ANSWERS
Question
Answer
How does the
Green List work?
You can store up to 10 SKAA transmitters on your Green List. These are your “favourite” audio
sources. Every time you add a transmitter, it is assigned the first open spot on the Green List. When
you single click the Bond Button, the receiver hunts through the Green List much like a car radio
hunts for radio stations when you press seek. If the Indicator is dim Green and flashes every few
seconds, this tells you the receiver is hunting through the Green List. Say you have 5 transmitters on
your Green List; your receiver will hunt through the list one by one: 1, 2, 3, 4, 5 and then back to 1
and so on. The dim Green Indicator flashes every time the receiver moves to the next spot on the list.
This hunting goes on for up to 1 minute. If your receiver doesn’t find any of your favourite
transmitters, it stops hunting and just waits for the last bonded favourite. If your receiver does find
one of your favourite transmitters, the hunting stops, the Indicator turns bright green, and your
receiver starts playing audio from that favourite. A dim Green Indicator that is NOT flashing means
the receiver is just sitting on one spot, waiting for a specific favourite transmitter to show up.
How do I bond
with a specific
Green transmitter?
Play audio from your source device and ensure it has a SKAA transmitter connected. Click the
Bond Button on your receiver. The receiver hunts through the Green List, flashing the Indicator as it
goes. Once your receiver finds one of your favourite transmitters, it bonds to it and plays audio from
that transmitter. If that isn’t the transmitter you wanted, click the Bond Button once more. Repeat
until your receiver bonds with the transmitter you want and you’re hearing the correct audio playing.
How do I select
transmitters if I
can’t reach my
Bond Button?
Say you want to put your receiver on a high shelf where you can’t reach the Bond Button easily. First,
set up your Green List: add all of the transmitters you’ll want to use. Then 4-click the Bond
Button to enter Red Mode. Now put the receiver up on the high shelf. Power on just one of your
transmitters and power off all others. The receiver automatically bonds to the transmitter that’s on.
How do I delete a
transmitter from
my Green List?
Factory Reset (6 Clicks of the Bond Button) clears the Green List and lets you start over from scratch.
If however, you’d like to delete just one transmitter from your Green List, first bond your receiver to
the transmitter you wish to delete. See the section above: How do I bond with a specific Green
transmitter?. Once you are bonded to it, hold down the Bond Button for a few seconds until
you see the Indicator flash Red —this Red flash means the transmitter has been deleted.
What is a Cluster?
Clusters are an optional convenience for “power users”. A Cluster is several SKAA receivers
behaving as one product. A left & right speaker pair, for example, or a sound bar and subwoofer.
What is the Master
receiver?
In any Cluster, there is a single Master receiver, and all of the other receivers in the Cluster follow its
behaviour. You can control the entire Cluster by operating the Bond Button of the Master. A
receiver must have a physical Bond Button in order to become the Master.
How do I
“uncluster” several
receivers?
Do the Make a Cluster of Receivers procedure once for each receiver, but omit Step 3. Do them one
at a time. This gives each of the receivers a functioning Bond Button, and each of them will
thereafter operate independently.
What are some
tips for making
Clusters?
Each step in the Make a Cluster of Receivers procedure has a 10-second time limit. When you see
the Master’s Indicator start to flash Red, you have 10 seconds to power on the next receiver. When
that receiver’s Indicator starts to flash Red, you have 10 more seconds to power on the next one, and
so on.
Why does only
one of my Bond
Buttons work?
When you make a Cluster from several receivers, the first one powered on in the Make a Cluster of
Receivers procedure becomes the Master of the Cluster. Only the Master’s Bond Button works
because a Cluster uses just one Green List —the Master’s Green List. The Bond Button of each of the
other receivers will work only for the Mute / Unmute function (3-Click of the Bond Button).
Can any group of
receivers be made
into a Cluster?
No. The receivers must be members of the same product family. If they are not, the Make a Cluster
of Receivers procedure won’t work. This is because only receivers which were designed to work
together (as a single product) can be made into a Cluster.

Aquarius Use Case #1
SKAA - 36 ms latency SKAA Pro - 19 ms latency Wire
Legend:
Computer with a pair of Aquarius speakers
Aquarius Speaker Aquarius Speaker
L
R
Ursula Transmitter
11

Aquarius Use Case #2
2.1 Home Theatre System
Aquarius Speaker
L
Aquarius Speaker
R
Talisa Transmitter
SKAA - 36 ms latency SKAA Pro - 19 ms latency Wire
Legend:
SKAA compatible Subwoofer
Television

Aquarius Use Case #3
Cluster of speakers
Aquarius Speaker
Mono
Talisa Transmitter
SKAA - 36 ms latency SKAA Pro - 19 ms latency Wire
Legend:
Aquarius Speaker
L
Aquarius Speaker
R
MASTER OF THE CLUSTER
SLAVE
SLAVE
If you wish to control a whole sound system using only
one speaker, you can do that by setting up a Cluster.
Check out section 17. Cluster of Speakers and SKAA
RECEIVER USER’S GUIDE at the end of this manual for
detailed info.
Television
SKAA compatible Subwoofer

Aquarius Use Case #4
Home-brew Party
Aquarius Speaker
L
Aquarius Speaker
L
R
Aquarius Speaker
R
Diz Transmitter
iPad
SKAA - 36 ms latency SKAA Pro - 19 ms latency Wire
Legend:
Aquarius Speaker
We offer a Cassandra Transmitter for USB Type C and a
Gemma Transmitter for micro USB. Check out www/
SKAAstore.com for a full range of available transmitters.

Aquarius Use Case #5
DJ House Party
SKAA - 36 ms latency SKAA Pro - 19 ms latency Wire
Legend:
Aquarius Speaker
L
Aquarius Speaker
R
Dani Transmitter
Powered Subwoofer Powered Subwoofer
L
Aquarius Speaker
R
Aquarius Speaker

Aquarius Use Case #6
Hybrid Speaker DJ Set-up
SKAA - 36 ms latency SKAA Pro - 19 ms latency Wire
Legend:
L
R
Powered Speaker
Dani Transmitter
Powered Subwoofer
Aquarius SpeakerAquarius Speaker
Streetheart Receiver
Streetheart receivers are available from
skaastore.com/products/streetheart.
Powered Speaker
Powered Subwoofer
Streetheart Receiver

Aquarius Use Case #7
DJ with Mic & Headphones
SKAA - 36 ms latency SKAA Pro - 19 ms latency Wire
Legend:
Dani Transmitter
Powered Subwoofer Powered Subwoofer
L
R
Aquarius Speaker Aquarius Speaker
Aquarius Speaker Aquarius Speaker
Valerie microphone
Helix Headphones
Mono
Mono
Streetheart Receiver

Aquarius Use Case #8
ULTIMATE DJ Set-up
SKAA - 36 ms latency SKAA Pro - 19 ms latency Wire
Legend:
Aquarius Speaker
L
Aquarius Speaker
Dani Transmitter
Aquarius Speaker
Dani Transmitter
Powered Speaker Powered Speaker
Aquarius Speaker
Valerie microphone
Mono
Mono
Streetheart Receiver Streetheart Receiver
Other manuals for Aquarius
1
Table of contents
Other Dillinger Labs Speakers manuals


