Dinan Tronics D440-0052 User manual

INS440-0052 Page 1 of 7 Rev 9/18/17
INSTALLATION INSTRUCTIONS
PART NUMBER D440-0052
APPLICATIONS:
12/14-2017 F55 Mini Cooper S (5-door with 2.0L B46/B48 engine)
12/14-2017 F56 Mini Cooper S (3-door with 2.0L B46/B48 engine)
________________________________________________________________
PARTS LIST
Qty Part # Description
1 D443-0041 DINANTronics Elite ECU
1 D442-0036 Harness; B48 Elite, Late
1 D443-0042 Bypass Plug
10 D502141 Zip ties
4 DT441-0022 HD Velcro Strips
________________________________________________________________
Congratulations for being selective enough to use DINANTronics Elite Performance
Tuner. We have spent many hours developing this kit to assure that you will receive
maximum performance and durability with minimum difficulty in installation. Please take
the time to read these instructions and call us if you have any difficulties during the
installation.
NOTE: This kit does not fit all combinations of vehicles & engines. Please pay careful
attention to the vehicles listed above. Note -- this kit is NOT suitable for JCW vehicles.
Do not install this kit if your specific vehicle configuration is not shown. Please contact
your Dinan representative if you have any questions.
PREPARE VEHICLE FOR INSTALLATION:
a) Park vehicle at the location where you will be installing DINANTronics.
b) Determine the range of the keys.
Step away from the vehicle and attempt to lock or unlock the car using the
remote.
Continue to move away until the car no longer responds to the key. This is the
range of the key.
INS440-0052 Page 2 of 7 Rev 9/18/17
During DINANTronics installation, ALL keys must be completely outside this
range. If a key remains within range of the car, the vehicle may respond to the
key and awaken unexpectedly, which could result in a stored fault and check
engine light.
c) Unlock the car and open both the hood and trunk.
d) Close all the doors.
e) Move all keys beyond the range of the car.
f) Leave the vehicle undisturbed for about 10 minutes. This allows adequate time for
the electronics to go to sleep.
g) Disconnect negative terminal of battery.
DINANTronics INSTALLATION:
1. Remove the engine cover by tugging upwards to release the clips, then set cover
aside.
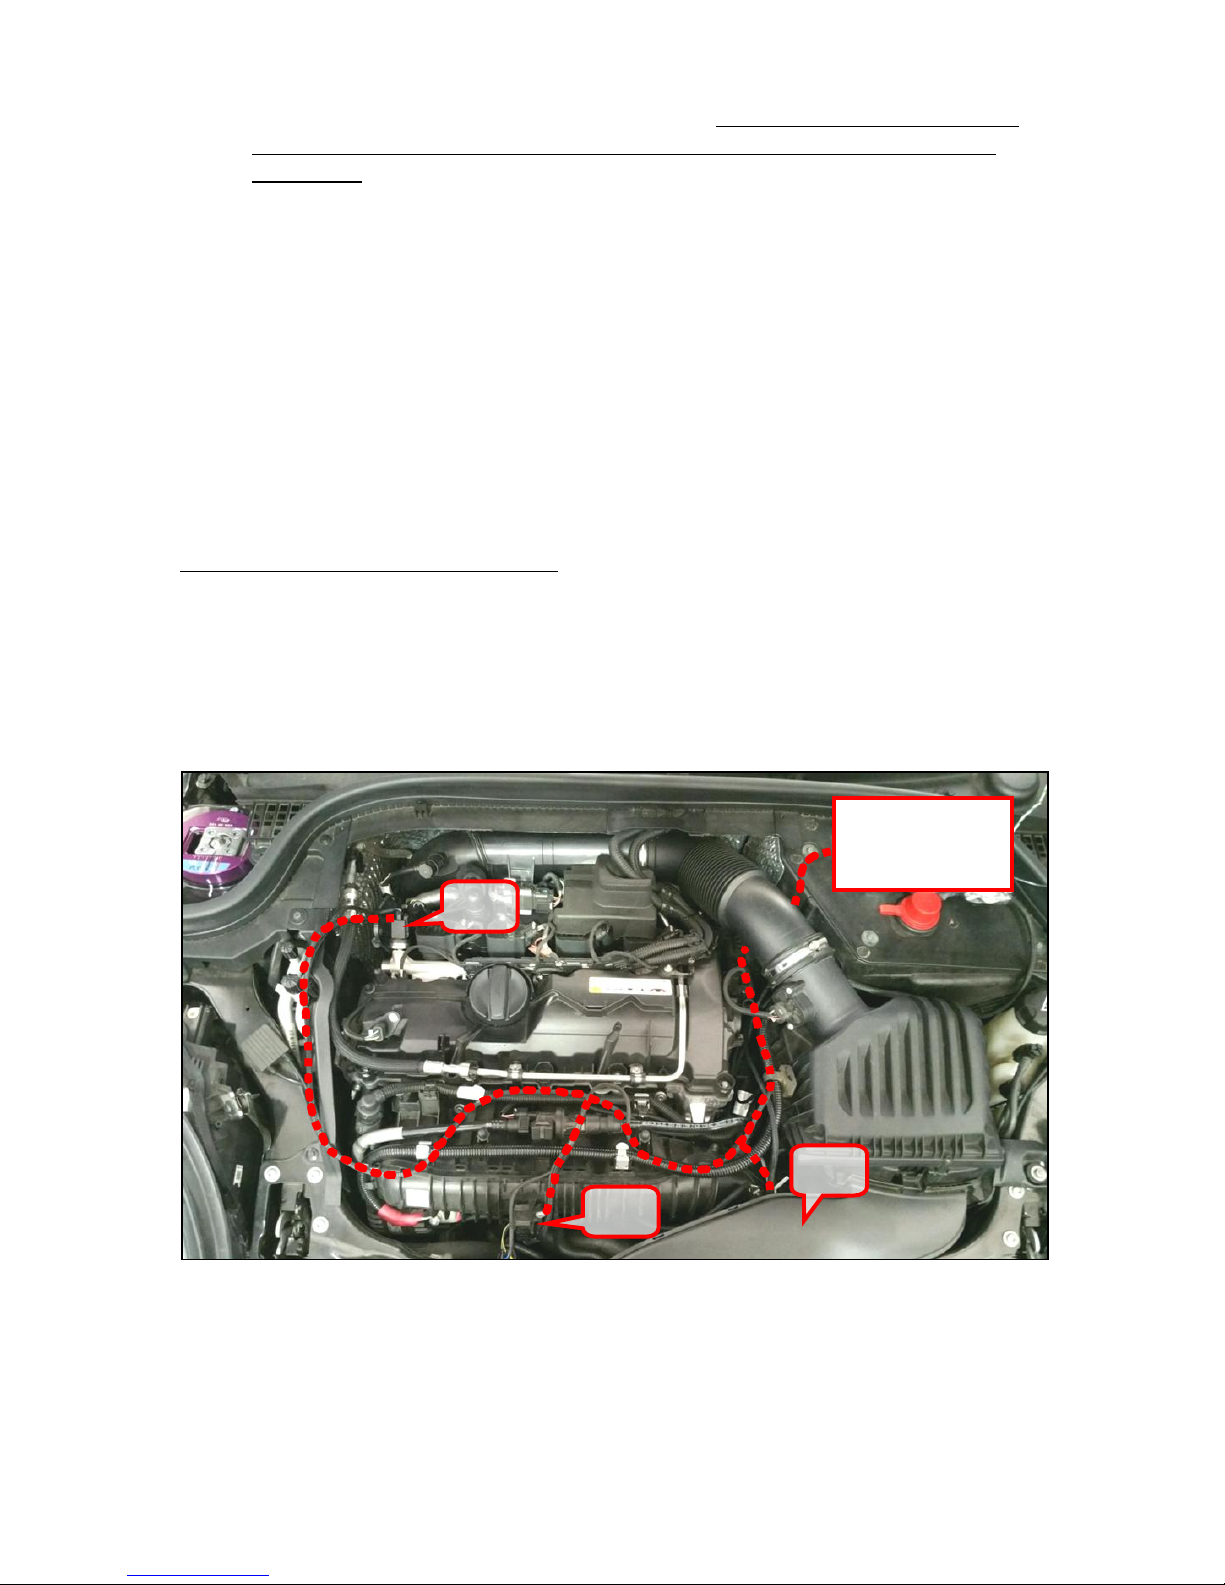
2. The DINANTronics ECU communicates with 3 pressure sensors in the engine
compartment, shown in the layout photo below.
NOTE: There are two possible connector styles for Sensor #3. You may
wish to glance at steps 11& 12, to confirm that the connector on the Dinan
harness is correct for your vehicle, before continuing with this installation.
DINANTronics
ECU may be
mounted here
#1
#2
#3

INS440-0052 Page 3 of 7 Rev 9/18/17
3. Sensor #1 is mounted to the charge air tube, just in front of the throttle body.
4. To access the charge air tube sensor, remove the two 10mm hex nuts and set aside
the air intake duct going to the airbox:
5. The charge air tube pressure sensor is shown below. It will have a connector that is
identical to the ones on the DINANTronics harness.
#1

INS440-0052 Page 4 of 7 Rev 9/18/17
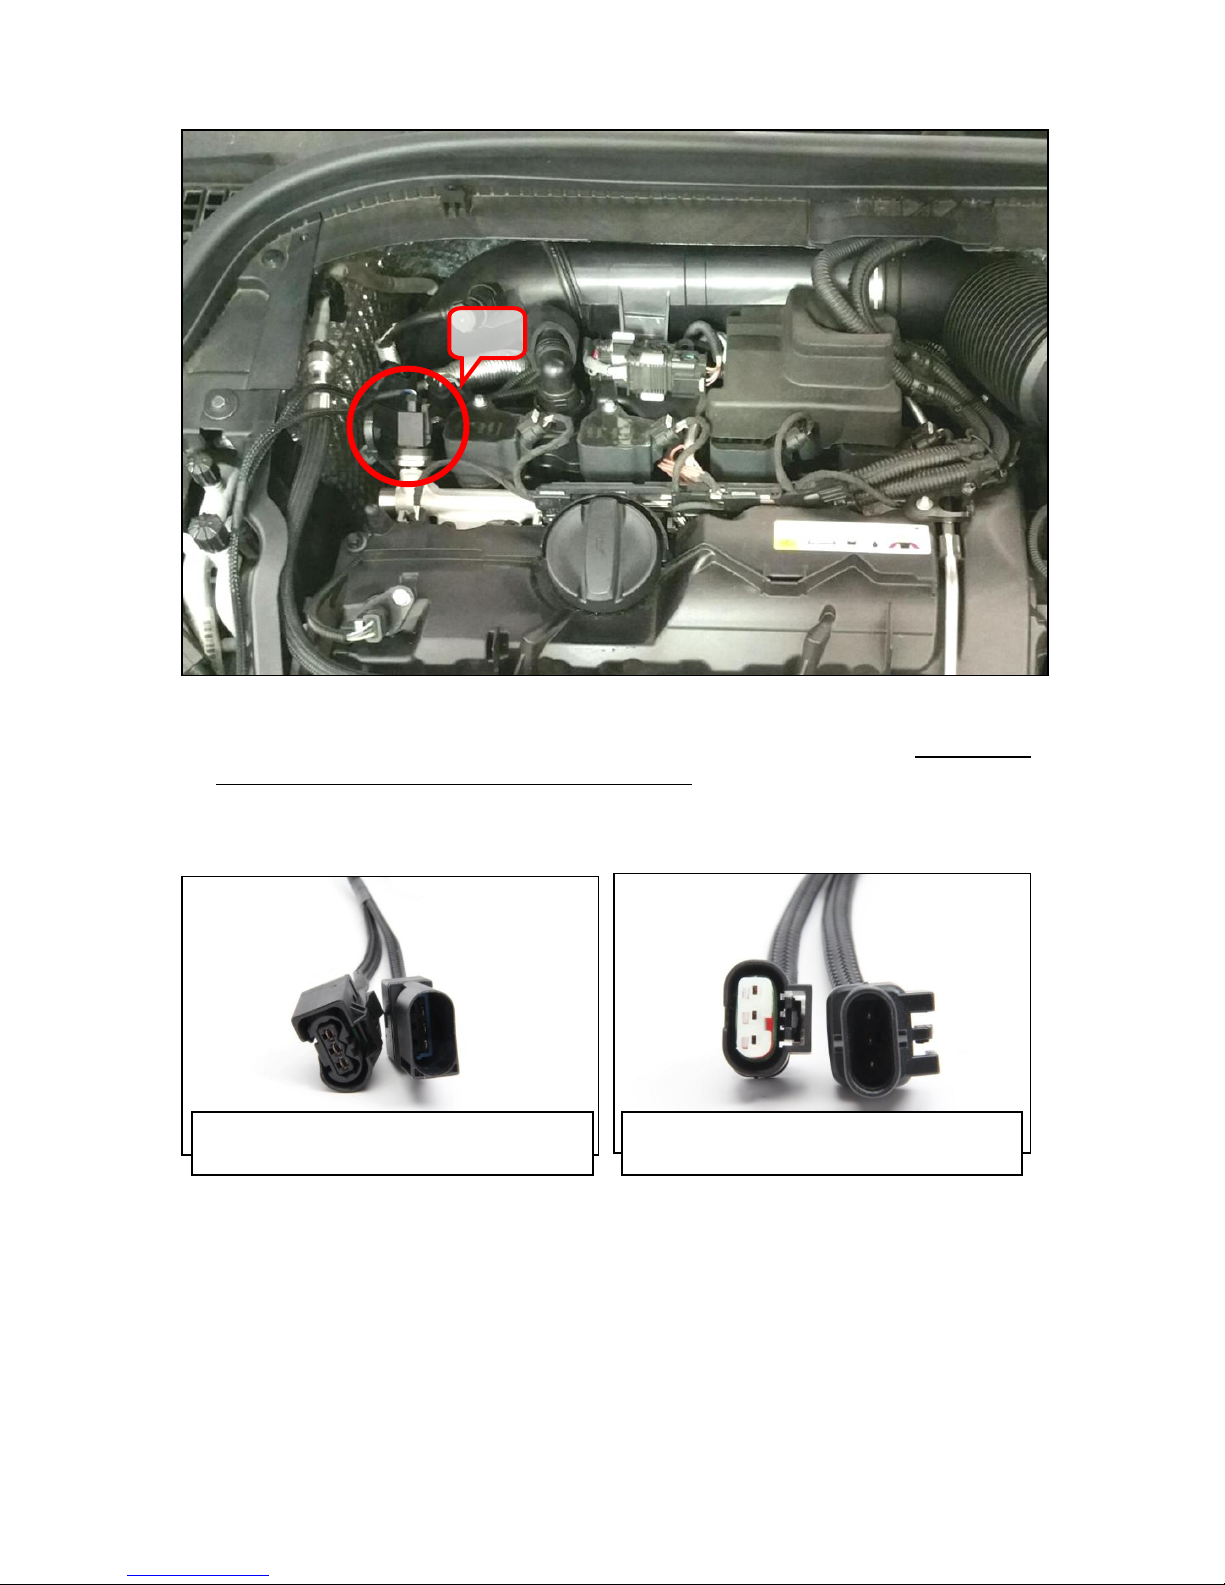
6. Study the locking system on the new DINANTronics connectors until you are
familiar with how the two connector halves are released. Some locks will require
the use of a small flat blade screwdriver to release the tang.
7. Disconnect the wiring harness from the pressure sensor.
8. Install the DINANTronics harness in between the charge air tube pressure sensor,
and the factory wiring harness. The connectors are unique, and can only be installed
one way. Make sure that the locking tangs on both connections are secure.
9. Route the DINANTronics harness to sensor #2, located on the intake manifold as
shown below.
10. Like the previous sensor, install the DINANTronics harness in between the manifold
pressure sensor and the factory wiring harness. The connectors are unique, and can
only be installed one way. Make sure that the locking tangs on both connections are
secure.
#2
INS440-0052 Page 5 of 7 Rev 9/18/17
11. Route the DINANTronics harness to sensor #3, located at the end of the fuel rail.
12. The fuel rail pressure sensor connection could be one of two configurations. Please
examine your harness connector and compare it to the photos below. One style is
a D-shape, while the other style is an oval-shape. If you do not have the correct
harness for your vehicle, please contact Dinan for an exchange -- do not continue
with installation
13. Like the previous sensors, install the DINANTronics harness in between the fuel rail
pressure sensor and the factory wiring harness. The connectors are unique, and can
only be installed one way. Make sure that the locking tangs on both connections are
secure.
14. The DINANTronics ECU may be mounted at the location shown in the first photo.
#3
If your stock harness has this connector,
then you may continue with installation.
Contact Dinan if your stock harness has this
connector -- do not install this harness.

INS440-0052 Page 6 of 7 Rev 9/18/17
15. Route the DINANTronics harness to the desired ECU location, taking care to:
Avoid all moving engine components or areas of extreme heat.
Ensure adequate slack in the wiring harness to allow for engine movement.
Use some of the included zip-ties to secure the harness as needed.
16. Connect harness to DINANTronics ECU. Take care to ensure that the connection
is securely latched.
17. Use the included double-sided Velcro tape to attach the ECU to the plastic cover.
18. Reinstall the air intake duct & engine cover.
19. Reconnect negative terminal of battery.
DINANTronics BYPASS PLUG:
20. A bypass plug is included in this kit. This plug allows you to return the car to stock
tuning, without removing the DINANTronics harness from the vehicle.
Should stock tuning be desired, follow the steps in the "Prepare Vehicle for
Installation" section; disconnect the DINANTronics ECU; and attach bypass plug
to the Dinan harness.
DINANTronics REGISTRATION:
21. On the DINANTRONICS ECU is a white identification label which displays the
MAC address of this ECU. The MAC address is a series of 16 letters & numbers.
Take note of the MAC address, as it will be needed to register your ECU with
Dinan.
22. Completely fill out the DINANTronics Product Registration page at the end of this
section. Submit this information to Dinan by visiting the webpage at
"http://decus.dinancars.com/retail", or you may fax or email the registration page
instead.
23. Enjoy!
INS440-0052 Page 7 of 7 Rev 9/18/17
Table of contents
Popular Automobile Part manuals by other brands

AUTOTECH
AUTOTECH 10.199.022K installation instructions

Generac Power Systems
Generac Power Systems FORD DURATEC 0F9765MNL Engine parts manual

Edelbrock
Edelbrock 73828 installation instructions

Ridewell Suspensions
Ridewell Suspensions RAR-254 Installation and service manual

BBK
BBK 4009 installation instructions

Murphy
Murphy SELECTRONIC TACHSWICH DT9803 installation instructions


Demco
Demco TP20080 Operators Operator's manual

Parker
Parker VO40 technical information

Fisher
Fisher Chevrolet 13000 series Service manual

Network Computing Devices
Network Computing Devices 2190 installation instructions

SPL
SPL RUAB Z33 installation instructions

Edelbrock
Edelbrock 5778 installation instructions