Dirtblaster NE445 User manual

DIRT BLASTER IN GROUND
AUTOMATIC POOL CLEANER
MODEL NE445
Congratulations on purchasing a
Dirt Blaster Automatic Pool Cleaner!
ASSEMBLY INSTRUCTIONS

DIRT BLASTER IN GROUND AUTOMATIC CLEANER

3
S
S
SST
T
TTE
E
EEP
P
PP
1
1
11
To install the seal locate the word “UP”. Face
it up towards the body of the cleaner. Gently
stretch the seal over the foot pad of the cleaner
until it sets itself into the groove as illustrated in
figure 2. Once in place the seal should rotate
and move freely.
ATTACH THE SEAL
NOTE
The seal is not reversible. It must be installed
with the flat side facing down towards the pool
liner and the pleated side facing upwards
towards the cleaner.
S
S
SST
T
TTE
E
EEP
P
PP
2
2
22
The dive float restrictor is attached by sliding it
over the cleaner’s body as shown in figure 3. It is
fastened by sliding it over the “U” shaped locking
clip on the body of the cleaner. Make sure the
locking tabs on both sides snap securely into
place.
ATTACH THE DIVE
FLOAT RESTRICTOR
NOTE
The dive float restrictor should be installed
with the float facing up.
S
S
SST
T
TTE
E
EEP
P
PP
3
3
33
Insert the bottom end of the strap into the
slots provided on the top and bottom of the
main body. Make sure that both ends snap in
securely.
ATTACH THE ROLLER
BUMPER STRAP
Figure 2
Figure 3
Figure 4
4
S
S
SST
T
TTE
E
EEP
P
PP
4
4
44
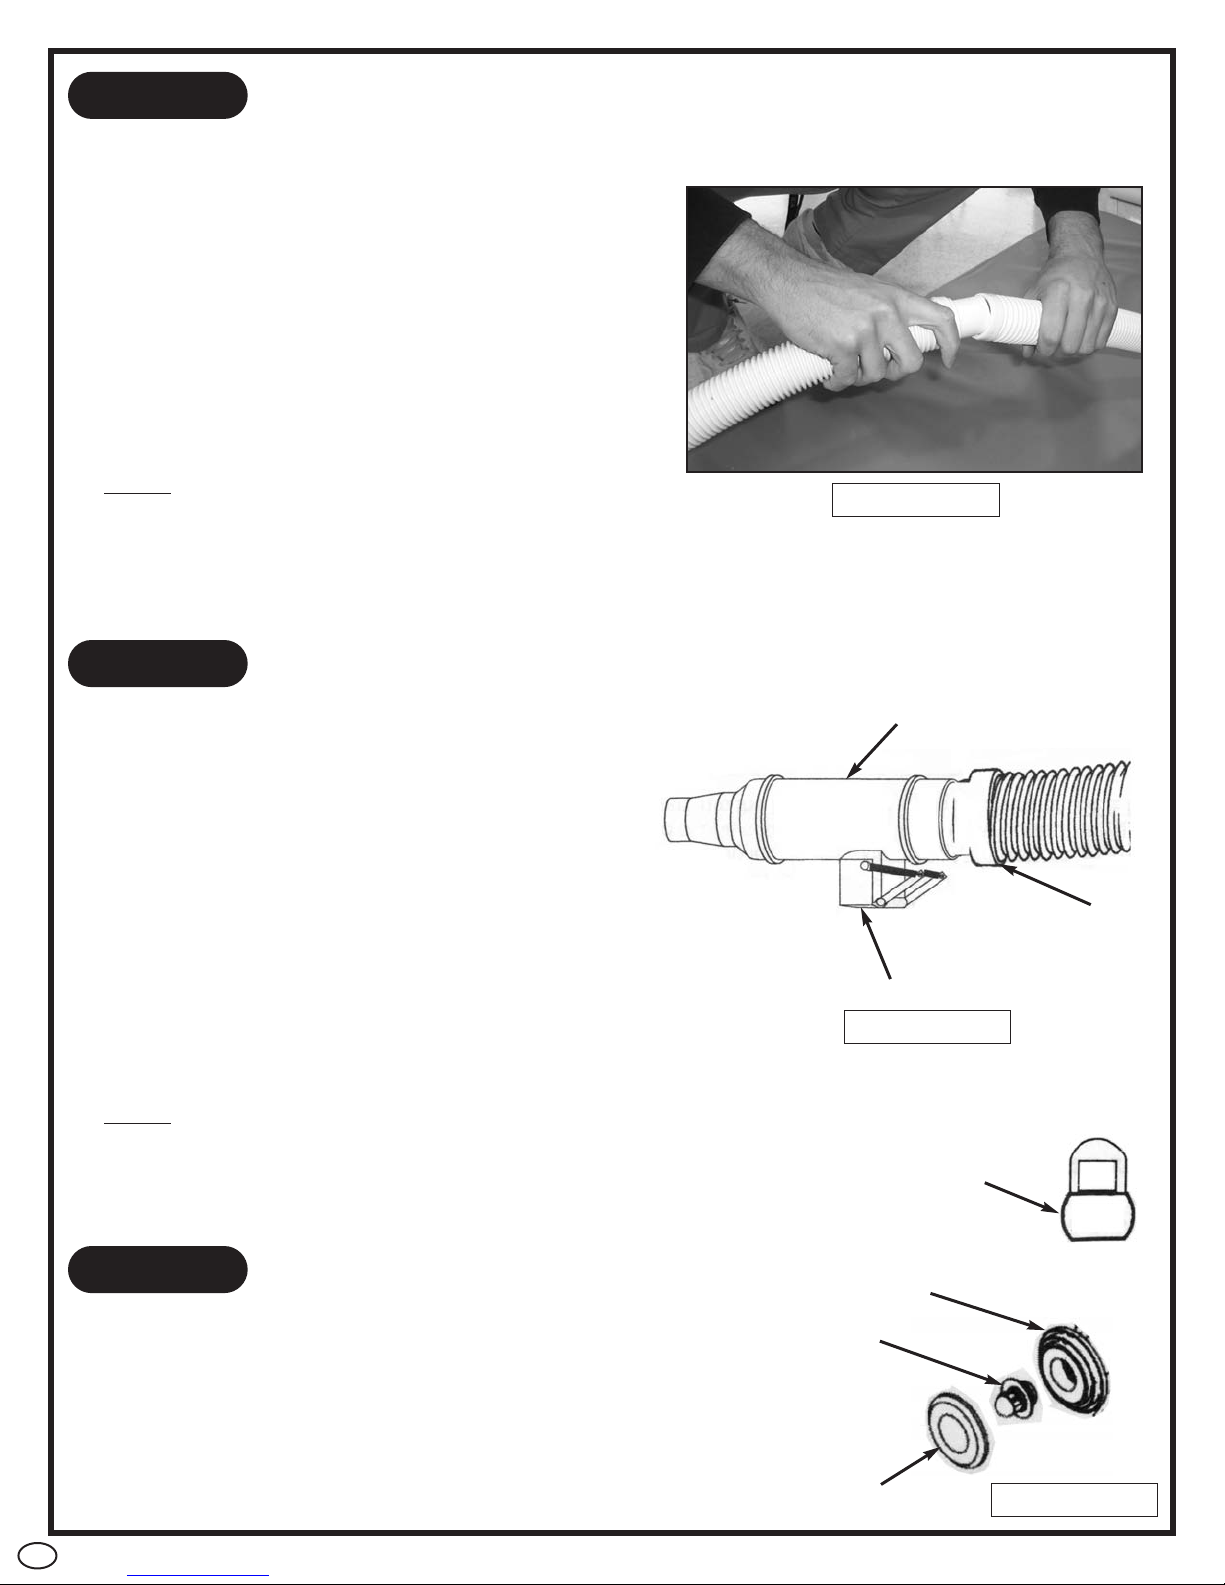
Your cleaner hose comes in 3’ sections which
must be connected together. The hoses are
connected by inserting the male cuff of one
section of hose into the female cuff of another.
Twist the sections of hose together until you
establish a snug fit (See figure 5). You will need
to assemble enough sections of hose to reach
from where the cleaner connects to your
skimmer to the opposite end of the pool, plus one
section. For example, if you have a 21’ round
pool, you will need to connect 8 sections of hose
for a total of 24’ of hose.
ASSEMBLE THE HOSE
NOTE
One of the hose sections has 2 female ends.
This section should be fitted last and will attach
to the pool’s vacuum connection. Save extra
sections of hose for replacements.
S
S
SST
T
TTE
E
EEP
P
PP
5
5
55
This is done by simply attaching the valve to
the last section of hose. The advantage of using
the valve is that it balances the flow of water
between the skimmer and the cleaner. The
valve is strongly recommended for maximum
performance, however is only necessary in
instances where there is excessive pump flow.
Excessive suction will make the cleaner move
too fast and could damage the vacuum’s
components and/or decrease the cleaner’s ability
to navigate the pool. In these instances the
automatic regulator valve must be used. This
will help restrict flow of water and make the
cleaner operate more efficiently.
INSTALL AUTOMATIC
REGULATOR VALVE
NOTE
Automatic Regulator Valve must be installed
so the bypass port is always facing down and is
below the water level.
S
S
SST
T
TTE
E
EEP
P
PP
6
6
66
To install the eyeball diverter remove the
original eyeball from the return by unscrewing the
lock ring. Replace the original eyeball with the
cleaner eyeball diverter. Replace the lock ring
and tighten. The best way to position the eyeball
diverter is so the flow is directed downward.
This will help eliminate the return flow from
interfering with the cleaner.
INSTALL EYEBALL DIVERTER
Figure 5
Eyeball Diverter
Lock (Retaining) Ring
Eyeball Diverter
Eyeball Fitting
Figure 7
Suction Bypass Port
Male End Of Hose
Flow Control Valve
Figure 6

5
I
I
IIN
N
NNS
S
SST
T
TTA
A
AAL
L
LLL
L
LLA
A
AAT
T
TTI
I
IIO
O
OON
N
NN
Your automatic pool cleaner is designed to work in a wide variety of
swimming pools. There are items that may or may not be needed to be installed
for your cleaner to function properly. All installations are covered in this manual.
Find which type of installation matches your pool configuration and follow the
instructions carefully.
For the cleaner to work properly, regardless of the installation type, the hose
needs to be completely primed. The easiest method of priming the hose is to
simply put the end of the hose up to your pools return fitting (eyeball) with the
pump running. The pump will force water through the hose and purge all of
the air out. Keep the pump running until there are no air bubbles coming out
the opposite side.
O
O
OO
P
P
PP
T
T
TT
I
I
II
O
O
OO
N
N
NN
1
1
11
This is the most common type of installation.
This type of skimmer is provided with a vacuum
plate that fits over the skimmer basket. The plate
has an elbow. Place the end of the Automatic
regulator valve over the elbow. Make sure that the
bypass post on the valve is facing down.
SKIMMER VACUUM PLATE
O
O
OO
P
P
PP
T
T
TT
I
I
II
O
O
OO
N
N
NN
2
2
22
For skimmers that do not use a vacuum plate.
Attach the end of the automatic regulator valve
into the 2” hose cone. The 2” hose cone is then
inserted into the bottom of the skimmer
NOTE
Make sure the cone fits snugly inside the
bottom of the skimmer.
INSIDE SKIMMER OUTLET
Once fully assembled,
your Automatic Pool Cleaner
should look like this.......

6
H
H
HHO
O
OOS
S
SSE
E
EE
B
B
BBA
A
AAL
L
LLA
A
AAN
N
NNC
C
CCE
E
EE
You will also need to attach hose weights to neutralize the hose’s buoyancy in the water.
For inground pools all three weights are typically needed. The first weight should be
placed on the fist section of hose between 4 and 12 inches from the body’s swivel head.
The next two weights should be positioned 6 feet and 10 feet from the body respectively.
The hose weights may need to be adjusted depending on the style of your pool.
With the cleaner off, the hose balance is correct when the cleaner’s seal rests flat on the
pool floor and the main body makes a 45 degree angle with the pool floor. The cleaner will
achieve the best performance when the hose neither weighs down or pulls up the unit.
Adjust the weights one inch at a time as needed, until the proper hose balance is achieved.
• HOSE IS TOO LIGHT — If the hose rises towards the surface at an angle greater than
45 degrees, move the weight closer to the cleaner.
• HOSE IS TOO HEAVY — If the hose sags downward at an angle less than
45 degrees, move the weight away from the cleaner.
H
H
HHE
E
EEL
L
LLP
P
PPF
F
FFU
U
UUL
L
LL
H
H
HHI
I
IIN
N
NNT
T
TTS
S
SS
• For pools with 2 suction lines (i.e. main drain and skimmer or 2 skimmers) it is
necessary to close off the suction line not being used for the cleaner. This can be done
by turning off the valve for the main drain, or using a skimmer bypass plate to restrict
the flow of water.
• As your vacuum cleaner removes debris from the pool and it is collected in your filter,
you may notice the vacuum operating slower than normal and a reduction in flow from
the return. Make sure that you periodically check your filter pressure and backwash
your filter or clean your filter element as needed.
• Remove as many obstructions as possible including ladders, floats, or any other items
that may be in the pool and could limit the cleaner’s ability to navigate the pool.
• Do not coil hose when taking the cleaner out of the pool. The hose may retain the
shape, forming a bend or kink which will hinder the cleaner’s performance.
V
V
VVA
A
AAC
C
CCU
U
UUU
U
UUM
M
MM
W
W
WWI
I
IIN
N
NNT
T
TTE
E
EER
R
RR
S
S
SST
T
TTO
O
OOR
R
RRA
A
AAG
G
GGE
E
EE
Remove your vacuum from the pool and dry completely. Disassemble the hose sections
and store in the original box, or lay the hoses out on a flat surface. NEVER store the hose
in a coiled position as it may retain the curved shape, not allowing the vacuum to operate
efficiently. Store the vacuum so the pleated seal lays flat, or remove the seal and store it in
a flat position. Store all parts indoors.
R
R
RRE
E
EEM
M
MMO
O
OOV
V
VVI
I
IIN
N
NNG
G
GG
D
D
DDE
E
EEB
B
BBR
R
RRI
I
IIS
S
SS
F
F
FFR
R
RRO
O
OOM
M
MM
T
T
TTH
H
HHE
E
EE
F
F
FFL
L
LLA
A
AAP
P
PPP
P
PPE
E
EER
R
RR
Sometimes debris may clog the bottom of the cleaner and prevent the flapper from
moving. This will restrict the flow of the cleaner. The flapper is located inside the main
body and must move freely at all times. You can see the flapper through the opening in the
baffle plate when the cleaner is turned upside down. Try to free the flapper by moving it
back and forth, or flush the cavity of the cleaner free with a garden hose. This will remove
any debris that may be lodged inside the cleaner.

7
If debris is still lodged inside the cleaner, you must remove the flapper. To do this you
must take out the four red plugs in the foot pad. These are found on the bottom of the
cleaner. They can be removed using a flat head screwdriver. Underneath there will be four
screws. Unscrew them and remove the foot pad from the main body. Once removed
there is a plate. Remove the single screw from this plate and slide it out of the main body.
This will expose the flapper and it can be pulled out.
Remove any debris that may be inhibiting the flapper. Once dislodged insert the flapper
back into the body. Slide the plate back into position and re-screw it into place. Then
re-install the foot pad. Make sure that all are securely in place.

8
PROBLEM
POSSIBLE CAUSE
SOLUTION
• Filter is dirty.
• Skimmer or pump strainer
baskets are clogged with
debris.
• Vacuum flapper clogged
with debris.
• Automatic regulator valve
stuck in open position.
• Crack or air leak in hose.
• Excessive debris on pool
floor.
• Suction coming from
multiple ports.
1. Vacuum moves too
slow or not at all
2. Vacuum moves
too fast
3. Vacuum cleans one
end of pool but will
not clean entire pool
• Automatic regulator valve
stuck in closed position.
• Automatic regulator valve
not installed.
• Insufficient number of
hose sections.
• Return flow interfering
with cleaner.
• Cleaner not weighted
properly.
• Backwash or clean
element.
• Empty baskets out.
• Turn cleaner over and
remove debris.
• Remove obstruction or
replace if broken.
• Replace hose section.
• Remove by manually
vacuuming or with leaf
rake.
• Check to ensure main
drain and all suction lines
are closed, except for
suction line to which the
cleaner is attached.
• Clean automatic regulator
valve port and hinge.
• Install automatic regulator
valve.
• Add hose sections.
• Make sure eyeball diverter
is installed and facing
down.
• Add or adjust hose
weights as needed.
4. Vacuum turns over • Excessive flow currents.
• Contacting an obstruction
in pool.
• Hose too long.
• Make sure eyeball
diverter is installed and
facing down.
• Remove obstruction.
• Remove hose sections
one section at a time
T
T
TTR
R
RRO
O
OOU
U
UUB
B
BBL
L
LLE
E
EES
S
SSH
H
HHO
O
OOO
O
OOT
T
TTI
I
IIN
N
NNG
G
GG
Popular Swimming Pool Vacuum manuals by other brands


Pentair Pool Products
Pentair Pool Products `LIL SHARK GW8000 Installation and user guide

Pool Blaster
Pool Blaster MILLENNIUM Li quick start guide

Steinbach
Steinbach Speedcleaner Poolrunner S63 ORIGINAL OWNER'S MANUAL

AREBOS
AREBOS AR-HE-BSR Original user manual

Steinbach
Steinbach 061025 ORIGINAL OWNER'S MANUAL

Maytronics
Maytronics dolphin dx6 User instructions


