Diskless Workstation DLW Term 1422 User manual

DLW Term 1422
User’s Manual

1
TABLE OF CONTENTS
1Product Overview.............................................................................................................. 3
1.1 Linux Embedded ...................................................................................................... 3
1.2 Thin Client Specifications......................................................................................... 3
1.3 Thin Client Features................................................................................................. 4
1.4 Thin Client Overview................................................................................................ 4
1.4.1 Connecting the Terminal...................................................................................... 5
1.4.2 Connector Descriptions........................................................................................ 5
2Initial Thin Client Setup..................................................................................................... 7
2.1 Hot-keys Functions................................................................................................... 7
2.2 Setup Wizard............................................................................................................ 7
2.2.1 Display Settings ................................................................................................... 8
2.2.2 Locale .................................................................................................................. 8
2.2.3 Network Configuration ......................................................................................... 8
2.2.3.1 Specify an IP address ................................................................................. 9
2.2.3.2 Name Servers ............................................................................................. 9
2.2.4 Finishing the Setup Wizard................................................................................ 10
3Connections Management.............................................................................................. 11
3.1 Using the Connections Properties Sheet............................................................... 11
3.2 Using the Configure Properties Sheet.................................................................... 12
3.3 Creating New Connections..................................................................................... 12
3.3.1 Choosing a Connection Protocol ....................................................................... 13
3.4 RDP Connections................................................................................................... 14
3.4.1 General .............................................................................................................. 14
3.4.2 Display ............................................................................................................... 14
3.4.3 Local Resources ................................................................................................ 15
3.4.4 Programs ........................................................................................................... 15
3.4.5 Performance ...................................................................................................... 16
3.5 ICA Connections .................................................................................................... 16
3.5.1 Creating a New ICA Connection Entry .............................................................. 16
3.5.1.1 Creating a new connection entry............................................................... 17
3.5.1.2 Server or Published Application................................................................ 17
3.5.2 Connecting to a Citrix Server............................................................................. 17
3.5.2.1 To start a previously defined connection .................................................. 17
3.5.3 Changing a Connection Entry............................................................................ 18
3.5.3.1 Changing the properties of a connection entry ......................................... 18
3.5.3.2 Specifying an Application to Run after Connecting to a Citrix Server....... 19
3.5.3.3 Specifying Logon Information.................................................................... 20
3.5.3.4 Changing Window Properties.................................................................... 20
3.5.3.5 Setting Connection Entry Options............................................................. 21
3.5.3.6 Configuring Firewall Settings .................................................................... 22
3.6 Web Browser Connection....................................................................................... 23
3.6.1 To Make a New Web Browser Connection........................................................ 23
3.6.2 Starting a Web Browser Connection.................................................................. 24
3.7 X11 Client............................................................................................................... 24
3.8 Shell Script Editor................................................................................................... 25
3.8.1 Make a Shell Script............................................................................................ 25
3.9 Termtek Emulation................................................................................................. 26
3.10 SSH Client.............................................................................................................. 26
3.11 NX Client ................................................................................................................ 28
3.12 Tarantella ............................................................................................................... 31
3.13 Telnet Client ........................................................................................................... 33
3.14 RSH (Remote Shell)............................................................................................... 34
3.15 GO-Global WinServer Client.................................................................................. 35
4Thin Client Properties ..................................................................................................... 38
4.1 General Tab ........................................................................................................... 38
4.1.1 Reset the Thin Client to factory-default property settings.................................. 38
4.2 Display Configuration............................................................................................. 38
4.2.1 Enable Screen Saver......................................................................................... 39

2
4.3 Control Panel Tab .................................................................................................. 40
4.3.1 System............................................................................................................... 40
4.3.2 Keyboard Properties .......................................................................................... 40
4.3.3 Locale ................................................................................................................ 41
4.3.4 Repeat ............................................................................................................... 41
4.3.5 Sound Volume ................................................................................................... 41
4.3.6 Date/Time Properties......................................................................................... 41
4.3.7 NFS.................................................................................................................... 42
4.3.8 FTP Update........................................................................................................ 42
4.3.9 Thin Printer ........................................................................................................ 43
4.3.10 Security Control............................................................................................. 44
4.3.11 Network Configuration................................................................................... 44
4.3.12 Startup........................................................................................................... 45
4.3.13 WMMode ....................................................................................................... 45
4.3.14 Printer............................................................................................................ 46
4.3.15 User Interface Language............................................................................... 47
4.3.16 Remove Local Storage.................................................................................. 47
4.3.17 Font Server Setting........................................................................................ 48
4.3.18 Network Disk Mount ...................................................................................... 48
4.3.19 File Sharing.................................................................................................... 49
4.3.20 Samba Setup................................................................................................. 49
4.3.21 Mouse............................................................................................................ 49
4.3.22 USB Manager................................................................................................ 50
5Advanced Function ......................................................................................................... 51
5.1 VNC Client Viewer.................................................................................................. 51
5.2 xterm....................................................................................................................... 52
5.3 System Info. ........................................................................................................... 52
5.3.1 CPU Info ............................................................................................................ 53
5.3.2 Memory Info....................................................................................................... 53
6Desktop Mode................................................................................................................. 54
6.1 Connections ........................................................................................................... 54
6.1.1 RDP Connection ................................................................................................ 54
6.1.1.1 General...................................................................................................... 54
6.1.1.2 Display....................................................................................................... 55
6.1.1.3 Local Resources........................................................................................ 55
6.1.1.4 Programs................................................................................................... 55
6.1.1.5 Performance.............................................................................................. 56
6.1.2 ICA Connection.................................................................................................. 56
6.1.2.1 Creating a New ICA Connection Entry...................................................... 57
6.1.2.2 Connecting to a Citrix Server .................................................................... 58
6.1.2.3 Changing a Connection Entry................................................................... 58
6.1.2.3.1 Configuring Network Properties ........................................................... 59
6.1.2.3.2 Improving Performance over a Low-Bandwidth Connection................ 59
6.1.2.3.3 Specifying an Application to Run at Connection.................................. 61
6.1.2.3.4 Changing the Window Properties......................................................... 62
6.1.2.3.5 Configuring Login Properties................................................................ 62
6.1.2.4 Changing Default Settings ........................................................................ 63
6.1.2.4.1 Changing Settings for the Disk Cache................................................. 63
6.1.2.4.2 Configuring Auto Client Reconnect...................................................... 64
6.1.2.4.3 Configuring Server Location and Business Recovery.......................... 65
6.1.2.4.4 Configuring Hotkeys............................................................................. 66
6.1.2.4.5 Configuring Preferences ...................................................................... 66
6.1.3 VNC Client Viewer ............................................................................................. 67
6.1.4 WEB Browser..................................................................................................... 68
6.2 Connection manager.............................................................................................. 68
6.3 Control Panel.......................................................................................................... 68

3
1Product Overview
1.1 Linux Embedded
Linux Embedded is a read-only Linux file system, built into your thin client. Linux Embedded allows you to
connect to a variety of server’s through the RDP (rDesktop) or a Citrix client. Linux Embedded also
provides many other network-centric applications, like the ability to mount a Samba server, or an NFS
(Network File Server) on the thin client.
The terms: thin client and terminal are used interchangeably throughout this manual.
1.2 Thin Client Specifications
CPU
VIA Eden V4 1.2GHZ
RAM
512 MB DDR2 240 pins support DDR2 533/667 Up to 1GB
Flash Memory
2 GB CF card standard, expandable to 8GB
Device Update Agent utility via Ethernet
Resolution
Resolution up to 1600x1200 / 85 Hz 32 bit to High color.
16 million palette supports all VESA monitors
Refresh Rate
Flicker-free, up to 85Hz
Video Memory
Graphics utilizes system RAM
Audio Support
Full 16 bit stereo FM synthesis, 8 bit mini Microphone in
Networking Protocols
10/100/1000 Base T Fast Ethernet, Twisted Pair (RJ45)
TCP/IP with DNS, DHCP and PPP
Load balancing supported by Citrix ICA
Remote modem dial up with Citrix ICA
Communications Protocols
MS RDP / Citrix ICA
One Parallel Port
Bi-directional centronics compatible, DB-25
One Serial Port
DB-9 pin male connector with RS-232C, up to 115.2K bps
One Display Port
Analogue VGA type video output (DB-15)
One DVI Port
Digital Visual Interface output (DVI-D)
USB Port
Six USB ports
SATA Port
Two SATA Port (1 Internal, 1 External)
Audio Port
Audio out, Microphone In, Line In
KB & Mouse Interface
Enhanced PS/2 keyboard and mouse interface
Extensible Slot
One PCI slot
One Smart Card Reader
Operation System
Microsoft Windows CE.NET
Set-up & Configuration
Local power-on boot, simple start-up wizard for set-up configurable
automatic Login, Multi-languages M/B support, Multiple auto-startup
support.

4
Server Operating System
Support
RDP:
Microsoft Windows NT4.0 + TSE.
Microsoft Windows 2000 Server Family.
Microsoft Windows 2003 Server Family.
Microsoft Windows XP with RDP protocol
ICA:
Citrix Winframe
Microsoft Windows NT4.0 + TSE+ Citrix Metaframe
Microsoft Windows 2000 + Citrix Metaframe.
Microsoft Windows 2000/ Windows 2003 + Citrix MetaframeXP.
1.3 Thin Client Features
Physical Characteristics
Height
251 mm (9.88 in)
Width
54.6 mm (2.15 in)
Depth
214 mm (8.43 in)
Net Weight
1.60 kgs (3.53 lbs)
Power Cord
6 ft (1.83m)
Environmental
Operating Temperature
5 to 40℃(41 to 104℉)
Non-operating
Temperature
-20to 60℃(-40 to 150℉)
Operating Humidity
10% to 90%, non-condensing
Operating Altitude
0 to 2,000 ft ASL
Nonoperating Altitude
0 to 40,000 ft ASL
Regulatory
EMC Terminal/Power Brick
FCC B, CE, CB, CUL, C-TICK, BSMI,
Safety Power Brick
UL1950, CB IEC60950.
Installation
1.4 Thin Client Overview

5
1.4.1 Connecting the Terminal
Follow these instructions to connect the terminal to its peripheral devices:
A. Connect the keyboard to the keyboard connector.
B. Connect the mouse to the mouse connector.
C. Connect the 10/100-T network cable to the RJ-45 network connector.
D. Connect the power cord and the adapter to the power connector with DC Adapter.
E. Connect the power cord to the power connector with DC Adapter.
1.4.2 Connector Descriptions
Power Switch
The Power Switch key to turn ON/OFF the thin client.
USB Port
These connectors can be used for the USB devices.
Parallel Port Connector
This connector can be used for a printer connection.

6
RJ-45 Network Connector
This connector can be used to connect the built-in 32-bit 10/100/1000-T Ethernet network LAN Controller
to a host or Hub.
SATA Port
These connectors can be used for Serial ATA device.
DVI Connector
This connector can be used for DVI Monitor
VGA Connector
This connector is for displaying on a standard VGA compatible device.
Serial Port Connectors
These connectors can be used for the serial device such as a modem device.
PCI Slot
This is an expandable PCI slot, requires PCI riser card.
Parallel Port Connector
LAN
PCI SLOT
VGA
CON PORT
SPEAKER
MIC
PARALLEL
DC
DVI
USB 2.0
Keyboard
Mouse
SATA(Serial ATA)
Line In
7
This connector can be used for a printer connection.
Audio Connector
This connector is used to connect to an outward speaker.
Micro phone input connector.
This Line In jack connector is a tape player or other audio sources.
PS/2 Keyboard Connector
This connector is for a standard keyboard using a PS/2 plug (mini DIN).
PS/2 Mouse Connector
This connector is for a mouse using a PS/2 plug (mini DIN).
Power Connector
This connector is for connecting the power cord with the terminal and the DC Adapter.
2Initial Thin Client Setup
2.1 Hot-keys Functions
Ctrl+Alt+Up/Down Arrow
Use this function to switch sessions.
Ctrl+Alt+End:
Use this function to go back to the Windows list.
Ctrl+Alt+Home:
Use this function to activate the Start menu.
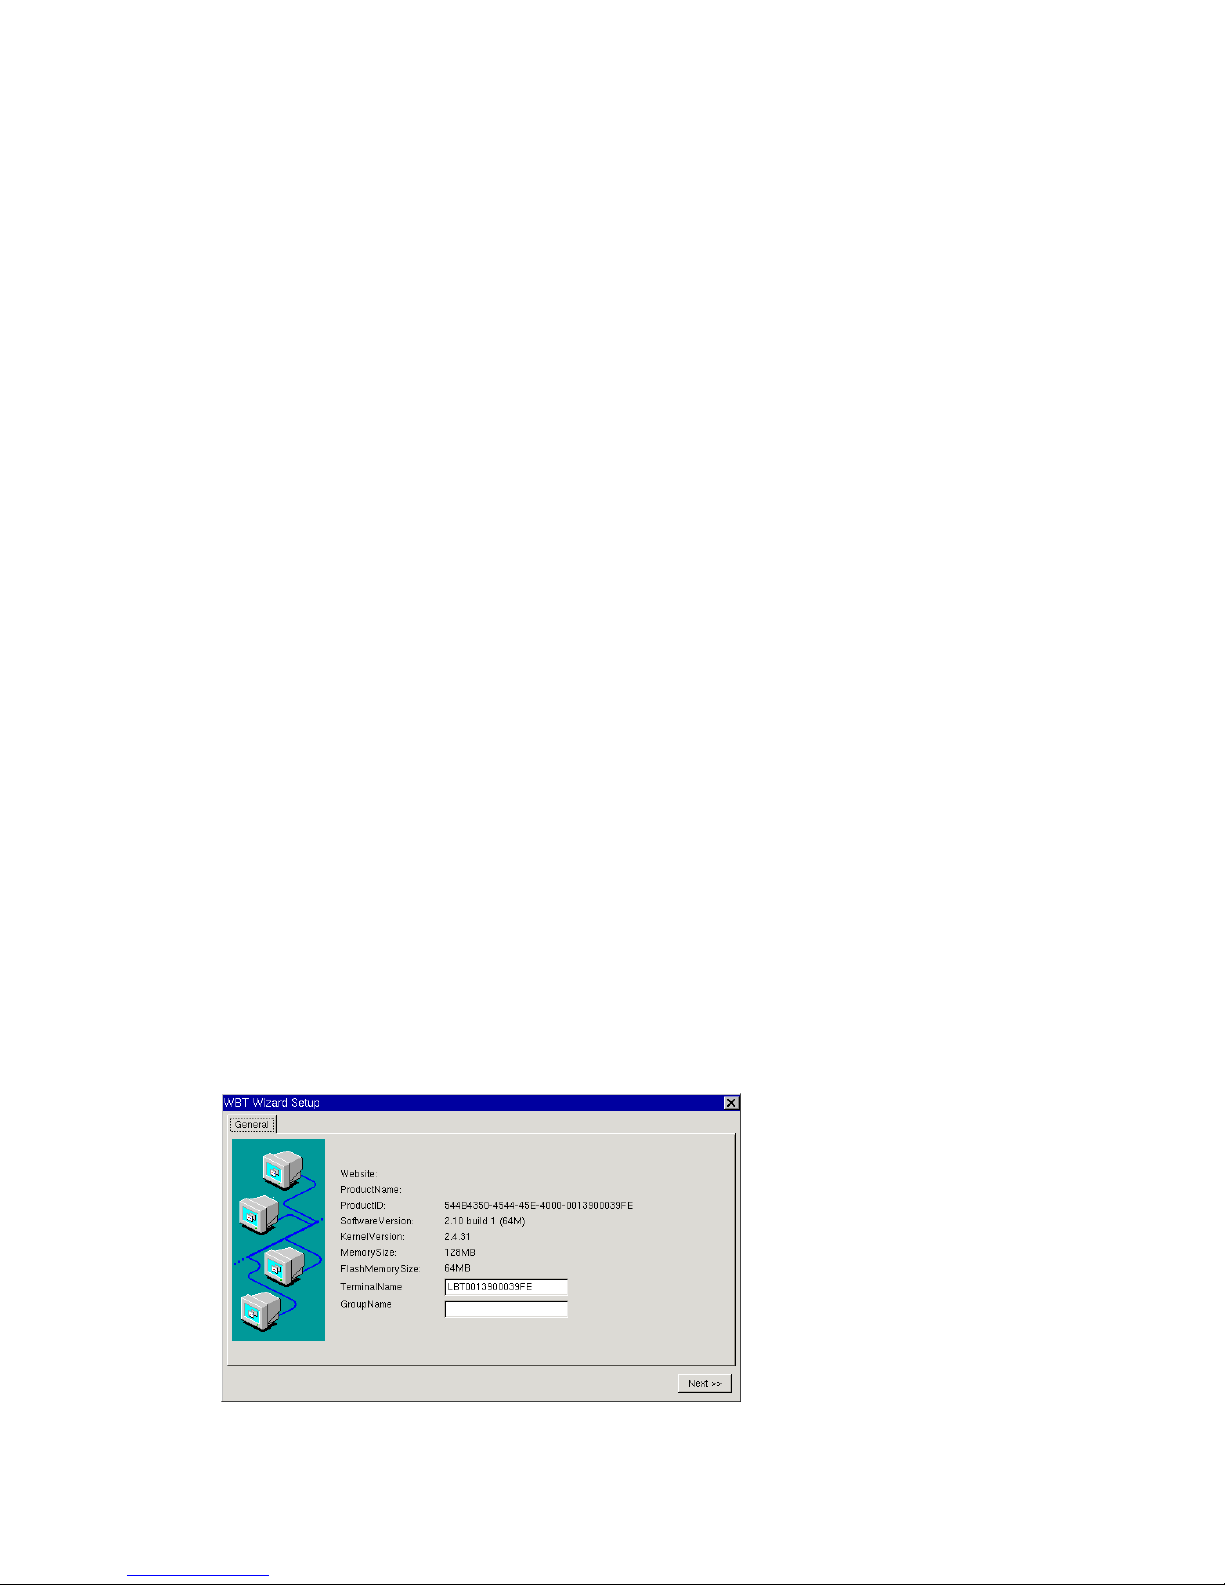
2.2 Setup Wizard
The Setup Wizard lets you set terminal network configuration and terminal display parameters. Any
future changes can be made using the Terminal Properties dialog box. You can launch this dialog box at
any time by pressing the [F2] key.
There are seven dialog boxes that display in succession during the process. Each dialog box is
self-explanatory. Some dialog boxes are informational and require no user input. Other dialog boxes will
prompt you for network and display information.
General

8
2.2.1 Display Settings
The monitor supports several kinds of resolutions. If you want to test it, choose the desired resolution
from the list box and click Test. *WARNING* Test any resolution before changing the resolution on your
DLW Term 1422. If you change to a bad resolution without testing you won’t be able to see your desktop!
2.2.2 Locale
Set up the appropriate geographic region (keyboard settings) for your keyboard.
2.2.3 Network Configuration
Network attached device must contain a unique network identifier. If the network is using TCP/IP as
a communication protocol, these identifiers are called IP addresses. The next few steps will allow you to
choose the method you wish to assign your IP address with. 2.2.3.1 Use the IP information supplied by
DHCP.
If your network provides DHCP (Dynamic Host Configuration Protocol) service and you want it to
provide the terminals IP information, leave the first option selected.
The thin client can get its IP address through a DHCP service by default. The DHCP will
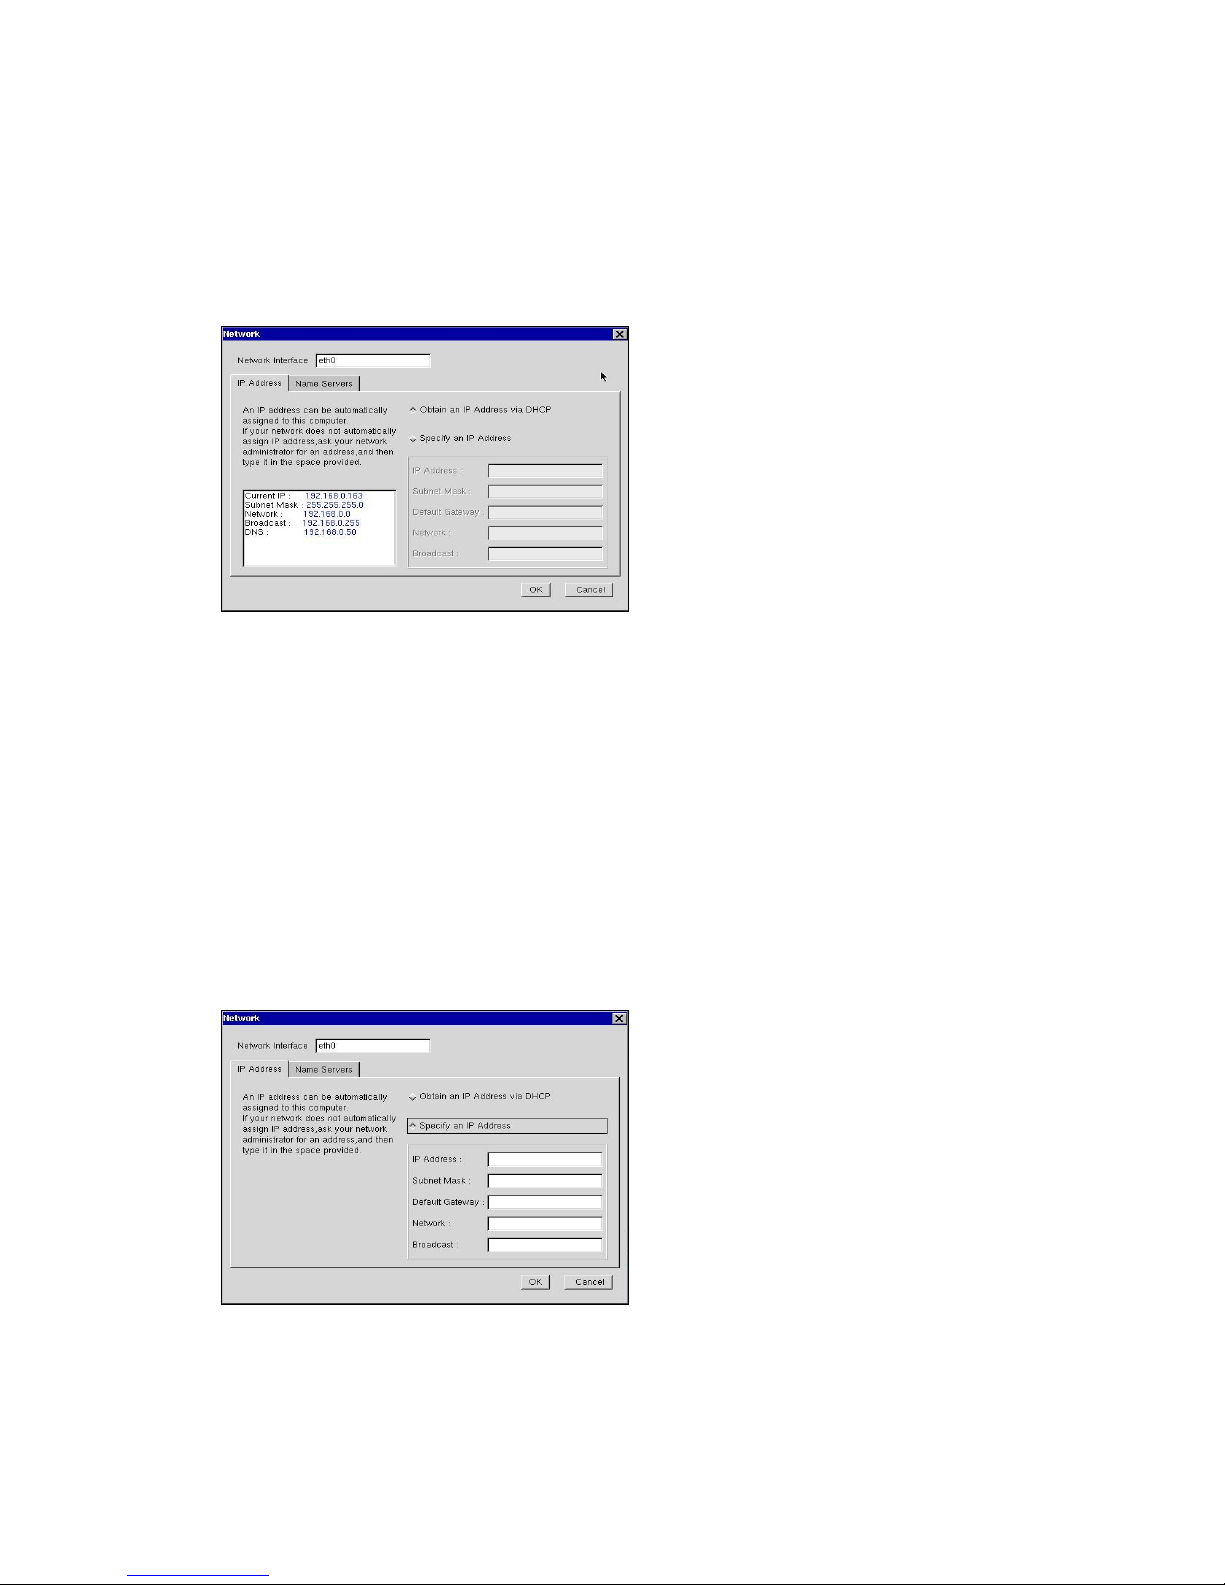
9
automatically assign an IP address that is drawn from a pool of available IP addresses, when a terminal
unit is powered on and a request is broadcast over the network.
Use the IP information supplied by DHCP. If you need to specify static IP address for the terminal,
select the second option. The option is selected automatically if your network does not provide a DHCP
service, or if the unit is not properly connected to the network. In these cases, leave the second option
selected.
IP Address
2.2.3.1 Specify an IP address
If the method you selected on the previous screen was to enter static IP address, the screen shown
below will then appear. You will be required to enter the following information onto the screen.
IP address
Required for identifying this unit to the network. The format will follow the standard addressing format.
Subnet Mask
Required for designating which network the IP address is a part of.
Gateway
Optional address which identifies the machine through which a subnet communicates with another
network.
Specify an IP Address
2.2.3.2 Name Servers
The screen shown below will appear only if you choose the Static IP Addressing method. The DHCP
method will provide this information required using a name resolution service. Terminal servers typically
support both DNS (Domain Naming Service) and WINS (Windows Internet Naming Service) name

10
resolution services. This screen allows the terminal unit to use one or both of these resolution services.
To enable DNS, WINS, or both, check the corresponding box. In the text boxes, enter the following
information as appropriate for each. Click OK.
Name Servers
2.2.4 Finishing the Setup Wizard
To review or change settings made on previous pages, click Back; to apply the settings, click Finish. To
change these settings after you have finished the Setup Wizard, press [F2] key to display the Terminal
Properties sheet.
Finish
11
3Connections Management
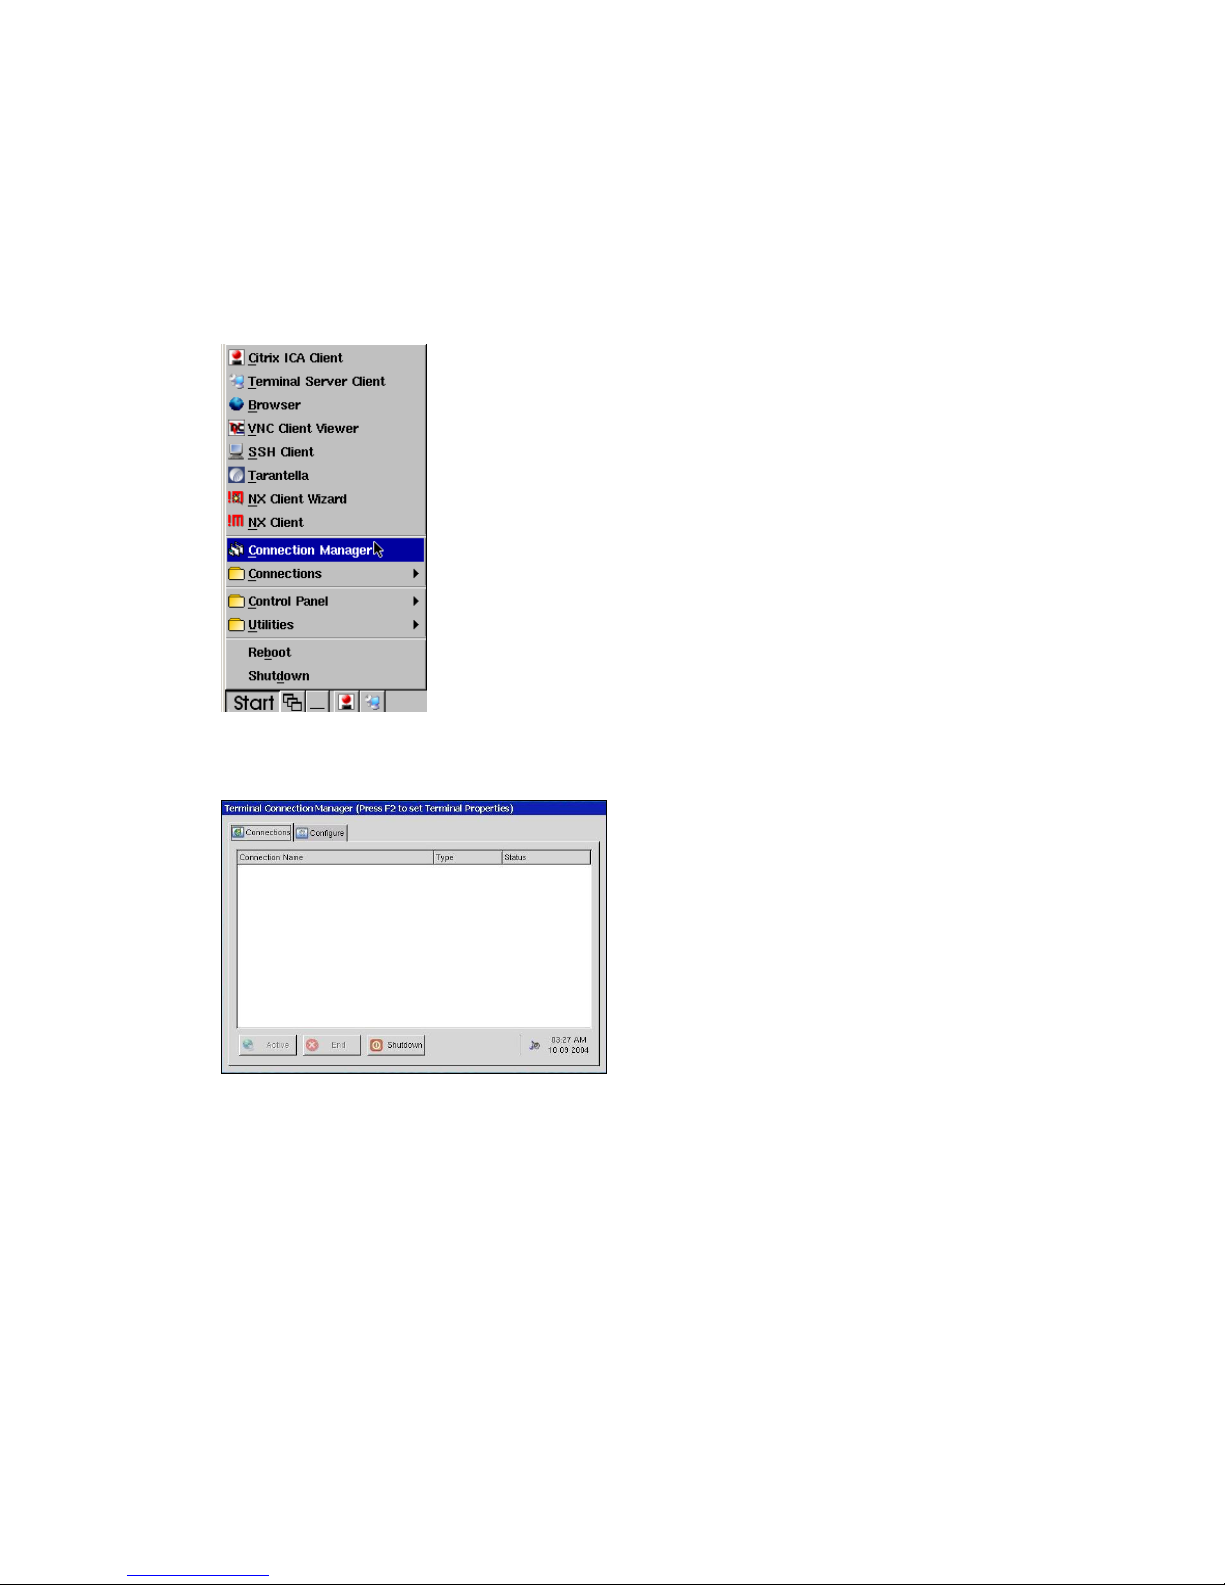
The Terminal Connection Manager dialog box is designed to help you manage your terminal's network
connections. The dialog box displays after boot, and consists of the Connections properties sheet and
the Configure properties sheet. The following figure shows the Terminal Connection Manager dialog
box. If in desktop mode, Terminal Connection Manager dialog will not appear automatically after boot,
click on Start, and select Connection Manager to open the manager as shown below. (To change
modes, please refer to section 4.3.11)
Terminal Connection Manager
3.1 Using the Connections Properties Sheet
The functions of the Connections properties sheet are used to make (connect to) terminal network
connections. The following figure shows the Connections properties sheet. Connections tab does not
exist in desktop mode, to connect to terminal network connections, click on Start, then go in
Connections, and then you can select the connection you wish you to make.
Connections Properties Sheet

12
3.2 Using the Configure Properties Sheet
The Configure properties sheet allows the user to Add, Edit, Delete, and configure connections. The
following figure shows the Configure properties sheet.
Configure Properties Sheet
Figure as above is a screenshot of DLW Term 1422 running in Desktop mode.
3.3 Creating New Connections
The New Connection dialog box is used to create new network connections. This dialog box is invoked
by: Clicking on the Configure tab in the Terminal Connection Manager dialog box and then clicking on
the Add command button on the Configure properties sheet. The following figure shows the New
Connection dialog box.

13
New Connection Dialog Box
3.3.1 Choosing a Connection Protocol
Use the scroll list shown in the dialog box above to select the type of connection protocol you want.
When you choose from the list above, you are deciding which connection protocol you want to use to
connect to a server. There are thirteen connection protocols available, they are as follow:
Microsoft Remote Desktop Client
RDP (Remote Desktop Protocol) protocol, which connects to a Microsoft Windows Terminal Server.
Refer to chapter 3.4 for RDP Connections.
Citrix ICA Client
ICA (Independent ComputingArchitecture) protocol, through which connects to an ICA
(Winframe/Metaframe) server. Refer to chapter 3.5 for ICA Connections.
Web Browser
Connects to the Internet directly via Mozilla FireFox. Refer to chapter 3.6 for the Internet
applications.
VNC Viewer
VNC (Virtual Network Computing) protocol, which connects to a VNC (WinVNC) server.
Refer to chapter 5.1 for all details.
X11
The X Display Manager Control Protocol (XDMCP) is used by X terminals (and X servers in
general) to set up an X session with a remote system over the network. Please refer to section 3.7
for further detail
Shell Script Editor
A powerful tool to setup Linux shell script in connection manager. You can write scripts in the
connection, and run the connection to execute the script. Refer to section 3.8 for more detail.
Termtek Emulation
Termtek Emulation is powerful tool to setup emulation of ANSI&ASCII and IBM emulation.
Please refer to section 3.9 for further detail.
SSH Client
SSH (Secure Shell) is a secure way to log into another computer over a network, you can execute
commands in remote machine as well as transfer files to and from the remote machine. Please
refer to section 3.10 for further detail.
NX Client
NX Client is a fast remote access solution; it’s used with NX Server. See:

14
http://www.NoMachine.com for more information. Please refer to section 3.11 for further detail.
Tarantella
Tarantella software is a scalable, secure way to web-enable applications.
Please refer to section 3.12 for further detail.
Telnet
Telnet is a network protocol used on the Internet or local area network LAN connections. You can
execute commands through the Telnet and they will be executed as if you were entering them
directly on the server console. Please refer to section 3.13 for further detail.
RSH
RSH (Remote Shell) is a command line program. You can execute shell commands as another
user, and on another computer across the computer network. Please refer to section 3.14 for
further detail.
GO-Global Windows Server Client
GO-Global is a fast remote access solution. It provides instant access to Windows
applications from any device or platform. Please refer to section 3.15 for further detail.
3.4 RDP Connections
3.4.1 General
You can type the Computer name, User name, Password, and Domain on this page.
3.4.2 Display
You can choose the size of your remote desktop and set the color quality.

15
3.4.3 Local Resources
You can set the sound and local device properties on this page.
3.4.4 Programs
If you want to start a program with a connection, you can click Start the following program on
connection . You can also specify path and file name when you specify a program.

16
3.4.5 Performance
The Performance properties sheet allows you to optimize the performance with connections.
3.5 ICA Connections
Use this application to create a Citrix ICA connection. Choose the Network Connection or Dial-In
Connection for the remote application.
3.5.1 Creating a New ICA Connection Entry
You can configure and run two types of ICAsessions:Citrix server connections and published
applications.
Citrix server connections allow you to remotely control a session on a Citrix server from your Thin
Client. Citrix server connections let you access the desktop of a specific Citrix server; you can run
any applications available on the desktop, in any order.
Published applications are specific applications set up by an administrator for remote users to run.
When connected, you are presented with only the application.
NOTE: This procedure describes the simplest way to create a connection entry. When you follow these
steps, you set the essential items you need to connect to a Citrix server from your Thin Client.
See “Changing a Connection Entry” for more information on changing the other properties for a
connection entry.

17
3.5.1.1 Creating a new connection entry
a. In the Terminal Connection Manager dialog box, click the Configure tab.
b. Click Add.
c. In the New Connection dialog box, click the list box and select Citrix ICA Client. Click OK.
3.5.1.2 Server or Published Application
a. Choose and click Server or Published Application.
b. For a server connection, type the name or IP address of the MetaFrame server or select the name
from the pop-up menu to the right of the Server field. —or—
For a published application, type the name of the published application or select the name from the
pop-up menu to the right of the Server field.
c. If you have typed the name of the MetaFrame server or published application, in the Description
field, type a unique description for the entry. The description is used to identify the connection in the
Citrix ICA Client window. If you have selected a server or published application from the pop-up
menu, a default description is automatically added.
d. Click OK to save the entry or Cancel to exit the Properties dialog box without saving the entry.
3.5.2 Connecting to a Citrix Server
3.5.2.1 To start a previously defined connection
a. In the Terminal Connection Manager dialog box, click the Connections tab.
b. Select the desired connection name and click Connect.

18
If you specified a valid user name and password in the connection entry, you are logged in as that user. If
no user name and password are present in the entry or if the information entered previously are invalid,
then server logon dialog box will appear. Enter a valid user name and password for the Citrix server and
click “OK” to log on.
3.5.3 Changing a Connection Entry
This section describes how to change properties for an existing connection entry.
3.5.3.1 Changing the properties of a connection entry
In the Terminal Connection Manager dialog box, click the Configure tab.
a. Click the name of the connection entry that you want to change.
b. Click Edit to display the Edit Connection Details dialog box.
c. Make the desired changes.
d. Click OK to save your changes.
The Edit Connection Details dialog box contains the following tabs:
a. The Server tab, where you can set the server or published application name to which to connect.
b. The Application tab, where you can specify an application to run after connecting to a Citrix server,

19
see section 3.5.3.2 “Specifying an Application to Run after Connecting to a Citrix Server” for more
information.
c. The Logon tab, where you can set the user name, password, and domain to log in to the Citrix
server automatically, see section 3.5.3.3 “Specifying Logon Information” for more information.
d. The Window tab, where you can set the number of colors used for the ICAClient window, see
section 3.5.3.4 “Changing the Window Properties” for more information.
e. The Options tab, where you can control the connection between the Citrix server and your thin client
and configure sound support, see section 3.5.3.5 “Setting Connection Entry Options” for more
information.
f. The Firewall Settings tab, where you can configure the client to use a SOCKS proxy and alternate
address re-mapping, see section 3.5.3.6 “Configuring Firewall Settings” for more information.
3.5.3.2 Specifying an Application to Run after Connecting to a
Citrix Server
Use the Application tab to specify an application to run after connecting to a Citrix server. If you specify
an application, you will not see the Windows desktop when you connect and the connection is closed
when you exit the application.
NOTE: This tab does not apply to connection entries for published applications. Any value entered is
ignored.
a. In the Terminal Connection Manager dialog box, click Configure.
b. Select the connection entry that you want to change and click Edit.
c. Click the Application tab.
d. In the Command Line box, specify the path and file name of the application to be run after
connecting to the Citrix server. For example, to launch Notepad automatically after connection , type:
C:\Wtsrv\Notepad.exe
e. In the Working Directory box, specify the working directory to be used with the application. If you
use Notepad to work on documents in the C:\My Documents directory, type C:\My Documents.
f. Click OK to save your changes.
When you log on to the Citrix server, Notepad begins. In Notepad, if you select Open from the File menu,
the C:\My Documents directory is displayed.
Table of contents
Other Diskless Workstation Desktop manuals


