Disney DCD6006-CAROM User manual

User’s Guide
CD Player
Manual del Usuario
Tocador de CD
Guide d'utilisation
Lecteur CD
DCD6006-CAR -A
FO LD

1
QUICK REFERENCE
Connect additional headphones to this jack to share music
Connect to AC Adapter
Stop CD playback/turn the unit Off
Play the CD/turn the unit On
Turn Bass Boost On or Off
Open the CD Compartment
Skip/Search backward
Skip/Search forward
Select CD mode
Adjust the Volume
Connect headphones to this jack
Rotate the transparent lid clockwise to change
the Disney Faceplate as desired. Replace the
transparent lid by rotating it counter-clockwise
Disney Elements © Disney

TO PLAY A CD:
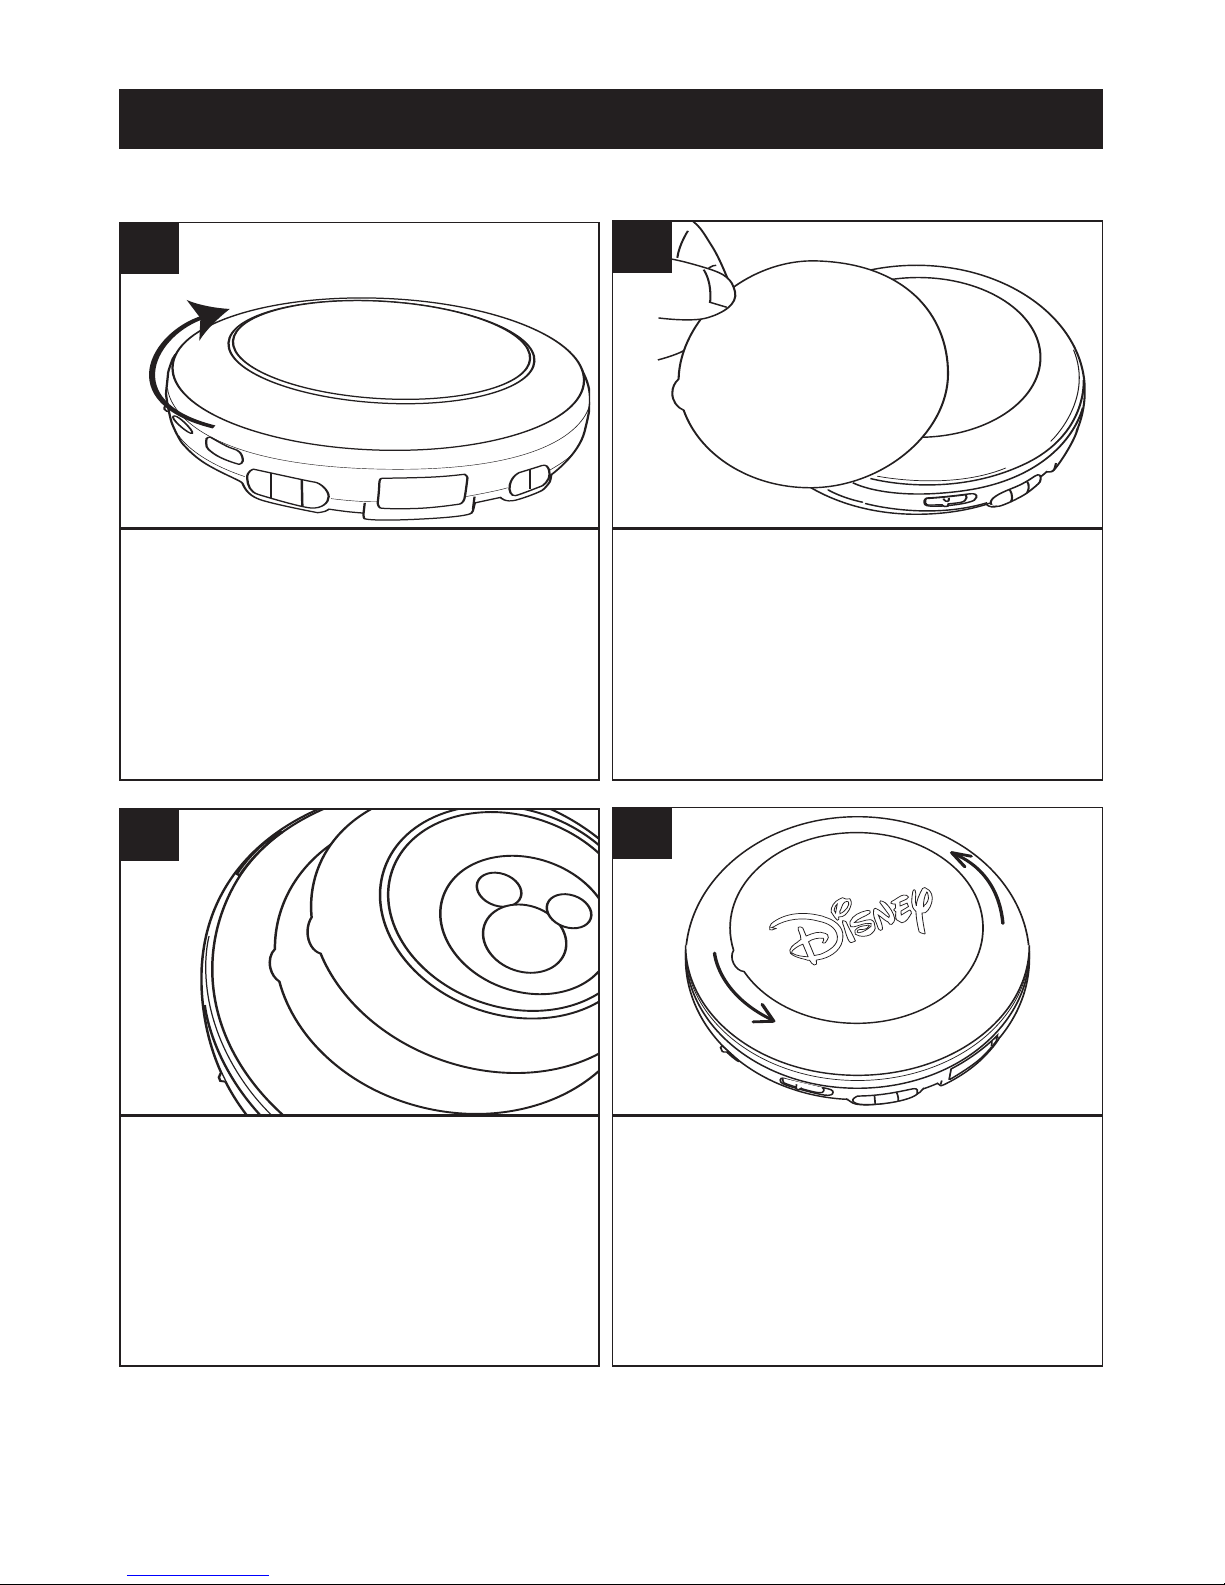
1. Open the CD compartment lid by sliding the CD OPEN switch to the right. Gently press a
disc, label side up, onto the spindle until it locks in place. Close the CD compartment lid.
Insert headphones into the PHONES jack.
2. While the unit is off, press the PLAY/PAUSE (®p)/POWER ON button to start playback. To
pause PLAYBACK, press the PLAY/PAUSE (®p)/POWER ON button again, the display will
blink. Press once again to resume playback.
3. Adjust the VOLUME control and DBBS switch as desired. To skip forward or backward
through the tracks on the disc, press the SKIP/SEARCH O or N button. To search forward
or backward through the tracks on the disc, press and hold the SKIP/SEARCH O or N button.
4. When the disc is through playing, it will stop. Press the STOP (■)/POWER OFF button to
stop the disc before it is finished; the total number of tracks will appear. Press the STOP
(■)/POWER OFF button again while in the Stop mode to turn the unit off or wait
approximately 60 seconds and the unit will automatically turn off.
REPEAT PLAYBACK:
1. With a CD inserted, press the PLAY/PAUSE (®p)/POWER ON button to turn the unit on,
then select a track using the SKIP/SEARCH O or N button. Press the MODE button once;
the Repeat 1 indicator 1 will appear in the display.
OR
1. With a CD inserted, press the PLAY/PAUSE (®p)/POWER ON button to turn the unit on.
Press the MODE button twice; the Repeat All indicator will appear in the display.
2. The unit will then Repeat playback the selected track or all the tracks on the CD until the
STOP (■)/POWER OF OFF button is pressed.
3. Adjust the VOLUME control and DBBS switch as desired.
INTRO PLAYBACK
1. With a CD inserted, press the PLAY/PAUSE (®p)/POWER ON button to turn the unit on and
press the STOP (■)/POWER OFF button to stop auto playback. Press the MODE button
three times; the INTRO indicator will appear in the display.
2. Press the PLAY/PAUSE (®p)/POWER ON button to begin playback. The unit will play the
first 10 seconds of each track. Adjust the VOLUME control and DBBS switch as desired.
Press the STOP (■)/POWER OFF button to stop Intro playback.
RANDOM PLAYBACK
1. With a CD inserted, press the PLAY/PAUSE (®p)/POWER ON button to turn the unit on and
press the STOP (■)/POWER OFF button to stop auto playback. Press the MODE button four
times; the RAND indicator will appear in the display.
2. Press the PLAY/PAUSE (®p)/POWER ON button to begin playback. The unit will play all the
tracks in random order.
3. Adjust the VOLUME control and DBBS switch as desired. When all the tracks have been
played, the unit will stop. Press the STOP (■)/POWER OFF button to stop Random playback.
NOTE: To cancel the mode function, press the MODE button repeatedly until the mode indicators
disappear from the display.
ALL
ALL
2
QUICK REFERENCE (CONTINUED)
Disney Elements © Disney

3
SAFETY PRECAUTIONS
CAUTION: TO REDUCE THE RISK OF ELECTRIC SHOCK, DO NOT
REMOVE COVER (OR BACK). NO USER-SERVICEABLE PARTS
INSIDE. REFER SERVICING TO QUALIFIED SERVICE PERSONNEL.
CAUTION
RISK OF ELECTRIC SHOCK
DO NOT OPEN
DANGEROUS VOLTAGE:
The lightning flash with arrowhead symbol, within an equilateral
triangle is intended to alert the user to the presence of uninsulated
dangerous voltage within the product’s enclosure that may be of
sufficient magnitude to constitute a risk of electric shock to persons.
ATTENTION:
The exclamation point within an equilateral triangle is intended to
alert the user to the presence of important operating and
maintenance (servicing) instructions in the literature accompanying
the appliance.
DANGER:
This product utilizes a Class 1 laser to read Compact Discs.
This laser Compact Disc Player is equipped with safety
switches to avoid exposure when the CD door is open and the
safety interlocks are defeated. Invisible and hazardous laser
radiation when open and interlock failed or defeated. Avoid
direct exposure to beam. Please do not attempt to defeat or
bypass the safety switches.
FCC WARNING:
This equipment may generate or use radio frequency energy. Changes
or modifications to this equipment may cause harmful interference
unless the modifications are expressly approved in the instruction man-
ual. The user could lose the authority to operate this equipment if an
unauthorized change or modification is made.
SURGE PROTECTORS:
It is recommended to use a surge protector for AC connection.
Lightning and power surges ARE NOT covered under warranty for this
product.

4
INFORMATION:
This equipment has been tested and found to comply with the limits for
a Class B digital device, pursuant to Part 15 of the FCC Rules. These
limits are designed to provide reasonable protection against harmful
interference in a residential installation. This equipment generates,
uses and can radiate radio frequency energy and, if not installed and
used in accordance with the instructions, may cause harmful interfer-
ence to radio communications. However, there is no guarantee that
interference will not occur in a particular installation. If this equipment
does cause harmful interference to radio or television reception, which
can be determined by turning the equipment off and on, the user is
encouraged to try to correct the interference by one or more of the fol-
lowing measures:
• Reorient or relocate the receiving antenna.
• Increase the separation between the equipment and receiver.
• Connect the equipment into an outlet on a circuit different from that to
which the receiver is connected.
•Consult the dealer or an experienced radio/TV technician for help.
• Do not open the CD compartment while the CD is rotating.
•Always keep the CD compartment closed when not in use.
• Keep all foreign objects out of the CD compartment.
•Place the unit on a stable surface.
• Avoid installing the unit in locations described below:
• Places exposed to direct sunlight or close to heat radiating
appliances such as electric heaters.
• On top of other stereo equipment that radiates too much
heat.
• Places lacking ventilation or dusty places.
• Places subject to constant vibration.
• Humid or moist places.
SAFETY PRECAUTIONS (CONTINUED)

5
Dear Customer:
Selecting fine audio equipment such as the unit you’ve just purchased is only the start of
your musical enjoyment. Now it’s time to consider how you can maximize the fun and
excitement your equipment offers. This manufacturer and the Electronic Industries
Association’s Consumer Electronics Group want you to get the most out of your equipment
by playing it at a safe level. One that lets the sound come through loud and clear without
annoying blaring or distortion and, most importantly, without affecting your sensitive hearing.
Sound can be deceiving. Over time your hearing “comfort level” adapts to higher volumes of
sound. So what sounds “normal” can actually be loud and harmful to your hearing. Guard
against this by setting your equipment at a safe level BEFORE your hearing adapts.
To establish a safe level:
• Start your volume control at a low setting.
• Slowly increase the sound until you can hear it comfortably and clearly, and without
distortion.
Once you have established a comfortable sound level:
• Set the dial and leave it there.
Taking a minute to do this now will help to prevent hearing damage or loss in the future.
After all, we want you listening for a lifetime.
We Want You Listening For A Lifetime
Used wisely, your new sound equipment will provide a lifetime of fun and enjoyment. Since
hearing damage from loud noise is often undetectable until it is too late, this manufacturer
and the Electronic Industries Association’s Consumer Electronics Group recommend you
avoid prolonged exposure to excessive noise. This list of sound levels is included for your
protection.
Decibel
Level Example
30 Quiet library, soft whispers
40 Living room, refrigerator, bedroom away from traffic
50 Light traffic, normal conversation, quiet office
60 Air conditioner at 20 feet, sewing machine
70 Vacuum cleaner, hair dryer, noisy restaurant
80 Average city traffic, garbage disposals, alarm clock at two feet
THE FOLLOWING NOISES CAN BE DANGEROUS UNDER CONSTANT
EXPOSURE:
90 Subway, motorcycle, truck traffic, lawn mower
100 Garbage truck, chain saw, pneumatic drill
120 Rock band concert in front of speakers, thunderclap
140 Gunshot blast, jet engine
180 Rocket launching pad
Information courtesy of the Deafness Research Foundation.
A
S
S
O
C
I
A
T
I
O
N
EST. 1924
E
L
E
C
T
R
O
N
I
C
I
N
D
U
S
T
R
I
E
S
EIA
We
LISTENING
For A Lifetime
Want You

6
LOCATION OF CONTROLS
4 5
1
3 6 7 8 9 1110 141312
2
1. PHONES Jack (Side of
Unit)
2. DC 4.5V Jack (Rear of Unit)
Z
3. PHONES Jack (Side of
Unit)
4. VOLUME Control
5. DBBS Switch
6. CD Door OPEN Switch
7. SKIP/SEARCH (o) Button
8. SKIP/SEARCH (n) Button
9. MODE Button
10. CD Compartment, Disney
Faceplate and Transparent
Lid
11. Display
12. STOP (■)/POWER OFF
Button
13. PLAY/PAUSE
(®p)/POWER ON Button
14. Battery Compartment
(Bottom of Unit)

7
This CD player requires either two (2) “AA” batteries (not included) or an
AC adapter (not included).
BATTERY INSTALLATION
The battery low indicator ( ) will appear in the display when the
batteries need replacing
1. Open the battery compartment door by
pressing out and then lifting up. To prevent
the possibility of losing the cover, it
cannot be removed.
2. Insert two (2) “AA” batteries (not included)
according to the polarity diagram inside the
battery compartment. Alkaline batteries are
recommended for the longest playing time.
AC OPERATION
To operate the unit using AC power, connect an AC adapter (not
included) to an AC outlet having 120V, 60Hz AC only. Plug the small end
into the DC 4.5V jack on the rear of the unit and connect the other end
into an AC outlet. The batteries are automatically disconnected when an
AC adapter is used.
CAUTION: When not using AC power, disconnect the AC adapter from
the wall outlet by pulling the plug (not the cord). Do not touch the AC
adapter with wet hands. Fully insert the plug without exposing any part of
the blade.
DC 4.5V
–+
POWER SOURCES
BATTERY PRECAUTIONS
Follow these precautions when using batteries in this device:
1. Use only the size and type of batteries specified.
2. Be sure to follow the correct polarity when installing the batteries as indicated next to the battery
compartment. Reversed batteries may cause damage to the device.
3. Do not mix different types of batteries together (e.g. Alkaline, Carbon-zinc or Rechargeable) or old
batteries with fresh ones.
4. If the device is not to be used for a long period of time, remove the batteries to prevent damage or
injury from possible battery leakage.
5. Do not try to recharge batteries not intended to be recharged; they can overheat and rupture.
(Follow battery manufacturer’s directions.)
–
+
–
+
–
+
–
+

8
To emphasize the bass, slide the
DBBS switch to the ON position. For
normal bass, slide the DBBS switch to
the OFF position.
1
1
To turn the unit on, press the
PLAY/PAUSE (®p)/POWER ON
button ❶.
To turn the unit off, press the STOP
(■)/POWER OFF button ❷.
1
2
1
BASS BOOST TURNING POWER ON/OFF
60 SECOND MOTION PROOF ELECTRONIC ANTI-SHOCK SYSTEM
This CD player has a built-in Anti-Shock System that cuts down on CD skipping,
which is useful when using the CD player in the car or while jogging/walking. Anti-
Shock is automatically activated when the unit is turned on.
HEADPHONE JACKS:
There are two sets of headphone jacks. Plug headphones in one jack for private
listening or both jacks for sharing.
OPERATION

9
OPERATION (CONTINUED)
At the top of the CD door, there is a
transparent lid. Rotate the lid
clockwise to remove it.
To remove lid
1
Change the Disney Faceplate with
another, or insert your own photo as
desired.
2
When replacing the faceplate, make
sure the tab on the Faceplate is
correctly positioned to the tab cavity
on the CD door.
3
To replace the transparent lid on top of
the CD door, make sure the Disney
logo on the lid is at the correct position,
then rotate the lid counter-clockwise.
4
CHANGING THE DISNEY FACEPLATE

10
CD OPERATION
Open the CD compartment lid by
sliding the CD OPEN switch to the
right. Gently press a disc, label side up,
onto the spindle until it locks in place.
Close the CD compartment lid. Insert
headphones into the PHONES jack.
1
1
While the unit is off, press the
PLAY/PAUSE (®p)/POWER ON button
to start playback. To pause playback,
press the PLAY/PAUSE (®p)/POWER
ON button again, the display will blink.
Press once again to resume playback.
2
2
TO PLAY A CD (Standard, CD-R and CD-RW)
Adjust the VOLUME control ❶ and
DBBS switch ❷ as desired. To skip
forward or backward through the tracks
on the disc, press the SKIP/SEARCH
O 3 or N 4 button. To search forward
or backward through the tracks on the
disc, press and hold the SKIP/SEARCH
O 3 or N 4 button.
2
1
34
3
When the disc is through playing, it will
stop. Press the STOP (■)/POWER OFF
button to stop the disc before it is finished;
the total number of tracks will appear.
Press the STOP (■)/POWER OFF button
again while in the Stop mode to turn the
unit off or wait approximately 60 seconds
and the unit will automatically turn off.
2
4
4
NOTES:
• This unit is capable of playing standard CDs or 3” singles; no adapter is required.
•If a disc is inserted incorrectly, dirty, damaged or not present at all, the display will
show “no disc”.
•As each track is played, the track number and elapsed time are shown in the display.
• To remove the disc, open the CD compartment while the unit is in the Stop mode or
off, then hold the edge of the CD, gently press the center pivot and lift the CD.
•The maximum time of a CD is 74 minutes for this unit.
•“- - - -” will appear in the display when the CD door is open.

11
CD OPERATION (CONTINUED)
With a CD inserted, press the
PLAY/PAUSE (®p)/POWER ON
button ❶ to turn the unit on, then select
a track using the SKIP/SEARCH O 2 or
N 3 button. Press the MODE button ❹
once; the Repeat 1 indicator 1 will
appear in the display.
ALL
21
3
4
1
The unit will then play the same track
over and over until the STOP
(■)/POWER OFF button ❶ is pressed.
Adjust the VOLUME control ❷ and
DBBS switch ❸ as desired.
1
1
3
3
2
2
TO REPEATEDLY PLAY BACK ONE TRACK
With a CD inserted, press the
PLAY/PAUSE (®p)/POWER ON
button ❶to turn the unit on. Press the
MODE button ❷twice; the Repeat All
indicator will appear in the
display.
ALL
1
1
2
2
1
The unit will then play all the tracks on
the CD over and over until the STOP
(■)/POWER OFF button ❶ is pressed.
Adjust the VOLUME control ❷ and
DBBS switch ❸ as desired.
1
1
3
3
2
2
TO REPEATEDLYPLAY BACK ALL TRACKS
TO CANCEL REPEAT PLAYBACK, press the MODE button four times if in
Repeat 1 mode, or three times if in Repeat All mode. The unit will continue
normal playback.
AUTO POWER OFF: When the unit is stopped (Standby mode) for
approximately one minute, the power will automatically turn off.

12
CD OPERATION (CONTINUED)
With a CD inserted, press the
PLAY/PAUSE (®p)/POWER ON
button ❶ to turn the unit on and press
the STOP (■)/POWER OFF button ❷
to stop auto playback. Press the MODE
button ❸ three times; the INTRO
indicator will appear in the display.
1
1
2
3
1
Press the PLAY/PAUSE (®p)/POWER
ON button ❶ to begin playback. The unit
will play the first 10 seconds of each
track. Adjust the VOLUME control ❷
and DBBS switch ❸ as desired. Press
the STOP (■)/POWER OFF button ❹
to stop Intro playback.
41
23
2
INTRO PLAY
With a CD inserted, press the
PLAY/PAUSE (®p)/POWER ON
button ❶ to turn the unit on and press
the STOP (■)/POWER OFF button ❷
to stop auto playback. Press the
MODE button ❸ four times; the RAND
indicator will appear in the display.
1
1
2
3
1
Press the PLAY/PAUSE (®p)/POWER
ON button ❶ to begin playback. The
unit will play all the tracks in random
order. Adjust the VOLUME control ❷
and DBBS switch ❸ as desired. When
all the tracks have been played, the
unit will stop. Press the STOP
(■)/POWER OFF button ❹ to stop
Random playback.
41
23
2
TO RANDOMLYPLAY BACK A CD
TO CANCEL Intro Play, press the Mode button twice.
TO CANCEL Random Play, press the MODE button once.

13
CARE AND MAINTENANCE
Caring for Compact Discs
• Treat the compact disc carefully. Handle the
compact disc only by its edges. Never allow your
fingers to come in contact with the shiny,
unprinted side of the compact disc.
• Do not attach adhesive tape, stickers, etc. to
the compact disc label.
• Clean the compact disc periodically with a soft, lint-free, dry cloth. Never use
detergents or abrasive cleaners to clean the compact disc. If necessary, use a
CD cleaning kit.
• If a compact disc skips or gets stuck on a section of the disc, it is probably dirty
or damaged (scratched).
• When cleaning the compact disc, wipe in straight lines from the center of the
compact disc to the outer edge of the compact disc. Never wipe in circular
motions.
• This unit is designed to play only compact discs bearing the
identification logo as shown here. Other compact discs may not
conform to the CD standard and may not play properly.
• Compact discs should be stored in their cases after each use to avoid
damage.
• Do not expose compact discs to direct sunlight, high humidity, high
temperatures or dust, etc. Prolonged exposure or extreme temperatures can
warp the compact disc.
• Do not stick or write anything on either side of the compact disc. Sharp writing
instruments, or the ink, may damage the surface.
Cleaning the Unit
•To prevent fire or shock hazard, disconnect your unit from the AC power
source when cleaning.
•The finish on your unit may be cleaned with a dust cloth and cared for as other
furniture. Use caution when cleaning and wiping the plastic parts.
• Mild soap and a damp cloth may be used on the front panel.
B
E
N
Z
E
N
E
C
L
E
A
N
E
R

14
TROUBLESHOOTING GUIDE
If you experience a problem with this unit, check the chart below before
calling for service.
SYMPTOM CAUSE SOLUTION
Unit will not Weak or dead batteries Replace batteries and insert
turn on. or inserted incorrectly. correctly.
Weak or dead Re- Recharge or replace
chargeable batteries. batteries (if used).
AC adapter Check AC adapter
not connected. connection.
Disc will not play. CD compartment Close CD compartment.
not closed.
Disc inserted Reinsert disc correctly.
incorrectly.
Dirty or defective Try another disc.
disc.
Moisture Wipe disc with soft
condensation cloth.
on disc.
Erratic CD playback. Dirty or defective Clean or replace disc.
disc.
No sound from Headphone Reinsert headphone
headphones. plug not inserted plug fully.
fully.
VOLUME control Increase volume.
set to minimum.
Weak batteries. Replace batteries.
Defective disc. Try another disc.

15
Power requirements......................................2 x LR6 "AA" alkaline battery
DC In 4.5V adapter (center positive)
D/A conversion...................................1-bit DAC eight times oversampling
Frequency response ............................................20~20,000Hz (+1,-3 dB)
Anti-shock. .......................................................................60 second buffer
Output level...........................................Line output: 0.6 Vms (47K ohms)
Headphone: 16mW (32 ohms)
SPECIFICATIONS

1
REFERENCIA RÁPIDA
Conecte audífonos adicionales a este enchufe para compartir la música
Conectar el Adaptador de AC
Detener la reproducción del CD/
Apagar la unidad
Reproducir el CD/Encender la unidad
Encender o Apagar el Incremento de Bajos
Abrir el Compartimiento del CD
Brincar/Buscar hacia atrás
Brincar/Buscar hacia adelante
Seleccionar el modo de CD
Ajustar el Volumen
Conectar audífonos a este enchufe
Girar la tapa transparente a la derecha para
cambiar la cubierta de Disney según desee.
Reemplazar la tapa transparente girándola a la izquierda
Disney Elements © Disney

REPRODUCIR UN CD:
1. Abra la tapa del compartimiento del CD deslizando el interruptor de abrir CD a la derecha. Oprima
suavemente un disco, con la etiqueta hacia arriba, sobre el eje hasta que se asegure en su lugar.
Cierre la tapa del compartimiento del CD. Inserte los audífonos en el enchufe para AUDÍFONOS.
2. Con la unidad apagada, oprima el botón de TOCAR/PAUSA (®p)/ENCENDIDO para iniciar la
reproducción. Para poner la REPRODUCCIÓN en pausa, , oprima de nuevo el botón
TOCAR/PAUSA (®p)/ENCENDIDO, la pantalla parpadeará. Oprima una vez más para reanudar la
reproducción.
3. Ajuste el control de VOLUMEN y el interruptor DBBS según desee. Para brincar hacia la siguiente
pista o a la anterior en el disco, oprima el botón BRINCAR/BUSCAR O o N. Para buscar hacia
adelante o atrás en una misma pista en el disco, oprima y mantenga oprimido el botón de
BRINCAR/BUSCAR O o N.
4. Cuando el disco termine de tocar, se detendrá. Oprima el botón de PARO (■)/APAGADO para detener
el disco antes de que termine; aparecerá el número total de pistas. Oprima de nuevo el botón de
PARO (■)/APAGADO mientras está en modo de paro o espere 60 segundos y la unidad se apagará
automáticamente.
REPRODUCCIÓN REPETIDA:
1. Con un CD insertado, oprima el botón de TOCAR/PAUSA (®p)/ENCENDIDO para encender la
unidad y luego seleccione una pista utilizando el botón de BRINCAR/BUSCAR O o N. Oprima una vez
el botón de MODO; en la pantalla aparecerá el indicador Repetir 1 .
O BIEN
1. Con un CD insertado, oprima el botón de TOCAR/PAUSA (®p)/ENCENDIDO para encender la
unidad. Oprima dos veces el botón de MODO; en la pantalla aparecerá el indicador de Repetir Todas
.
2. La unidad reproducirá entonces todas las pistas seleccionadas o todas las pistas en el CD hasta que
oprima el botón de PARO (■)/APAGADO.
3. Ajuste el control de VOLUMEN y el interruptor DBBS según desee.
REPRODUCCIÓN DE INTRO
1. Con un CD insertado, oprima el botón de TOCAR/PAUSA (®p)/ENCENDIDO para encender la
unidad y luego oprima el botón de PARO (■)/APAGADO para detener la reproducción automática.
Oprima tres veces el botón de MODO; En la pantalla aparecerá el indicador INTRO.
2. Oprima el botón de TOCAR/PAUSA (®p)/ENCENDIDO para empezar la reproducción. La unidad
reproducirá los primeros 10 segundos de cada pista. Ajuste el control de VOLUMEN y el interruptor
DBBS según desee. Oprima el botón de PARO (■)/APAGADO para detener la reproducción de la
introducción.
REPRODUCCIÓN ALEATORIA
1. Con un CD insertado, oprima el botón de TOCAR/PAUSA (®p)/ENCENDIDO para encender la
unidad y luego oprima el botón de PARO (■)/APAGADO para detener la reproducción automática.
Oprima cuatro veces el botón de MODO; en la pantalla aparecerá el indicador RAND.
2. Oprima el botón de TOCAR/PAUSA (®p)/ENCENDIDO para empezar la reproducción. La unidad
reproducirá todas las pistas en orden aleatorio.
3. Ajuste el control de VOLUMEN y el interruptor DBBS según desee. Cuando se hayan reproducido
todas las pistas, la unidad se detendrá. Oprima el botón de PARO (■)/APAGADO para detener la
reproducción aleatoria.
NOTA: Para cancelar la función de modo, oprima repetidamente el botón de MODO hasta que
desaparezcan los indicadores de modo de la pantalla.
ALL
ALL
2
REFERENCIA RÁPIDA (CONTINÚA)
Disney Elements © Disney

3
MEDIDAS DE SEGURIDAD
ADVERTENCIA: Para reducir el riesgo de descargas eléctricas no saque la cubierta o
la tapa posterior. Allí no se encuentran partes que puedan ser reparadas por el usuario.
Lleve su unidad a un Centro de Servicio Autorizado.
CUIDADO
RIESGO DE DESCARGA
ELÉCTRICA. NO ABRIR
ADVERTENCIA: La figura de la flecha con forma de rayo dentro de un
triángulo está hecho para alertar al usuario de la presencia de cables sin
aislar de "voltaje peligroso" dentro del gabinete, de tal magnitud que
puede causar un riesgo de descarga eléctrica a las personas.
ADVERTENCIA: El signo de exclamación dentro de un triángulo está
hecho para alertar al usuario de la existencia de instrucciones
importantes tanto de servicio como de funcionamiento y mantenimiento
que vienen con la unidad.
PELIGRO:
Este producto utiliza un láser de Clase 1 para leer los discos
compactos. Este reproductor de discos compactos con láser está
equipado con interruptores de seguridad para evitar el contacto
cuando la puerta del CD está abierta y el intercierre de seguridad
está vencido. Radiación láser invisible y riesgosa cuando está
abierto y el intercierre está averiado o vencido. Evite la exposición
directa al haz de luz. Le rogamos que no intente vencer o
circunvalar los interruptores de seguridad.
AVISO DE LA FCC:
Este equipo genera o puede usar energía de frecuencia radial. Cualquier cam-
bio o modificación al equipo, puede causar interferencia nociva, a menos que
estas modificaciones esten expresamente indicadas en el manual de instruc-
ciones. El usuario puede perder el derecho de operar este equipo si efectuara
un cambio o modificación no autorizadas.
PROTECTORES DE OLEADA:
Se recomienda para utilizar un protector de oleada para la conexión de la CA.
Las oleadas del relámpago y de la energía no se cubren bajo garantía para
este producto.

4
AVISO DE LA FCC:
Este equipo genera o puede usar energía de frecuencia radial. Cualquier
cambio o modificación al equipo, puede causar interferencia nociva, a
menos que estas modificaciones esten expresamente indicadas en el
manual de instrucciones. El usuario puede perder el derecho de operar
este equipo si efectuara un cambio o modificación no autorizadas.
Este sistema está de acuerdo con los límites exigidos por la Clase B para
dispositivos electrónicos tal como se especifican en la Parte 15 del
Reglamento FCC. Estos límites ofrecen una protección razonable contra
la interferencia de radio o televisión, aún cuando esté operando correcta-
mente. Para eliminar cualquier interferencia, usted puede intentar una o
más de las siguientes medidas correctivas:
• Re-oriente o cambie de posición la antena receptora.
• Aumente la distancia existente entre el sistema y el radio o televisión.
• Use distintos toma-corrientes para el radio o la televisión.
• Si el problema subsiste, consulte a un técnico especializado en
radio/televisión.
• No abra el compartimiento del CD mientras el CD esté girando.
•Siempre mantenga el compartimiento del CD cerrado cuando no se esté
usando.
•No meta objetos extraños en el compartimiento del CD.
• Coloque la unidad sobre una superficie estable.
• Evite instalar la unidad en los lugares descritos a continuación:
•Lugares expuestos a la luz directa del sol o cerca de aparatos que
irradian calor como calentadores eléctricos.
•Arriba de otros equipos estereofónicos que irradian demasia
do calor.
• Lugares con poca ventilación o polvorientos.
• Lugares sujetos a una vibración constante.
• Lugares húmedos.
MEDIDAS DE SEGURIDAD
This manual suits for next models
1
Table of contents
Languages:
Other Disney CD Player manuals