1.1 KOS1401 LOOP POWERED TRIP
INPUT
Type Two wire 4-20mA, 50mA Max.
Protection Reverse connection protected.
Loop Drop 5V Max.
OUTPUT
Alarm HIGH or LOW level switch selected, side entry.
Contact Single Relay Changeover with NO/NC contacts available.
Rating Resistive Load 2ª@250V AC/125V DC
Max. Power 150W (Inductive Loads).
Indication Alarm LED on module front face
Setpoint 0-100% multi turn potentiometer, access on module front
face(Repeatibility ±0.2%)
Hysteresis 0.1-5% Single turn trim pot on module front face
Delay 0.5 second fixed delay
Failuremode On loss of signal: HIGH level No alarm condition
LOW level Alarm condition
(i.e. Alarm operates as if signalhas fallen to –25% or 0mA)
Min.Current 3.5mA
1.2 GENERAL SPECIFICATIONS
Isolation 3000V AC rms between contacts and inputs
1000V AC rms between contacts
Ambient 0-50ºC ; 10-95% RH non condensing
Connection Captiveclampscrews
Cable Size 4mm2solid/2.5mm2 stranded
Case Material Grey Poliamide
Case Flammability To UL94-V0 VDE 0304 pt3 Level IIIA
Dimensions 60 x 60 x 21 (67.5mm above rail)
Mounting Snap on top hat (DIN EN 50022-35)
Max Vibration 12G 10 to 55 Hz at double amplitude 2mm
Shock Res 12G
Compliant with EN50081-1, EN50082-1
Weight 100grams
2.0 INSTALLATION
WARNING - Hazardous voltages may be present on the terminals – the
equipment must be installed by suitability qualified personnel and
mounted in an enclosure providing protection to at least IP20.
WARNING –If
not installed and used in accordance with these
instructions, protection against hazards may be impaired.
(IMPORTANT NOTE it may be preferred to set the user adjustment on
the bench prior to installation).
2.1 MECHANICAL
This trip must be housed within a suitable enclosure that will provide
protection from the external environment, to ensure that the stated
temperature and humidity operating ranges are mantained. As KOS1401
contains a high quality relay, care must be taken to ensure the trip is not
subjected to strong shock or vibration, as this may result in momentary
opening of the relay contacts. The KOS1401 must not be located near a
strong magnetic field, such as a transformer, solenoid or electric motor.
The KOS1401 case is designed to snap fit onto a standard ”TOP HAT”
DIN rail. To remove from DIN rail, apply pressure at the bottom face of the
back upwards towards the rail to release the spring clip and tip away from
the top. The trip may be mounted in any orientation and stacked side by
side along the rail.
2.2 ELECTRICAL
Connections to the trip are made via screw terminals, with wire protector
plates provided inside each terminal. To maintain CE compliance twisted
pair (screened) cables are recommended for signal connections. It is also
good practice to ensure that all 4-20mA loops are grounded at a single
point. Before installation ensure the 4-20mA loop has enough voltage
available to drive the trip. Refer to the above specification for the loop
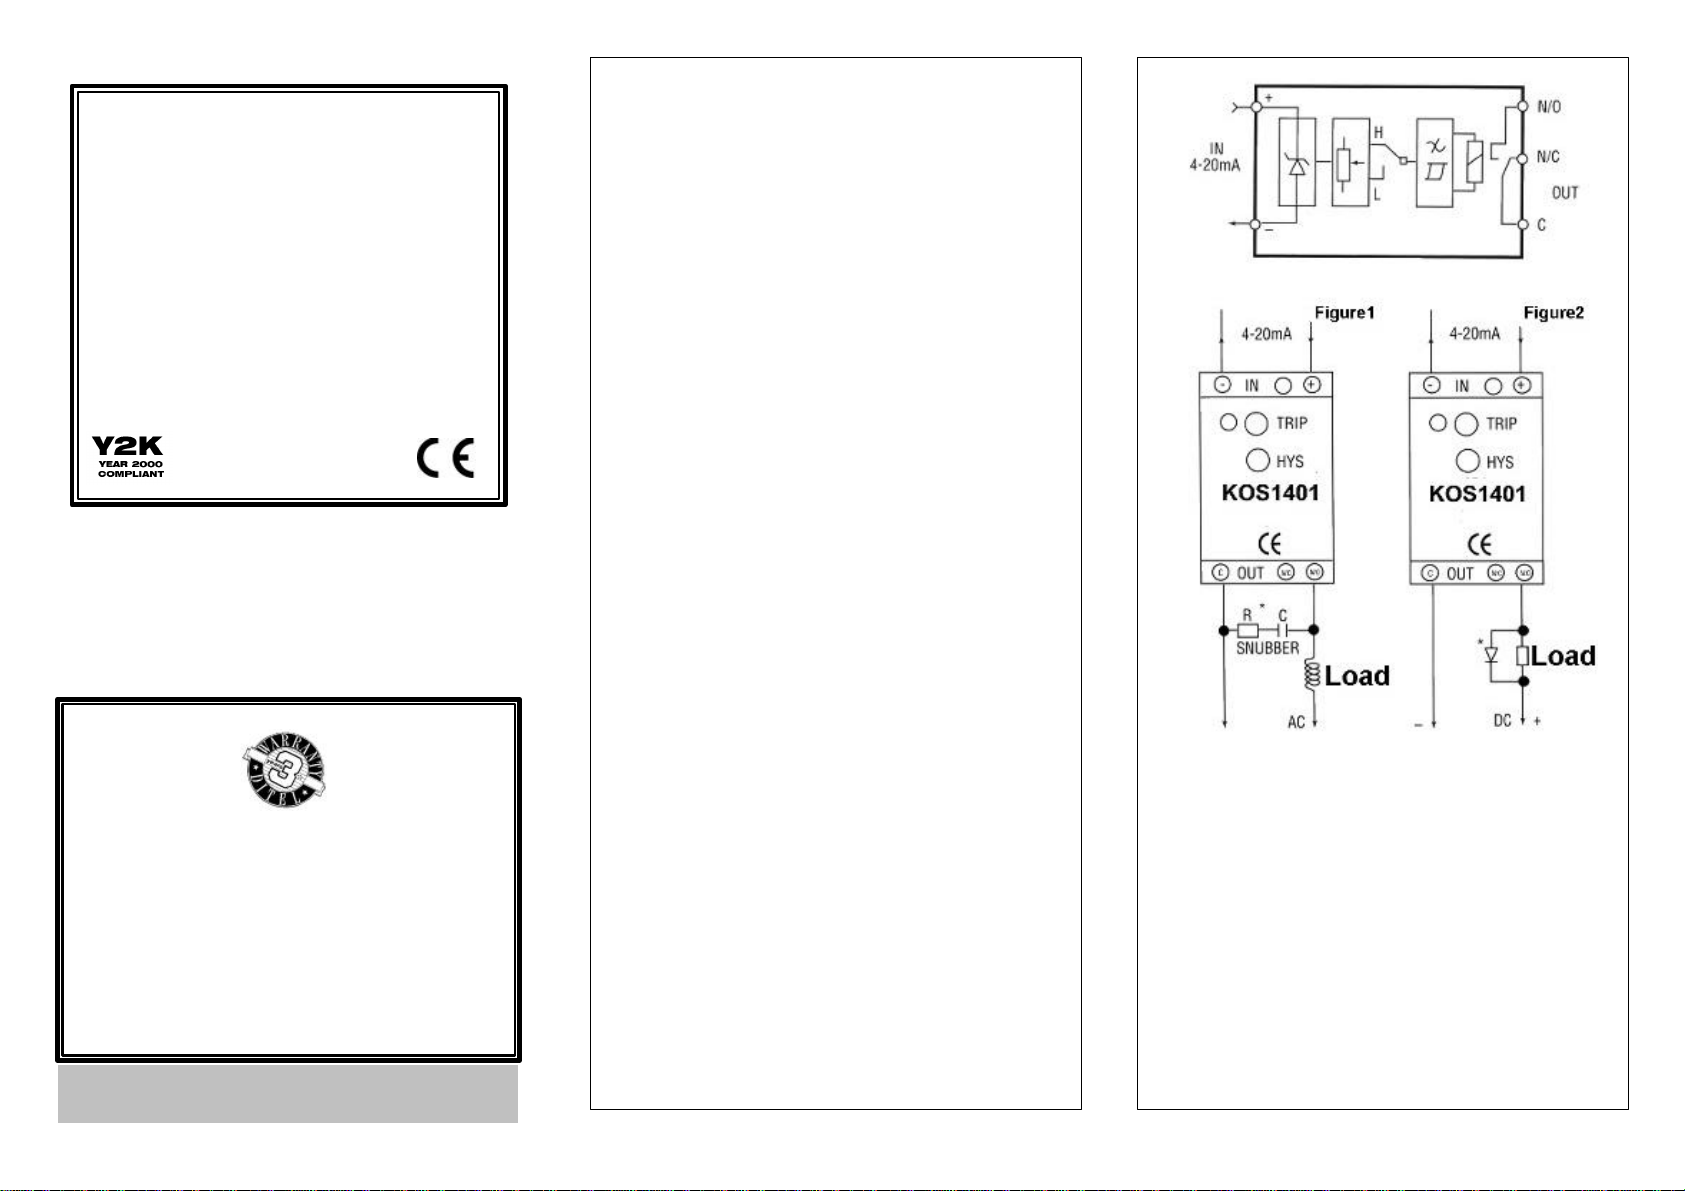
voltage drop. The change over contacts provided by the KOS1401 are
capable of switching 250V AC 125V DC @ 2 A resistive load, 150 Watts
inductive load. Internal Varistors are connected across the contacts to
protect against over voltage. It is advised that a external RC snubber
network is used when switching inductive AC loads (see fig 1).When
switching DC inductive loads, a diode connected in parallel with the
inductor must be used to protect the contact from the energy stored in the
inductor (see fig 2).
KOS1401
LOOP POWERED
TRIP AMPLIFIER
1 RELAY
The instruments are warranted against defective materials and
workmanship for a period of three years from date of delivery.
If a product appears to have a defect or fails during the normal use
within the warranty period, please contact the distributor from which
you purchased the product.
This warranty does not apply to defects resulting from action of the
buyer such as mishandling or improper interfacing.
The liability under this warranty shall extend only to the repair of the
instrument. No responsability is assumed by the manufacturer for
any damage which may result from its use.


