DOEPFER LMK2+ User manual

Masterkeyboard LMK2+ ohne Gehäuse
Master Keyboard LMK2+ without Case
Zu allererst / First of all
Überprüfen Sie sofort nach Erhalt alle Komponenten, inbesondere die Tastatur, auf
mechanische Transportschäden und reklamieren Sie diese umgehend bei Ihrem
Händler.
Immediately upon receipt, check all components, in particular the keybed, for
mechanical transport damage and immediately file a complaint with your dealer.
Vor dem Einbau / Before installation
Wir empfehlen dringend, alle Komponenten vor dem Einbau in ein Gehäuse oder
einen Spieltisch zuerst auf einwandfreie Funktion zu überprüfen. Legen Sie die
Tastatur auf eine eben Fläche (z.B. Tischplatte) und schließen Sie Midi-Elektronik und
das Netzteil an. Achten Sie darauf, dass die Midi-Elektronik nicht den Metallrahmen
der Tastatur berührt und dadurch ein Kurzschluss entsteht. Verbinden Sie den
Ausgang der Midi-Elektronik mit einem geeigneten Klangerzeuger und überprüfen Sie
alle Tasten der Tastatur.
We strongly recommend that you first check all components for proper operation
before installing them in a case or console. Place the keybed on a flat surface (e.g.
tabletop) and connect the midi electronics and the power supply. Make sure that the
midi electronics does not touch the metal frame of the keybed, which could cause a
short circuit. Connect the output of the midi electronics to a suitable sound generator
and check all keys of the keybed.
Im Falle einer Reklamation / In case of a complaint
Wenden Sie sich im Falle einer Reklamation unmittelbar an den Händler, von dem Sie
das Gerät erworben haben. Er wird Ihnen dann die weitere Vorgehensweise
mitteilen.
In case of a complaint, contact the dealer from whom you purchased the device
immediately. He will then inform you of further procedures.
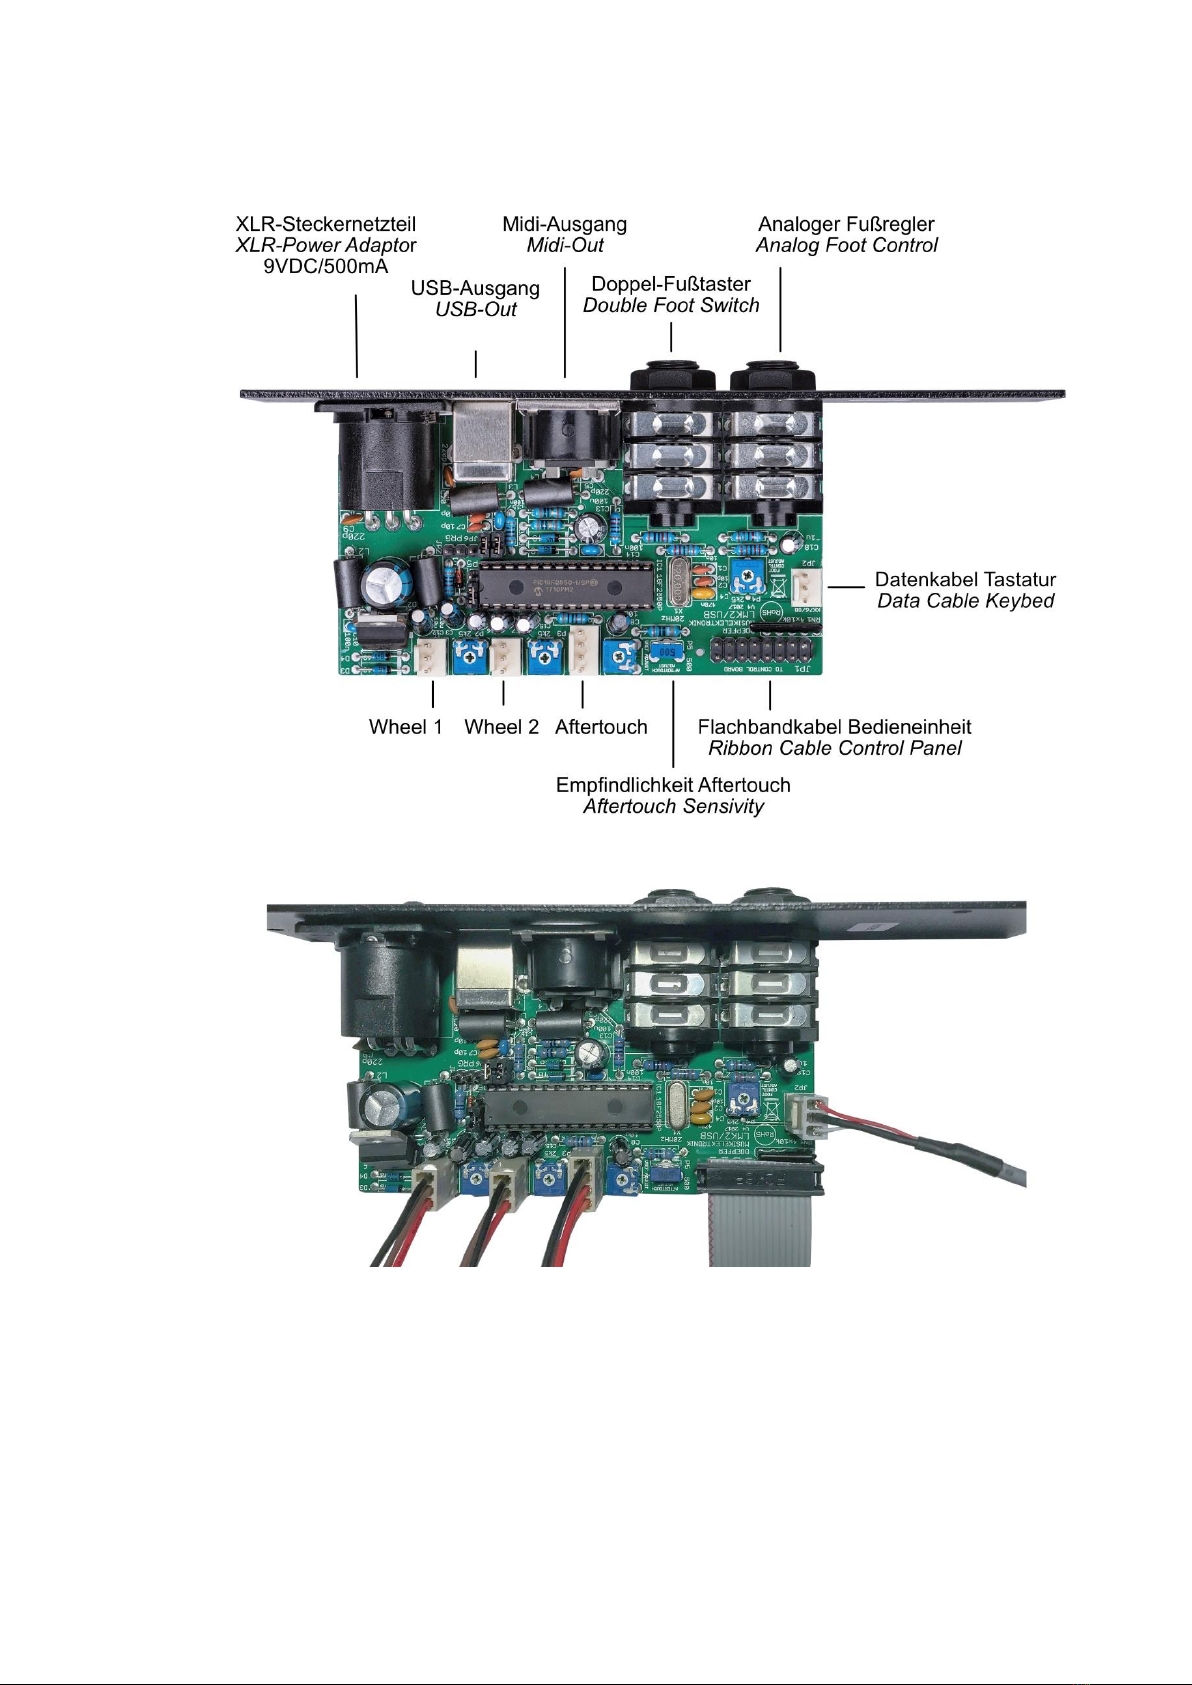
1. Anschlüsse des Mainboards / Connectors on Main Board

2. Montage der Tastatur / Assembly of the keybed
Die Tastatur muss auf einer stabilen Platte montiert werden, um ein Durchbiegen des
Tastaturrahmens zu verhindern. Verwenden Sie zur Befestigung 11x Schrauben M5
mit metrischem Gewinde (M5x20 liegen bei).
Wichtig: Beachten Sie unbedingt die Montagehinweise auf der letzten Seite.
The keybed must be assembled to a solid plate to avoid the keybed frame from
bending. Use 11x metric screws M5 (M5x20 are included).
Important: Follow the assembly instructions on last page.
3. KK88-Scannerplatine / KK88-Scanner Board
Die KK88-Scannerplatine ist bereits unter der Tastatur auf den Kontaktplatinen
montiert und an diese angeschlossen. Führen Sie das dort aufgesteckte runde graue
Datenkabel zum LMK2+ Mainboard und stecken Sie es dort auf den gezeigten
Steckverbinder auf.
The KK88 Scanner Board is already assembled and connected to the contact boards of
the keybed. Lead the round grey data cable to the LMK2+ main board and plug it to
the shown connector.
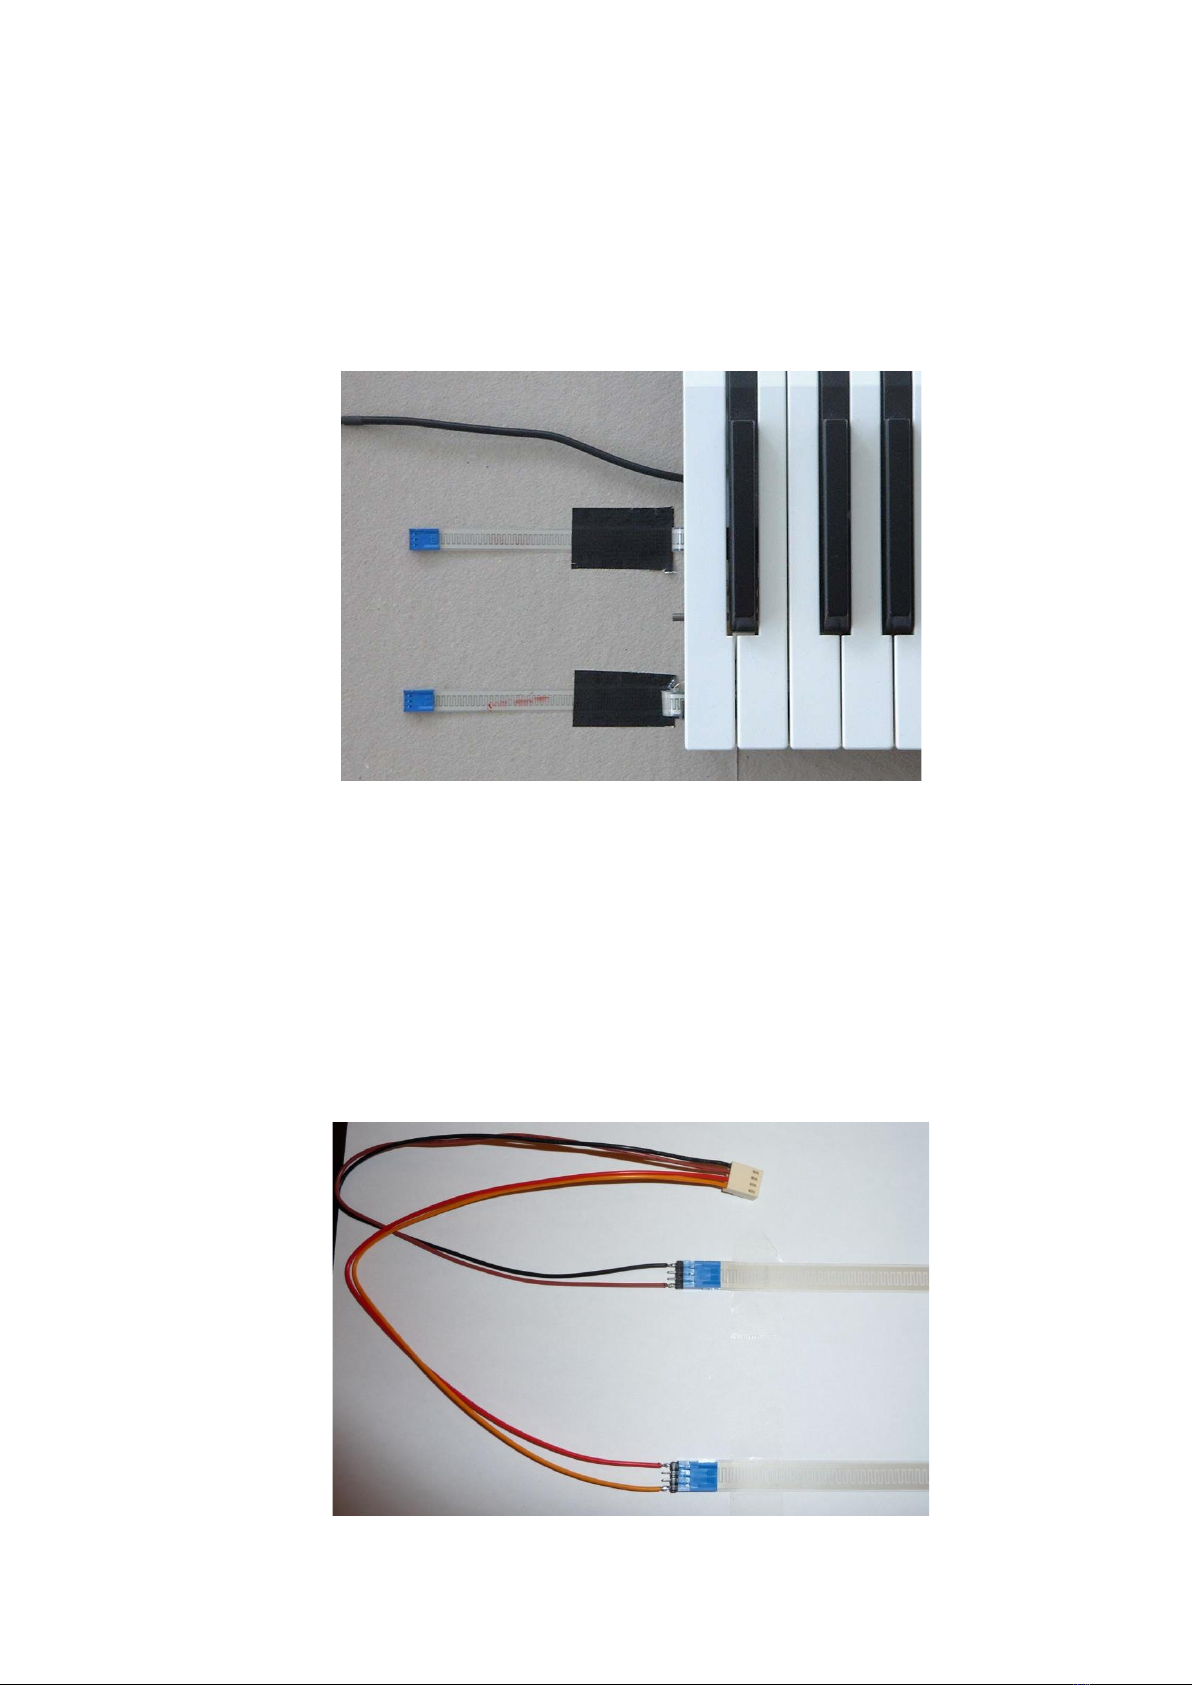
4. Aftertouch
Die beiden Anschlüsse mit den blauen Steckverbindern mit Hilfe von Klebeband auf
der Montageplatte fixieren, um ein Verdrehen zu verhindern.
Fix the two ribbon cables with blue connectors to the mounting plate by using
adhesive tape to avoid warping.
Das 2+2 adrige Adapterkabel (rot/orange + braun/schwarz) mit den blauen
Steckverbindern verbinden. Es gibt keine Polarität!. Die Steckverbindungen ebenfalls
mit Klebeband sichern. Das Adapterkabel mit dem vorgesehenen Anschluss auf dem
Mainboard verbinden. Die Aftertouch-Empfindlichkeit lässt sich mit dem
gekennzeichneten Einstellregler auf dem Mainboard anpassen.
Connect the 2+2 core adaptor cable (red/orange + brown/black) to the blue
connectors arbitrary. The is no polarity! Protect the connectors with adhesive tape as
well. Connect the adaptor cable to the connector on the main board provided. The
aftertouch sensivity can be adjusted with a trim control on the main board.

5. FATAR TP/40GH - Montagehinweise/Assembly Instructions
Im Ruhezustand der Tasten ist die Oberfläche zum rückwärtigen Ende der Tastatur hin geneigt, wie
es auch bei akustischen Klavieren und Flügeln der Fall ist. Es darf auf keinen Fall versucht werden,
die Tastatur durch rückwärtiges Anheben so zu montieren, dass die Tastenoberfläche im
Ruhezustand waagerecht ist! In diesem Fall würde der vordere Teil des Tastaturrahmens nicht mehr
plan auf der Bodenplatte aufliegen, sodass sich beim Festschrauben der Rahmen stark verzieht. Die
Folge wären Funktionsstörungen an der Hammermechanik oder sogar Schäden, die nicht unter
unsere Garantieleistungen fallen.
The surface of the keys at rest is sloping towards the rear end of the keybed as well as with acoustical
grand pianos. Never lift the rear end of the keybed frame to achieve a plane surface at rest. In this
case the front part oft he frame will no longer lie flat on its supporting surface. Screwing the keybed
in this position will warp the metal frame and cause distortions of the hammer action or even
damages. This is not covered by our warranty!

6. Anschluss der Bedieneinheit / Connection of the Control Panel
Verbinden Sie das graue Flachbandkabel sowie die Anschlusskabel von Wheel 1 und
Wheel 2 mit den gekennzeichneten Anschlüssen auf dem Mainboard (siehe erste
Seite) .
Connect the grey ribbon cable and the connection cables of Wheel 1 and Wheel 2 to
the connectors on the main board (see first page) .
7. Stecker-Netzteil / Power Adaptor
Verwenden Sie nur das mitgelieferte XLR-Steckernetzteil 100-240VAC / 9VDC-500mA.
Only use the 100-240VAC / 9VDC-500mA power adaptor provided
Other manuals for LMK2+
1
This manual suits for next models
1
Table of contents


