Dolphin DRC-1G User manual

1
167-3, Dodang-Dong, Wonmi-Gu, Bucheon-Shi, Gyeonggi-Do, 420-805 Korea
TEL: +82–32-612-3456
FAX: +82-32-612-3820
http://www.dolphin.co.kr
e-mail: trade@dolphin.co.kr
RACK CONVEYOR DISHWASHER
DRC-1G(E)
MANUAL

2
- INDEX -
page
1. Specifications & Dimensions ---------------------- 3
2. Features ------------------------------------- 5
3. Part name ------------------------------------ 6
4. Usage --------------------------------------- 7
5. Maintenance ---------------------------------- 10
6. Trouble shooting ------------------------------- 11
7. Electrical Parts -------------------------------- 13
8. Dishwasher Installation ------------------ ------- 16
9. Attachment (Caution for use) --------------------- 18

3
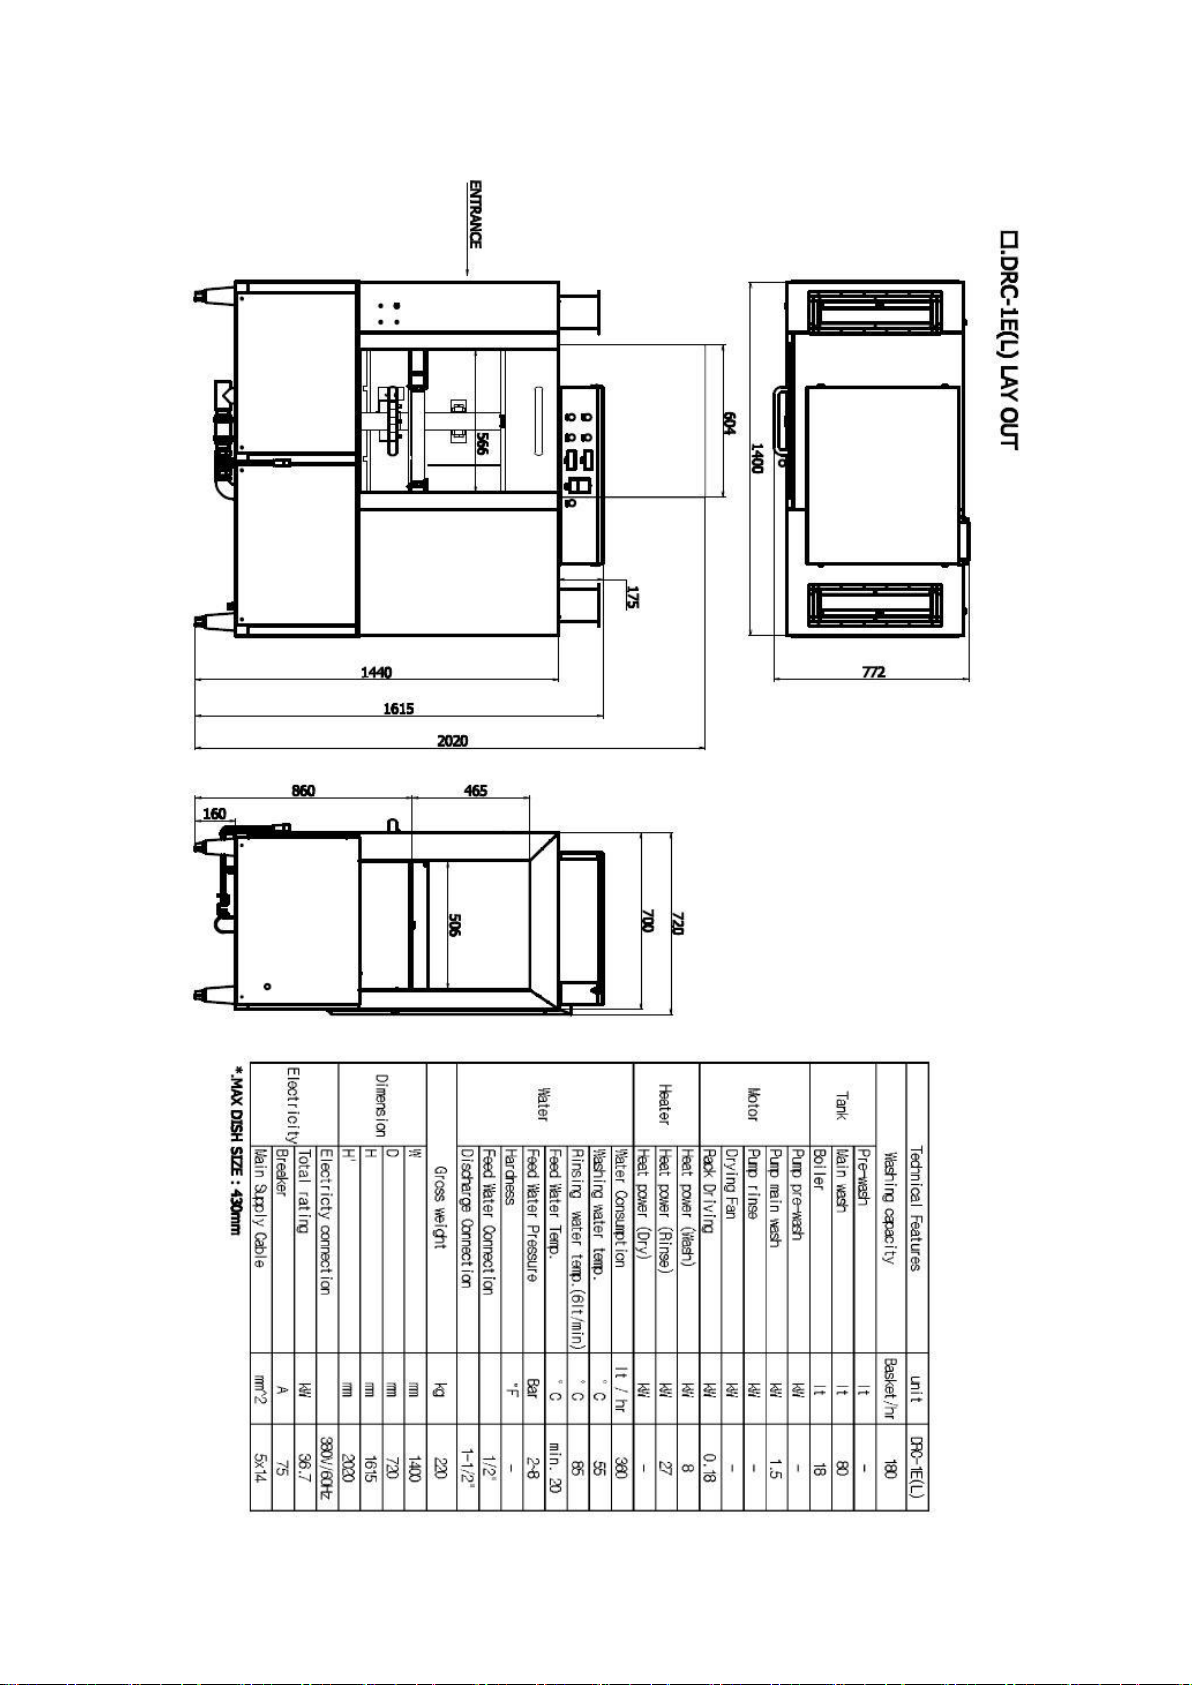
1. Specifications and Dimensions
MODEL
DRC-1(Dolphin Rack Conveyor Dishwasher)
DRC-1G(L/R)
DRC-1E(L/R)
DIMENSIONS
STANDARD TYPE
STANDARD TYPE
1,400(L)×720(W)×1615(H)mm
1,400(L)×740(W)×1445(H)mm
TYPE
GAS TYPE ELECTRIC TYPE
1. MATERIALS : STS-304 1.0T, 1.2T, 1.5T 2.0T
2. ELECTRIC SPECIFICATIONS : 380V 3Ph 4 wired, 220V 1Ph
3. ELECTRIC CONSUMPTION : 5.8 KW (GAS TYPE), 36.7KW(ELECTRIC TYPE)
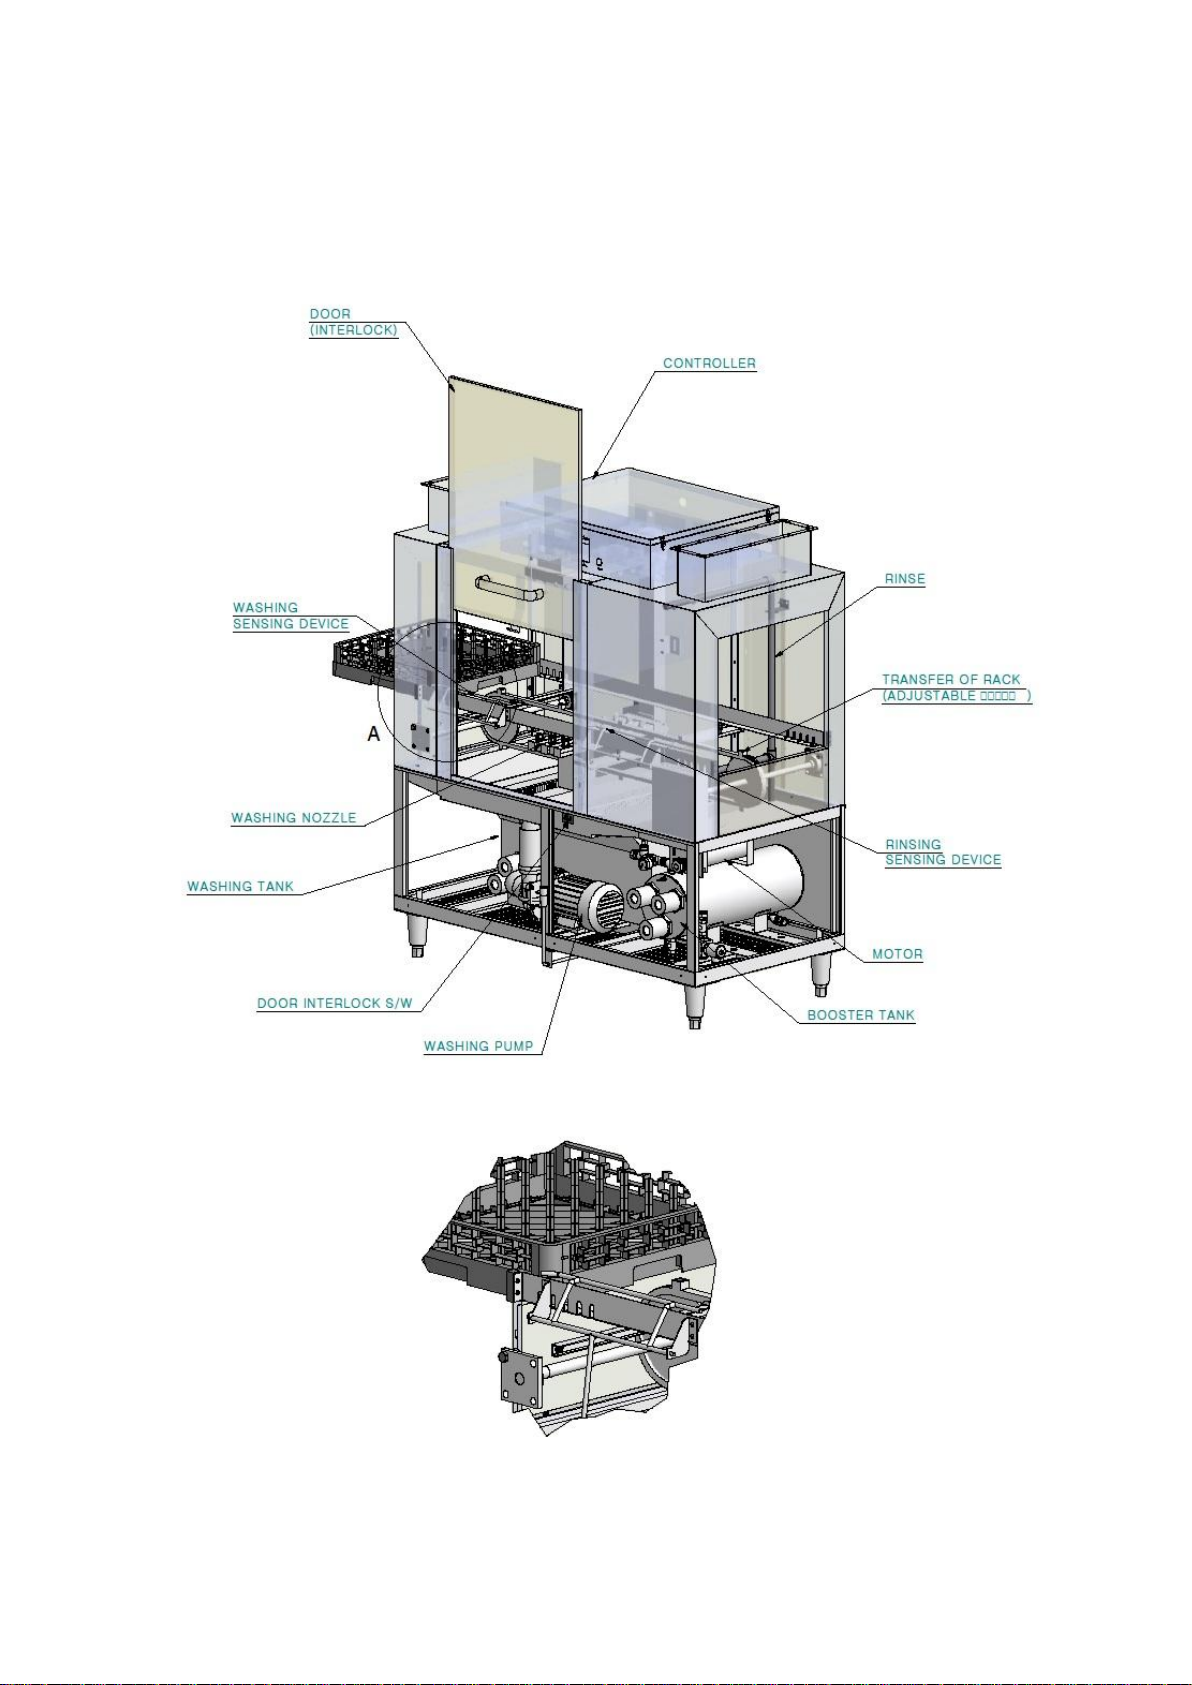
4. WASH PUIMP : 1.7kw(220V 1Ph & 380V 3Ph, 500 L/min)×1ea
5. WASH TANK CAPACITY : 80 Liter×1ea
6. WASH TEMPERATURE : 60℃~70℃
7. HEATING ELEMENT FOR WASH TANK : 4 KW x 1EA
8. WASH TYPE : POWERFUL WASH
9. GAS BOOSTER : INSTANT GAS BOOSTER BY LNG OR LPG
2~3 UNIT OF GAS BOOSTER(W/O TANK)
OR 1 UNIT OF GAS BOOSTER(W/ TANK)
ELECTRIC BOOSTER: 27KW ELECTRIC HEATER EQUIPPED
10. WATER CONSUMPTION : WASH TANK - 80 L×1EA
RINSE WATER CONSUMPTION –600 L/hr
11. HEAT QUANTITY : FOR WASH TANK - 4,400 Kcal/h
FOR RINSE TANK –LNG 42,000 Kcal/h, LPG 3.5 kg/h
※DEPENDING ON KITCHEN ENVIRONMENT
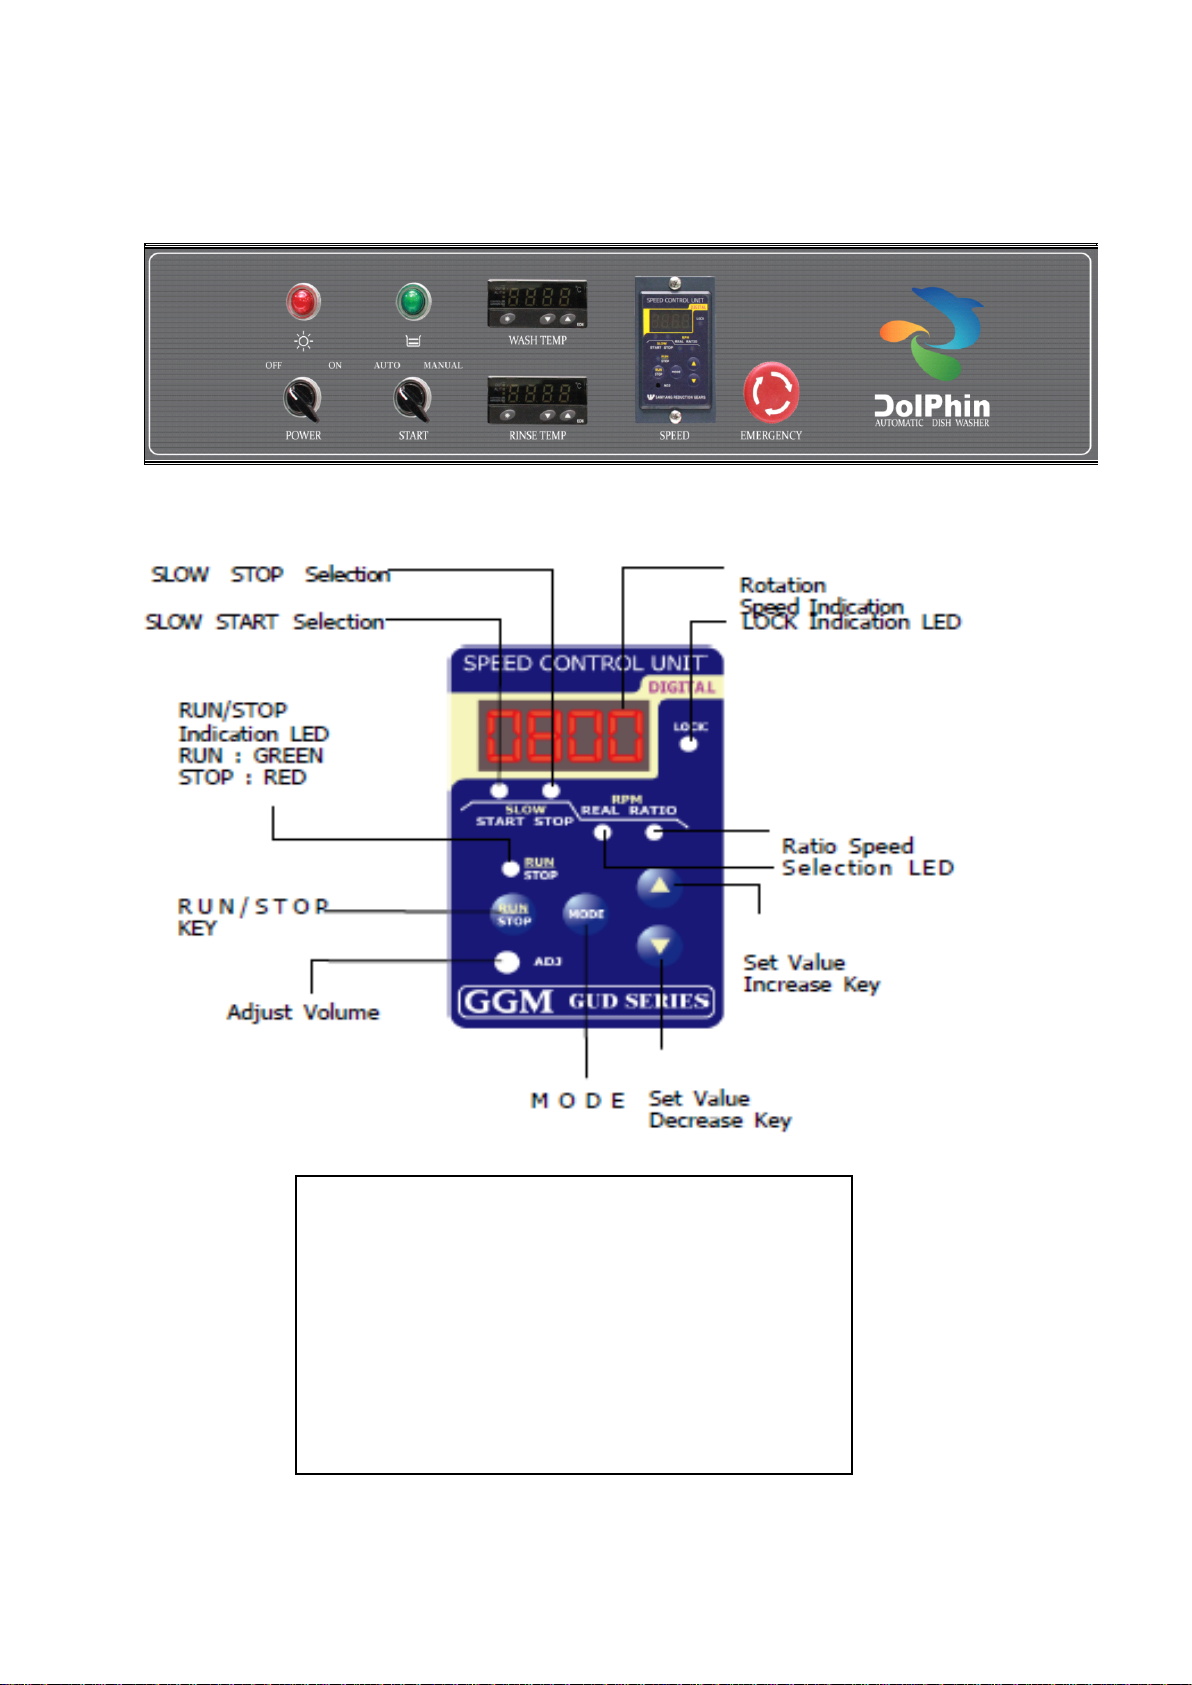
12. CONVEYOR SPEED : 0-2 M/min(SPEED CONTROL MOTOR: 180W, SPEED CONTROL AVAILABLE)
13. NOZZLE TYPE : WASH NOZZLE –UPWARD & DOWNWARD ROTATING FIXED NOZZLE(REMOVABLE)
RINSE NOZZLE - UPWARD & DOWNWARD FIXED NOZZLE(REMOVABLE)
14. SAFETY DEVICE : OVERLOAD RELAY
EMERGENCY SWITCH AT INLET AND OUTLET
15. WASH CAPACITY : RACK 170-180EA/HOUR (CONVEYOR SPEED 1.5 M/min)
※DEPENDING ON USAGE ENVIRONMENT
16. OTHER SPECIFICATION : GAS –INSTANT GAS HEATER 16L(W/O TANK),15A, 2.6 Kg/h
INSTANT GAS HEATER 16l(W TANK), 15A, 3.5 Kg/h
TAP WATER CONNECTION –PRESSURE:1.2 Kg/cm2, PIPE : 15A OVER,
DRAINING CONNECTION - 40A OVER PIPE AT BOTTOM OF THE M/C

4

5
2. DRC Features
◎Rack Conveyor Dishwasher Features
①Automatically moving and washing the tableware in the rack
②Conveyor speed is easily controlled depending on operation environment
③Economic system saving water and energy
④Conveyor system washing the various tableware
⑤Easy installation in the small space
⑥Right/Left style available for kitchen structure
⑦The strong washing/rinsing efficiency by close washing/rinsing nozzle
⑧Safety system by automatically shut down when overload

6
3. Parts Name

7
4. Usage
1) Pre-check for operation
①clean the inside of dishwasher.
②remove the food stuffs on the strainer.
③remove the debris on the nozzles of wash and rinse.
④clean the debris and scale in the wash tank.
2) Notice on operation
①never turn dishes upside down.
②don’t put others except for dishes.
③don’t load over 300mm height dishes.
3) Preparation for wash
①close the drain valve.
②check damaged main electrical cable.
③open all watering valves.
④turn on the switch (check red lamp flickering)
(start watering when ON and stop watering when full, then when green lamp
flickering, it’s ready sign)

8
4) Washing
①don’t operate till wash temperature 50~60℃.
②turn on start switch.
Automatic: automatic wash water sprayed on rack loading
Manual: wash water sprayed continuously
③check pump working and its noise.
④check conveyor and emergency switch.
⑤check rinse aid and detergent.
⑥load the rack into inlet smoothly.
⑦press emergency button when machine malfunctions.
5) Check after work
①check no dishes inside of dishwasher.
②turn off the power switch if finished up the work.
③open drain valve for draining.
④take food stuffs off out of strainer.
⑤clean the inside of dishwasher.
⑥close all valves.
6) Usage of Speed controller (GUD-C)
①press “mode”button twice with switch on.
②set the speed with ▲or ▼button.
③the speed will be set after 10 sec. if no changing.

9
▣DRC-1HE CONTROLLER & SPEED
LOCK ON : MODE S/W 7 TIMES PUSH
LOCK OFF :
1. AUTO/MANUAL S/W -> MANUAL
2. SPEED CONTROLLER RUN/STOP S/W PUSH
& MAIN POWER S/W ON
SPEED ADJUST
MODE S/W TWICE PUSH -> UP & DOWN
STANDARD : 800 (THIS IS MOTOR RPM.)

10
5. Maintenance
1) Keep the machine clean
◎make it sure to clean remains inside of machine after work.
◎remove remains on strainer after work.
◎wash the food stuffs out on the wall and bottom of machine.
◎frequently check no stuffs on washing nozzle and rinsing nozzle, be sure to
remove stuffs.
◎It may get stained by remained chemicals on surface of machine, wipe it out
carefully and keep it clean.
◎When don’t use the machine for long time, open the drainer and drain wash
water wholly.
◎Be careful the control box not to get wet when you clean the machine. It
may occur the electric shock and malfunction.
◎Always remove the scale of the machine.
2) Be sure to use the chemicals for dishwasher only.
◎The normal market chemicals may generate too much foam and reduce the
washing efficiency, as well as cause the malfunction.
3) Be careful to keep the proper temperature.
◎The best washing efficiency is realized at the proper temperature of wash
and rinse water.
◎The washing water temperature: 45℃~ 65℃
◎The rinse water temperature: 70℃~ 90℃

11
6. TROUBLE SHOOTING
1) If the system does not work?
◎Check the main breaker-ON in the control box.
◎Check the ELB ON in the operation breaker.
◎Check the power lamp-ON at Power s/w ON.
◎Check the Ready lamp ON.
◎Check the Main Electric power 380V (in case of 3 Phase 4 wired)
◎Check the operating power 220V.
2) If not watering
◎Check the power s/w lamp
◎Check the watering valve open
◎Check the 380V on main breaker
◎Check the watering (solenoid) valve
◎Check power on floatless sensor
◎Check the lamp off after clean the sensor if floatless sensor lamp on.
3) If not quit watering
◎Clean the floatless sensor
◎Clean the solenoid valve
◎Check the floatless sensor lamp on
4) If dish is not clean after wash
◎Remove dregs at the wash nozzle
◎Check the tripper up on wash contactor
◎Remove the dregs in wash pump
◎Check the leakage and short of wash pump
◎Push the tripper after check wash pump
◎Check 380V on wash pump contactor by voltage tester
◎Check the water is full in wash tank, otherwise fill up the water into
the wash tank after its leakage.
◎Check the wash temperature, 55℃~65℃
◎Check the chemical agent feeding, automatically
◎If lower temperature, check the temperature controller and contactor
5) If rinse is not good
◎Check if the water pressure, 1.2Kg/㎠over
◎Clean dregs on the rinse nozzle
◎Check rinse temperature, 82℃

12
6) If conveyor chain does not work
◎Check emergency s/w ON
◎Check the display of chain speed
◎Check the chain speed control ON
◎Check the current control overload relay
◎Check relay lamp of motor
◎Check the chain
◎Check the sprocket and its key of motor
7) If emergency does not work
◎Check emergency s/w
◎Check the current control overload relay
◎Check the lamp of motor relay
8) When out of the chain in the conveyor
◎Disjoint the chain after power off Immediately
◎If loosen chain, fasten it with tension control nut
9) If out of order at gas booster(for DRC-1HG)
◎Check gas supply
◎Check the gas, high or low pressure? (Preferred low pressure in case
of LPG)
◎Check the inlet & outlet valve of gas booster

13
7. Electrical parts
1) Contactor & Overload Relay

14
2) Earth Leakage Circuit Breaker

15
3) ELECTRIC WIRE DIAGRAM

16

17
8. Dishwasher Installation
1) Instruction before installation
◎Confirm the place to be installed
◎Confirm the electric specifications [380V, 3ph, 4wired]
◎Confirm watering pressure, over 1.2kg/㎠
◎Confirm the ventilation
◎Position the drainage
2) How to install the dishwasher
◎Level the dishwasher in using adjustable feet
◎Connect the cable to terminal bloc in order
◎Be sure to confirm the elec. spec's, 380V, 3Ph, 4wired
◎Connect the rinse aid hose to check valve

18
※Watering for initial operation
1. Open panel and connect the watering hose [1/2”stainless flexible
hose] to solenoid valve
2. Open the ball valve [Available to throttle watering volume by this
valve]
3. Power On at control box
4. Check the watering out of rinse nozzle after opening panel
[It takes 20 minutes to fill up the tank]
5. Check the start lamp (green color) at control box
If green lamp on, the tank is full and the M/C ready to start
6. Turn on the start switch at control box.

19
CAUTION FOR USE !
1. Except technician trained in safety education, don’t operate the machine
2. Don’t wash too many dishes in a rack at one time
3. Use designated rack for small pieces like cup, spoon etc.
4. Keep the door closed while operating
5. While operating, don’t open the door nor touch the body –may cause
burn injuries by hot water
6. Don’t open electric control box, it may cause the electric shock
7. Must be grounded of power outlet for prohibiting electric shock
8. Make sure to install the machine in good-ventilated place away from any
inflammables.
9. When ignition defects of gas booster, immediately shut-off gas valve,
check gas leakage and call local service center
10. Wear the protection glove because hot water may cause burn injuries
during operation and the sharpen edge may cause hurt injuries during
cleaning, moving and operating
11. Don’t touch the rotating chain of inlet and outlet of machine, immediately
press the emergency stop button when abnormal operation
12. Don’t wash the poisoned dishes - be fatal danger if contaminated to the
dishes
13. Don’t put inflammable liquid into tank
14. Don’t wash undesignated dishes
15. Don’t use the dishes coated or weaken by aluminum or alkalinity
16. Be careful for children not to touch chemical agents and operating switch
17. Don’t get the detergent or rinse aid in skin when exchanging chemicals.
When touched, immediately wash it out with warm water
18. When drink the chemicals, immediately throw them up and ask a doctor
19. Call local service center if any problems or questions
This manual suits for next models
1
Table of contents
Other Dolphin Dishwasher manuals