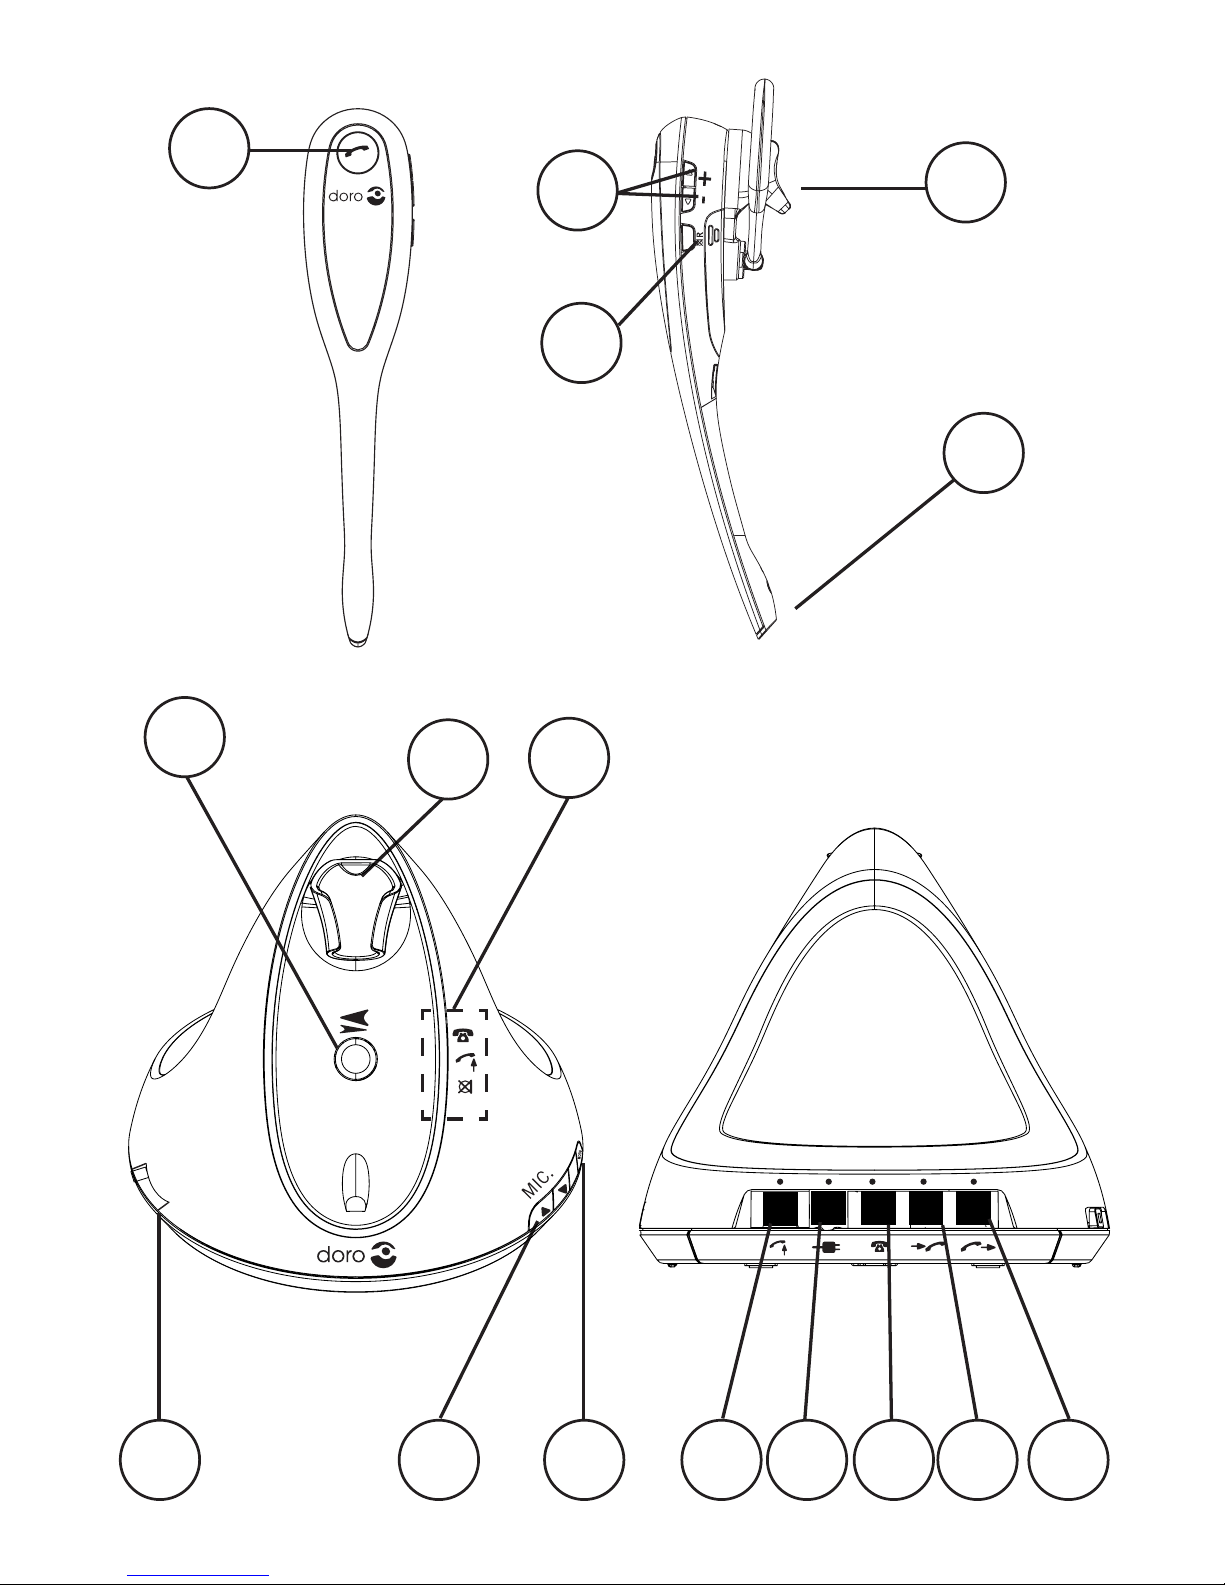
Doro Prosound hs1910 User manual

Prosound
hs1910 DECT

161514131211109
8
7
6
5
4
3
2
1

English
1 Answer button q
2 Volume control +/-
3 Mute button/Call Waiting z/R
4 Receiver
5 Microphone
6 Register button J
7 Charging cradle
8 Base indicators
9 Termination (A-G)
10 Adjustmentofamplication}/{
11 Settings w
12 Handset lifter (q
, blue)
13 Power (Y, green)
14 Line (T, red)
15 Telephone (q, orange)
16 Handset (q, light blue)
Svenska
1 Svarsknapp q
2 Volymkontroll +/-
3 Sekretess/samtal väntar z/R
4 Högtalare
5 Mikrofon
6 Registreringsknapp J
7 Laddningsklyka
8 Basenhetsindikatorer
9 Terminering (A–G)
10 Förstärkningsreglage }/{
11 Inställningar w
12 Lurlyftare (q
, blå)
13 Ström (Y, grön)
14 Linje (T, röd)
15 Telefon (q, orange)
16 Lur (q, ljusblå)
Dansk
1 Svarknap q
2 Lydstyrkeregulering +/-
3 Mikrofonafbryder/Banke på z/R
4 Modtager
5 Mikrofon
6 Registreringsknap J
7 Opladningsholder
8 Indikatorer på baseenheden
9 Terminering (A-G)
10 Forstærkningsjustering }/{
11 Indstillinger w
12 Håndsætløfter (q
, blå)
13 Strøm (Y, grøn)
14 Linje (T, rød)
15 Telefon (q, orange)
16 Håndsæt (q, lyseblå)
Norsk
1 Svar-knapp q
2 Volumregulering +/-
3 Mikrofonsperre/Samtale venter z/R
4 Mottaker
5 Mikrofon
6 Registrer-knapp J
7 Lader
8 Indikatorer på baseenhet
9 Terminering (A-G)
10 Regulering av forsterkning }/{
11 Innstillinger w
12 Håndsettløfter (q
, blå)
13 Strøm (Y, grønn)
14 Linje (T, rød)
15 Telefon (q, oransje)
16 Håndsett (q, lyseblå)

Suomi
1 Vastauspainike q
2 Äänenvoimakkuuden säätö +/-
3 Mykistyspainike/Koputus z/R
4 Kuuloke
5 Mikrofoni
6 Rekisteröintipainike J
7 Laturi
8 Tukiaseman merkkivalot
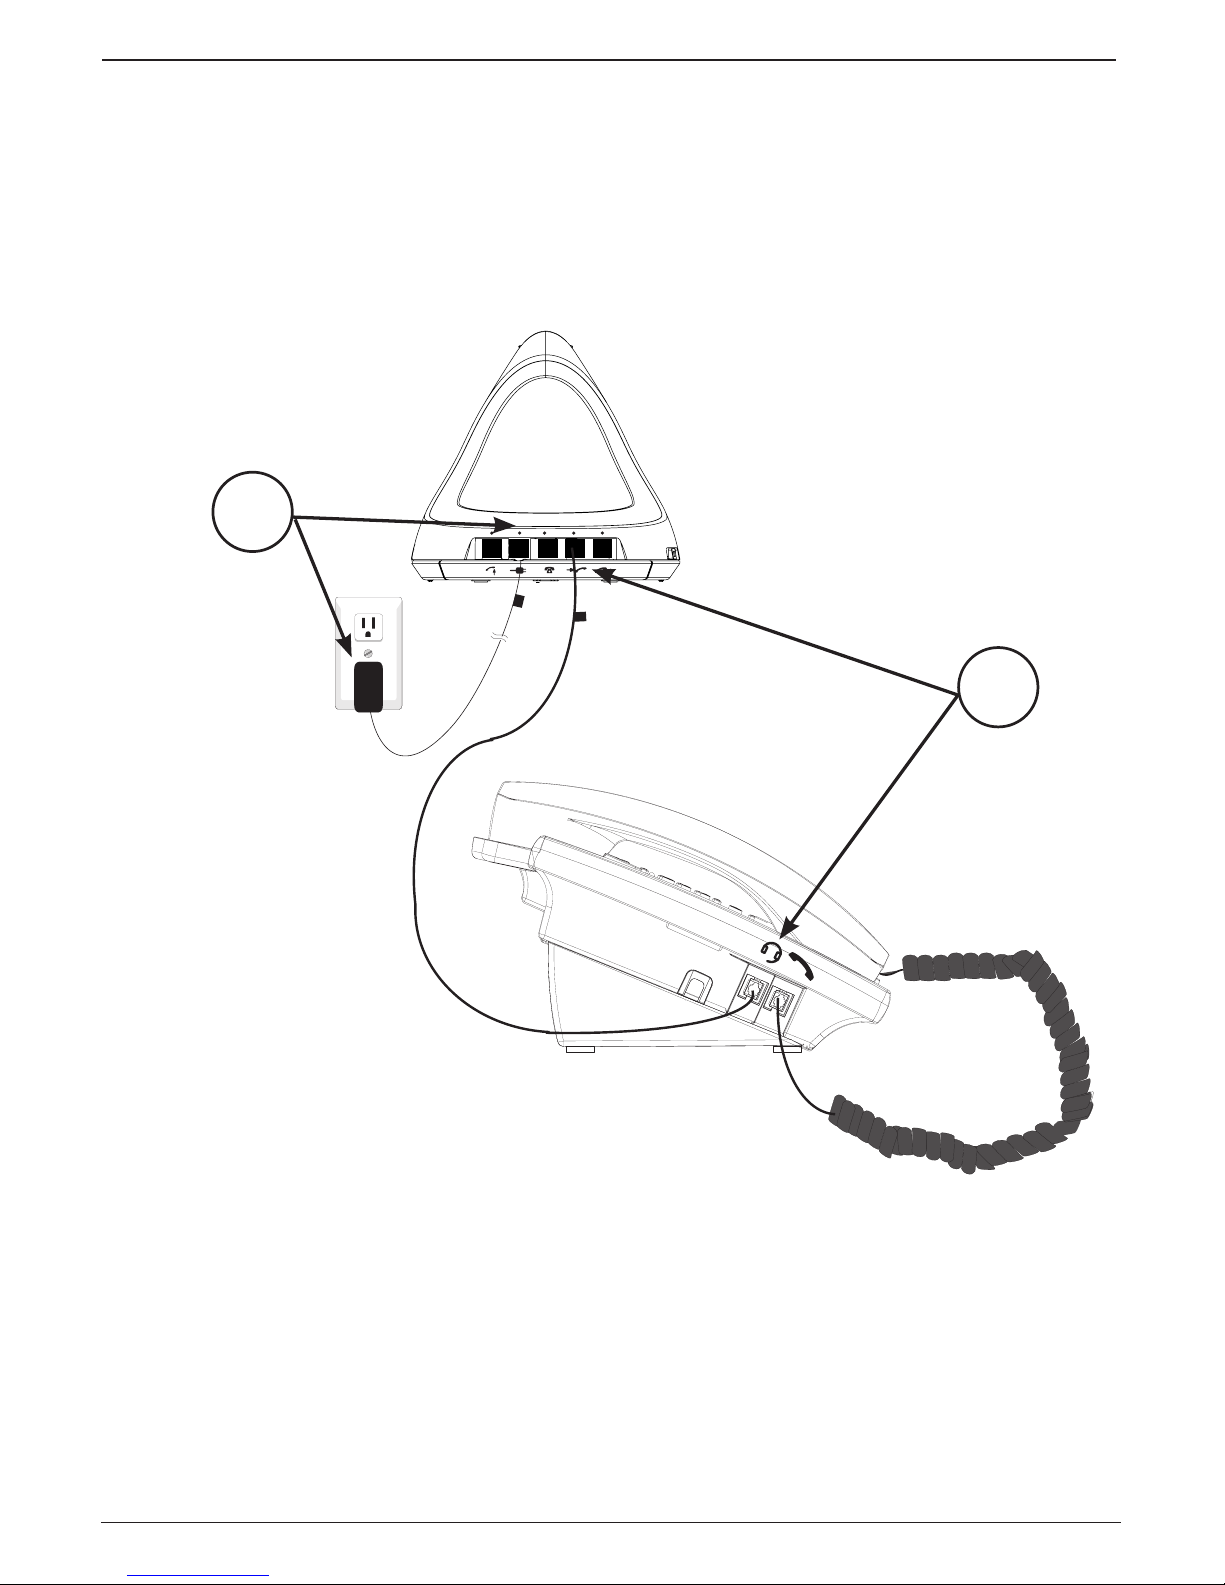
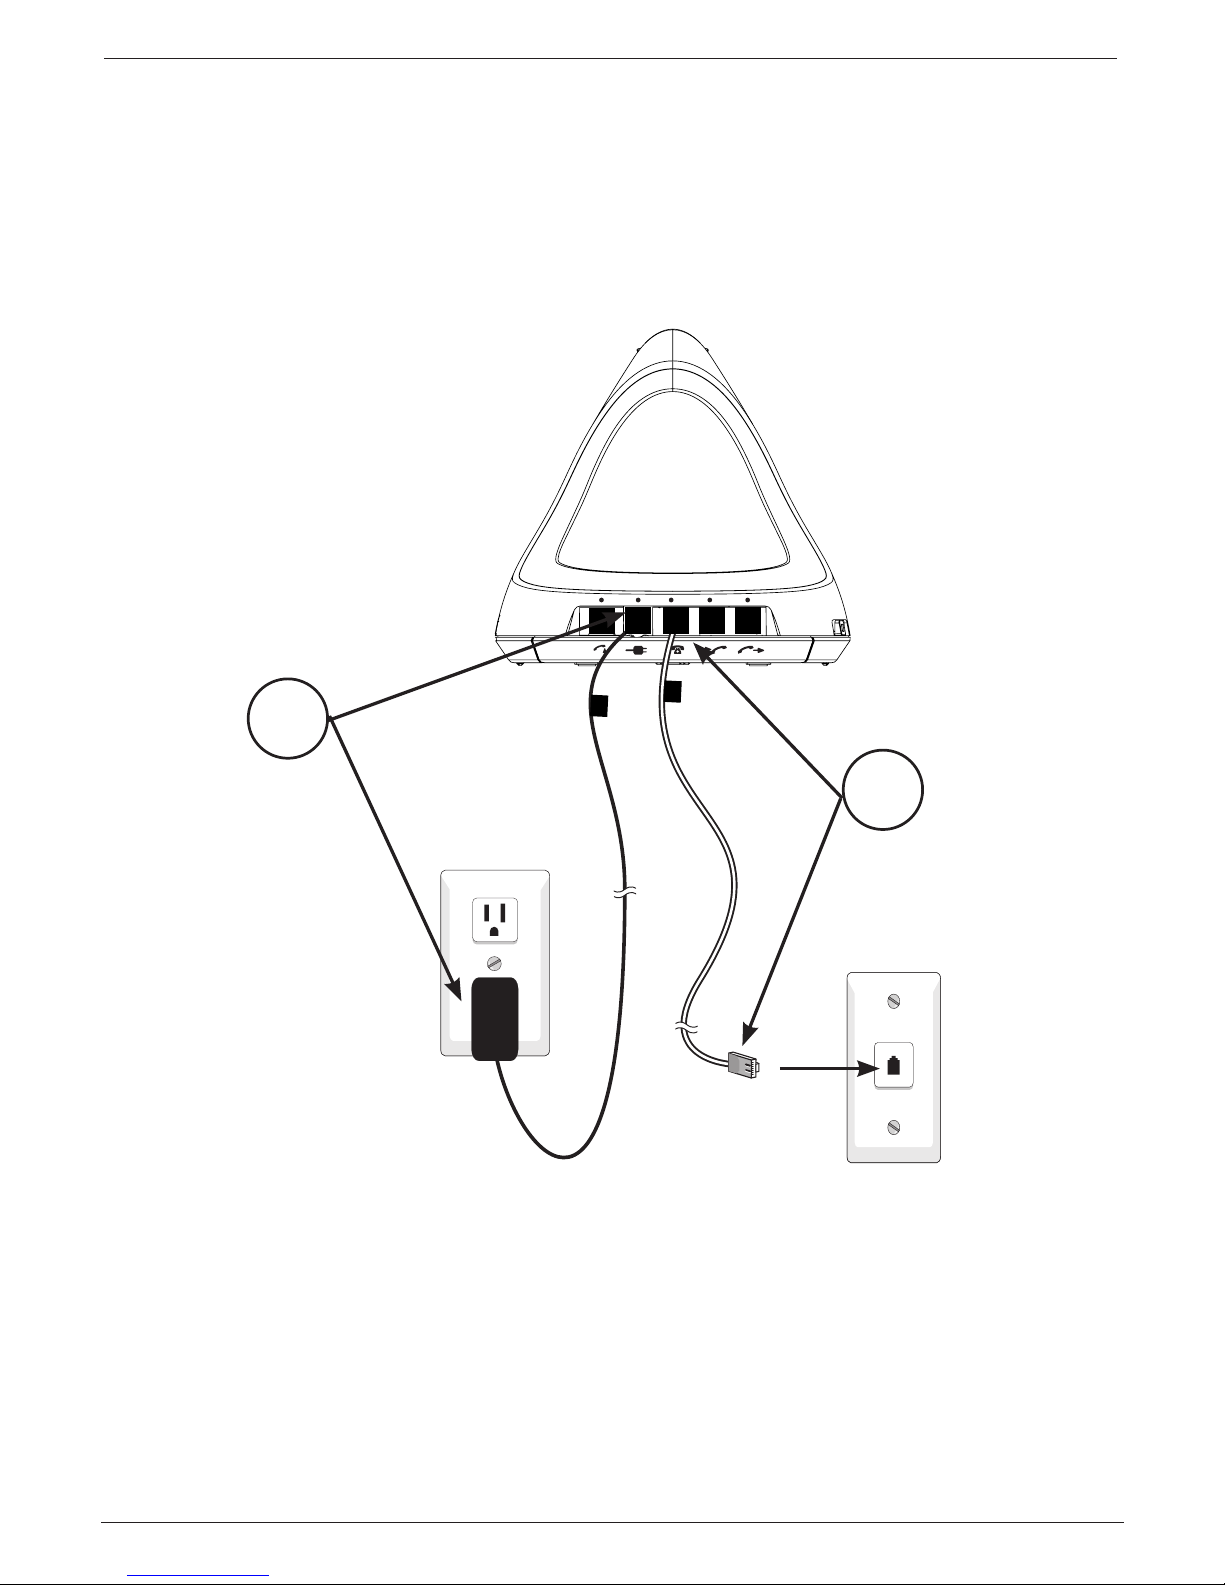
9 Liitäntä (A-G)
10 Vahvistuksen säätö }/{
11 Asetukset w
12 Luurin suodatin (q
, sininen)
13 Vista (Y, vihreä)
14 Linja (T, punainen)
15 Puhelin (q, oranssi)
16 Luuri (q, vaaleansininen)
Français
1 Bouton de prise d’appel q
2 Réglage du volume +/-
3 Bouton sourdine/appel en
attente z/R
4 Récepteur
5 Microphone
6 Bouton d’enregistrement J
7 Socle de charge
8 Voyants de la base
9 Terminaison (A-G)
10 Réglagedel’amplication}/{
11 Réglages w
12 Décrocheur de combiné (q
,
bleu)
13 Alimentation (Y, vert)
14 Ligne (T, rouge)
15 Téléphone (q, orange)
16 Combiné (q, bleu clair)
Deutsch
1 Abheben/Auegen-Tasteq
2 Lautstärke-Einstellung +/-
3 Stummschaltung/R-Funktion z/R
4 Lautsprecher
5 Mikrofon
6 Anmeldetaste J
7 Ladestation
8 LED-Anzeigen an der Basis
9 Anpassungseinstellung (A-G)
10 Mikrofon-Empndlichkeit}/{
11 Einstellmenü w
12 Hörerlifter (q
, blau)
13 Netzteilanschluss (Y, grün)
14 Direkter analoger Anschluss
(T, rot)
15 Anschluss zur Hörerkabelbuchse
(oder Headsetbuchse) am Telefon
(q, orange)
16 Anschluss Kabel zum Hörer
(q, hellblau)
Nederlands
1 Antwoordknop q
2 Volumeknop +/-
3 Mute-knop/Wisselgesprek z/R
4 Ontvanger
5 Microfoon
6 Registratieknop J
7 Lader
8 Indicatoren basisstation
9 Afsluitingen (A-G)
10 Afstelling signaalversterking }/{
11 Instellingen w
12 Telefoonhoornopnemer (q
, blauw)
13 Voeding (Y, groen)
14 Lijn (T, rood)
15 Telefoon (
q, oranje)
16 Handset (q, lichtblauw)

1
English
Installation
You must install and charge the battery before using the headset.
Installation options
IMPORTANT: If you have the handset lifter (purchased separately), follow the
installation instructions in the Lifter for hs1910 DECT manual.
Installation options:
Using the headset connected to the handset socket on any telephone.
q
MUST be lit on the base (see Settings).
Using the headset connected to a telephone with separate headset outlet.
q
MUST be lit on the base (see Settings).
Using the headset with a standard analog telephone line as a stand-alone
product. TMUST be lit on the base (see Settings).
Using the headset with a standard analog telephone line together with a
telephone. TMUST be lit on the base (see Settings).
Cord labels
The cords provided with your headset have coloured labels attached to help you
plug them into the headset base. The back of the headset base has coloured
dots above the sockets that correspond to the labels on the cords.
Headset base installation
Before installing the headset base: Remove the rear bottom piece of the headset
base by pushing it away from the base.
Install the headset base as shown on the
following pages.
After completing the installation:
Slide the rear bottom piece towards the
base until it clicks into place.
Changable adapters
The mains power adapter has changable
plugs
Place the UK or EU plug in the
adapter slot.
Slide it gently downwards until you hear
a click. The adapter is now ready for use.
To change plug, press the release
button.
1.
2.
3.
4.
1.
2.
3.
2
1
3
EU
UK

2
English
Battery
The battery in the headset is charged when the headset is placed on the base
unit. The light on the headset is lit during the entire charging period.
Whenthebatteriesarefullycharged(4hours)theyaresufcientforabout
6–9 hours call time and about 100 hours in standby mode. The times apply at
normal room temperature. For optimum daily performance, return the headset
to the base when not in use. Full battery capacity is only achieved when the
batteries have been charged 4-5 times. The base unit has an automatic charging
mechanism that prevents the battery from being overcharged or damaged
due to prolonged charging. As batteries only have a certain lifespan it is quite
normal that call time and standby time will decrease somewhat compared to the
specicationswhenthetelephoneisusedregularly.
Press on both sides of the battery compartment
cover and remove the cover.
Insert battery according to the markings and lay
thewiresatontopofthebattery.
Insert the tab on the bottom of the battery cover
into the battery compartment. Press down gently
on the battery cover until it snaps into place.
Place the headset on the headset base and push
it downward until the light on the headset turns
on.
Warning!
Danger of explosion if battery is incorrectly placed.
Replace only with the same type.
1.
2.
3.
4.
123
4

3
English
Option 1: Analog or digital phone installation
With this installation, you can make and receive calls using the
PHONE MODE (q). Please note that the handset must be used to connect/
disconnect the headset to the line. This is also the installation option to be used
together with the Lifter for hs1910 DECT.
Connect the mains adapter to Y(green) and to an electrical outlet.
Disconnect the curly handset cord from the telephone. Connect the end of
the curly handset cord to q(light blue).
Connect the orange cord to q (orange) and the other end to the
handset outlet of the phone.
Make/answer a call
Use your telephone as normal to make/answer a call.
On the headset, press qto connect to the line.
On the headset, press qagain to disconnect the call.
Replace handset to end the call.
Note!
The headset can be kept active, but that will drain the battery faster.
1.
2.
3.
1.
2.
3.
4.
1
2
3

4
English
Option 2: Analog or digital phone with headset outlet installation
With this installation, you can make and receive calls using the
PHONE MODE (q). Use the phone’s headset button to connect/disconnect
the headset to the line.
Connect the mains adapter to Y(green) and to an electrical outlet.
Connect the orange cord to q (orange) and the other end to the
headset outlet of the phone.
Make/answer a call
On the headset, press qto connect.
Use the headset button on your telephone and make/answer a call.
On the headset, press qagain to disconnect the call.
Use the headset button on your telephone to end the call.
Note!
The headset can be kept active, but that will drain the battery faster.
1.
2.
1.
2.
3.
4.
1
2

5
English
Option 3: Stand-alone installation (analog telephone line)
With this installation, you can receive calls only. Please note that the headset
must be in LINE MODE (T).
Connect the mains adapter to Y(green) and to an electrical outlet.
Connect the line cord to T(red) and to a telephone outlet (both RJ11 and
UK available).
Answer a call
On the headset, press qto answer an incoming call.
On the headset, press qagain to disconnect the call.
Note!
The ring volume will be very low with this option.
1.
2.
1.
2.
1
2

6
English
Option 4: Parallel phone installation (analog telephone line)
With this installation, you can make and receive calls using the analog phone
with the headset in LINE MODE (T).
Connect the mains adapter to Y(green) and to an electrical outlet.
Connect the line cord to T(red) and into the supplied splitter (both RJ11
and UK avaiable).
Connect the telephone’s line cord into the splitter and connect the splitter
to a telephone outlet.
Make/answer a call
Answer a call as described on previous page.
Use your telephone as normal to make/answer a call.
On the headset, press qto connect to the line. You can replace the
handset after you hear sound in the headset.
On the headset, press qagain to disconnect the call.
1.
2.
3.
1.
2.
3.
/
1
2
3

7
English
Range
The headset’s coverage varies depending on whether the radio waves carrying
the conversation are blocked by obstacles in their path (up to 50 m in a typical
ofceenvironment).Coveragecanbeimprovedbyturningone’sheadsothatthe
headset is aligned with the base unit.
Soundqualitydeclinesasthelimitisreacheduntilthecallisnallyinterrupted.
Headset positioners
Over-the-ear
To attach the ear hook to the headset:
Insert the earpiece into the ear hook and press it towards the earpiece until
it clicks into place.
Hook the headset onto the desired ear. Adjust the angle of the headset
until the microphone is pointing towards your mouth.
NOTE: You may rotate the hook to t either the right or left ear.
To remove, twist and pull the ear hook until it separates.
1.
2.
1
2

8
English
Over-the-head
To attach the headset to the headband for wearing on the left or right ear:
Insert the earpiece into the headband ring.
Push the earpiece towards the headband ring until it clicks into place.
Adjusttheheadbandtotyourhead.Adjustandrotatetheangleofthe
headset until the microphone is pointing toward your mouth.
NOTE: To wear on the other ear, rotate the headset within the headband ring.
To remove, twist and pull the headset until it separates from the ring of the
headband.
1.
2.
3.
12
3

9
English
Behind-the-neck
Theneckbandringispositionedtowearontherightearwhenrstpurchased.
To wear the headset on your left ear:
Remove the ring from the neckband by pulling the ring downwards.
Insert the ring into the left arm of the neckband.
To attach the headset to the neckband for wearing on the left or right ear:
Insert the earpiece into the neckband ring.
Push the earpiece towards the neckband ring until it clicks into place.
Place the neckband around your neck and over your ears and adjust and
rotate the angle of the headset until the microphone is pointing toward your
mouth.
NOTE: To remove, hold on both sides of the headset and twist and pull the
headset until it separates from the ring of the headband.
1.
2.
1.
2.
3.
1 2
3

10
English
Settings
q
PHONE MODE or TLINE MODE
There are two modes available on the headset base:
• PHONE MODE (q
): If you are connecting to a phone via the handset or
headset outlet or using the handset lifter (sold separately) (is the default).
-OR-
• LINE MODE (T): with a standard analog telephone line.
To change the mode:
In idle mode, press w on the headset base to select LINE MODE (T) or
PHONE MODE (q
). The corresponding light on the front of the headset base
will turn on to indicate the mode setting.
For full instructions on installing and using the handset lifter,
see the Lifter for hs1910 DECT manual.
Adaptation to different telephones
Termination
The base unit has a termination switch for adaptation to different telephone
systems. The switch can be set in different positions (A-G). If the headset does
not work, try all positions until both the receiver and sender have good sound
quality. Dis standard.
Adjustment of signal amplification
If necessary the sending level (your talk) can be adjusted in 5 stages with the
MIC. }(down)/{(up) on the speech.
Volume control
The volume can be adjusted during a call with the +vand -Vbuttons on the
headset. A “triple beep” is heard at the highest and lowest level respectively.
Mute button z/R
The microphone can be switched off/on during a call. Press z/Ron the headset
to turn off the headset microphone. When mute is on, the zlight on the headset
base will be on and a short beep will be heard every 15 seconds until mute is
turned off. Press z/Ragain to unmute the call.
Call waiting
If your phone line supports call waiting service, you will hear a beep if there is
an incoming call while you are already in a call. Press and hold z/R(2 sec.) on

11
English
the side of the headset to put your current call on hold and answer the new call.
You can press and hold z/Rat any time to switch back and forth between calls.
NOTE: R+ 2is sent through the line. Your telephone line must comply with this
code to work with call waiting.
The timing of the R (recall) is set for EU standard. If the headset should be used
in France, Portugal or under PABX with other line characteristics, please change
the setting as follows:
Press and hold wuntil T/q
/zon the base starts blinking.
Use MIC. {one base to select:
T100ms, all European countries except France and Portugal.
q
300ms, France and Portugal.
z600ms, New Zealand and USA.
Press wtoconrm.
Registration
Adding and registering headset
Your base can register up to two cordless headsets.
TherstregisteredheadsetwillhaveablueOlight. When you register a second
headset to the headset base the Olight of the headset will be orange. You
cannot register a headset if any headset is in use.
A headset can only be registered to one product at a time, so the headset must be
unregistered before registering to another headset base or cordless phone/system.
To register a headset to the headset base:
Make sure the battery is properly installed in the headset. Owillash
twiceeveryvesecondstoindicatetheheadsetisnotregistered.
On the headset base, press and hold Juntil zon the headset base turns
on (about four seconds) and release the button.
Place the headset into the headset base.
Registration may take up to 30 seconds to complete. zon the headset base will
turn off and Oof the newly registered headset will turn orange if registration is
successful.
If the registration is not successful, Oontheheadsetwillashtwiceevery
veseconds.Toresettheheadset,removetheheadsetfromthechargerandtry
the registration process again.
1.
2.
3.
1.
2.
3.

12
English
Replacing a headset
You may need to de-register your headsets if:
You have two registered headsets and need to replace one of them.
-OR-
You wish to change the designated headset number of your registered headsets.
Youmustrstde-registerbothheadsets,andthenre-registereachheadsetyou
wish to use. Please read carefully through all the instructions on this page before
beginning the de-registration process.
To de-register all headsets
Press and hold Jon the headset base until zon the headset base turns
onandstartstoash(atleast10seconds),thenreleasetheJbutton.
Immediately press and release Jagain. You must press Jwhile zis
stillashing.(Thelightashesforaboutsevenseconds.Ifthelightstops
ashing,startagainwithsteponeabove.)
z will be off and Oontheheadset(s)willashtwiceinafewseconds
indicating the headset is not registered.
To re-register the headset(s) to the headset base, follow the registration
instructions on previous page.
NOTE!
If the de-registration process was not successful, you may need to reset the
system and try again.
You cannot de-register the headsets if any other headset is in use.
Register the headset to a third party device
Prior to registration onto any other DECT-system you need to de-register the
headset from the base. You can register this headset onto most GAP-compatible
DECT-system, providing that they use PIN 0000.
This model is GAP (Generic Access Prole) prepared, which means that the
headset can be used with most other GAP compatible units irrespective of
manufacturer. However the GAP protocol cannot guarantee that all functions may
be accessed.
Beforeattemptingtoregistertheheadset,rstreadtheinstructionsfor
registering a new DECT handset in the manual supplied with your DECT system.
Registering the headset will be very similar and the information below describes
the registration sequence for a typical DECT telephone.
Change the system Authentication code of your DECT system to 0000 to
match the preset PIN of the headset. Your DECT telephone manual will
describe how to do this.
Note: Many DECT telephones already use 0000 as their default
Authentication code, so you may not need to change it.
1.
2.
3.
4.
1.

13
English
Set the DECT telephone base to subscription mode by following the
instructions in your DECT system manual.
Place the headset into the headset hs1910-base.
Complete registration by following any remaining instructions in your DECT
telephone manual.
Registration may take up to 60 seconds to complete. Oon the newly
registered headset will turn blue/orange if registration was successful.
If the registration is not successful, Oontheheadsetwillashtwiceevery
veseconds.Toresettheheadset,removetheheadsetfromthechargerandtry
the registration process again.
NOTE!
The headset MUST be de-registered from the active DECT system before being
registered to another. Follow you DECT system manual for instructions on how to
do this.
Sound/light descriptions
Headset alert tones
Three quick beeps. VOLUME }/{keys are pressed when the volume
is already at its highest or lowest setting.
The headset is not registered and the headset O
button was pressed.
The headset has gone out of the range of the base
during a call.
•
•
•
1 short beep every
20 seconds.
Low battery warning.
1 short beep every
15 seconds.
The call is muted.
1 long beep
repeated.
There is an incoming call.
1 short beep. When Ois pressed to go on-hook or off-hook.
2.
3.
4.

14
English
Headset qindicator status
On Headset is charging on the headset base.
Headset is trying to register to the headset base.
On when the headset is out of range.
•
•
•
Flash Thebatteryisverylow.Threeashesandpause,willrepeat
three times then shut down.
Flashestwiceeveryvesecondstoindicatethattheheadsetis
not registered.
Flashes every 20 seconds to indicate that the battery is low
and needs to be charged on the headset base.
Flashes every three seconds to indicate the headset is in use.
Flashes quickly when there is an incoming call.
•
•
•
•
•
Base indicator status
T
LINE MODE On when TLINE MODE is selected.
Flashes quickly when there is an incoming call.
Flashes when the headset is in use or another
telephone is in use on the same line.
•
•
•
q
PHONE MODE
On when q
PHONE MODE is selected.
Flashes quickly when there is an incoming call.
Flashes when the headset is in use.
•
•
•
z
MUTE On when a call is muted or you are registering
a headset.
Flashes when you are de-registering headset(s).
•
•

15
English
Troubleshooting
Disconnect any additional equipment, extension cords and other phones. If the
problem is resolved, the fault lies with another piece of equipment.
Check that all cords are undamaged and correctly plugged in.
Make sure that the battery connector is plugged into the cordless headset.
Charge the battery in the cordless headset for at least 4 hours. For
optimum daily performance, return the cordless headset to its base when
not in use.
Move the cordless headset closer to the headset base. You might have
moved out of range.
When the handset lifter is used, make sure PHONE MODE is selected on
the headset base and the headset is in use (pressing Oon the headset
and the q
ontheheadsetbaseashes).Slideonthesideofthe
headset base from A to G until the dial tone is clear.
If you subscribe to a high-speed Internet service (Digital Subscriber Line
-DSL)throughyourtelephonelines,youmustinstallaDSLlterbetween
thetelephonelinecordandthetelephonewalljack.Thelterwillprevent
noise caused by DSL interference.
Reset the headset base. Unplug the unit’s electrical power. Wait for
approximately 15 seconds, then plug it back in. Allow up to one minute for
the cordless headset and headset base to reset.
If despite the above measures the device still doesn’t work, contact the place
where the equipment was purchased for service. Don’t forget the receipt/invoice.
•
•
•
•
•
•
•

16
English
Others
Specific Absorption Rate (SAR)
This device meets applicable international safety requirements for exposure to
radio waves.
This device measures 0.02 W/kg (measured over 10 g tissue).
The max. limit according according to the WHO is 2W/kg (measured over 10 g
tissue).
Declaration of conformity
We hereby declare that the product ‘Prosound hs1910 DECT’ conforms to the
essential requirement and other relevant regulations contained in the directives
1999/5/EC(R&TTE), 2002/95/EC(ROHS). A copy of the manufacturer’s
declaration is available at: www.doro.com/dofc
Guarantee
This product is guaranteed for a period of 24 months from the date of purchase.
In the unlikely event of a fault occurring during this period, please contact the
place of purchase. Proof of purchase is required for any service or support
needed during the guarantee period.
This guarantee will not apply to a fault caused by an accident or a similar
incident or damage, liquid ingress, negligence, abnormal usage, non-
maintenance or any other circumstances on the user’s part. Furthermore, this
guarantee will not apply to any fault caused by a thunderstorm or any other
voltageuctuations.Asamatterofprecaution,werecommenddisconnecting
the device during a thunderstorm.
Batteries are consumables and are not included in any guarantee.
This guarantee does not apply if batteries other than DORO original batteries
have been used.
NOTE! This guarantee does not affect your legal (statutory) rights under your
applicable national laws relating to the sale of consumer products.
Specifications
Battery: 3.7 V, 240 mAh Lithium Polymer
Mains adapter: SW-6030090300,
INPUT: 100-240 VAC, 50-60 Hz, 200mA
OUTPUT: 6 VDC, 300 mA + 9VDC, 300 mA
Use only original battery and orignal power adapter.
Danger of explosion if battery is incorrectly placed.
Other manuals for Prosound hs1910
1
Table of contents
Languages:
Other Doro Headset manuals