Dragon War G12 User manual

User Manual
Professional Gaming Mouse

CONTENTS
PACKAGE CONTENTS / SYSTEM REQUIREMENTS / TECHNICAL SPECIFICATIONS. 2
GAMING MOUSE LAYOUT 3
INSTALLING YOUR DRAGONWAR RELOAD 4
CONFIGURING YOUR DRAGONWAR RELOAD 5
ASSIGN MOUSE BUTTON 6
BUTTON ASSIGNMENT MENU 7
AUTO RELOAD SETTING 8
SENSITIVITY OPTIONS 9
CREATING MARCOS 10
ASSIGN BUTTON TAB 11
MACRO MANAGER 12
PROFILE 13
POLLING RATE 14
• Dragonwar Reload Gaming Mouse
• User Manual
• Set Up CD Rom
PACKAGE CONTENTS / SYSTEM REQUIREMENTS
TECHNICAL SUPPORT
PACKAGE CONTENTS
• PC or Mac with a free USB 2.0 port
• Windows 7 / Windows Vista / Window XP / Mac OS X
• 2 years limited warranty
• Free online technical support at www.dragonwar.jp
SYSTEM REQUIRMENTS
TECHNICAL SPECIFICATIONS
• Customizable ergonomics to fit all hand sizes
• 3200dpi Blue-sensor system
• Gold plated connector
• Braided USB cable
• 512KB On-Board Memory
02Dragonwar

Dragonwar03
G12 GAMING MOUSE LAYOUT
AB
C
D
E
F
G
H
A. Left Mouse Button
B. Right Mouse Button
C. Scroll Up
D. Scroll Down
E. Gun Change / Function Key
F. Sensitivity Stage Change
G. Forward
H. Backward
04Dragonwar
INSTALLING YOUR DRAGONWAR G12
Step 1: Plug the Dragonwar G12 into the USB port of your computer.
Step 2: Run the installer and follow the Programme.
Step 3: Wait until the software automatically downloads and installs.
Step 4: Open the programme,then set up

Dragonwar05
MOUSE TAB
CONFIGURING YOUR DRAGONWAR G12
The Mouse Tab is your default tab when you first install Programme.This tab allows
you to customize your device’s profiles, button assignments, performance,lighting
and auto reload setting.
ASSIGN BUTTON
GAME PROFILES
CREATE PROFILE
LOAD PROFILE
PROFILE 1
PROFILE 2
PROFILE 3
PROFILE 4
PROFILE 5
SAVE PROFILE
EDIT PROFILE
1. Click
2. Menu
3. Scroll up
4. Wheel click
5. Scroll down
6. Auto Reload
7. CPI cycle
8. IE Forward
9. IE Backward
OK
CANCEL
APPLY
GAME PROFILES
GAME SETTNG
AUTO RELOAD
SENSITIVITY
ADVANCED SETTING
ASSIGN BUTTON
PROFILES
SYSTEM PROFILES
ASSIGN L & R CLICK
RELOAD SPEED
RELOAD SPEED
AUTO RELOAD
AUTO RELOAD
ON
OFF
Bullets : 1
Bullets : 2
Full Auto
6
1
32
10Dragonwar 06Dragonwar
ASSIGN MOUSE BUTTON
which you can choose from the Assign Button submenu:
Initially, each of the mouse buttons is set to DEFAULT.
Left Click - Performs a left mouse click using the assigned button.
Menu - Performs a right mouse click using the assigned button.
Scroll Up - Performs a“Scroll Up”command using the assigned button.
Wheel Click - Activates the universal scrolling function.
Scroll Down - Performs a“Scroll Down”command using the assigned button.
Auto Reload - Switch Pistol or Machine Gun Mode in the Game
DPI Cycle - Adjusted sensor resolution of 800/1600/2400/3200 DPI
IE forward - Performs a“Backward” command for most internet browsers.
IE backward - Performs a “Forward” command for most internet browsers.
1
2
3
4
5
6
7
8
9
1 2
3
4
5
6
7
8
9

08Dragonwar
BUTTON ASSIGNMENT MENU
Each of the mouse buttons is set to DEFAULT. However, you may change the
function of these buttons by clicking the desired button to access the BUTTON
ASSIGNMENT Menu.
5. Click on the Profiles button at the main menu
to release the Assign Button menu.
6. Please confirm if Button 6 is assigned Auto Reload
function. If not, please assign it.
(Once the button 6 has set, you may switch Pistol
or Machine gun mode in the game by just press
this button on the mouse.)
7. Click on Apply and Exit buttons at the Main Menu.
8. Enjoy your new weapon.
ASSIGN BUTTON
GAME PROFILES
CREATE PROFILE
LOAD PROFILE
PROFILE 1
PROFILE 2
PROFILE 3
PROFILE 4
PROFILE 5
SAVE PROFILE
EDIT PROFILE
1. Click
2. Menu
3. Scroll up
4. Wheel click
5. Scroll down
6. Auto Reload
7. CPI cycle
8. IE Forward
9. IE Backward
AUTO RELOAD SETTING
1. Click on the Auto Reload button at the
main menu to release the setting window.
2. Input the number of your magazine capacity
- Pistol : User set 2 shots less than the actural
capacity of the magazine usually.
- Machine Gun Single Shot : Same as Pistol.
- Machine Gun Continuing Shoots : Please
click on the Full Auto button.
3. Reload Speed : Default rate is suggested
speed rate for most shooting games.
4. Click on the ON button to enable the
Auto Reload function.
RELOAD SPEED
RELOAD SPEED
AUTO RELOAD
AUTO RELOAD
ON
OFF
Bullets : 1
Bullets : 2
Full Auto
Dragonwar07

ASSIGN BUTTON
GAME PROFILES
CREATE PROFILE
LOAD PROFILE
PROFILE 1
PROFILE 2
PROFILE 3
PROFILE 4
PROFILE 5
SAVE PROFILE
EDIT PROFILE
1. Click
2. Menu
3. Scroll up
4. Wheel click
5. Scroll down
6. Auto Reload
7. CPI cycle
8. IE Forward
9. IE Backward
10Dragonwar
CREATING MARCOS
Assign Marco
Multimedia
Profile
CPI switch
Windows
Click
Menu
Wheel click
Double click
Assign a shortcut
Button of
IE Forward
IE Backward
Scroll up
Scroll down
Tilt Left
Tilt Right
Assign a launch
Fire button
On-To-Go
Windows key
Open driver
Marco Manager
Test
Test 2
If the button function or key is not listed, or if you would like to assign a marco to a
button, select“Marco”from the menu.In addition, all saved marco will be shown on a
sub menu for quick selection when you mouse over the“Marco”option.
Sensitivity pertains to how much effort is needed to move the mouse pointer in any
direction.The higher the sensitivity, the more responsive the mouse will be.
By default, the X-axis (horizontal) and Y-axis (vertical) use the same sensitivity values.
However, you may set different sensitivity values to each of the axes by selecting the
ENABLE X-Y SENSITIVITY option.
SENSITIVITY OPTIONS
Enable X - Y Sensitivity
SENSITIVITY OPTIONS
SYNCHRONOUS TRACKING
DPI LEVEL 1
800
0 20Hz-20Hz-60Hz-100Hz 60Hz 100Hz
1200
1600 2000
2400 3200
4000 5600
DPI LEVEL 2
DPI LEVEL 3
DPI LEVEL 4
1. Select the number of sensitivity
stage needed.
2. Click on the stage you would like to
preset and adjust using the arrow on
the slider below.
3. Click“Apply” when done.To switch
between different sensitivity stages,
simply assign the Sensitivity Stage Up
and Sensitivity Stage Down functions
to the desired buttons.
Dragonwar09

To create a marco command, simply click the START RECORD button. Once you have
recorded a macro, you may edit the commands you have entered by selecting each
command on the macro screen.
MARCO MANAGER
MACRO MANAGER
MACRO SELECT
NEW
OK CANCEL
DELETE
KEY PRESS
SEQUENCE
RECORD
OPTIONS
START RECORD
RECORD
DELAYS
BETWEEN
KEY
COMMANDS
REPEAT
test
test 2
A. Load the Marco Manager and click
on the Marco Select tab.
B. Click “Record” to start creating a
macro.
C. Type in the desired sequence of
keystrokes, then click “Stop” to
end the recording.
D. Click “Apply” when done.
12Dragonwar
CLICK
ASSIGN BUTTON TAB
In the Assign Buttons tab, you can assign various functions to each of the buttons
based on your own preferences.
Perform a left mouse click
MENU
Open a context-sensitive menu
IE BACKWARD
Assign a“Backward” command in Windows Explorer / Internet Explorer.
WHEEL CLICK
Click once on the assigned button to activate scroll wheel. Drag your Dragonwar
G12 to scroll in the direction of the mouse movement.
IE FORWARD
DPI CHANGE
Assign the DPI speed up
SCROLL UP
Scroll up the page you currently viewing
AUTO RELOAD
Assign M button + AUTO RELOAD = auto reload
Assign a“Forward” command in Windows Explorer / Internet Explorer.
Dragonwar11

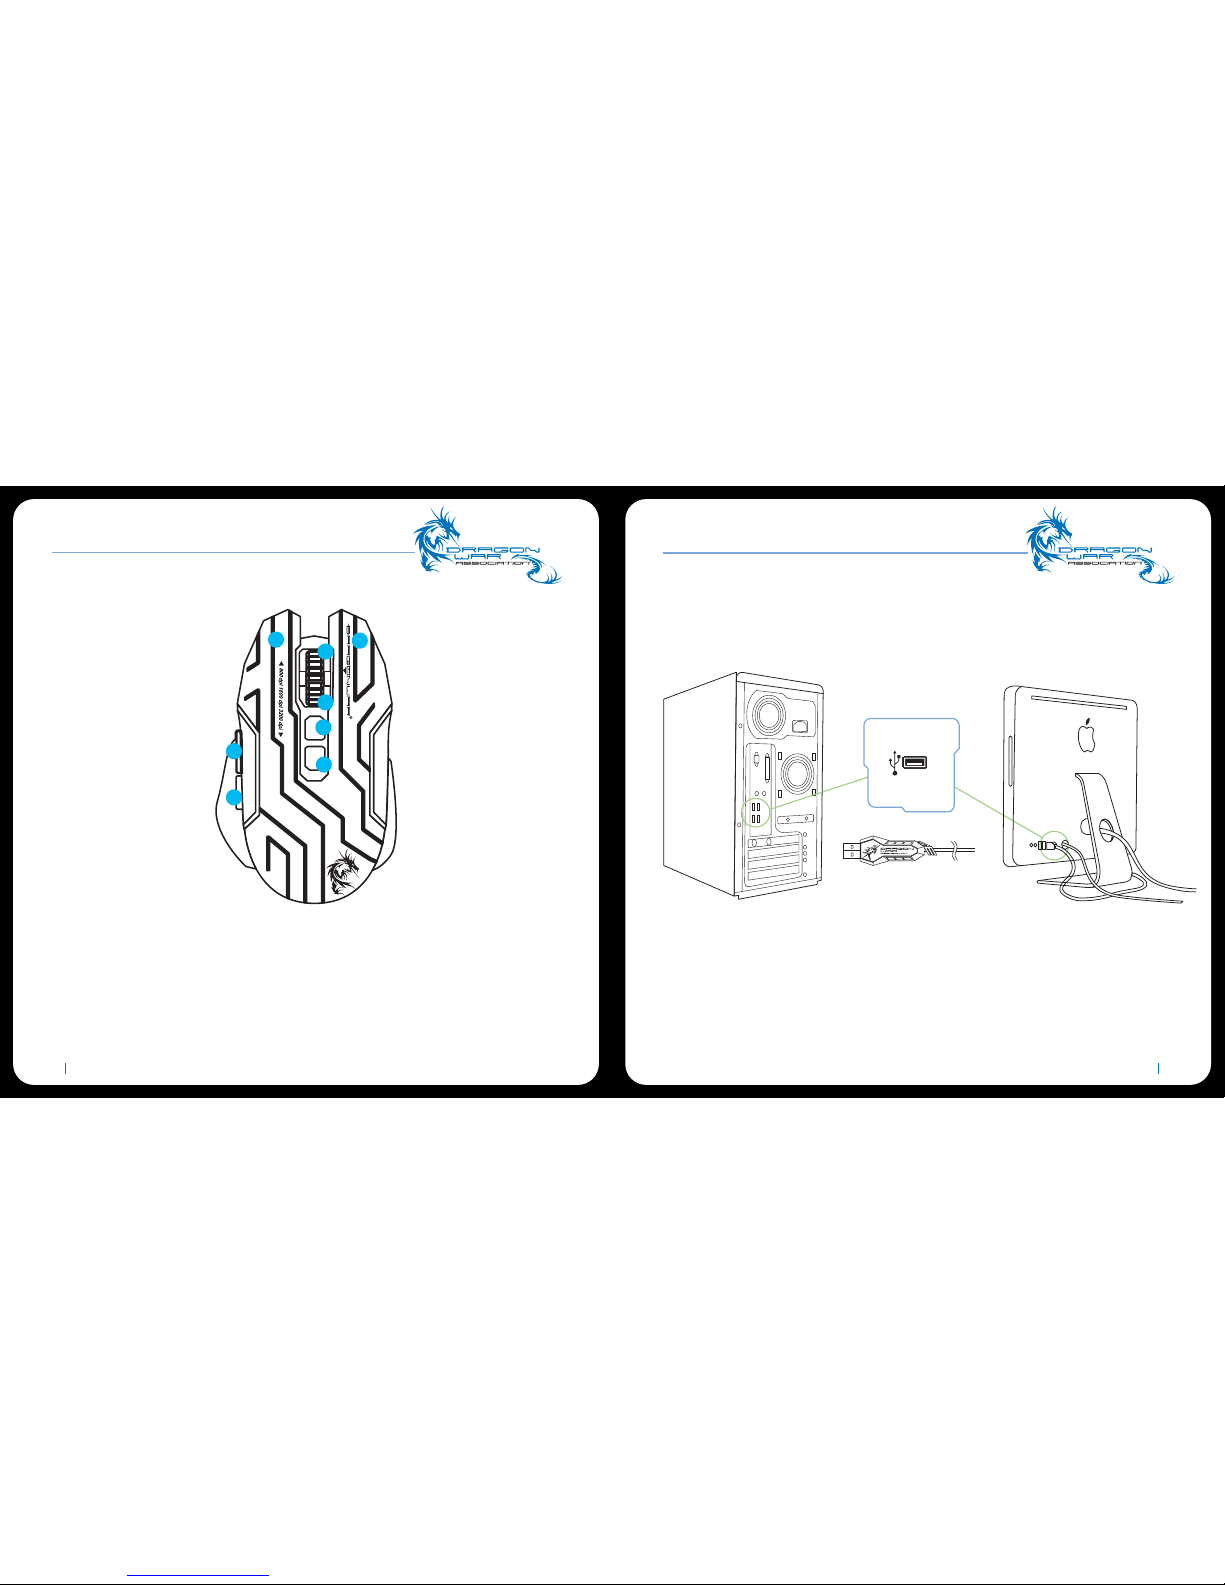
The higher the polling rate, the more often the computer receives information about
the status of your mouse,thus increasing the mouse pointer’s reaction time.You can
switch between 125Hz (8ms), 500Hz (2ms) and 1000Hz (1ms) by selecting your desired
polling rate on the dropdown menu.
POLLING RATE
LIGHT EFFECT
POLLING RATE
BREATHING
CHOOSE A SINGLE COLOR
RESET TO FACTORY DEFAULT
ON - TO - GO SPEED
DEFAULT
RED
ORANGE
PINK
2ms 125ms 255ms190ms65ms
GREEN
BLUE
ON
125
Hz 250
Hz 500
Hz 1000
Hz
OFF
FULL LIGHT
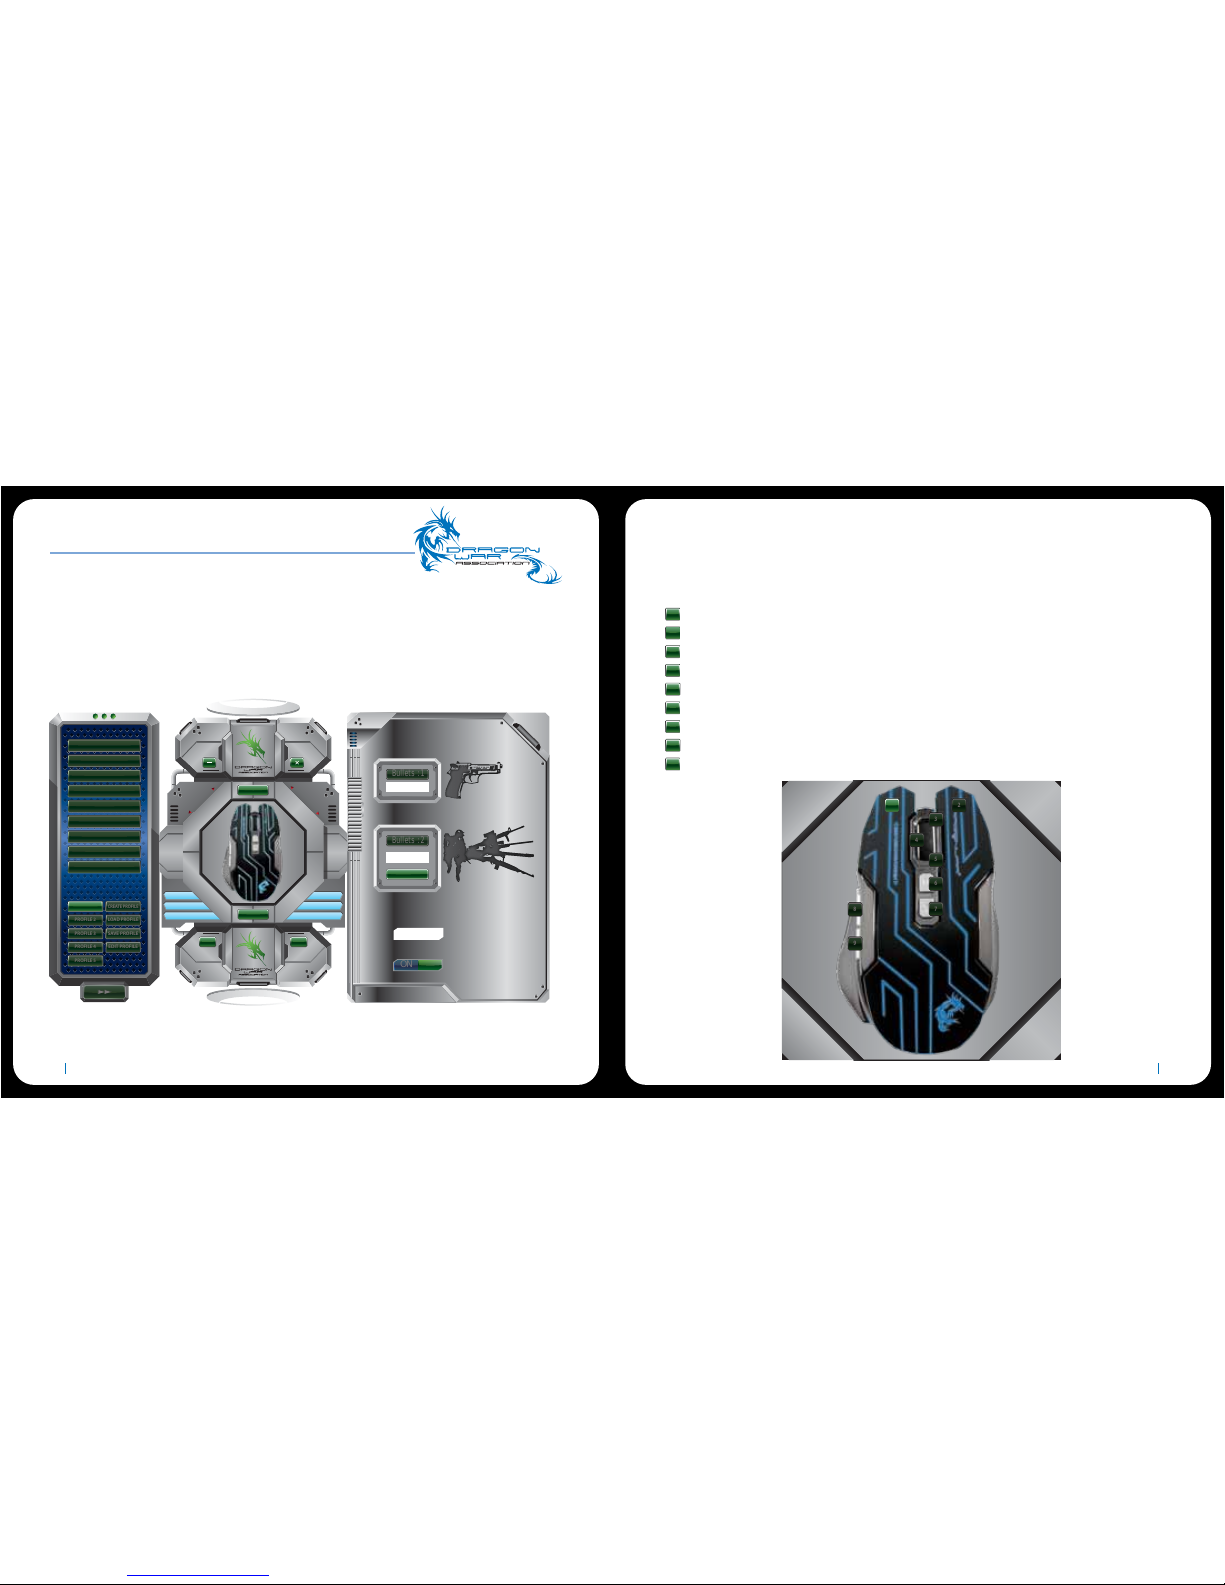
The light Effect allows you to configure the LEDs of your Dragonwar Reload.You can
set the lighting to Breathing, Full light. Similar to the previous tabs, the changes made
here are also automatically saved to your current profile.
LIGHT EFFECT
14Dragonwar
PROFILE
Profile contains the default settings of your device.Any changes made within each
tab will automatically be saved into the current profile.If you want to rename this
profile, you may do so by typing on the field below PROFILE NAME.
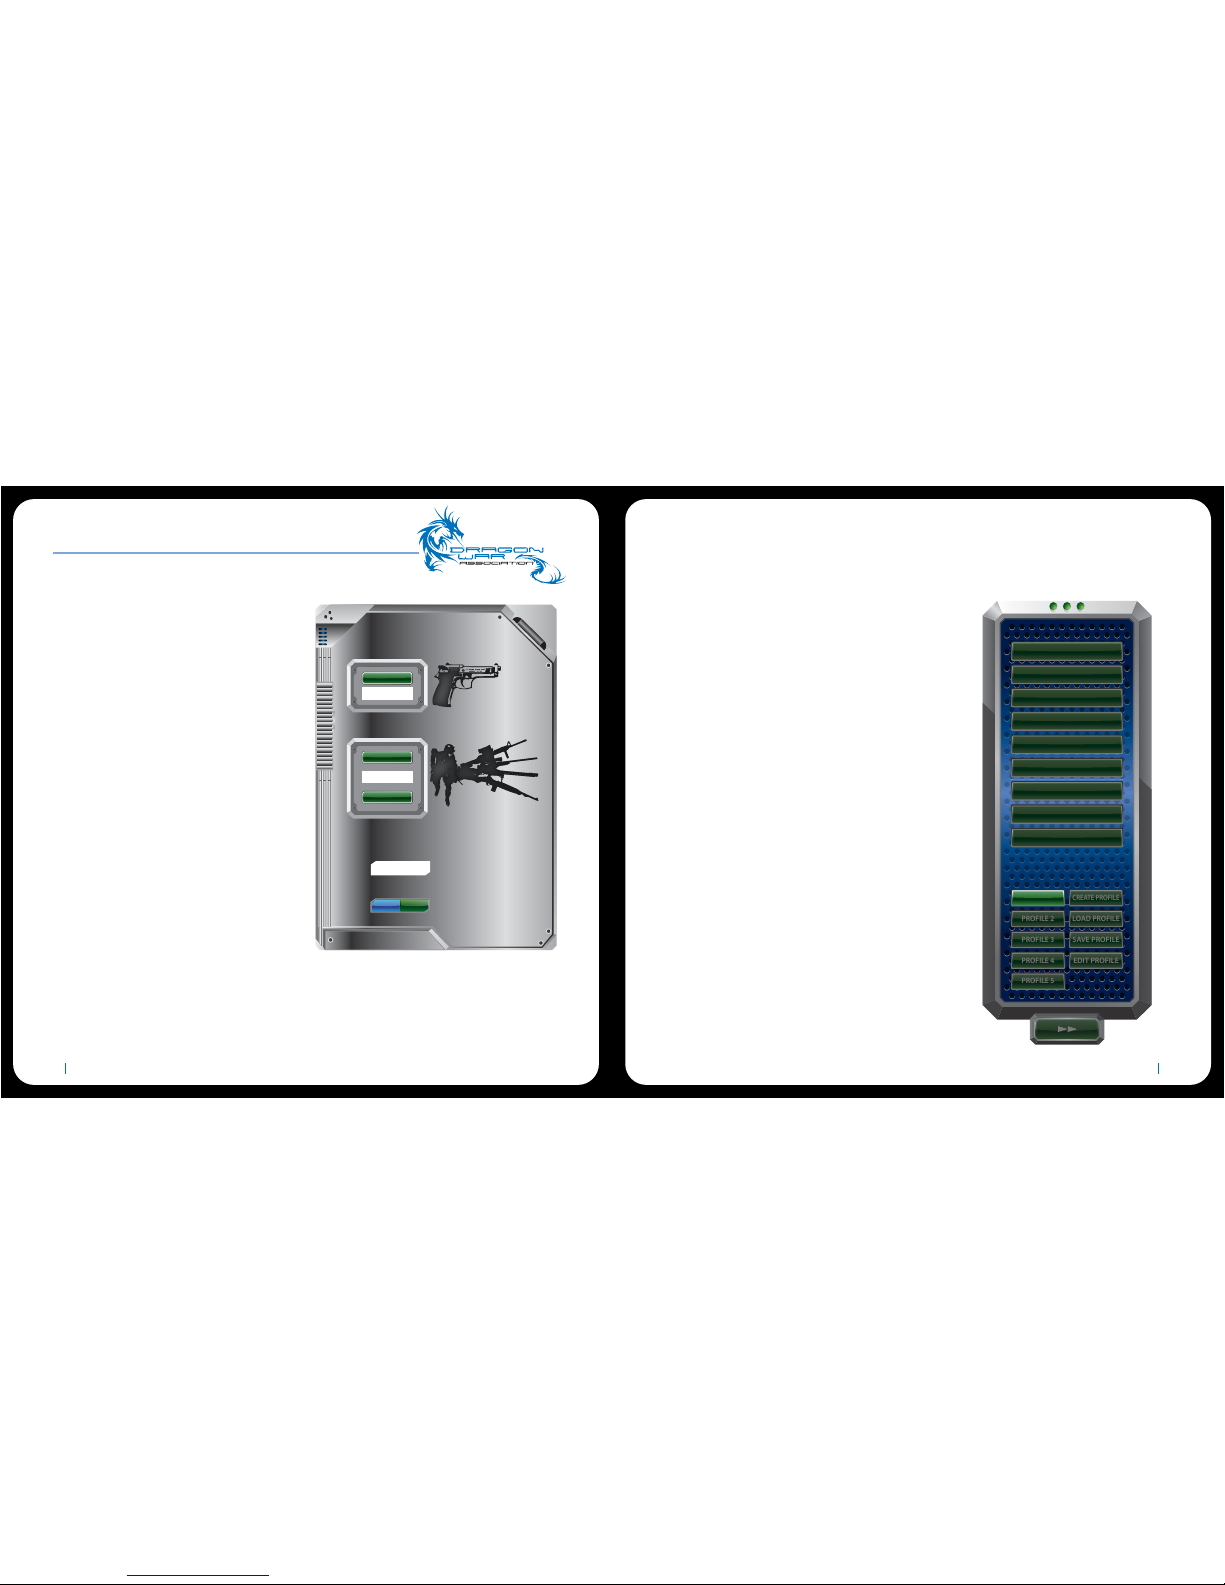
CREATE / EDIT GAME PROFILE
GAME PROFILE INFORMATION
PROFILE NAME
PATH TO EXECUTABLE (*.EXE)
PROFILE NAME :
Here you can give your game profile name
PATH TO EXECUTABLE:
This is the path to executable file of the game
you want the game profile to be assigned to if
you start the game the driver will automatically
load the right game profile from one of the 5 slots.
OK CANCEL
a. Profile Name: Enter a profile name
of your choice.
b. Path to executable (*.exe): Enter a
You can even set a profile to work with
a specific program or application by
using the LINK PROGRAM option and
clicking the button to search for it.
Dragonwar13
Table of contents
Other Dragon War Mouse manuals