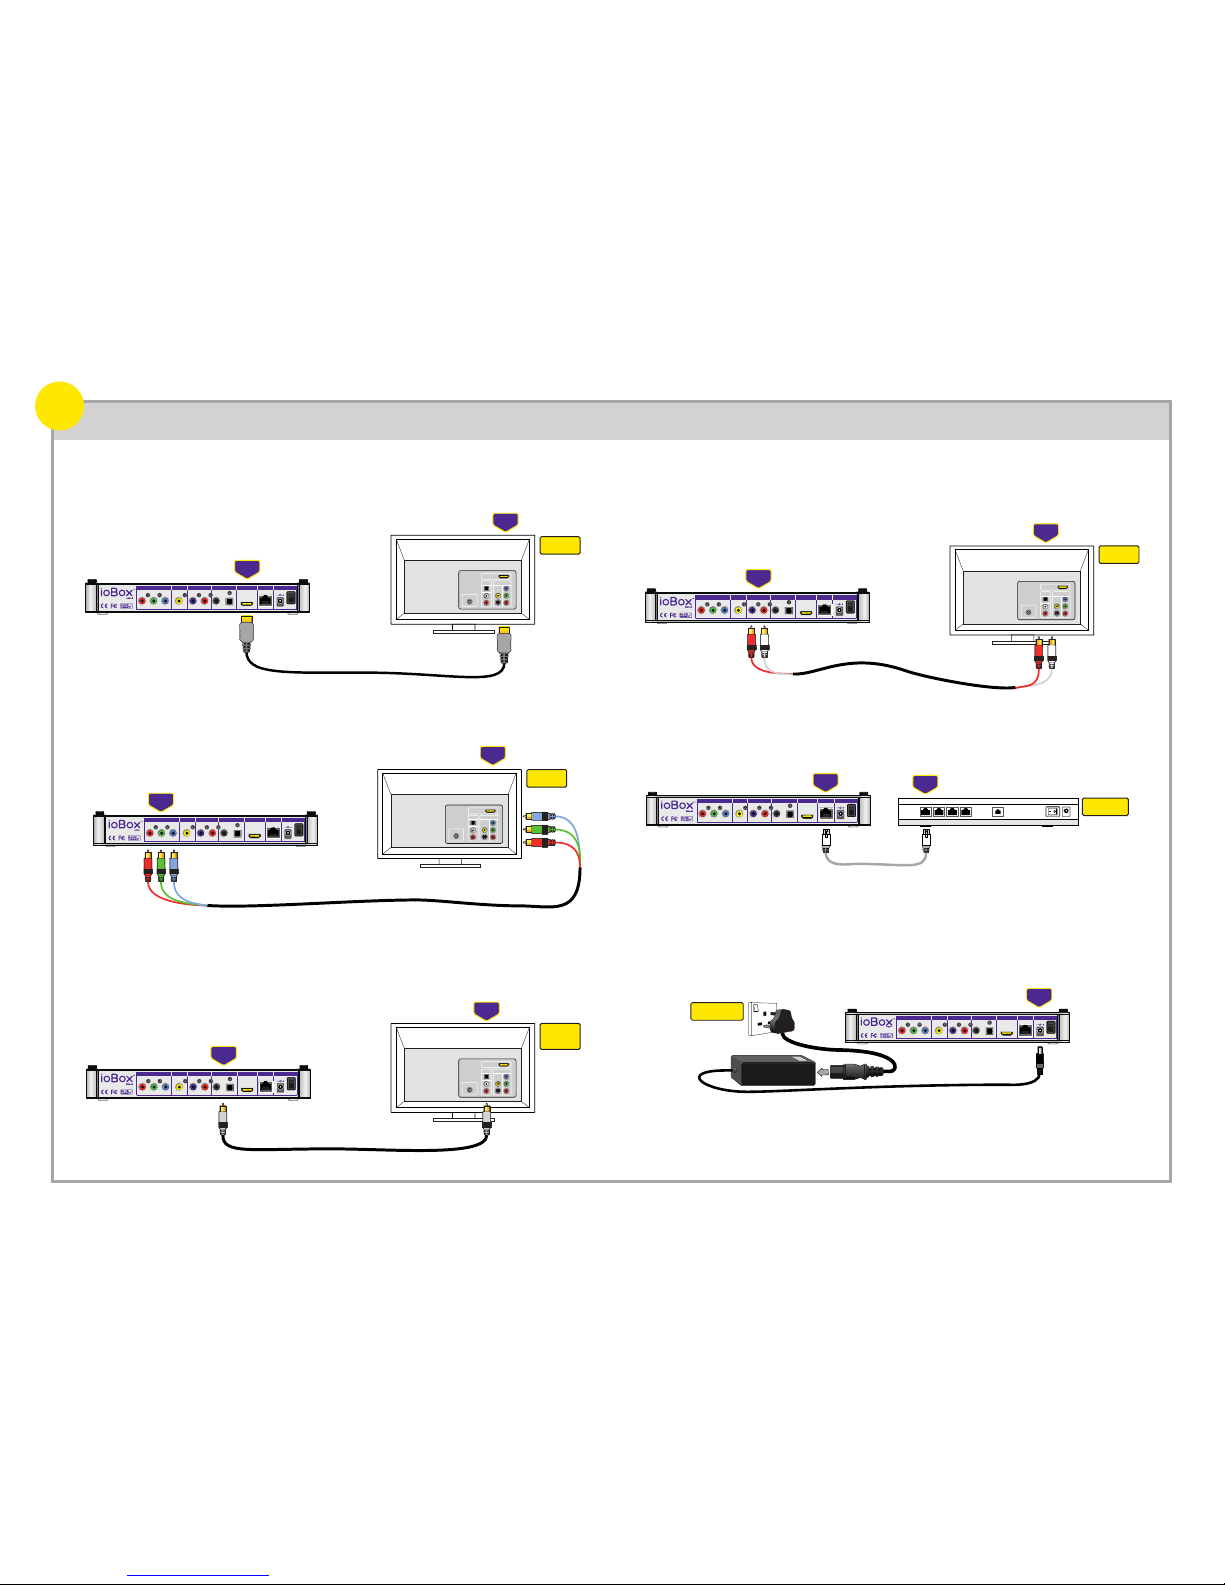
Dragontech ioBox-100HD User manual

V1.0
User Manual
www.dragontechcorp.com
© Copyright 2008, Dragontech Corporation Ltd. All rights reserved. ioBox is a registered trademark of Dragontech Corporation Ltd. Networked Media
Tank is a trademark of Syabas Technology. Other product and company names mentioned herein may be trademarks of their respective companies.
Dragontech Corporation Ltd may make changes to specifications and product descriptions at anytime, without notice.
For further help, please visit
www.ioboxhd.com and
www.networkedmediatank.com
For further help, please visit
www.ioboxhd.com and
www.networkedmediatank.com

YPbPr
12V DC
POWERLANHDMIDIGITAL AUDIOANALOG AUDIO
OPTICALCOAXLPr Y Pb R
VIDEO
Please confirm that the package includes the following items, and that those items are in good condition:
ioBox-100HD high definition network media player
Universal power adapter (100v-240v) with power cord
Remote control with 2 AAA batteries
USB slave cable
HDMI cable
4 screws for 3.5" HDD installation and 4 smaller screws for 2.5" HDD installation
This User Manual
If you find that anything is missing or damaged after opening the package, please contact your reseller.
Familiarise yourself with ioBox-100HD
Unwrap the package Remote control hints
2
31
Turn the remote control over.
Remove the battery compartment cover by placing
your thumb in the indent and carefully sliding it
backwards.
Insert the 2 AAA batteries (provided) into the slots,
taking special care to aline the positive (+) and negative
(-) ends of the batteries with the diagram inside the
compartment.
Replace the cover by sliding it horizonally from the back
of the remote control. It will click firmly into place.
1
2
3
4
5
6
7
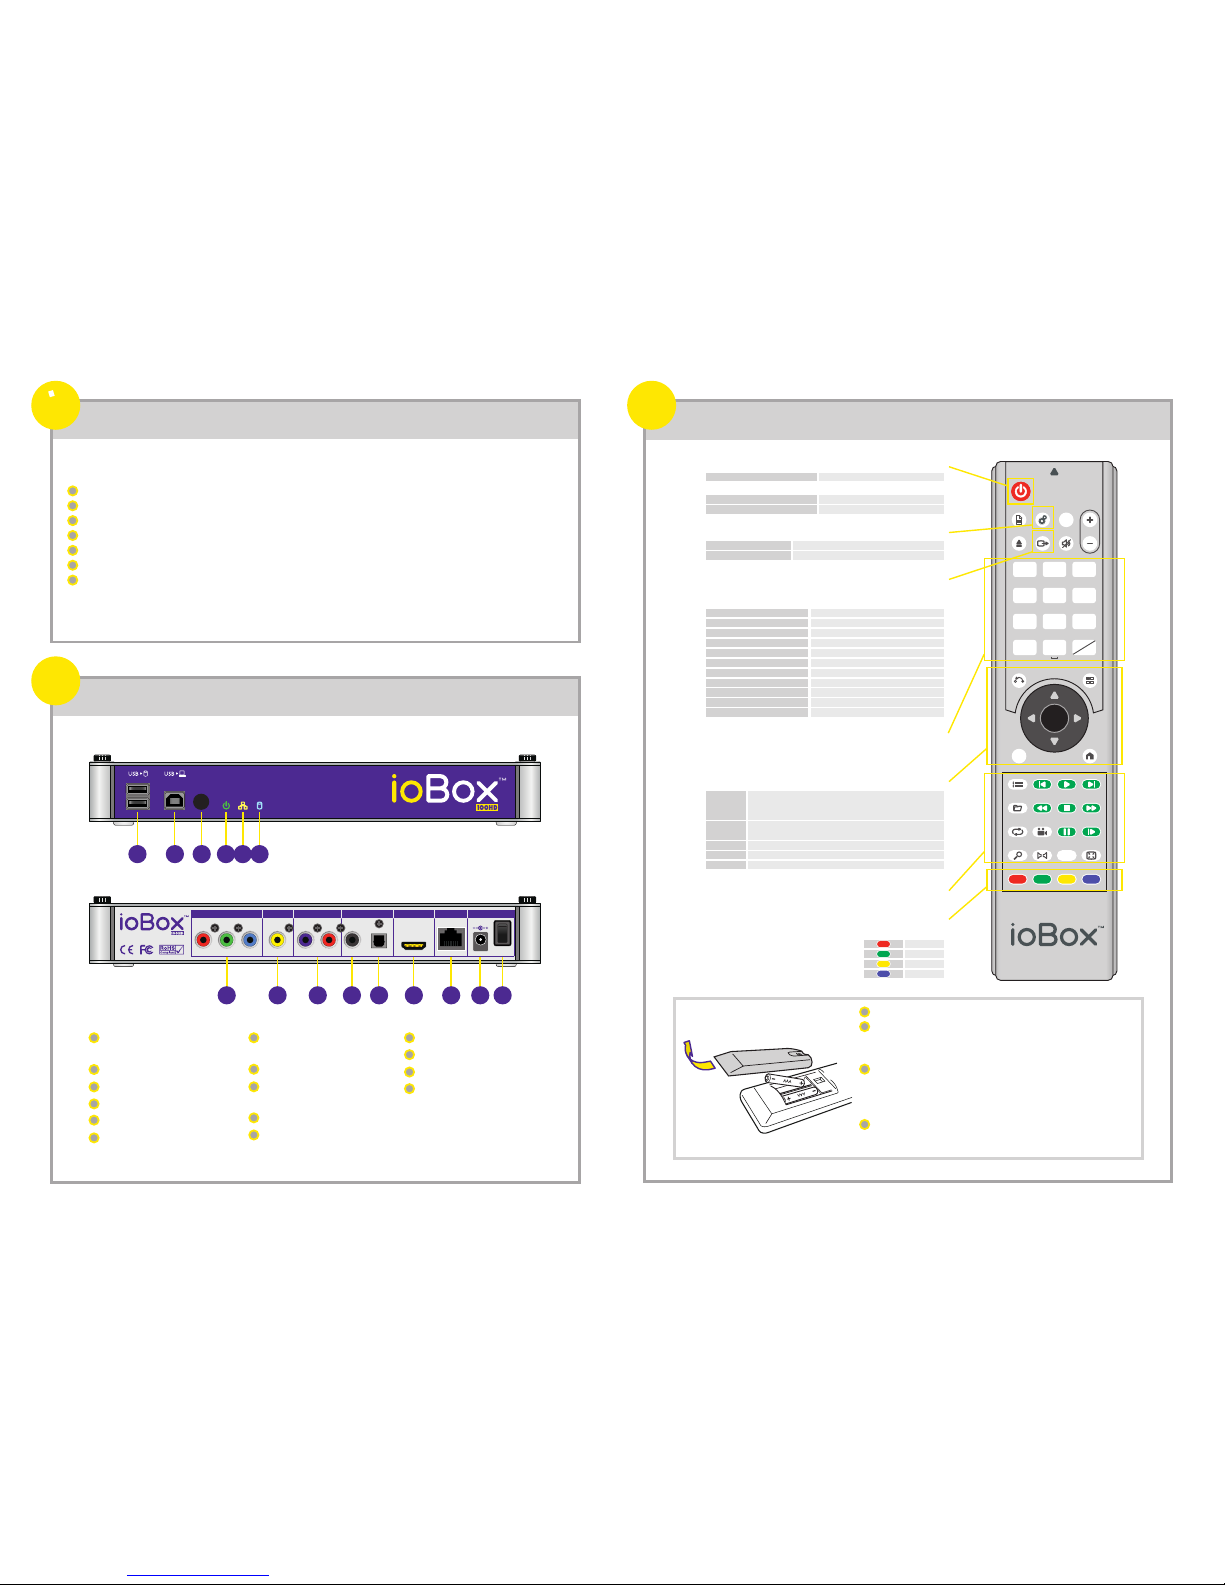
USB 2.0 host ports (to
external DVD-ROM/disks)
USB 2.0 slave port (to PC)
IR receiver
Power indicator
Network activity indicator
Hard disk activity indicator
Component video output
(YPbPr)
Composite video output
Analogue audio output
(stereo left and right)
Coaxial digital audio output
Optical digital audio output
HDMI digital video output
Local Area Network (LAN)
Power socket
Power switch
7 8 9 10 11 12 13 14 15
2 3 4 5 61
1
2
3
4
5
6
7
8
9
10
11
12
13
14
15
1 2 3
4 5 6
7
DELETE
BT
ENTER
AA
CAPS
NUM
8
0
9
i
ABC
RETURN
FILE MODE SETUP SUSPEND
EJECT TV MODE MUTE
INFO
MENU
TITLE
REPEAT
TIME SEEK AUDIO SUBTITLE ZOOM
ANGLE
HOME
SOURCE
.:/@ DEF
GHI JKL MNO
PQRS TUV WXYZ
VOL/
PAGE
Front panel
Rear panel
TV MODE + 0 Auto TV mode
TV MODE + 1 Component/Composite NTSC 480i
TV MODE + 2 Component/Composite PAL 576i
TV MODE + 3 reserved
TV MODE + 4 Component 720p60
TV MODE + 5 Component 1080i60
TV MODE + 6 Component 1080p60
TV MODE + 7 HDMI 720p60
TV MODE + 8 HDMI 1080i60
TV MODE + 9 HDMI 1080p60
TV MODE + CAPS/NUM Toggles between 50Hz and 60Hz
1
2
3
4
Fitting the remote control
batteries
POWER only: Standby
Within 5 seconds after pressing POWER button:
POWER + EJECT: Soft reset
POWER + DELETE: Shutdown
On Menu screen: Enters the setup page
During video playback: Adjusts brightness, contrast etc
SOURCE:
HOME:
ARROWs:
ENTER:
RETURN:
Lists all available media sources such as internal
HDD/USB HDD/SMB/NFS etc.
During DVD playback: Repeat Chapter/Title
Enters the Movie, Music, Picture, Text selection screen.
During DVD playback: Repeat A/B
Navigates the menus
Executes a command or plays ONLY the selected file(s)
Returns to the previous menu
Video
Music
Photo
Others
POWER
SETUP
TV MODE
Within 5 seconds after pressing TV MODE button, pressing a
numeric button will change the video outputs and resolutions:
During media playback, these will jump to a percentage
of the length of the file. e.g. 1=10%, 2=20%
Navigation buttons
Numeric buttons
DVD style playback control buttons
Coloured buttons
When in File Mode:

Installing internal Hard Disk (optional)
4
a
c
b
d
e
g
f
Before installation, please make sure you have all the following items:
Remove the 4 screws
shown in the diagram and
lift off the top cover.
Make sure all the cables, including power cord, have been disconnected from the
ioBox-100HD.
Place your hard disk onto the base of ioBox-100HD in the space provided, with the
label side of the hard disk facing towards you, and the SATA connector of the hard
disk facing towards the SATA adapter on the system board.
Align the disk's SATA connector with the SATA adapter of the system board and
push the hard disk towards it until the disk's SATA connector has been fully inserted
into the SATA adapter.
Carefully support the weight of the hard disk and turn over the case with a finger
firmly pressing the hard disk. Now, the four screw holes on the bottom should align
with the four screw holes of the hard disk.
Fasten the 4 screws provided through the baseplate and into the disk (the smaller
screws are for a 2.5" HDD)
Reinstall the top cover and screws to finish.
3.5" HDD
2.5" HDD
3.5" HDD
2.5" HDD
A flat, clear space to work on, free of dust, dirt and moisture.
Philips screwdriver
4 HDD screws (provided)
A 3.5" or 2.5" SATA hard disk
1
2
3
4
2.5" Hard Disk Drive

Television
YPbPr
(component)
YPbPr
(component)
Audio Video
Antenna
HDMI
INPUTS
Television
HDMI
Audio Video
Antenna
HDMI
INPUTS
HDMI
HDMI
HDMI
HDMI is the highest quality video output from ioBox-100HD and can also carry multi-channel audio,
reducing cabling.
In order to get High Definition video from ioBox-100HD without HDMI, a Component (YPbPr) cable
must be used.
If you are connecting the audio to an AV Receiver or to an HDTV without HDMI, the best quality
connection to use is one of the digital audio outputs - either Coaxial or Optical.
Video+Audio for HDMI-equipped HDTVs
Video for HDTVs without HDMI
Audio for AV Receivers or HDTVs without HDMI
Many TVs don't accept a digital audio signal, in which case the analogue stereo audio outputs of
ioBox-100HD can be used. You may also want to use this connection to a Hi-Fi system for music.
Audio for HDTVs without HDMI or a digital connection
Simply use a Cat. 5 network cable to connect ioBox-100HD to your home network.
Network connection
Insert the power cord into a suitable power outlet and the 12v DC plug into ioBox-100HD.
Note: The appearance of the plug and transformer will vary from country to country.
Power connection
Cabling
5
Ethernet
Network Ethernet
Network
Network
Hub/Router
Television
Analogue
Audio
Audio Video
Antenna
HDMI
INPUTS
Analogue
Audio
Television
or
Receiver
Audio Video
Antenna
HDMI
INPUTS
Coax or
Optical
Coax or
Optical
in
12V DC
100v-240v AC
Power Outlet
(cable not included)
YPbPr
12V DC
POWERLANHDMIDIGITAL AUDIOANALOG AUDIO
OPTICALCOAXLPr Y Pb R
VIDEO
YPbPr
12V DC
POWERLANHDMIDIGITAL AUDIOANALOG AUDIO
OPTICALCOAXLPr Y Pb R
VIDEO
YPbPr
12V DC
POWERLANHDMIDIGITAL AUDIOANALOG AUDIO
OPTICALCOAXLPr Y Pb R
VIDEO
YPbPr
12V DC
POWERLANHDMIDIGITAL AUDIOANALOG AUDIO
OPTICALCOAXLPr Y Pb R
VIDEO
YPbPr
12V DC
POWERLANHDMIDIGITAL AUDIOANALOG AUDIO
OPTICALCOAXLPr Y Pb R
VIDEO
YPbPr
12V DC
POWERLANHDMIDIGITAL AUDIOANALOG AUDIO
OPTICALCOAXLPr Y Pb R
VIDEO

Please ensure your display has been correctly connected and powered on.
Power on the ioBox-100HD via the rear power switch.
A welcome screen will appear, followed by a menu listing of the available media sources
(the boot process of the ioBoxHD will take about 1 minute).
From time to time, new firmware is released to add new enhancements and fix reported problems.
Please visit www.ioboxhd.com/downloads.html to download the latest firmware for
ioBox-100HD, and de-compress the files to the root directory of a USB flash drive.
Please visit www.ioboxhd.com/downloads.html to download the latest firmware for
ioBox-100HD, and de-compress the files to the root directory of a USB flash drive.
Plug the USB flash drive into the player and browse it.
Select the fourth media type (Text)
and then press ENTER.
Select the html file (e.g. usbupdate.html), and press ENTER.
Choose the firmware version, and press ENTER.
The system will perform firmware upgrade
automatically.
Important! Don't interrupt the update process.
Once the process is finished, the system will restart.
If you cannot see this screen,
please make sure you have selected
the correct input from your HDTV.
You may also need to use TV
MODE + numeric button on the
remote control to select a correct
output mode for ioBox-100HD.
Now you may customize the player and select your preferences. Press SETUP on the
remote to enter setup menu, and then select Preferences and Audio/Video for common
settings.
Congratulations - ioBox-100HD is now ready to use! Most users can stop here and enjoy this new
toy. Advanced users may go to section 7.
The first power up
6Firmware upgrade (optional)
7
a
c
b
a
c
b
d
e
f

NMT (Networked Media Tank) applications are a set of advanced network applications which enable the
ioBox100-HD to work as a Samba file server, Torrent server, uPnP AV server and more. You MUST have
installed an internal HDD (section 4) in order to install NMT applications.
Before starting the setup process, please download the latest firmware for ioBox-100HD from
www.ioboxhd.com/downloads.html, then de-compress the files to the root directory of a USB
flash drive (if you did not do it in section 7).
Before starting the setup process, please download the latest firmware for ioBox-100HD from
www.ioboxhd.com/downloads.html, then de-compress the files to the root directory of a USB
flash drive (if you did not do it in section 7).
Plug in the USB disk and then press
"SETUP" on the remote. Use the arrow
and Enter buttons on the remote to select
"Maintenance", and then select "NMT
setup wizard".
The NMT installation wizard will appear.
If you installed NMT in the hard disk
before, please select "Typical Setup",
otherwise please select "Fresh Setup".
Choose "next" to continue.
Warning! This will format the hard disk
and erase all the data on it. The HDD
will be formatted as Linux EXT2/EXT3
file system, which is not recognized by
Windows unless you install a 3rd party
driver on your Windows PC.
Choose hard disk and file system for the
hard disk. EXT3 is recommended.
Choose "next" to continue.
A warning message appears.
Choose "next" to continue again.
Please select USB and then choose "next"
to start the installation process.
After installation has completed, ioBox-100HD will restart.
Installing NMT applications (optional)
8
a
c
b
d
e