DrBrowns Customflow BF100 User manual

Customow™
Double Electric Breast Pump
with SoftShape™Silicone Shields
Model Number BF100
E506451

INTENDED USE
EN
For lactating women to express and collect milk from their breasts to complement breastfeeding.
Unless otherwise advised by your healthcare professional, it is best to wait until your breastfeeding
routine is established (approximately 4 weeks) before expressing breast milk. If you are exclusively
pumping for a medical or non-medical reason, it is recommended to contact your healthcare provider
on when to begin pumping.
Product Description
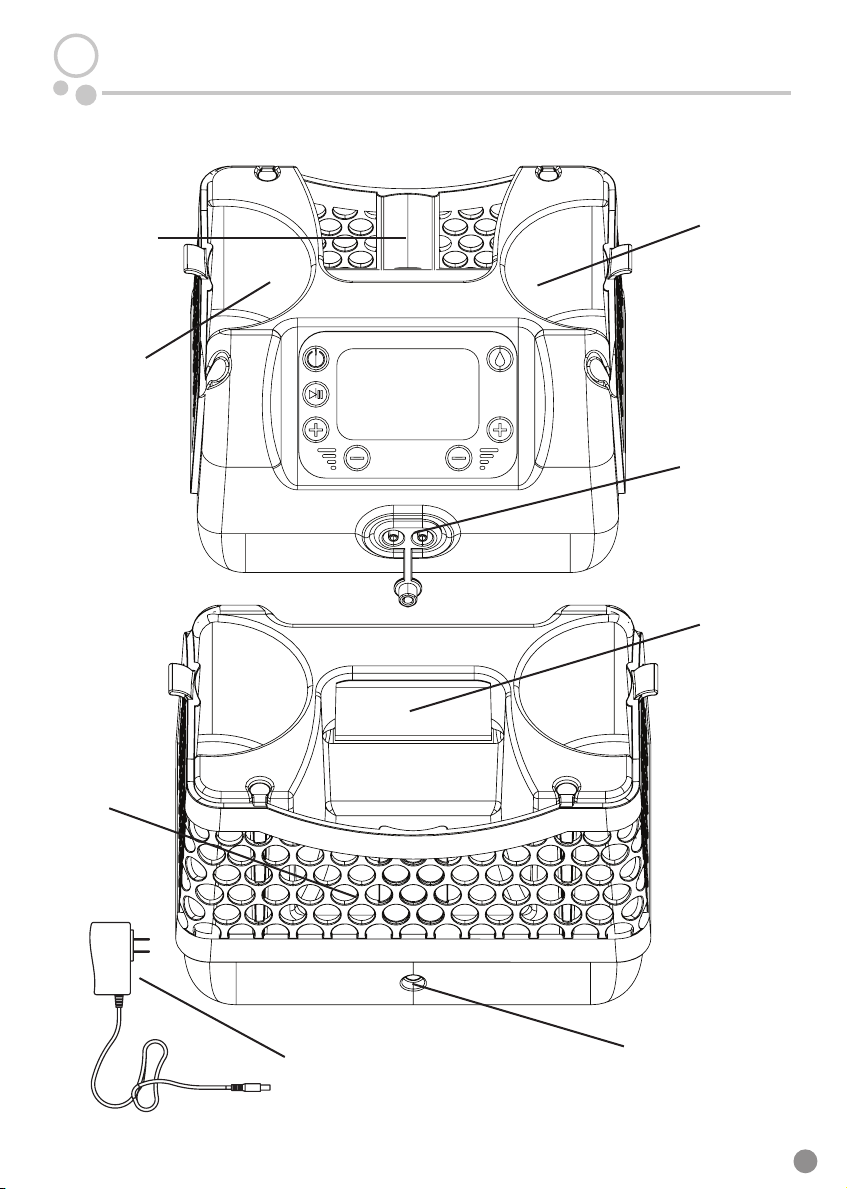
The Dr. Brown’s®Customflow™ Double Electric Breast Pump is a personal use electric breast pump
capable of double pumping. The device is electrically powered from an external AC powered supply
and is provided non-sterile.
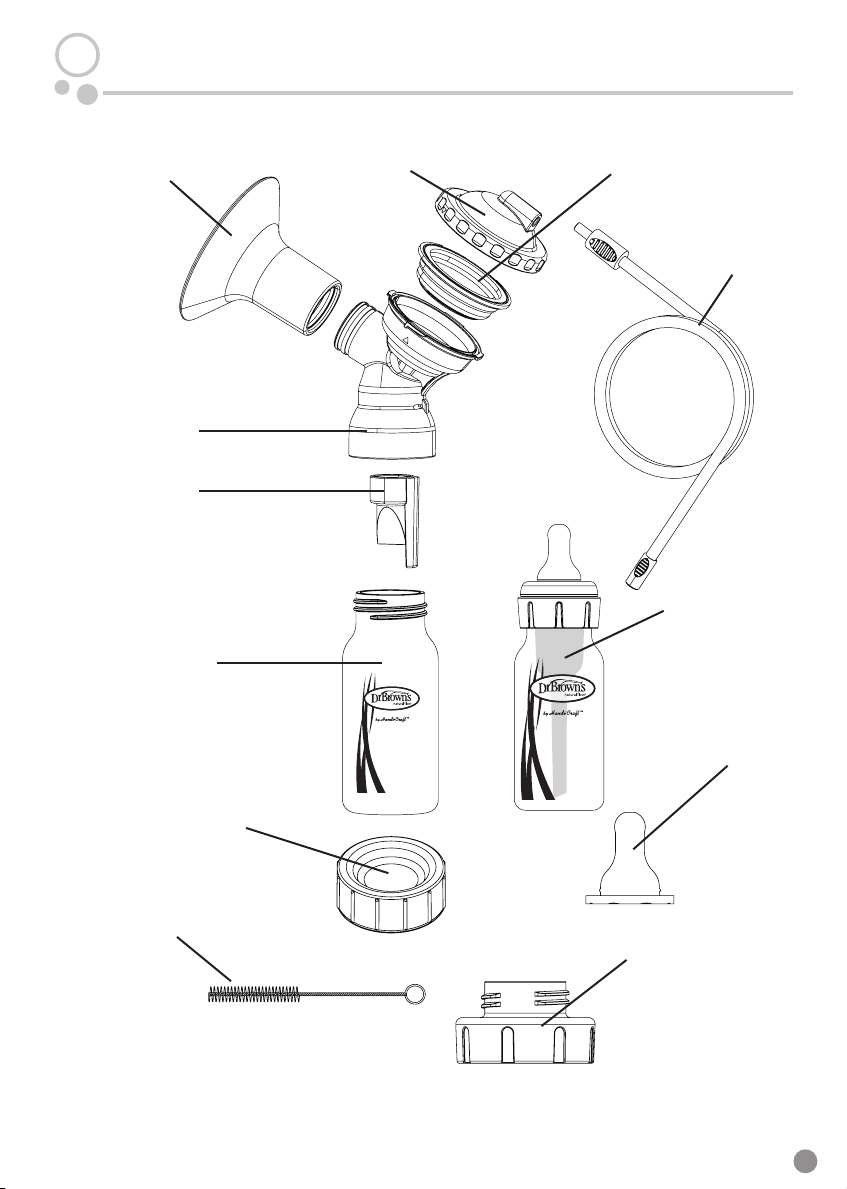
The Double Electric Breast Pump consists of the pump unit, breast shields, tubing, bottle vessel,
duckbill valve, and other related accessories. The materials used are silicone SoftShape™ Silicone
Shields, nipples, membranes, duckbill valves), polypropylene (pump body and bottle vessels) and
acrylonitrile butadiene styrene (pump unit). The electric breast pump's drive unit employs a
diaphragm type vacuum pump, powered by a DC motor, supervised by a microcontroller. The
microcontroller provides control over motor speed (vacuum creation) and solenoid (vacuum release).
Model BF100 has 2 modes:
1. Letdown Mode Used to stimulate the release of milk from the breast.
2. Expression Mode Used after the breast is stimulated to release milk.
PLEASE DO NOT RETURN THIS PUMP TO THE RETAILER
If you experience any issues with your Dr. Brown’s Pump,
please contact our dedicated Breast Pump Customer Service team
by calling 1- 833-224-7675.
Outside of the US and Canada, contact your local distributor.
Visit www.DrBrownsBaby.com for tips and help.

Table of Contents
Safety Information ..................................................................... 3
Breast Pump Components...................................................... 6
Cleaning......................................................................................... 8
Assembly....................................................................................... 10
Using the Pump .......................................................................... 14
Pump Help.................................................................................... 17
Storing & Feeding Breast Milk................................................ 18
Technical Data ............................................................................. 20
Troubleshooting ......................................................................... 21
Important Symbols.................................................................... 22
Disposal ......................................................................................... 23
Warranty........................................................................................ 24
2

3
Read all instructions before using this product.
WARNING: Read this ENTIRE Instruction Manual to become familiar with the features of the product before
operating. Failure to operate the product correctly can result in damage to the product, personal property and
cause serious injury. Failure to operate this product in a safe and responsible manner could result in injury or
damage to the product or other property. This product is not intended for use by children. Do not use with
incompatible components.This Manual contains instructions for safety, operation and maintenance.
It is essential to read and follow all the instructions and warnings in the manual, prior to setup or use,
in order to operate correctly and avoid damage or serious injury.
DANGER - To reduce the risk of electrocution:
• Always unplug electrical product immediately after use.
• Do not use while bathing.
• Do not place or store product where it can fall or be pulled into a tub or sink.
• Do not place or drop into water or other liquid.
• Do not reach for a product if it has fallen into water. Immediately unplug from electrical outlet.
WARNING - To avoid re, electrocution, or injury:
• Danger of electrocution! Keep the device dry! Never immerse in water or other liquids!
Do not run water over the pump.
• The breast pump and accessories are not heat-resistant: keep away from radiators, open ame and sunlight.
• Keep the power adapter away from heated surfaces.
• Do not reach for any electrical device if it has fallen into water. Unplug immediately.
• Do not use outdoors or operate where aerosol (spray) products are being used or where oxygen
is being administered.
• The breast pump should never be left unattended when plugged into a power source.
Safety Information
PLEASE SAVE THESE INSTRUCTIONS
Visit www.DrBrownsBaby.com for tips and help.

4
Read all instructions before using this product.
WARNING (Cont):
• Never operate an electrical device if it has a damaged cord, plug or battery pack, if it is not working properly,
if it has been dropped or damaged, or dropped into water. If damage is found, immediately discontinue use of
power adapter or battery pack and call Dr. Brown’s Customer Service at 1-833-224-7675. Outside of the US
and Canada, contact your local distributor.
• Do not use the breast pump while bathing or showering.
• Close supervision is necessary when the breast pump is used in the vicinity of children to prevent strangula-
tion due to power adapter cord or tubing.
• Follow the exact order of the steps in powering breast pump as listed on page 13 of this Instruction Manual.
• Only use the power adapter supplied with the breast pump.
• Make sure the voltage of the power adapter is compatible with the power source.
CAUTION - To avoid risk of minor injury:
• Wash hands thoroughly with soap and water before touching breast pump, kit and breasts and avoid
touching the inside of containers or lids.
• Separate and wash all parts that come in contact with breast milk immediately after use to avoid dry up of
breast milk residue and prevent growth of bacteria. Always inspect SoftShape™ Silicone Shields, connectors,
valves, membranes and tubing prior to use for cleanliness.
• Only use drinking-quality tap or bottled water for cleaning your breast pump and parts.
• Use the breast pump only for its intended use as described in this manual.
• Do not use the breast pump while sleeping or overly drowsy.
• This is a single user product. Use by more than one person may present a health risk.
Safety Information
PLEASE SAVE THESE INSTRUCTIONS
Visit www.DrBrownsBaby.com for tips and help.

5
Read all instructions before using this product.
CAUTION (Cont):
• Do not drive while pumping.
• Inspect all pump components before each use.
• Never use a damaged device. Replace damaged or worn parts.
• Do not store wet or damp parts as mold may develop.
• Do not run pump with wet tubing. Doing so will harm the pump motor.
• While some discomfort may be felt when rst using a breast pump, using a breast pump should not
cause pain.
• If you are experiencing discomfort at the base of the nipple due to rubbing of your breast tissue with the
SoftShape™ Silicone Shields, discontinue use and contact your healthcare professional or lactation consultant.
• Contact your healthcare professional or lactation consultant if you can express only minimal or no milk or if
expression is painful.
• Do not try to express with vacuum that is too high and uncomfortable (painful).The pain, along with
potential breast and nipple trauma, may decrease milk output.
• Make sure tubing is not kinked or pinched while pumping.
• Do not hold the pump kit by the bottle.This can lead to blockage of the milk ducts and engorgement.
• Do not thaw frozen breast milk in a microwave or in a pan of boiling water.
• Do not microwave breast milk. Microwaving can cause severe burns to baby’s mouth from hot spots that
develop in the milk during microwaving. (Microwaving can also change the composition of breast milk.)
Safety Information
PLEASE SAVE THESE INSTRUCTIONS
Visit www.DrBrownsBaby.com for tips and help.

6
2x Membrane Cap
2x SoftShape
TM Silicone Shield,
ts 24-27mm
2x Pump Connector
2x Duckbill Valve
2x Narrow BottleVessel
2x Dr. Brown’s®
Options+™ Bottles
*Narrow toWide Neck
Adapter provided for use
with Dr. Brown’s Wide Neck
bottles (bottles not included).
2 x NarrowTravel/Storage Cap
1x Slowest Flow/
Preemie Flow™ Nipple
2x Narrow to Wide Neck Adapter*
1x Wire Cleaning Brush
Pump Instruction Manual & Bottle Instructions
2x Membrane
2x Tubing
Breast Pump Components

7
1x Customow™ Double Electric Breast Pump
Storage Area
Bottle Holder
Bottle Holder
Ports/Port Cover
Handle
1x Silicone
Stretch Wall
Power Adapter Plug In
1x 6V Power Adapter
Breast Pump Components

8
SoftShapeTM
Silicone Shields
Pump Connectors
Membranes
Duckbill Valves
Bottle Vessels
Narrow-to-Wide Neck Adapters (if using)
ALWAYS USE DRINKING QUALITY WATER FOR CLEANING!
Cleaning Instructions for Milk-Contact Parts:
1. Disassemble pump following instructions on page 10.
2. Rinse milk residue from parts under cool running water.
3. Place all parts in warm soapy water to soak for several minutes.
4. Use a cloth or soft brush to clean all parts.
5. Rinse parts under cool running water until all soap has been removed.
6. Alternately, wash all parts in the top rack of the dishwasher.
7. Rest parts on a clean towel or rack to air dry.*
8. Sanitize/sterilize before each use. (Microwave and electric steam sterilizers may be used to sterilize
milk contact parts.)
*All parts must be completely dry before storing to prevent bacteria and mold growth.
Store clean, dry parts in a bag or container until next use.
• Let parts cool after washing in dishwasher or sterilizing. Handle carefully.
• See separate instructions for bottle cleaning & assembly.
BEFORE FIRST USE, AND AFTER EVERY USE
Clean and sterilize all pump parts that come in contact with milk:
Cleaning

9
NON MILK-CONTACT PARTS:
The following parts do not come in contact milk and should only be cleaned as needed.
Membrane Cap
Tubing
Special Cleaning Instructions for Tubing:
1. Tubing does not come in contact with milk and should only be washed if dirty or condensation is present.
2. If condensation is from a previous washing process, there is no need to wash again.
3. Wash with warm soapy water and rinse clean with clear water.
4. Allow water to drain from tubing completely after washing.
5. Shake out any remaining water droplets and hang to dry.
6. Do not use tubes until completely dry.*
*A small amount of condensation is allowable; however, a tube with water droplets may damage the pump motor.
Cleaning
Silicone stretch wall may be removed for cleaning, as necessary. Silicone stretch wall may simply be wiped
clean with a damp cloth but is also dishwasher and sterilizer safe.
DO NOT SUBMERGE THE
PUMP MOTOR IN WATER!
WIPE CLEAN WITH
DAMP CLOTH ONLY.

10
Pull SoftShape
TM Silicone Shield
to remove from
pump connector.
DISASSEMBLY:
The SoftShape™ Silicone Shields/Milk Collection Kits come pre-assembled. All milk-contact components must
be disassembled, washed and sterilized prior to rst use.
Twist membrane cap
a ¼ turn and lift
to remove.
Lift membrane from
edge to remove from
pump connector.
Pull tab on duckbill valve to
remove from pump connector.
DO NOT PULL ON POINTED END OFVALVE.
Twist bottle to unthread from the pump connector.
Assembly

11
Push neck of
SoftShape
TM Silicone Shield
onto pump connector.
Ensure that both rings
are attached.
Set membrane cap
in place and twist
a ¼ turn to attach.
Drop in membrane and press
down edges to secure.
Twist bottle to thread on to pump connector.
Wash hands before touching & assembling milk collection kit.
All milk-contact components must be disassembled, washed and sterilized prior to rst use.
From the underside of the connector, push
duckbill valve rmly onto the cylindrical
piece inside the pump connector.
1
2
Assembly

12
Male end of tubing connects
to the membrane cap.
Female end of tubing connects
to port on front of pump.
TUBING:
To use for single-sided pumping,
remove the tube that is no
longer needed and place
the port cover in the empty port.
Assembly

13
STRETCH FIT WALL:
POWER ADAPTER:
Wrap stretch wall
around pump and slide
each wall column into
its holder from above.
Fold the cord, do not wrap.
Wrapping the cord can
break the wires.
To prevent damage to your
power adapter cord,
always grasp the body of
the adapter as shown above.
Never pull by the cord
to unplug.
Always unplug the
adapter from the
pump before storage.
Assembly

14
DISPLAY:
Before pumping, wash hands thoroughly with warm soapy water. Inspect all breast pump parts for cleanliness
- IF UNWASHED, FOLLOW INSTRUCTIONS ON PAGE 8. Look closely at the silicone shield, membrane, and
duckbill valve to inspect for any signs of wear or damage. Suction may decrease if parts are damaged or not
properly assembled. Contact Dr. Brown’s Customer Service to inquire about replacement parts. Outside of the
US and Canada, contact your local distributor.
Do not try to express milk if the level of vacuum is painful, this may lead to nipple and/or breast trauma and
cause diculties with expression. Contact your medical professional or lactation consultant if you can only
express minimal amounts of milk, or if expression is painful in any way.
Power Button Timer
Mode Selector Button
Vacuum Level Display
Vacuum Up Button
Vacuum Down Button
Letdown Mode Indicator
Start/Pause Button
Cycle Display
Cycle Up Button
Cycle Down Button
Using the Pump
VACUUMCYCLE

15
LETDOWN and EXPRESSION MODE:
Letdown Mode is used to stimulate the release of milk from the breast. This mode mimics
baby’s way of rapidly sucking at the beginning of a breastfeeding session, prompting the reex
that releases breast milk.
Expression Mode is used once the breast milk has been released and is now expressing from
the nipple.This mode mimics baby’s more relaxed feeding that happens once milk is owing
and draws milk more deeply from the breast.
Using Letdown Mode:
1. Press the POWER BUTTON to turn the unit on.
2. The pump will automatically display Letdown Mode at the last vacuum level used.
3. Position the assembled milk collection kit on breast as directed on page 16.
4. Press the START/PAUSE BUTTON to begin pumping.The timer will begin. Press the button again at any
time you wish to pause pumping.
5. If needed, adjust vacuum level to your preferred starting level using theVACUUM UP andVACUUM DOWN
BUTTONS.There are ve user-selectable vacuum levels in the Letdown Mode: L1, L2, L3, L4, L5.
Adjustments to vacuum level may be made at any time while pumping - adjustments cannot be made to
the cycle level in Letdown Mode. It may take several pumping sessions to discover your most comfortable
and productive vacuum level.
Using Expression Mode:
1. Once letdown has begun (milk is visibly expressing from nipples), switch to Expression Mode.
2. Press the MODE SELECTOR BUTTON. The LETDOWN MODE INDICATOR symbol will disappear when in
Expression Mode.
3. The pump will automatically display Expression Mode at the last vacuum level used.
4. If needed, adjust cycle level (speed) to your preferred level using the CYCLE UP and CYCLE DOWN BUTTONS.
There are ve user-selectable cycle levels in the Expression Mode: 36, 40, 43, 46, 49.
5. If needed, adjust vacuum level to your preferred level using the VACUUM UP and VACUUM DOWN BUTTONS.
There are twelve user-selectable vacuum levels in the Expression Mode: L1 through L12.
6. Once pumping is complete (breast milk is no longer expressing), simply press the POWER BUTTON to turn
o the pump.
Adjustments to vacuum & cycle levels may be made at any time while pumping in Expression Mode. It may
take several pumping sessions to discover your most comfortable and productive cycle and vacuum levels.
Using the Pump

16
Pumping with a Single Milk Collection Kit:
Remove the unneeded hose from the port on the front of the pump. Place the port cover in the empty port.
Vacuum strength will intensify when switching from two to one port. Adjust vacuum levels to your preferred
comfort level.
Placement of the Milk Collection Kit:
Position the SoftShape™ Silicone Shield over your breast, centering the nipple in the neck of the shield.
Your nipple should not touch or rub on the side walls of the shield. Check nipple positioning again once
the pump is operating, to ensure that it remains away from the sides. If not, pause pump and try
repositioning. Your breast should completely ll the SoftShape™ Silicone Shield so that a seal may form to
achieve proper vacuum levels.
While you may feel some discomfort when rst pumping, it should not cause pain. Adjust the cycle and
vacuum levels to lower settings to achieve your preferred comfort level and milk ow.
Using the Pump

17
TIPS FOR EXPRESSING BREASTMILK
Relax! Create a comfortable and relaxing setting for your pumping sessions.
Stay Hydrated. Drink plenty of water throughout the day and keep a glass of water with you while you
pump.
Create a Routine. Condition yourself to express milk at the same time each day by creating a routine around
pumping.Try pumping each morning after you shower or pumping in the afternoon while watching your
favorite television show.
Think of Baby! Simply imagining that you are breastfeeding may help induce letdown. If you are away from
home, some moms nd that a picture of baby or a recording of their cry helps.
Massage. A tried and true method - massaging your breasts before you begin pumping can help to quicken
letdown. Massage again when you see your milk slowing to help release all milk from the breast.
COMMONLY ASKED QUESTIONS
What is the dierence between Letdown Mode and Expression Mode?
Letdown Mode helps stimulate letdown (milk releasing from breast). Expression Mode is used after Letdown
Mode - once the milk is visibly owing from nipple - to draw milk from breast for collection.
What is the dierence between cycle and vacuum levels?
Vacuum levels represent the amount of suction. Cycle levels represent the speed of the on/o suction cycle.
How do I nd my preferred cycle and vacuum levels?
Every mom reacts dierently to cycle and vacuum levels. Start low and work your way up to a comfortable
and productive level. It may take a few pumping sessions to nd your ideal settings, and your ideal settings
may change over time. The CustomowTM settings are fully customizable so that you can have your perfect
pumping experience every time!
What do I do if milk gets in the tubing?
Wash the tubes as directed on page 9 of this instruction manual. Remember to dry the tubing completely
before using - water in the tubes may damage the motor. If mold appears in tubing, discard and replace.
What do I do if there is low/no suction?
Check that the tubing is securely connected. Disassemble and check parts for damage. Reassemble, ensuring
that parts are connected properly, creating a good seal for the vacuum.While pumping, ensure that your
breast is also creating a seal by fully lling the shield.
Why does my pump turn o after I have been pumping for a while?
Your pump has a safety feature that shuts o the pump after 30 minutes.
If I have a problem, can I take my pump to a local repair center?
No. Please contact Dr. Brown’s dedicated Breast Pump Customer Service team at 1-833-224-7675 with any
concerns about how your pump is operating. If outside of the US and Canada, please contact your local distributor.
Pump Help

18
Guidelines Are for Home Use and Not for Hospital Use.
Use the following guidelines for the storage of breast milk.
By following recommended storage and preparation techniques, breastfeeding mothers and caretakers of
breastfed infants and children can maintain the safety and quality of expressed breast milk for the health of
the baby. These are general guidelines for storing breast milk at dierent temperatures. Various factors (milk
volume, room temperature when milk is expressed, temperature uctuations in the refrigerator and freezer,
and cleanliness of the environment) can aect how long breast milk can be stored safely.
Breast Milk Storage Guidelines Center for Disease Control and Prevention (“CDC”);
https://www.cdc.gov/breastfeeding/recommendations/handling_breastmilk.htm
Adapted from“ABM Clinical Protocol #8: Human Milk Storage Information for Home Use For Full-Term Infants,”Revised 2017
Storage Locations and Temperatures
Type of Breast Milk Countertop
77ºF or colder (25ºC)
(room temperature)
Refrigerator
40ºF (4ºC)
Freezer
0ºF (-18ºC)
Freshly Expressed
or Pumped
Up to 4 hours Up to 4 days Within 6 months
is best
Thawed, Previously
or Pumped
Leftover from
a Feeding
1-2 hours Up to 1 day
(24 hours)
Use within 2 hours after
the baby is nished feeding
Never
refreeze human milk
after it has
been thawed
Up to 12 months
is acceptable
Human Milk Storage Guidelines
(baby did not nish bottle)
Storing & Feeding Breastmilk

19
STORE
• Label milk with date and baby’s name if delivering to childcare.
• Do not store milk on the door of the refrigerator or freezer.
• Freeze milk in small amounts of 2 to 4 ounces to avoid waste when warming.
• Breastmilk expands when frozen. Leave a little space at the top of your container.
• If you do not plan on using freshly expressed milk within four days, freeze it right away.
THAW
• Always thaw and use the oldest milk rst.
• Thaw milk under warm running water, in a container of warm water, in the refrigerator overnight, or in
breast milk warming machine.
• Never thaw milk in the microwave. Microwaving destroys nutrients baby needs, and hot spots created in the
microwave can burn baby’s mouth.
• Use milk within 24 hours of thawing.
• Use thawed or warmed milk within two hours.
• Never refreeze thawed milk.
FEED
• To heat milk, place the sealed container under warm running water, in a container of warm water, or in
breast milk warming machine
• Do not heat milk on the stove or in the microwave.
• Test the temperature before feeding it to your baby by putting a few drops on your wrist.
• Swirl the milk, mixing the fat back into the milk.
• Leftover milk should not be used after two hours.
Storing & Feeding Breastmilk
Table of contents
Other DrBrowns Breast Pump manuals