DrBrowns natural flow Breast Pump User manual

Bomba Manual Tira-Leite Materno
com protetor de silicone SoftShape™
MANUAL DE INSTRUÇÕES
Por favor, leia e guarde estas instruções. Aceda a www.drbrownsbaby.com para mais informações.
Manual Breast Pump
with SoftShape™Silicone Shield
INSTRUCTION MANUAL
Please read and save these instructions. Visit www.drbrownsbaby.com for more information.
Tire-lait manuel
avec téterelle en silicone SoftShape™
MODE D’EMPLOI
Veuillez lire et conserver ce mode d’emploi. Pour plus
d’information, visitez le www.drbrownsbaby.com.
Extractor de leche manual
con Protector de silicona SoftShape™
MANUAL DE INSTRUCCIONES
Por favor, lea y guarde estas instrucciones.
Visite www.drbrownsbaby.com para obtener más información.
BPA Free
Sin BPA
Sans BPA
Sem BPA
DR. BROWN'S et toutes les autres marques de commerce sont la propriété ou
utilisées sous licence par Handi-Craft Company.
DR. BROWN’S y todas las demás marcas registradas son propiedad o se usan
bajo licencia de Handi-Craft Company.
Handi
–
Craft Company
St. Louis, Missouri 63116 USA/États-Unis/EE.UU.
drbrownsbaby.com (800) 778-9001
Made in China. Fabriqué en Chine.
Fabricado en China. Fabricado na China.
May be patented, see drbrownsbaby.com/patents.
Ces produits peuvent faire l’objet de brevets.
Consultez drbrownsbaby.com/patents.
Puede estar patentado, vea drbrownsbaby.com/patents.
©2019 Handi-Craft Company. All Rights Reserved.
©2019 Handi-Craft Company. Tous droits réservés.
©2019 Handi-Craft Company. Todos los derechos reservados. F1
DR. BROWN’S and all other trademarks are owned or used under license by
Handi-Craft Company.
BPP003

Intended Use
For lactating women to express and collect milk from their breasts
to complement breastfeeding.
Unless otherwise advised by your healthcare professional, it is best
to wait until your breastfeeding routine is established (approximately
4 weeks) before expressing breast milk. If you are exclusively pumping
for a medical or non-medical reason, it is recommended to contact
your healthcare provider on when to begin pumping.
Product Description
Dr. Brown’s® Manual Breast Pump is a personal use manual breast
pump that includes two modes of expression and is capable of
single pumping.
PLEASE DO NOT RETURN
THIS PUMP TO THE RETAILER
If you experience any issues with your
Dr. Brown’s® Manual Breast Pump:
In the US and Canada, contact our dedicated Breast Pump
Customer Service team by calling 1-833-224-7675.
Outside of the US and Canada, please contact your local distributor.
Table of Contents
Safety Information ........................................................................2
Manual Pump Components ......................................................3
Cleaning............................................................................................3
Assembly..........................................................................................4
Using the Pump .........................................................................5-6
Storing, Thawing & Feeding ......................................................7
Tips & Troubleshooting ...............................................................8
EN

Visit www.DrBrownsBaby.com for tips and help.
SAFETY INFORMATION
Read all instructions before using this product.
PLEASE SAVE THESE INSTRUCTIONS
WARNING:
Read this ENTIRE Instruction Manual to become familiar with the features of the product
before operating. Failure to operate this product correctly and in a safe and responsible manner could
result in injury or damage to the product or other property. This product is not intended for use by children.
Do not use with incompatible components. This Manual contains instructions for safety, operation and
maintenance. It is essential to read and follow all the instructions and warnings in the manual, prior setup
or use, in order to operate correctly and avoid damage or serious injury.
IMPORTANT REMINDERS:
• Plastic bottles and component parts become brittle when frozen and may break when dropped.
Handle bottles of frozen milk with care.
• DO NOT FREEZE GLASS BOTTLES
• Bottles and component parts may become damaged if mishandled, e.g. dropped, over-tightened,
or knocked over.
• Take appropriate care in handling bottles and components.
• Do not use breast milk if bottles or components become damaged.
• Wash hands thoroughly with soap and water before touching breast pump and breasts, and
avoid touching the inside of containers or lids.
• Separate and wash all parts that come in contact with breast milk immediately after use to avoid
drying of breast milk residue and to prevent growth of bacteria. Always inspect breast shield,
connector, valve and membrane prior to use for cleanliness.
• Only use drinking-quality tap or bottled water for cleaning your breast pump and parts.
WARNING! To avoid health risk and reduce chance of injury:
• This product is intended for use by a single user only and should not be shared between users.
• Do not drive while pumping.
• Never use while pregnant, as pumping can induce labor.
• Clean and sanitize all parts that come in contact with your breast and breast milk prior to rst use.
• Wash all parts that come in contact with your breast and breast milk after every use.
• Do not store wet or damp parts as mold may develop.
• Inspect all appropriate pump components before each use.
• Do NOT continue pumping for more than 2 consecutive pumping sessions if no results are
achieved.
• While some discomfort may be felt when rst using a breast pump, using a breast pump should
not cause pain.
• If you are experiencing discomfort at the base of the nipple due to rubbing of your
breast tissue with the breast shield tunnel, discontinue use and contact your healthcare
professional or lactation consultant.
• For assistance with correct breast shield sizing and comfort, please contact a healthcare
professional or lactation consultant, or contact customer service at 1-833-224-7675 in the US
or Canada. Outside of the US and Canada, please contact your local distributor.
• Contact your healthcare professional or lactation consultant if you can express only
minimal or no milk or if expression is painful.
• Do not try and express with vacuum that is too high and uncomfortable (painful).
The pain, along with potential breast and nipple trauma, may decrease milk output.
• Do not thaw frozen breast milk in a microwave or in a pan of boiling water.
• Do not microwave breast milk. Microwaving can cause severe burns to baby’s mouth
from hot spots that develop in the milk during microwaving. (Microwaving can also
change the composition of breast milk.)
2
Aceda a www.DrBrownsBaby.com para dicas e apoio ao cliente.Visit www.DrBrownsBaby.com for tips and help.
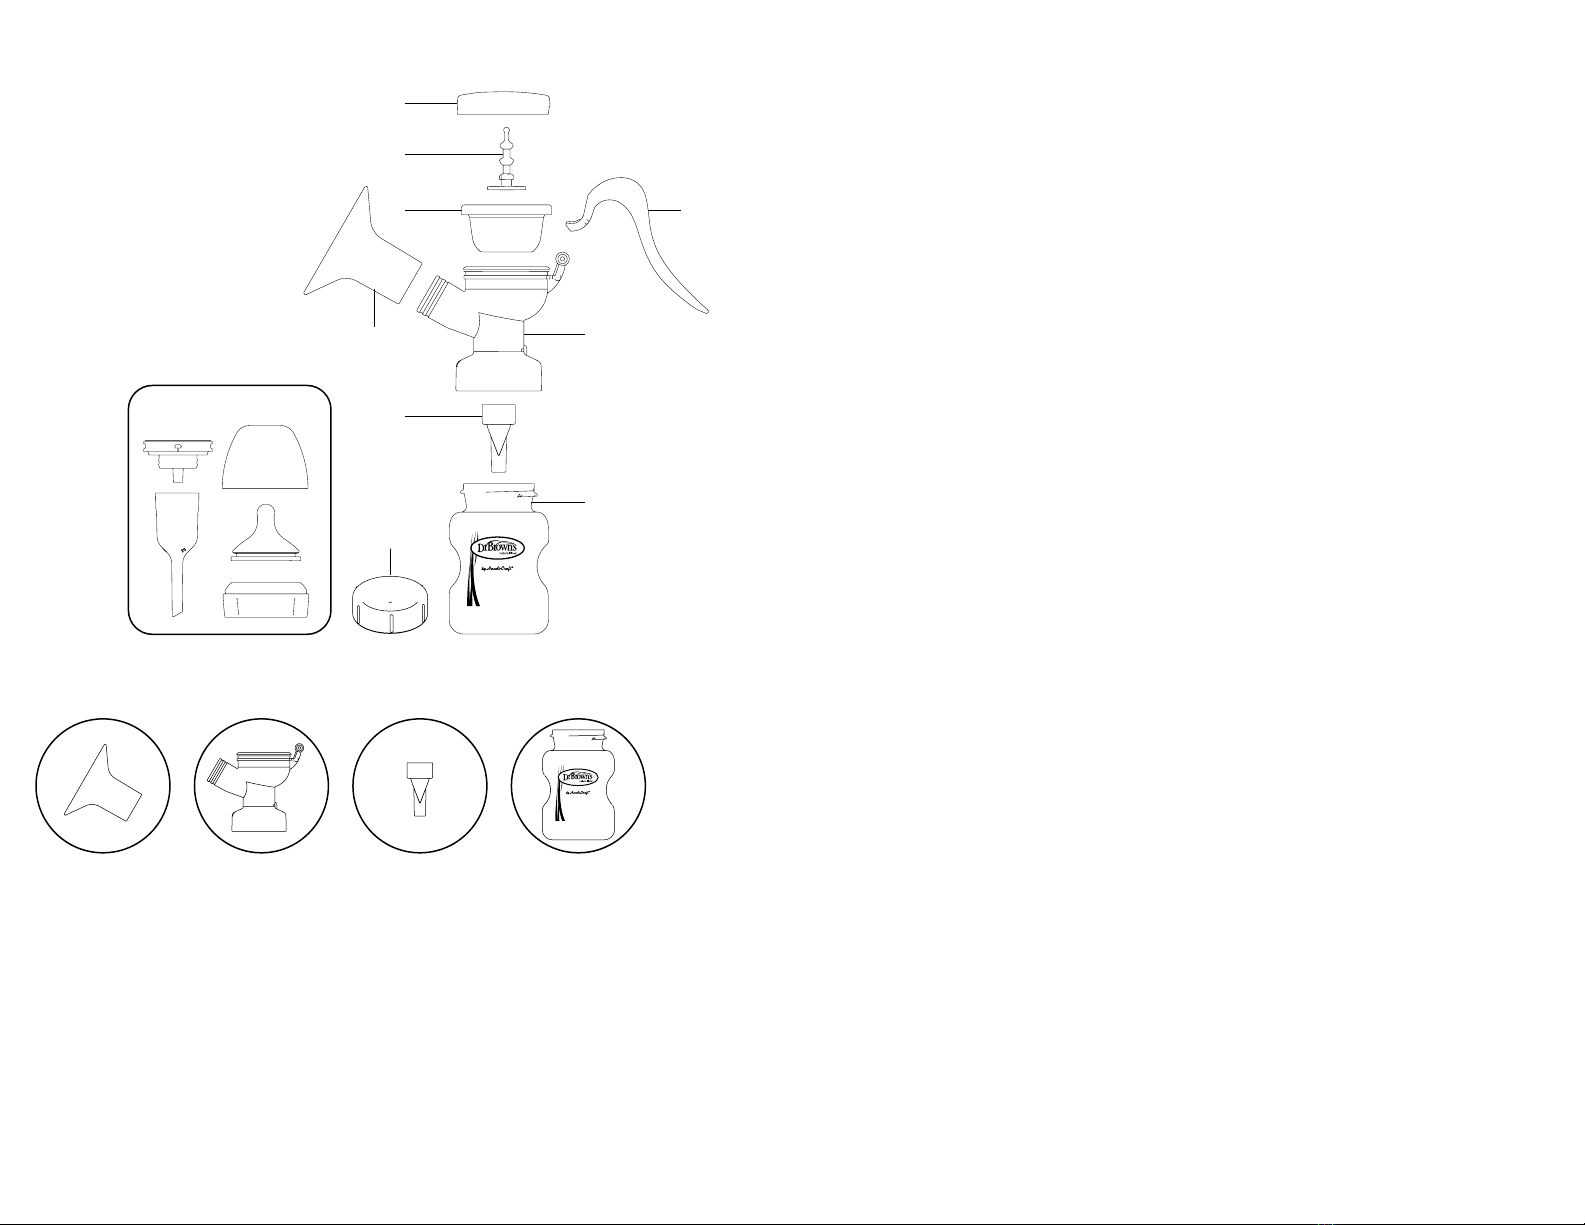
MANUAL PUMP COMPONENTS
1. 1x Membrane Cap
2. 1x Mode Pin
3. 1x Membrane
4. 1x Handle
5. 1x SoftShapeTM Silicone Shield
6. 1x Pump Connector
7. 1x Duckbill Valve
8. 1x 5 oz/150 ml Wide-Neck Bottle Vessel
9.1x Options+TM Wide-Neck Bottle Parts
10.1x Wide-Neck Storage Cap
1x Cleaning Brush
1x Bottle Instructions
BEFORE FIRST USE, and AFTER EVERY USE clean and sterilize all pump parts that come in contact with milk:
1. Disassemble pump following step 8 on page 4.
2. Rinse milk residue from parts under cool running water.
3. Place all parts in warm soapy water to soak for several minutes.
4. Use a cloth or soft brush to clean all parts.
5. Rinse parts under cool running water until all soap has been removed.
6. Alternately, wash all parts in the top rack of the dishwasher.
7. Rest parts on a clean towel or rack to air dry.*
8. Sanitize/sterilize before each use.
*All parts must be completely dry before storing to prevent bacteria and mold growth.
Store clean, dry pump in a bag or container until next use.
• Microwave and electric sterilizers, or boiling water, may be used to sterilize all parts.
• Let parts cool after washing in dishwasher or sterilizing. Handle carefully.
CLEANING
1
2
3
7
56
8
4
9
10
SoftShape™
Silicone Shield
Pump
Connector
Duckbill
Valve
Wide-Neck
Bottle Vessel
3
SUGESTÕES E RESOLUÇÃO DE PROBLEMAS
SUGESTÕES
A amamentação e a extração com bomba são experiências únicas para as mães que amamentam. Leia as
sugestões abaixo antes de começar a utilizar a bomba.
• Terá mais facilidade em extrair leite com a bomba se estiver descontraída e a pensar no bebé.
• Evite extrair leite com a bomba se estiver com pressa.
• Para uma utilização ecaz da bomba, deve ter paciência e praticar.
• A utilização frequente da bomba agiliza a descida do leite e aumenta o uxo.
• Todas as mães são diferentes. Algumas conseguem fazer descer o leite mais depressa e outras não. Algumas
conseguem extrair leite na primeira utilização e outras não.
• Não desanime, se não conseguir extrair leite na primeira tentativa. Faça uma pausa e tente outra vez mais
tarde.
• Não desanime, se só conseguir extrair uma pequena quantidade de leite. Isso é normal, especialmente nas
primeiras tentativas.
• Com o tempo, a utilização regular da bomba entre a amamentação pode ajudar a manter a produção de
leite.
• Pode estimular o uxo de leite aplicando uma compressa morna ou tomando um banho/duche quente.
• Acima de tudo, a utilização da bomba deve ser uma experiência agradável. Se sentir dores ou desconforto
ao utilizar a bomba, contacte uma conselheira de amamentação ou o seu médico.
RESOLUÇÃO DE PROBLEMAS
• Todos os componentes têm de estar devidamente montados para garantir o correto funcionamento da
bomba. Certique-se de que todas as peças estão bem encaixadas.
• Posicione o protetor bem centrado em torno do mamilo.
• Pressione a bomba contra o seio de forma a encostar completamente o protetor, mas sem comprimir
demasiado, para não inibir o uxo de leite.
• Quando apertar a asa, deve sentir uma leve sucção no seio.
• Caso necessite de ajuda para utilizar a bomba ou caso tenha perdido ou partido alguma peça, contacte o
serviço de Apoio ao Cliente da Dr. Brown’s.
32

Visit www.DrBrownsBaby.com for tips and help.Aceda a www.DrBrownsBaby.com para dicas e apoio ao cliente.
Wash hands before touching & assembling pump.
ENSURE ALL PARTS ARE CLEAN & STERILIZED. LET PARTS COOL AND HANDLE CAREFULLY.
ASSEMBLY
1. Position SoftShapeTM
Silicone Shield over the
neck of the pump connector.
Check that the shield has
been positioned in both rings
on the neck of the connector.
2. Secure duckbill valve
onto underside of pump
connector, making sure that
it has been pushed on all
the way. Check that slit on
valve can open completely.
3. Screw on vessel
to connector.
4. Pull mode pin up through
bottom of membrane until it
snaps into place.
5. Fit membrane onto top of
pump connector, ensuring
that the lip lays atly over the
edge, all the way around.
6. Hook the end of the
handle onto the mode pin
and press the middle of the
handle rmly onto the hinge
on the pump connector.
7. Place the membrane cap
over the membrane, and
snap into place to secure the
membrane.
8. To disassemble, follow all
steps in opposite order. When
removing duckbill valve, use
tab to pull valve free. DO NOT
PULL ON VALVE.
4
ARMAZENAGEM, DESCONGELAMENTO E
AMAMENTAÇÃO
Indicações de armazenamento do leite materno do Centro para o Controlo e a Prevenção de Doenças (Center for Disease Control
and Prevention, CDC); https://www.cdc.gov/breastfeeding/recommendations/handling_breast milk.htm
ARMAZENAR
• Identique os recipientes do leite materno para utilização na creche do seu bebé com a data e o nome dele.
• Não armazene o leite na porta do frigoríco ou do congelador.
• Congele o leite em pequenas quantidades de 60 a 120 ml (2 a 4 oz) para evitar o desperdício depois de o
aquecer.
• A congelação faz expandir o leite materno. Não encha o recipiente até à borda.
• Se não pensa utilizar o leite acabado de extrair no prazo de quatro dias, congele-o imediatamente.
DESCONGELAR
• Descongele e utilize sempre o leite a começar no mais antigo.
• Descongele o leite pondo-o debaixo de água morna a correr, mergulhando-o num recipiente com água
morna, deixando-o de um dia para o outro no frigoríco ou num aparelho para aquecer o leite materno.
• Nunca descongele o leite no micro-ondas. O micro-ondas destrói nutrientes que o bebé necessita e não
aquece o leite uniformemente, deixando zonas demasiado quentes que podem queimar a boca do bebé.
• Utilize o leite até 24 horas depois de o descongelar.
• Utilize o leite descongelado ou aquecido no prazo de duas horas.
• Nunca volte a congelar leite descongelado.
ALIMENTAR
• Aqueça o leite no recipiente fechado debaixo de água corrente quente, mergulhado em água quente ou num
aparelho para aquecer leite materno.
• Não aqueça o leite no fogão ou no micro-ondas.
• Teste a temperatura antes de o dar ao bebé, deitando algumas gotas no seu pulso.
• Mexa o leite, para misturar os depósitos de gordura.
• Utilize o leite que sobrar da amamentação no prazo de duas horas.
• Para mais informação sobre a alimentação com o biberão Dr. Brown’s® Options+™, consulte as instruções do
biberão incluídas.
Localização e temperatura do armazenamento
Tipo de leite materno
No balcão de cozinha
25 °C (77 °F) ou inferior
(temperatura ambiente)
No frigoríco
4 °C (40 °F)
No congelador
-18 °C (0 °F) ou inferior
Acabado de extrair
Até 4 horas Até 4 dias
De preferência no prazo de
6 meses
Aceitável até 12 meses
Descongelado, previamente
congelado
1-2 horas Até 1 dia (24 horas)
Nunca congele novamente
o leite humano, após o
descongelar
Restos de uma sessão de
amamentação
(o bebé não acabou o biberão)
Utilize no prazo de 2 horas, após a alimentação do bebé
Estas instruções são para utilização doméstica e não hospitalar.
Siga as seguintes instruções para armazenar o leite materno.
Ao respeitarem as técnicas de armazenamento e preparação recomendadas, as mães e os cuidadores
asseguram não só a segurança e a qualidade do leite retirado, mas também a saúde dos bebés e das crianças
em amamentação. As seguintes instruções destinam-se a garantir o correto armazenamento do leite a
diferentes temperaturas. Vários fatores (o volume do leite, a temperatura ambiente aquando da extração do
leite, as utuações de temperatura do frigoríco e do congelador e as condições de higiene do ambiente)
podem afetar a duração de armazenamento do leite em condições de segurança.
31
Table of contents
Other DrBrowns Breast Pump manuals


