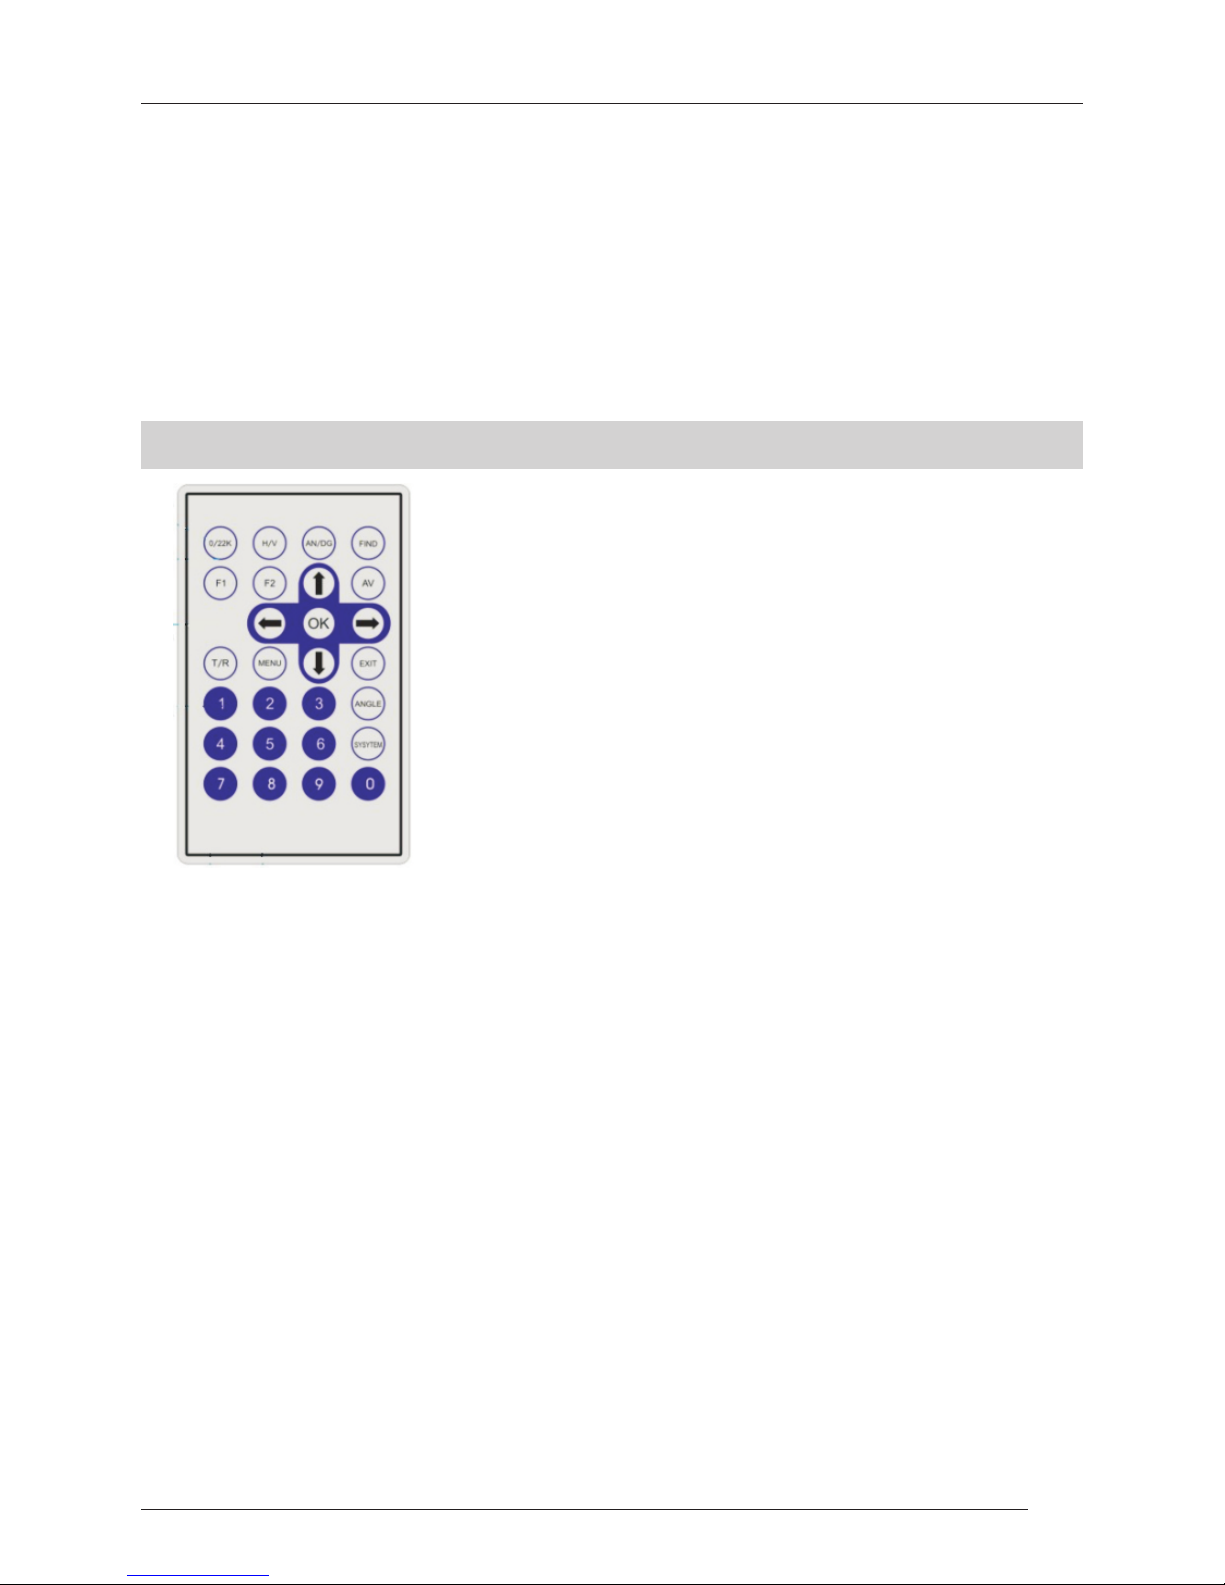
Dreamsky TSF 40 User manual

Dreamsky
R
DIGITAL SATELLITE & TERRESTIAL FINDER
USER'S MANUAL
TSF 40

Thank you for purchasing this product and therefore trusting
our company.
To obtain the best performance from this product, please read
the manual carefully before using for first time.
The technical specifications and operating methods included
in this manual are subject to changes without notice. In case
of any inquires after a period of usage, please contact the
manufacturer to the latest news and updates.
2

Table of Contents
Chapter I.Introduction......................................................4
Chapter II.Function........................................ …………….5
A.Front Panel........................................................5
B.Remote Control.................................................7
C.Quick Operation................................................8
1.Language setting………………………………8
2.DVB-S Signal Finding…………………………9
3.DVB-T Signal Finding.................. …………..12
D.Detailed operation Guide................................14
1.Power On ……………................................. 14
2.Installation... ………............ .....………….....14
3.System Setting.............................................16
4.Spectrum......................................................17
5.Angle Calculation.........................................17
6.Channel Information.....................................18
7.Channel list...................................................18
Chapter III. Specification................................................. 19
3

Chapter I Introduction
Digital satellite finder ASF200SF is professional instruments
dedicated to aligning and setting satellite dishes quickly, easily
and accurately.
Designed for field measurement, all instruments are compact
(0.9kg with the battery), autonomous (packed with battery and
fast charger), rainproof designed and are equipped with a 3.5 Inch
High Definition TFT LCD Screen for better readability.
The instrument can be left and operate on its own as it is equipped
with rechargeable Li-on battery pack, 12.6V, 2,200 mAh ensuring
a standard operation for 4 hours. We recommend that you to give
the unit a three hours charge at first time.
In the package:
1 x Protective carrying bag with strap.
1 x Car charger cable.
1 x Upgrade line.
1 x Audio/Video cable.
1 x Adaptor/charger.
1 x Full function IR remote control.
4

Chapter II Function
<Figure2-1>
1.LNB INPUT:
Satellite signal input port, connects directly to satellite antenna
with coaxial cable.
2.ANT INPUT:
Terrestrial signal input female port.
3.LCD Screen:
Shows menus and programs clearly.
A.Front Panel
5

5.LOCK LIGHT:
This will be lighted when signal is locked.
6.22K/13V/18V LIGHT:
Indicates the mode of 22K/13V/18V.
7.FUNCTION KEY:
Consist of 2 keys, F1 – F2.
F1: Changes the signal bar on SIGNAL FINDING menu.
F2: Actives DiSEqC1.2 function on the SIGNAL FINDING menu.
AN/DG: To active the spectrum on the SIGNAL FINDING menu.
0/22K: A quick key to switch 22K output on the SIGNAL FINDING menu.
H/V: A quick key to switch 13V/18V output on the SIGNAL FINDING menu.
8.ARROW KEY AND OK KEY
4.POWER LIGHT:
Light up while power is on.
Use Arrow key to browse the item, press OK key to select option.
9.NUMERICAL KEY:
Used to enter numerical settings directly.
10.FIND KEY:
Accesses prompt satellite menu that sets and aligns a satellite dish quickly.
11.MENU KEY:
Display the main menu or return to the previous one.
12.EXIT KEY:
Cancel the selection and exit from the present menu.
13.ANGLE KEY:
Accesses the AZ, EL and Polarity calculation menu.
14.SYSTEM KEY:
Access SYSTEM mode to create all parameters and information.
15.POWER KEY:
For turn-on / off, to press and hold for 3 seconds to power on the device.
16.TV/RADIO:
Selects and plays TV/Radio channel in playing mode.
17.AV(Optional):
Shifts AV output / input.
6

18.Charge port:
Allows the external power supply as well as the charging of the battery.
19.USB Port:
Used to connect to PC for upgrade.
20.R/L/VIDEO:
Output audio and video signa.l
21.AV IN:
Input audio and video signal to LCD screen.
B.Remote Control
(1) 0/22K:
Switch 22K output on the SIGNAL FINDING menu.
(2) H/V:
Switch 13V/18V output on the SIGNAL FINDING menu.
(3) AN/DG:
Actives the spectrum on the SIGNAL FINDING menu.
(4) FIND Key:
Accesses easy satellite find menu that sets and aligns a satellite dish quickly.
(5) F1:
Changes the signal bar on SIGNAL FINDING menu.
(6) F2:
Actives DiSEqC1.2 function on the SIGNAL FINDING menu.
(7)Arrow Key and OK Key:
Browse the item and press OK key to select.
(8) AV:
Shifts AV output /AV input.
7

(9)TV/RADIO:
Selects and plays TV/Radio channel in playing mode.
(10)MENU Key:
Display the main menu or return to the previous one.
(11) EXIT Key:
Cancel the selection and exit from the present menu.
(12) 0-9 Numerical Key:
Enter numerical settings directly.
(13) ANGLE Key:
Accesses the AZ, EL and Polarity calculation menu.
(14) SYSTEM Key:
Access SYSTEM mode to create all parameters and information.
C. Quick Operation
1)Menu language Setting
1.Turn on the satellite finder
2.Press SYSTEM button to display the setting menu. see <Figure2-2>.
<Figure2-2>
3.Use [◄][►] button to change the language items . Select the
language that you need.
2)Quick operation guid
The following screen displays when confirming SIGNAL FINDING
menu on the main menu. Select mode, terrestrial or satellite
according to your search.
<Figure2-3> 8

DVB-S SIGNAL FINDING:
1.The DVB-S finding menu shown as <Figure2-4>.
<Figure2-4>
The modifiable parameters are the following:
SATELLITE NAME: Use [◄][►] button to scroll through the
stored memory and select required satellite.
LNB SETTING: Select the item needs editing, and set its
LNB Type: Use [◄][►] button to select C/Ku/Universal mode.
LNB.LOW / LNB.HIGH: input the parameters as desired by number key.
TRANSPONDER: Modification of a transponder's parameters,
including:
FREQUENCY: Press [◄][►] button to add or reduce values
or specify the desired value by the numeric keys.
SYMBOL RATE: Perform same operation as described as FREQUENCY.
POLARITY :Use [◄][►] button to select between vertical and horizontal.
Note: Make sure all above information is correct to search the signal
SCAN CHANNEL: Once you have correctly informed all date, use
[◄][►] button to select the scan mode, then press OK to launch search.
(a.) TP SCAN: Scan all transponders one by one, see<Figure2-5>.
successfully
parameters as desired.
<Figure2-5>
9

(b) TP NIT: Scan the transponders in one certain network.
SAT SCAN: Scan all the transponders in one satellite (these
transponders have been set in advance).
(c)
(d.) Blind 8MHz: Blind scan the frequency from 950-2150 by step
8MHz; see<Figure2-6>.
<Figure2-6>
(e.) Blind 12MHz: Blind scan the frequency from 950-2150 by step 12 MHz.
In the course of signal searching, you can get to know the status by
bar meter of the
LEVEL and QUALITY as well as the numerical of S/N, FEC,
BER. DiSEqC indicates which port is connected to the DiSEqC1.0 switch.
Adjust the dish slightly until you get the maximum of level and best quality.
Once the signal is got, the LOCK light comes on immediately. Now,
if press F1 to enter Outdoor / ZOOM mode, you can find acontinue
beeping sound working as indicator that may change its tone frequency
according to the signal strength.
2.MODE CHANGE: Press F1 to shift the display mode between Normal
/Zoom/Outdoor Zoom mode:
<Figure2-7>
10

S/N : reflects the signal to noise in dB
Outdoor mode
<Figure2-8>
3.MOTOR SETTING: Press F2 to activate the DiSEqC1.2 control
menu , see<Figure2-9>
<Figure2-9>
(a.) MOTOR RESET: Clear the limit of the position, Press OK on the item.
(b.) MOTOR INITIAL: Back to the initial position, Press OK on the item.
COMMAND: Control motor moving to west or east, Use [◄][►]
button to shift.Stop option automatically once the signal is locked.
4.USAL SETTING: Press OK on the USAL SETTING item, see
<Figure2-10>
(c)
11

<Figure2-10>
Choose your desired satellite at the Satellite Name option. Give
your location value to the Local Longitude and Local Latitude.
Enter the position of your selected satellite to the Satellite Longitude
if it is not correct. Press OK to select USAL POSITION, then the motor
will turn toward your selected satellite as calculating its position
DVB-T SIGNAL FINDING:
1. DVB-T signal finding menu shown as <Figure2-11>
<Figure2-11>
The modifiable parameters are the following:
FREQUENCY: With [◄][►] button to add or reduce values or
press OK to get the stored list pop up.
Band Width: Switch band width among 6/7/8
VOLTAGE: using ◄][►] button to choose different voltage power
supply to antenna.
SCAN CHANNEL: There are 2 methods to process scan, using
[◄][►] button to choose then press OK to launch search.
12

(a)TP Scan: Use [◄][►] button to change the SCAN CHANNEL item
to the option TP SCAN, then press OK to scan. see<Figure2-12>,
<Figure2-12>
(b)Scan All: Use [◄][►] button to change the SCAN CHANNEL item
to the option SCAN ALL, then press OK to scan. see<Figure2-13>
<Figure2-13>
In the course of signal searching, you can get to know the status
bar meter of the LEVEL and QUALITY as well as the numerical of
S/N and BER. Meanwhile, other details indicating the modulation
mode like FEC, CON, GUA and MOD are all readable.
Adjust the antenna slightly until you get the maximum of level
and best quality.
Once the signal is got, the LOCK light comes on immediately. Now,
if press F1 to enter Outdoor / ZOOM mode, you can find a continue
beeping sound working as indicator that may change its tone
frequency according to the signal strength.
2.MODE CHANGE: Press F1 to shift the display mode between
Normal /Zoom/Outdoor
13

Zoom mode:
<Figure2-14>
S/N : reflects the signal to noise in dB
Q: reflects the signal quality (%)
S: reflects the signal level (%)
Press [◄][►] key to adjust the volume of beep.
14
Multi-Channel mode:
3.FAV Channel setting: Press F2 to show the setting menu
D. Detailed operation Guide
1) POWER ON
Press POWER ON button and hold for 3 seconds to turn on the device
TIPS: Release the POWER ON button when the logo is displayed.
2)INSTALLATION
Choose INSTALLATION item on main menu, then the following
window appears.

2. LNB TYPE: Use [◄][►]button to browse all options.
3.22K SWITCH: Use [◄][►]button to shift AUTO/ON/OFF
4.LBN POWER: Use [◄][►]button to choose OFF /ON
5.DISEQC1.0: allows switching among DISEQC port A/B/C/D
6.DISEQC1.1: allows switching among DISEQC switch from
port 1 to port 16,
7.NEW SAT: Press OK to create a new satellite name by﹡soft
keyboard popping up on screen.
8.DEL SAT: press OK to delete the current satellite.
9.TV EDIT: All existent channels that are of satellite and terrestrial
to be edit here. Press F1 to edit TV channel, see <Figure2-16>
<Figure2-16>
MOVE INDEX:
Moves channel to another position. Press 2 to MOVE INDEX mode,
and the MOVE INDEX on the help information will be highlighted.
Press OK to select channel.
Use [▲] [▼] key to move the cursor to a new position as you require
and then press OK to confirm.
15
see <Figure2-15>
<Figure2-15>
1. SATELLITE NAME: Use [◄][►]button to browse stored satellites
or press OK to show the satellite list for selection.

﹡SOFT KEYBOARD instruction:
Use [◄][►][▲] [▼] buttons to move cursor and Press OK to
pick the alphabet.
Use SAVE button on keyboard to save the channel name entered in.
Use DEL button on keyboard to delete the alphabet entered.
Use OTHER button on keyboard for shifting upper/lower case.
Use EXIT button to leave soft keyboard mode.
10.RADIO EDIT: Press F2 to edit radio channel.
Usage instruction refers to TV EDIT
3)SYSTEM SETTING
1.Press SYSTEM button to display setting menu, see <Figure2-17>
<Figure2-17>
16
DELETE CHANNEL:
Deletes the current channel. Press 3 to DELETE CHANNEL, and
the DELETE CHANNEL on the help information will be highlighted.
Use [▲] [▼] key to select a channel press OK to delete.
NAME EDIT:
Press 4 to NAME EDIT, and NAME EDIT on the help information
will be highlighted.
Press OK to enter name with ﹡soft keyboard on screen.

6.FACTORY DEFAULT: Remove all the user data, press OK to
confirm on the item.
4)SPECTRUM
5)DVB-S SPECTRUM
Pressing AN/DG key on the signal finding menu gives access to
the spectrum analyzer function. The spectrum of current satellite
signal represents as <Figure2-18>
<Figure2-18>
1.H/V key to change between18V(Horizontal) and 13V(Vertical)
2.F2 key to change the scan step (8Mhz , 12Mhz, 20Mhz optional)
3.AN/DG: can change the scan mode from analog to digital
4.F1: to switch ZOOM mode and NORMAL can mode
17
2.OSD TRANSPARENT: Adjust OSD transparent mode.
3.SLEEP TIMER: Set up the sleep timer mode for auto shut off timer
4.PROFILE : Shift between the normal mode and outdoor mode
5.LOCK BEEP: Switch on/off the beep function while signal locked

5.Freq: to show the value of current focus frequency
6.Green axis indicates focused frequency, can be moved by up
& down Key for faster movement or by left & right keys for slower
movement.
7.Top maker will be shown on the high level position of spectrum.
8.The user can move the green column to the peak,and press
OK to scan out the channels.
9.LNB STATUS: reference to the LNB connected or not.
TIPS: Distinguishing of the analog spectrum. There is few change
of the spectrum data between the neighbor steps when signal
is weak. In case, the signal appears, the spectrum level will
increase suddenly or the slope increase to a certain data, which
is the peak.
DVB-T SPECTRUM
Pressing AN/DG key on the signal finding menu gives access to
the spectrum analyzer function. The spectrum of current satellite
signal represents as <Figure2-18>
18

<Figure2-18>
10.F2 key to change the scan step
11.F1: to switch ZOOM mode and NORMAL can mode
12.Green axis indicates focused frequency, can be moved by
up & down Key for faster movement or by left & right keys for
slower movement.
13.Top maker will be shown on the high level position of spectrum.
14.The user can move the green column to the wave crest,and
press OK to scan out the channels.
TIPS: Distinguishing of the analog spectrum. There is few change
of the spectrum data between the neighbor steps when signal
is weak. In case, the signal appears, the spectrum level will increase
suddenly or the slope increase to a certain data, which is the peak.
19

6)ANGLE CACULATION
1.Press ANGLE button to display the Calculation menu, see
<Figure2-19>
<Figure2-19>
2. SATELLITE NAME: Use [◄][►]button to browse stored satellites
or press OK to show the satellite list for selection.
3.Give your location value to the Local Longitude and Local Latitude.
4.Move cursor to ANGLE CACULATION and press OK to calculate
Move cursor to ANGLE CACULATION and press OK to calculate
the dish. The result you can read on ANTENNA AZIMUTH, ANTENNA
ELEVATION item.
6)CHANNEL INFORMATION
In the playing mode, pressing F1 key gives access to looking
over the information of current Satellite name and transponder,
as < Figure2-20> shown
< Figure2-20>
Satellite name and transponder information will be displayed.
20
Table of contents