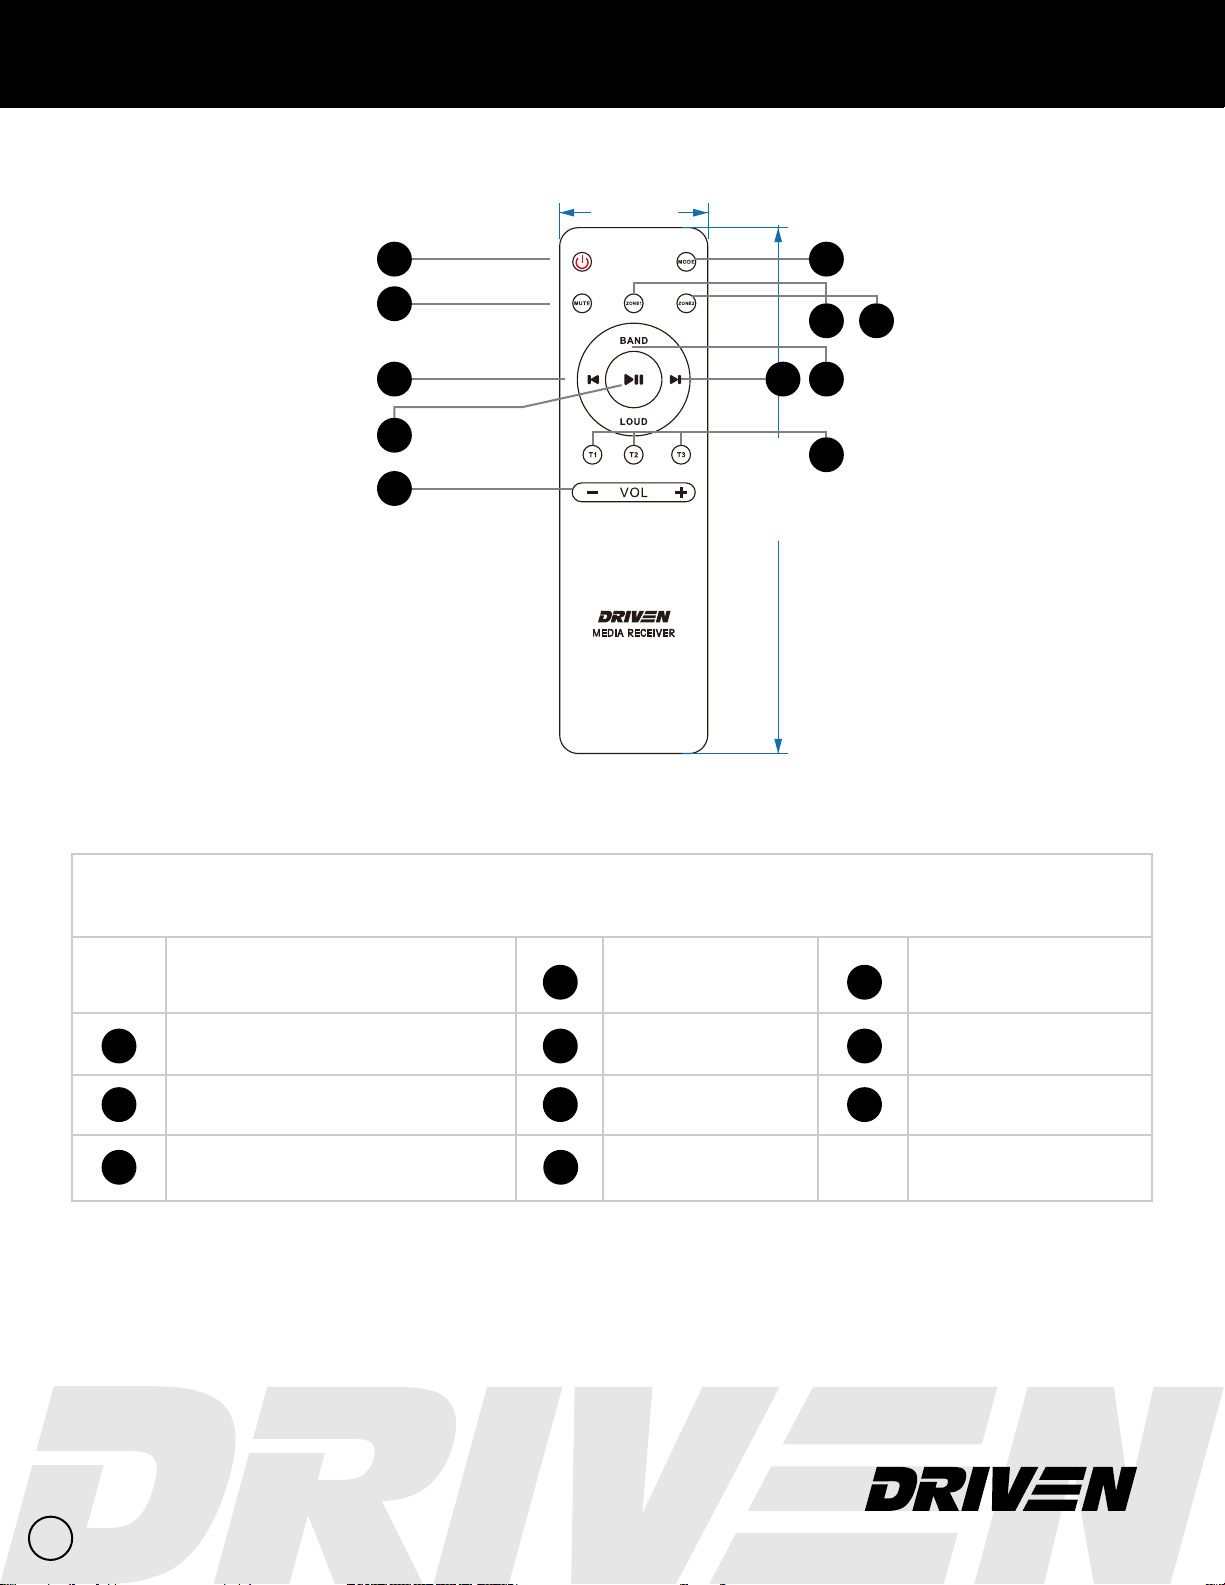
DRIVEN DR3200BT User manual

DR3200BT
Welcome
Instruction Manual
Thank you for purchasing the Driven Entertainment System. Before operating your new product, please read
these operating instructions carefully. They contain important information for safe use, installation and
maintenance of the product.
Please keep this instruction manual for future reference. The manufacturer does not accept responsibility for
any damages that may arise due to improper use. If you have any further questions regarding our products,
please contact us at:
ZONE1
ZONE2
3RPT
INT
2
HDMI USB
4RDM 56
VOL
SEL
MODE
TIME
T1
MUTE
T3
T2
BAND
APS
1
MEDIA RECEIVER
DR3200BT
1
FM2 94.5 1
CH

Front Panel Diagram
1
1
2
3
13
14
15
4
Zone 1
Speakers on/o
11
Track Select / Radio Station Search
Previous
12
11
12
10
Track Select / Radio Station Search
Next
10
Volume
VOL+ / VOL-
20
Reset
Press to master reset the unit
21
USB
Input
19
HDMI
Input
2
Zone 2
Speakers on/o
3
Selectable Sound Settings
Bass/Trebble/Sub/Zone Volume/EQ
4
Mode
USB/BT/HDMI/RADIO/AV1/AV2
(Short press to toggle between sources)
5
Power On/Off — Mute
Short press to turn on. Long press to turn o.
(Short press while powered on to mute)
6
T1
Interior Speaker LED
(T1 output switch, turn on/off)
13
Play Pause / P1
Radio Mode: Short press to select station P1, Long press
to save station in P1. (USB Mode: Play / Pause)
14
INT / P2
Radio Mode: Short press to select station P2, Long press
to save station in P2.
(USB Mode: Song browsing)
15
RPT / P3
Radio Mode: Short press to select station P3, Long press
to save station in P3. (USB Mode: Repeat playlist)
16
RDM / P4
Radio Mode: Short press to select station P4, Long press
to save station in P4.
(USB Mode: Randomize playlist)
17
P5
Radio Mode: Short press to select station P5, Long press
to save station in P5.
18
P6
Radio Mode: Short press to select station P6, Long press
to save station in P6.
7
T2
Exterior Speaker LED
(T2 output switch, turn on/off)
8
T3
Optional Function
(T3 output switch, turn on/off)
9
Band/Tuner Selection
APS, FM1, FM2, FM3, AM1, AM2
ZONE1
ZONE2
3RPT
INT
2
HDMI USB
4RDM 56
VOL
SEL
MODE
TIME
T1
MUTE
T3
T2
BAND
APS
1
MEDIA RECEIVER
DR3200BT
6
8
7
9
16 17
18
5
20
2119
2
FM2 94.5 1
CH

Trigger Functions
9
10
Forward
Previous
11
Play / Pause
Volume
1 3
Power
2
3
4
Mute
Mode
Zone 2
Band
8
7
5
6
Zone 1
Remote Control Buttons
Remote Control Diagram
24
678
9
10
11
5
5.31in (135.00mm)
1.5 in (38.00mm)
Note: DR3200REM optional remote
available, sold seperately.
3

Installation
Location
1. Carefully remove the plastic frame from the front panel of the unit.
2. Fix the unit in place with the 4 included #8 pan head self-tapping screws.
3. Replace the plastic from on the front panel of the unit.
• Choose a mounting location away from humid areas, water sources, burning products or any equipment
that can radiate heat.
• Select an area on the wall or cabinet, which is free from cable, fuel or brake lines.
• Ensure when the stereo is mounted in the cut out that the wires at the rear of the unit are not pressed
against the heat sink.
Installing the unit
• Before nally installing the unit, connect the wiring temporarily and make sure the unit and the system
function properly.
• Fix the unit to the wall using 4 self-tapping screw as indicated in the illustration.
Screw
Screw
Plastic frame of
the front panel
4

4-Speaker (2 zone) Wiring
ZONE 1
LEFT
WHITE
ZONE 1 LEFT SPEAKER (+)
WHITE/BLACK
ZONE 1 LEFT SPEAKER (-)
ZONE 1
RIGHT
GRAY
ZONE 1 RIGHT SPEAKER (+)
GRAY / BLACK
ZONE 1 RIGHT SPEAKER (-)
ZONE 2
LEFT
GREEN
ZONE 2 LEFT SPEAKER (+)
GREEN / BLACK
ZONE 2 LEFT SPEAKER (-)
ZONE 2
RIGHT
PURPLE
ZONE 2 RIGHT SPEAKER (+)
PURPLE / BLACK
ZONE 2 RIGHT SPEAKER (-)
Note: All speakers must be connected as shown. If one wire is removed or improperly
connected then all speakers on the relevant zone will not function as intended. Connection
with incorrect speaker polarity will lead to poor sound quality or speaker damage.
Harness Pin Connections
Brown (Black) / SW-
Grey (Black) / ZONE 1R-
Grey / ZONE 1R+
Purple (Black) / ZONE 2R-
Purple / ZONE 2R+
Green / ZONE 2L+
Green (Black) / ZONE 2L-
White / ZONE 1L+
White (Black) / ZONE 1L-
Yellow / B+12V
Pink / T3-CON
Orange / T2-CON
Blue (White) / T1-CON
Blue / AMP-CON
Black / B+12V
Brown / SW+
Red / ACC
Connections
Wiring Diagram
Antenna
AV OUT
AV OUT 1
AV OUT 2
Subwoofer Out
Audio Out
Wiring
Connecting Harness
5

Operation
Common Operation
1. To power the unit On/O
When the unit is powered Off, it may be switched On by pressing the POWER button. When the unit is
switched On, press and hold the POWER button to switch it o.
2. To select a function mode
Press MODE button repeatedly on on the front panel to select the corresponding mode.
(FM/AM, AV1, AV2, BLUETOOTH, HDMI)
3. To adjust the volume level
During playback, press VOLUME+ or VOLUME- button on the front panel to increase or decrease the
volume.
4. To mute or resume the sound
During playback, short press POWER button on the front panel to mute sound. Repeat this to disable
mute function.
5. To check speaker output status and select speaker output
Short-press ZONE 1 or ZONE 2 button on the front panel to check the speaker output status.
Press and hold ZONE 1 or ZONE 2 button on the front panel to turn ON/OFF the corresponding speaker
output, “Z 1 ON/OFF” or “Z 2 ON/OFF” will be displayed on the LCD.
6. To set the sound mode and menu
Press and hold SEL button to turn on BASS, then press SEL button repeatedly to select or circulate
through TRE (treble), EQ OFF (FLAT/AMERICA3/AUSTRALIA/EUROPE), press VOLUME+/- to change the
settings. Press SEL button to conrm your selection.
- 1) VOL LAST / VOL DEFA
VOL LAST: The last volume level setting will be saved automatically after the unit is swithced o, and
restored after powered on.
VOL DEFA: Press SEL button on the front control panel, the AVOL mark will be displayed on LCD. Use
VOLUME +/- to set the volume level as a constant value.
- 2) VOL LAST / VOL DEFA
In Radio mode, with the DX/LOCAL selection you can change the attenuator settings at the input stage
of the radio. This selection helps to avoid overloading the radio when strong (local) stations are received.
Select DX (DISTANT) mode to receive far/weak radio stations (highest sensitivity settings are enabled)
and select LOCAL for very strong stations (which are located nearby).
- NOTE: This button is only for FM reception. In AM mode, LOC is in valid.
7. To display and adjust the time
Press and hold MODE button to display time.
Press and hold MODE button for ~ 2 seconds until the time displays then release and hold MODE button
again until the hour begins to ash. Use VOLUME+/- button to adjust the hour. While hours is ashing,
hold MODE button until minutes begin to ash then Use VOLUME+/- button to adjust the hour.
6

8. To reset the unit
- 1) Press RESET button with a cuspidal object. The unit will be reset to factory default settings.
Radio Operation
1. To select radio band
Press BAND button repeatedly to select a desired radio band in sequence and circulating as:
-->FM1-->FM2-->FM3-->AM1-->AM2
2. To search for radio station manually or automatically
- In radio mode, press << / >> button to search your desired radio stations up/down manually.
- Press and hold << / >> button to search for the strongest station up/down automatically.
3. To store current station or turn on a preset one
- 1) If you want to store the current station, press and hold one of the digit butttons form 1~6 to store the
current station on the designated preset. You can store up to 30 presets.
- 2) Press one of the 6 buttons from 1~6 to enter the preset station in current band.
4. To auto search and store the top 6 strongest stations In radio mode, press and hold BAND button on the
front panel, the unit will start to search the available stations and check the signal strength from the lowest
frequency. The top 6 strongest stations will be saved to the corresponding preset numbered band 1~6.
USB Operation
1. To insert or pull out the USB stick
To play the tracks in USB disk, insert the USB disk into the USB port. The playing mode will be changed to
USB mode automatically and the USB indicator will be displayed on the LCD.
2. Press << or >> button to play previous or next track.
3. To fast forward or backward
Press and hold << or >> button to play backward or fast forward, release to resume normal playback.
4. To play previous or next 10th track.
Press 5 or 6 button to play previous or next 10th track.
5. How to use 1/PLAY/PAUSE button
During playback, press 1/PLAY/PAUSE button to pause playback,
Press 1/PLAY/PAUSE button again to resume,
Press and hold 1/PLAY/PAUSE button to select the rst track to play.
7

Note: DR3200BT supports NFC pairing. The NFC detection area is on the right of the
Power button.
1. Click the MODE button on the DR3200BT front panel to go to Bluetooth mode.
2. You should see NOT PAIR displayed on the LCD. If you see BT LINK and the Bluetooth icon is on, that
means DR3200BT is already connected to another device. You can clear it by pressing and holding the
BT button for ~2 seconds until NO LINK is shown, then continue with the rest of the steps below.
3. Go to the Bluetooth menu of your device.
4. Ensure Bluetooth is turned On.
5. Select the device named DRIVEN.
6. If the pairing and connection is successful, the mobile will show connected while DR3200 will show BT
LINK and the Bluetooth icon on LCD.
Bluetooth Operation
Pair and Connect
6. To repeat track(s)
- During playback, press 3/RPT button briey to play the current track repeatedly. RPT ONE will be
displayed on LCD.
- Press RPT button twice to play the track(s) in the album repeatedly. RPT DIR will be displayed on LCD.
- Press RPT button three times to repeat all tracks. RPT ALL will be displayed on LCD.
- Press RPT button four times to cancel the RPT function, RPT OFF will be displayed on LCD.
7. To play tracks at random
During playback, press RDM button to play all tracks at random. Press it again to cancel.
8. To search a track
Press USB button, TRK 0/00/000 (depending on the total tracks that are saved in the USB disk) will be
displayed on the LCD and the place marker in the 0 position will begin ashing.
After inputing your desired track, press 1/PLAY/PAUSE button to play the track to be selected.
8

• Bluetooth connection of mobile devices typically covers a 33 ft (10m) open-eld range. DR3200BT
“remembers”the last connected device. The unit will disconnect from any device that goes out-of-range,
DR3200BT will auto-reconnect to your device once it is back in range.
• If you explicitly disconnect the Bluetooth link by pressing the corresponding menu item in your device the
DR3200BT will not auto-reconnect.
• If you turn o Bluetooth from your device while the unit is connected, DR3200BT will not auto-reconnect
when you turn on the device’s Bluetooth option. Some devices will try to reconnect with the last Bluetooth
connected device.
• However, if you turn o Bluetooth on the device after an out-of-range disconnection, DR3200BT will
auto-reconnect once you turn on Bluetooth on the device when it is within range.
• Note that whenever disconnected, the DB3200BT can be paired and connected by any other Bluetooth
device.
Disconnect and Reconnect
• You can explicitly forget (or unpair) DB3200BT in mobile. If you do that while connected in range,
DB3200BT will be properly notied and all settled.
• If you do that after being disconnected while out-of-range, DB3200BT will still auto connect with the
device. If this happens, you can press and hold the BT button for ~2 seconds on DB3200BT to clear its
memory.
Forget (or Unpair)
• When audio is streamed from mobile to DB3200BT, BT AUDIO is shown on the LCD.
• You can control the trick modes (play, stop, next, prev) either from your device or DB3200BT.
• If you hear no sound or very low volume output, please check the volume on your device, then adjust the
volume on the DB3200BT to the level of your choice.
Audio Playback
9

Specifications
General
DC 12V
Max. 5A
4 x 9 W RMS
(4 Ohm speakers)
4 Channels
3.80 x 3.80 x 3.14 in
96.7 x 96.7 x 79.8 mm
Supply
Voltage
Current
Consumption
Power
Output
Number of
Channels
Mounting
Dimensions
(W x H x D)
FM Section
87.5mHz - 107.9mHz (U.S.A.)
Max. 5A
Frequency
Range
Eective
Sensitivity
AM Section
Frequency
Range
Eective
Sensitivity
Preamp
Output
522kHz - 1620kHz (USA)
40dBu
1V Output
USB Playback
Audio
Format
Frequency
Characteristics
Signal to Noise
Ratio (SNR)
MP3, WMA
20Hz - 100Hz <= 5dB
10kHz - 20kHz <= 5dB
1V Output
10

Driven warrants any products purchased in the U.S.A. from an authorized
Driven dealer.
All Products are warranted to be free from defects in material and
workmanship under normal use and service for a period of one (1) year.
This warranty applies to the original purchase only.
Driven will either repair or replace (at its own discretion) any unit that has
been found to be defective and under warranty provided the defect occurs
within the one (1) year warranty period.
This limited warranty does not exted to units that have been subjected to
misuse, abuse, neglect, or accident. In Driven’s judgement, products that
show evidence of having been altered, modied, or serviced without
Driven’s TM authorization, will be ineligible under this warranty.
To Obtain warranty service please contact your retailer or visit our website
at www.drivenelectronics.com
Designed and Engineered in the U.S.A.
LIMITED WARANTY
Other manuals for DR3200BT
1
Table of contents
Other DRIVEN Home Theater System manuals
Popular Home Theater System manuals by other brands

Sony
Sony HT-K5 operating instructions

Philips
Philips MCD 700 quick start guide

Sony
Sony DAV-HDZ235 - Dvd Home Theater System Specifications

Panasonic
Panasonic SCPT950 - DVD HOME THEATER SOUND SYSTEM operating instructions

Philips
Philips HTS6515 quick start guide

Zenith
Zenith XBS444 Installation and operating guide, warranty