Dromida SKYCRUISER2 User manual

READ THESE
READ THESE
INSTRUCTIONS
INSTRUCTIONS
BEFORE
BEFORE
FLYING!
FLYING!
™
WARNINGS
FOR YOUR SAFETY PLEASE
READ AND UNDERSTAND THESE
WARNINGS.
Radio control models are not toys.
Serious injury to people or damage to property
can result if they are not used in a responsible
manner.
Read all instructions carefully prior to
assembling and before flying this model. Seek
advice should any information be unclear.You
assume all risk and responsibility when using
this model.
GENERAL WARNINGS
●Never fly your aircraft from the street or at night.
Always fly in an open area free of obstructions.
●When flying, make sure any spectators are
behind you.
●Always be conscious of the spinning propeller.
Be careful not to allow loose clothing to be drawn
into the propeller.
●Because your aircraft is operated by radio control,
it is important to make sure you are always using
fresh and/or fully charged batteries. Never allow
the batteries to run low, or you could lose control
of the aircraft.
●Do not allow any of the electrical components to
get wet, or electrical damage may occur.
●You should complete a successful range check
of your radio equipment prior to each new day of
flying, or prior to the first flight of a repaired aircraft.
●Do not use any solvents to clean your model.
Solvents will damage the foam and plastic.
Use a dry cloth to clean any dirt from outside
of the aircraft.
●This product includes small and sharp-edged
parts. Always assemble and keep this product
out of children’s reach.
●Do not fly your airplane on days with strong
winds or side winds.
●When not using the model, always take the battery
out of the plane and switch off the transmitter.
Also, remove the batteries from the transmitter as
batteries may overheat or leak, causing damage.
●Do not store this model in a high-temperature/
humidity area or in direct sunlight.
RADIO CONTROL
SYSTEM WARNINGS
●Always turn on your transmitter before
turning on the aircraft and always
remove the battery from the aircraft
before turning off your transmitter.
●Always unplug the flight battery when not flying
the aircraft.
●Never shorten the receiver antenna, or you could
lose control of the aircraft during flight.
●Never attempt to disassemble or modify any of
the radio control system components.
LIPO BATTERY WARNINGS
YOU MUST READ THIS BEFORE
CHARGING THE BATTERY
●All instructions, warnings, and cautions must be
followed at all times. Failure to do so can lead to
serious injury or fire. Do NOT use this product
before reading and understanding all directions
and warnings.
●Do NOT use or charge the battery if it is hot
or swollen.
ITEMS INCLUDED
LiPo Flight Battery
SKY Cruiser 2
AC Power Supply
2.4GHz
Controller
“AA”
Batteries
Flight Battery
Charger

2
●Do NOT overcharge. Maximum voltage for each battery
must be followed.
●Do NOT short-circuit the battery. Check polarity before
connecting the battery to the charger.
●Remove the battery when it’s not in use.
●Do NOT operate or charge unattended.
●Do NOT use the battery if you do not understand the
warnings and proper use of the battery.
●Always let the battery cool and “rest” between uses and
charging. Do NOT charge inside your car.
●Inspect the battery before each use for swelling or other
malformation.If the battery has swelled, it MUST be discarded.
●Do NOT poke, bend or damage the battery.The outer casing
is soft and can be damaged.
●The battery must never exceed 160°F (70° C) for any reason.
INSTALL
TRANSMITTER BATTERIES
1
2
3
“AA”
CHARGE THE FLIGHT BATTERY
1
100 – 240 V AC
Power On
2Charging
Green
Red GreenGreen
3Charge
Complete
GreenGreen
1Plug the charger into a 100–
240V outlet. The green LED
will come on.
2
Plug the battery’s balance plug
into the charger as shown. The
red LED will come on also.
3
Once the battery is charged,
the red LED will turn off.
4
Unplug the battery and the
charger.

33
Level ight
Dive (Down)
Climb (Up)
Straight
Right Turn
Left turn
ClimbClimb
Dive
Dive
AA
Trim A (Elevator)
LeftLeft Right
Right
BB
Trim B (Rudder)
If the model is climbing
or diving when the
stick is positioned as
shown, use the A trim
button to make small
trim changes. Adjust
until the plane ies
level at half throttle.
If the model keeps turning
left or right while ying
into the wind, use the B
trim button to make
small trim changes.
Adjust until the plane
ies straight at half
throttle.
TRANSMITTER FUNCTION

4
ASSEMBLY
Insert the wing joiner into
one of the wing halves. Next,
slide the two wing halves
together inside the fuselage
as shown.
Wing
Joiner
PLUG IN THE FLIGHT BATTERY
1. Turn on the transmitter. Move
the throttle to 0%.
2.
Undo the canopy latch. Lift
up on the back edge of the
canopy and then slide it
backwards.
3.
Connect the matching plugs
and install the battery in the
nose of the plane.
4.
Insert the front canopy hook
into the slot provided.
5.
Rotate the back of the canopy
onto the latch and apply
pressure.There will be a ‘click”
when the latch is secure.
Half power - 50%
Full power - 100%
Power off - 0%

55
CHOOSING A FLYING FIELD
The flying field you choose is very important and should
be a large, open grass field. There should not be any ve-
hicles, buildings, power lines, trees, large rocks or anything
else that your model can crash into.
Control may be lost
if the airplane is
more than 500 feet
[150 meters] from the
transmitter.
CHOOSING A GOOD DAY TO FLY
Very
Light
Wind
Strong
Wind
Calm weather with either no wind or wind speed of 3–5 mph
[5–8 kph] is suitable for flying.
150 ft
150 ft
150 ft
150 ft
TAKEOFF
No
No
YES
1. Apply full throttle while facing into the wind. Hold the
plane horizontally and launch straight and level with a
gentle pushing motion.
2. After launching, reduce power to 50–75%, use gentle
rudder movements to turn left or right. Use small
movements of the elevator and throttle to adjust the
climb and altitude. (If the battery is not charged properly,
the plane will not climb).
Move the throttle stick down to 0% when crashing
to avoid damage.
TURNING
Once you reach 50 to 75 feet [15–20m] in altitude, you will be able to make a safe turn. Practice making turns both left and
right, adding a small amount of up elevator as the turn begins.
1Enter the turn by
slowly moving
the rudder about
halfway.
2Once the turn starts, add in a
small amount of up elevator to
maintain altitude and help turn
the plane.
3Use small
movements of
rudder and elevator
to control the turn
radius and altitude.
4Continue...
5To complete
the turn,
slowly release
the elevater
and rudder.

6
AFTER LANDING
1.
Always unplug and remove the plane’s battery first.
2.
Turn off the transmitter and remove its batteries
second.
3.
Allow the motor time to cool before flying again.
4.
Allow the battery to cool before recharging.
MAKING REPAIRS
For light weight and durability, the Sky Cruiser 2 is made
of foam. If it does break, repairs can be made using CA
(cyanoacrylate) glue (available at your local hobby shop).Once
the glued parts are fitted together, use clear tape to hold them
in place as they dry. Small cracks can be fixed with the clear
tape without the glue. When doing repairs, use as little glue
as possible to keep the weight down and be sure to keep the
tail and wings as straight as possible.
LANDING
When your plane feels like it is beginning to lose power, it is time to land.
Top View
1
2
3
456
Wind
Pilots View
Always land directly into the wind!
Wind
1Fly downwind to set up for landing.
Reduce the throttle to 25%.
2Turn 90 degrees
using a small
amount of rudder.
3Glide until
lined up for
final turn.
4Use a small amount of
rudder to turn into the
wind. You will want to be
lined up with the grass
landing area. Reduce or
increase throttle to adjust
speed and altitude. 5Reduce throttle to zero. Add in a “small”
amount of elevator to help slow the plane.
Let it glide! If you are short of the landing
area, add in a little power to extend the
glide. If you are long, power up and go
around for another try.
6Just before landing, “are” the plane
by slowly add a little more elevator.
The plane will slide to a stop in the
grass. Be careful! If you add in too
much elevator while gliding fast, the
plane will stall and possibly crash.
grass landing area
50−75 feet

77
REPLACEMENT PARTS
DIDA3050 Wing Set
DIDA3051 Fuselage
DIDA3052 Horizontal Stabilizer
DIDA3053 Vertical Stabilizer
DIDA3054 Canopy
DIDA3055 Pushrods
DIDA3056 Wing Joiner
DIDA3057 Folding Propeller
DIDA3058 Motor
DIDA3059 2.4 GHz Receiver
DIDJ2060 2.4 GHz Transmitter
DIDP1130 AC Balancing Charger
DIDP1095 Battery LiPo 2S 300mAh 20C
LINKING to FUTABA S-FHSS
The Sky Cruiser 2 will link to most Futaba S-FHSS transmitters.
1. Turn on the transmitter (if necessary place your Futaba
transmitter in “linking/pairing” mode) and plug the model’s
battery in.
2. Press and hold the link button
(inside the model’s nose) for
three seconds.
3. If the link has been successful
the control will move. If not
repeat the linking steps.
NOTE: To link back to the Dromida Q415 the process is the
same as above.
Be sure to stay clear of the propeller when linking.
The motor may start if the throttle servo reverse
is in the wrong position.
Link Button
PLANE SPECIFICATIONS
22.04 in.
[560 mm]
Weight
Wingspan
Height
Length
29.5 in.
[750mm] 3.8oz
[108g]
4.72 in. [120 mm]
SERVICE
If your Dromida product requires repairs or replacement,
contact:
Hobby Services 9am-5pm Central Mon.-Fri.
3002 N. Apollo Drive, Suite 1 (217) 398-0007
Champaign, Il, 61822, U.S.A.
hobbyservices@hobbico.com
BATTERY RECYCLING
ATTENTION: The SKY Cruiser 2 is powered
by a rechargeable LiPo battery.At the end of the
battery’s useful life, under various state and local
laws, it may be illegal to dispose of the battery
into the municipal waste system.Check with your
local solid waste officials for details in your area for recycling
options or proper disposal. We encourage contacting your
local recycling center for more information.

dromida.com© 2016 Dromida, a Hobbico®company DIDA1050
TROUBLESHOOTING
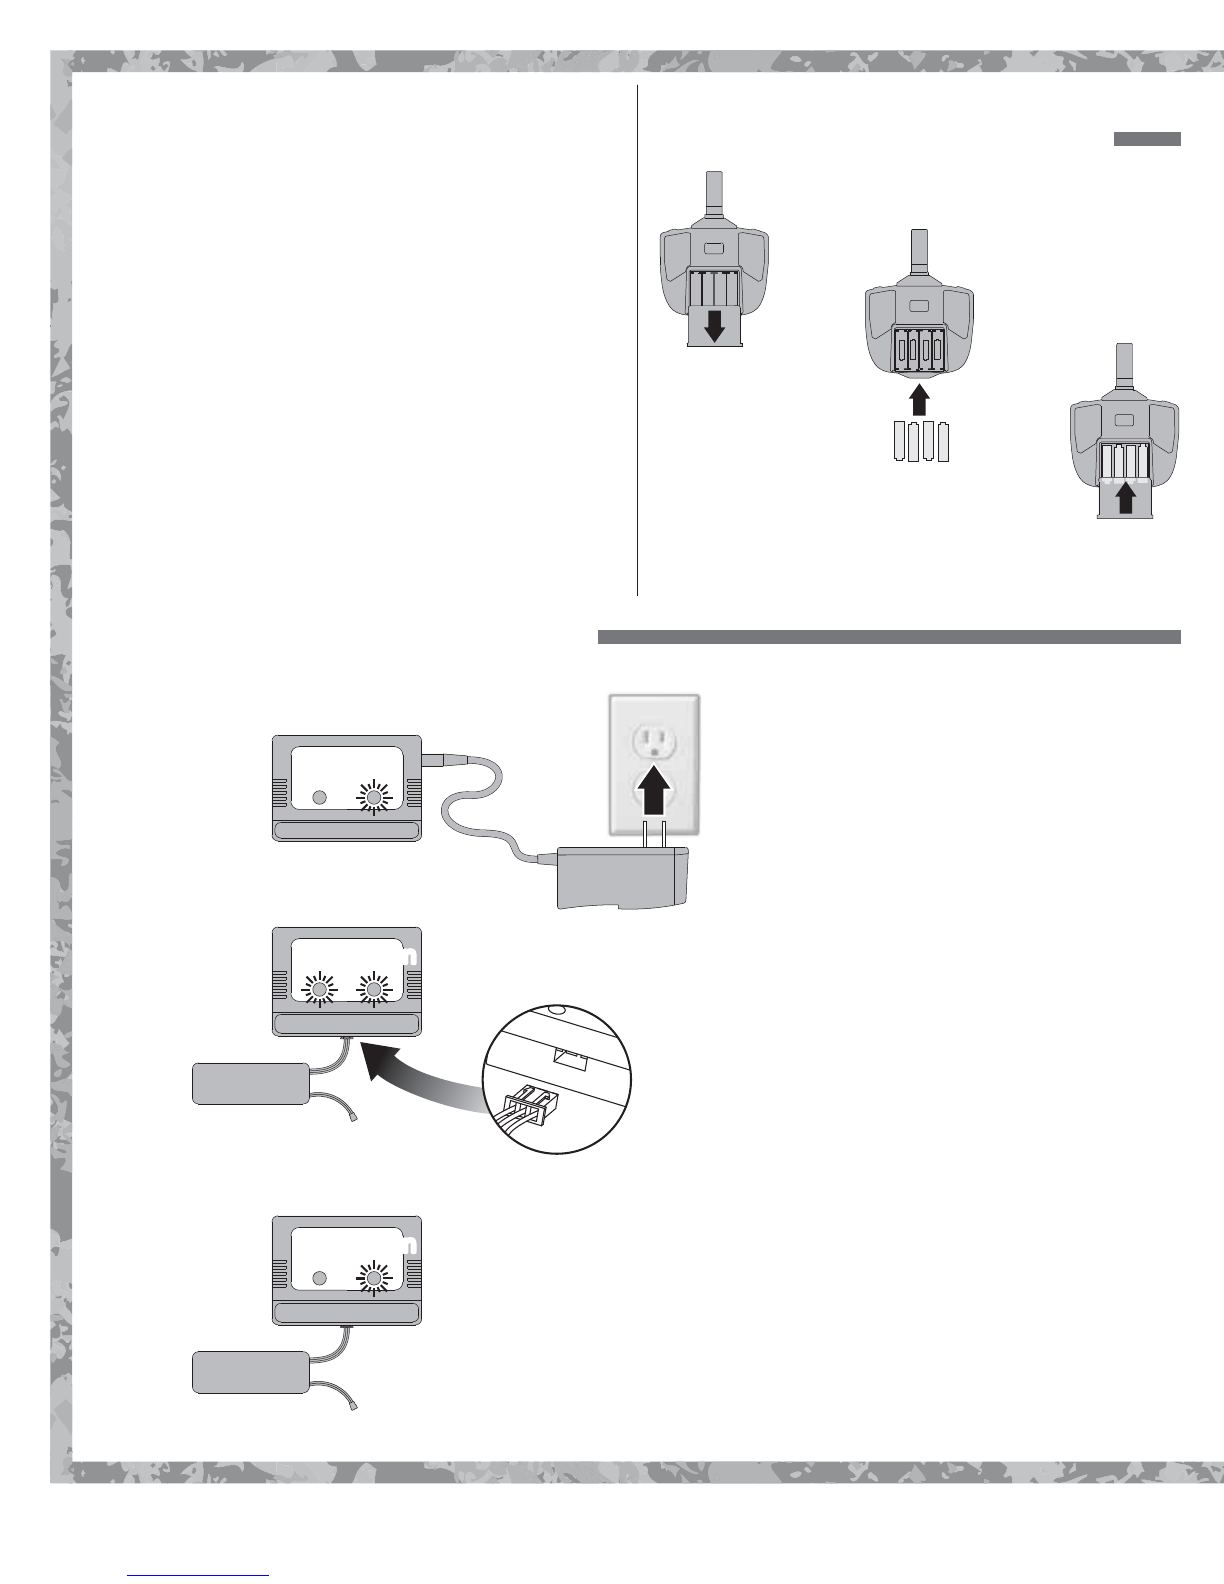
PROBLEM: Transmitter LED does not illuminate when
tuned on.
Solution: Transmitter batteries are installed incorrectly.
Remove batteries and check polarity markings.
Solution: Transmitter batteries are low. Replace the
batteries.
PROBLEM: The model does not respond to the
transmitter.
Solution: The battery needs to be charged. Charge
the battery.
Solution: The battery is not plugged in to the plane.
Plug it in.
Solution: The control linkages are not connected to
the control surfaces. Inspect and reattach or
replace the parts as needed.
Solution: The plane is not linked to the transmitter;
review and follow the linking procedure.
Solution: The transmitter batteries are low. Replace
the batteries.
PROBLEM: Flight time is short.
Solution: The flight battery was not fully charged. Let
the battery cool and charge again.
Solution: The flying conditions are too cold (below
60°F or 15°C).
Solution: The battery is old or damaged. Replace
the battery.
PROBLEM: The plane has excess vibration.
Solution: The prop is damaged. Replace the prop.
Solution: The motor shaft is bent. Replace the motor.
PROBLEM: The model does not fly straight or level.
Solution: The transmitter trims are not set properly.
Adjust the trims until the plane flies straight
and level.
Solution: Check the control linkages for damage.Repair
or replace parts as needed.
PROBLEM: The motor stops in flight.
Solution: When the flight battery voltage drops too low
the battery power to the motor is stopped.
Control surfaces will still operate for a
controlled landing. Land immediately and
recharge the battery.
FCC STATEMENT
FCC ID#: IYF-Dromida Q415
Brand: Dromida
This device complies with part 15 of the FCC rules. Oper-
ation is subject to the following two conditions.
(1) This device may not cause harmful interference.
(2) This device must accept any interference received, in-
cluding interference that may cause undesired operation.
NOTE:THE MANUFACTURER IS NOT RESPONSIBLE
FOR ANY RADIO OR TV INTERFERENCE CAUSED BY
UNAUTHORIZED MODIFICATIONSTOTHIS EQUIPMENT.
Any changes or modifications not expressly approved by
the party responsible for compliance could void the user’s
authority to operate the equipment.
This equipment complies with FCC radiation exposure
limits set forth for an uncontrolled environment.
This equipment should be installed and operated with a
minimum distance of 8 inches [20cm] between the radiator
(transmitter) and your body.
This transmitter must not be co-located or operating in
conjunction with any other antenna or transmitter.
KNOW BEFORE YOU FLY
As a new owner of an unmanned aircraft system (UAS),
you are responsible for the operation of this vehicle and
the safety of those around you. Please contact your local
authorities to find out the latest rules and regulations.
In the United States, please visit:
knowbeforeyoufly.org faa.gov/uas
www.hobbico.com/ama-lipo-warning.html
Table of contents
Other Dromida Toy manuals