DSI LIGHTING DS18697 User manual

Item # 310 500 021
Model # DS18697
USE AND CARE GUIDE
FLOOR LAMP
Questions, problems, missing parts? Before returning to the store,
call Design Solutions International Customer Service
Mon-Fri 9:30 am to 3:00 pm EST
1-800-388-6141 ext. 216
For customer service support and the fastest response, please email us at

Table of Contents
Safety Information
Warranty
READ AND SAVE THESE INSTRUCTIONS.
ONE (1) YEAR WARRANTY
WHAT IS COVERED
The manufacturer warrants this fixture to be free from defects in materials and workmanship for a period of one (1) year from date of
purchase. This warranty applies only to the original consumer purchaser and only to products used in normal use and service. If this product
is found to be defective, the manufacturer’s only obligation, and your exclusive remedy, is the repair or replacement of the product at the
manufacturer’s discretion, provided that the product has not been damaged through misuse, abuse, accident, modifications, alteration,
neglect, or mishandling. This warranty shall not apply to any product that is found to have been improperly installed, set-up, or used in any
way not in accordance with the instructions supplied with the product. This warranty shall not apply to a failure of the product as a result of
an accident, misuse, abuse, negligence, alteration, faulty installation, or any other failure not relating to faulty material or workmanship.
This warranty shall not apply to the finish on any portion of the product, such as surface and/or weathering, as this is considered normal wear
and tear.
WHAT IS NOT COVERED
The manufacturer does not warrant and specifically disclaims any warranty, whether expressed or implied, of fitness for a particular purpose,
other than the warranty contained herein. The manufacturer specifically disclaims any liability and shall not be liable for any consequential or
incidental loss or damage, including but not limited to any labor/expense costs involved in the replacement or repair of said product.
Contact the Customer Service Team at 1-800-388-6141 ext. 216 Eastern Time, Mon-Fri 9:30 am to 3:00 pm EST. For customer service support
IMPORTANT: Inspect the wire insulation for any cuts,
abrasions, or exposed copper that may have occurred during
shipping. If there is a defect in the wire, do not continue the
assembly process.
CAUTION: CONSULT A QUALIFIED ELECTRICIAN IF
YOU HAVE ANY ELECTRICAL QUESTIONS. If you have
any non-electrical questions about this fixture, please
call our Customer Service Team at 1-800-388-6141
ext. 216. Please reference your SKU (310 500 021) or
UPC (802513186970).
Table of Contents............................................................ 2
Safety Information.......................................................... 2
Warranty...........................................................................2
One (1) Year Warranty..................................................................2
What is Covered..........................................................................2
What is Not Covered................................................................... 2
Pre-Assembly.................................................................. 3
Planning Assembly......................................................................3
Package Contents.......................................................................3
Assembly..........................................................................4
Care and Cleaning.......................................................... 6
Troubleshooting.............................................................. 6
Service Parts................................................................... 7
Model..........................................................................................7
2
□This product has been manufactured with the highest
standards of safety and quality.
□For energy savings, this portable luminaire has been
engineered to safely use a self-ballasted compact uorescent
bulb in place of an incandescent bulb.
□Before assembling your portable luminaire, spread all parts out
on a clean surface. Inspect each part for defects that may have
occurred during shipping.

IMPORTANT: Inspect the wire insulation for any cuts,
abrasions, or exposed copper that may have occurred
during shipping. If there is a defect in the wire, do not
attempt installation. Please call the Customer Service
Team at 1-800-388-6141 ext. 216. For customer service
support and the fastest response, please email us at
NOTE: You can use a Max 150-Watt medium base (E26)
3-way type “A” bulb or Max16-Watt medium base (E26)
3-way self-ballasted LED bulb (sold separately).
Pre-Assembly
PLANNING ASSEMBLY
Read all instructions before assembly.
To avoid damaging this product, place it on a soft, non-abrasive surface, such as carpet or cardboard.
3
PACKAGE CONTENTS
Part Description Quantity
AFinial
(Pre-assembled on the harp (C)) 1
B Shade 1
C Harp 1
D Socket assembly 1
E Crystal column 1
Part Description Quantity
F Upper tube 1
G Middle tube 1
H Lower tube 1
I Power cord 1
J Base 1
A
B
C
D
E
F
G
H
J
I

Assembly
F
F
E
D
G
H
I
I
J
4
□Pull the excess power cord (I) through the base (J).
□Tighten the lower tube (H) onto the base (J).
□Tighten the middle tube (G) onto the lower tube (H).
□Tighten the upper tube (F) onto the middle tube (G).
□Pull any excess power cord (I) through the base (J).
□Tighten the column (E) onto the upper tube (F).
□Tighten the socket assembly (D) onto the column (E).
1 Connecting the tubes onto the base 2 Connecting the column and socket
assembly onto the tube
NOTE: Hold power cord (I) in place while screwing on
tube to ensure power cord does not twist.
NOTE: Hold power cord (I) in place while screwing on
tube to ensure power cord does not twist.

Assembly (continued)
D
A
C
D
I
B
4
□Screw a Max150W medium base (E26) 3-way type A bulb
(sold separately) into the socket of the socket assembly (D).
□Insert the harp (C) prongs into the saddle of the socket
assembly (D) and slide the retaining covers over the joints to
secure the harp (C).
□Unscrew the nial (A) from the harp (C), place the shade (B)
onto the harp (C) and secure with the nial (A).
□Plug into the outlet, turn on the switch located on the socket
assembly (D) and enjoy.
3 Installing the light bulb 4 Installing the shade
NOTE: You can also use one Max 16W medium base
(E26) 3-way self-ballasted LED bulb (sold separately). Do
not exceed the recommended wattage.
NOTE: Remove the plastic cover before using this shade.

5
Care and Cleaning
Troubleshooting
□Use a dry, soft cloth to dust or wipe carefully.
□Do not clean with abrasive materials, bleach, or solvents.
Problem Possible Cause Solution
The lights will not turn on. The bulb is burned out. Replace the light bulb.
The power is off. Ensure the power supply is turned on.
The cord is not plugged in. Ensure the cord is plugged into an outlet.
The circuit breaker is off. Ensure the circuit breaker is set in the “ON” position.
The fuse blows, or the circuit breaker
trips, when the light is turned on.
There is an exposed wire. Discontinue use of the lamp. Check the wire connections.
Contact a qualied electrician or call the Customer Care
Service Team at 1-800-388-6141 ext. 216. For customer
service support and the fastest response, please email us

Service Parts
6
MODEL: DS18697
Part Description
AFinial
(Pre-assembled on the harp (C))
B Shade
C Harp
D Socket assembly
E Crystal column
Part Description
F Upper tube
G Middle tube
H Lower tube
I Power cord
J Base
A
B
C
D
E
F
G
H
J
I

Questions, problems, missing parts? Before returning to the store,
call Design Solutions International Customer Service
Mon-Fri 9:30 am to 3:00 pm EST
1-800-388-6141 ext. 216
For customer service support and the fastest response, please email us at
Retain this manual for future use.

Artículo núm. 310 500 021
Modelo núm. DS18697
GUÍA DE USO Y MANTENIMIENTO
LÁMPARA DE PIE
¿Tiene alguna pregunta o algún problema? ¿Le faltan piezas? Antes de volver a la
tienda, llame al Servicio de atención al cliente de Design Solutions International
De lunes a viernes, de 9.30 a 15 h EST
1-800-388-6141 ext. 216
Para obtener ayuda de nuestro Servicio de atención al cliente y la respuesta más
rápida, envíenos un correo electrónico a

PRECAUCIÓN: CONSULTE A UN ELECTRICISTA
CUALIFICADO SI TIENE ALGUNA PREGUNTA SOBRE
ELECTRICIDAD. Si tiene alguna pregunta sobre esta
lámpara que no esté relacionada con la electricidad,
llame al teléfono del equipo del Servicio de atención al
cliente: 1-800-388-6141 ext. 216. Proporcione el código
SKU (310 500 021) o UPC (802513186970).
2
Tabla de contenidos
Información de seguridad
LEA Y GUARDE ESTAS INSTRUCCIONES.
Tabla de contenidos........................................................2
Información de seguridad.............................................. 2
Garantía........................................................................... 2
Garantía de un (1) año................................................................ 2
¿Qué cubre? .............................................................................. 2
¿Qué no cubre? ......................................................................... 2
Premontaje...................................................................... 3
Planicación del montaje............................................................3
Contenidos del paquete.............................................................. 3
Montaje............................................................................ 4
Mantenimiento y limpieza.............................................. 6
Reparación de averías....................................................6
Piezas de repuesto......................................................... 7
Modelo........................................................................................ 7
□Este producto se ha fabricado con los máximos niveles de
seguridad y calidad.
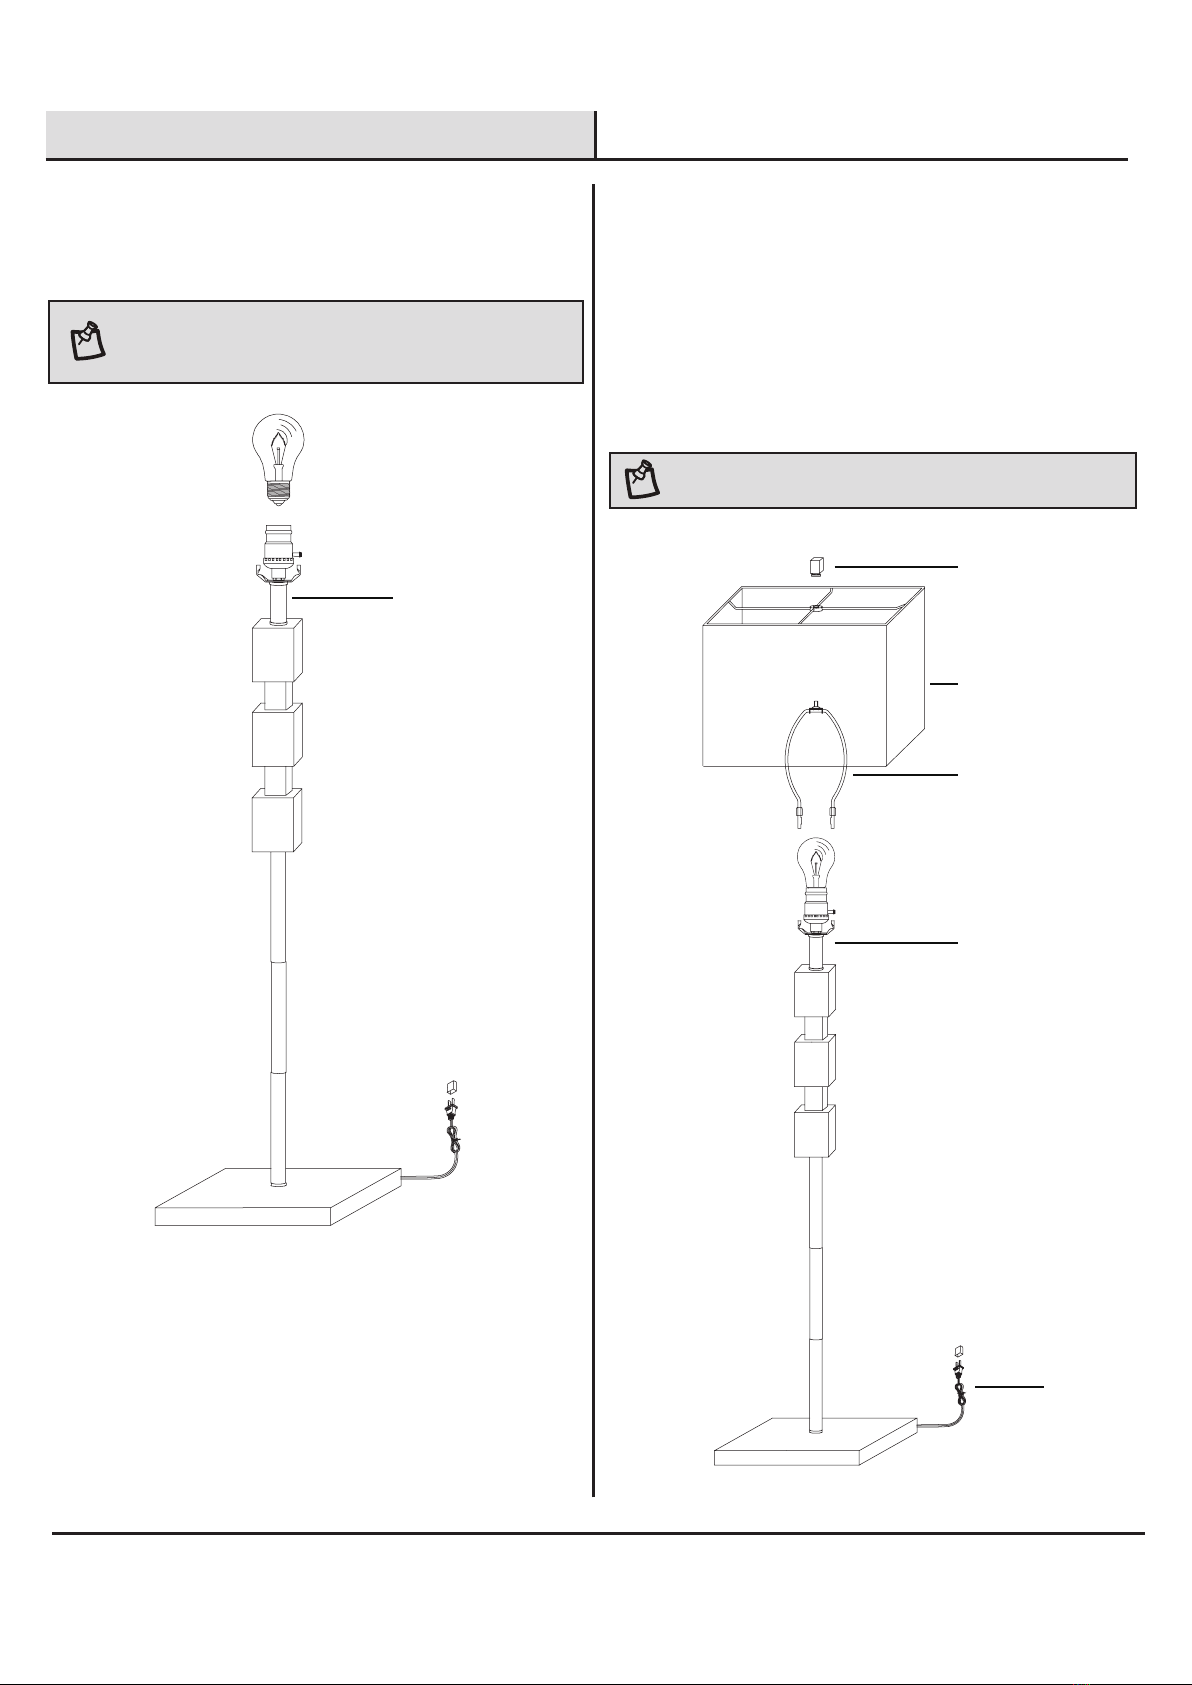
□Con el n de ahorrar energía, esta lámpara portátil ha
sido diseñada para utilizar de forma segura una bombilla
uorescente compacta con balasto propio en lugar de una
bombilla incandescente.
□Antes de montar la lámpara portátil, coloque todas las piezas
en una supercie limpia. Inspeccione cada pieza para detectar
cualquier defecto que pueda haberse producido durante el
envío.
IMPORTANTE: Inspeccione el aislamiento del cable para
detectar cualquier corte, abrasión o exposición del cobre
que pueda haberse producido durante el envío. Si el cable
tiene algún defecto, no continúe con el proceso de montaje.
Garantía
GARANTÍA DE UN (1) AÑO
¿QUÉ CUBRE?
El fabricante garantiza que esta lámpara no presentará defectos de material ni de mano de obra durante un período de un (1) año a partir
de la fecha de compra. Esta garantía se aplica solo al comprador original y únicamente a los productos que se utilicen en condiciones
normales y reciban un mantenimiento adecuado. Si este producto resulta defectuoso, la única obligación del fabricante, y la única solución,
es reparar o sustituir el producto a discreción del fabricante, siempre que el producto no se haya dañado por uso indebido, abuso, accidente,
modificaciones, alteración, negligencia o mal manejo. Esta garantía no se aplicará a ningún producto que se haya instalado, configurado
o utilizado de forma incorrecta sin haber seguido las instrucciones que incluye el producto. Esta garantía no se aplicará a ningún fallo
del producto ocasionado por accidentes, mal uso, abuso, negligencia, alteración, instalación defectuosa o cualquier otro fallo que no esté
relacionado con el material defectuoso ni la mano de obra.
Esta garantía no se aplicará al acabado de ninguna parte del producto, como la superficie y/o partes erosionadas, ya que se considera uso y
desgaste normal.
¿QUÉ NO CUBRE?
El fabricante no otorga y renuncia expresamente a cualquier garantía, ya sea explícita o implícita, de idoneidad para un fin determinado,
distinta de la garantía que incluye este producto. El fabricante renuncia expresamente a cualquier responsabilidad y no se hará responsable
de ninguna pérdida ni daño consiguientes o imprevistos, incluidos pero sin limitarse a, los costes de mano de obra o los gastos derivados de
la sustitución o la reparación de dicho producto.
Póngase en contacto con el equipo del Servicio de atención al cliente llamando al 1-800-388-6141, ext. 216, hora del este, de lunes a viernes,
de 9.30 a 15 h EST. Para obtener ayuda de nuestro Servicio de atención al cliente y la respuesta más rápida, envíenos un correo electrónico a

OBSERVACIÓN: Puede utilizar una bombilla de base
media (E26) de 150 W como máximo de 3 vías de tipo “A”, o
bien una bombilla LED de 3 vías con balasto propio de base
media (E26) de 16 W como máximo (se venden por separado).
3
CONTENIDOS DEL PAQUETE
Pieza Descripción Cantidad
ARemate
(preinstalado en el arpa (C)) 1
B Pantalla 1
C Arpa 1
D Conjunto del casquillo 1
E Columna de cristal 1
Pieza Descripción Cantidad
F Tubo superior 1
G Tubo medio 1
H Tubo inferior 1
I Cable de alimentación 1
J Base 1
A
B
C
D
E
F
G
H
J
I
IMPORTANTE: Inspeccione el aislamiento del cable
para detectar cualquier corte, abrasión o exposición del
cobre que pueda haberse producido durante el envío.
Si el cable tiene algún defecto, no intente realizar la
instalación. Llame al 1-800-388-6141, ext. 216, para
contactar con el equipo del Servicio de atención al
cliente. Para obtener ayuda de nuestro Servicio de
atención al cliente y la respuesta más rápida, envíenos
un correo electrónico a CustomerSupport@DSILighting.
Premontaje
PLANIFICACIÓN DEL MONTAJE
Lea las instrucciones antes de comenzar el montaje.
Para evitar dañar este producto, colóquelo sobre una supercie suave, no abrasiva, como una alfombra o un cartón.

Montaje
F
F
E
D
G
H
I
I
J
4
□Tire del cable de alimentación sobrante (I) a través de la base
(J).
□Apriete el tubo inferior (H) a la base (J).
□Apriete el tubo medio (G) en el tubo inferior (H).
□Apriete el tubo superior (F) al tubo medio (G).
□Tire del cable de alimentación sobrante (I) a través de la base (J).
□Apriete la columna (E) al tubo superior (F).
□Apriete el conjunto del casquillo (D) a la columna (E).
1 Conexión de los tubos a la base 2 Conexión de la columna y el conjunto
del casquillo al tubo
OBSERVACIÓN: Sostenga el cable de alimentación (I)
en su lugar mientras lo enrosca al tubo para asegurarse
de que el cable de alimentación no se retuerza.
OBSERVACIÓN: Sostenga el cable de alimentación (I)
en su lugar mientras lo enrosca al tubo para asegurarse
de que el cable de alimentación no se retuerza.

Montaje (continuación)
D
A
C
D
I
B
4
□Enrosque una bombilla de base media (E26) de 150 W como
máximo de 3 vías de tipo A (se venden por separado) en el
casquillo del conjunto del casquillo (D).
□Introduzca las puntas del arpa (C) en la montura del conjunto
del casquillo (D) y deslice las cubiertas de retención sobre las
juntas para asegurar el arpa (C).
□Desenrosque el remate (A) del arpa (C), coloque la pantalla (B)
sobre el arpa (C) y fíjela con el remate (A).
□Enchufe la toma de corriente, encienda el interruptor ubicado
en el conjunto del casquillo (D) y disfrute.
3 Instalación de la bombilla 4 Instalación de la pantalla
OBSERVACIÓN: También puede utilizar una bombilla
LED de 3 vías con balasto propio de base media (E26) de
16 W como máximo (se venden por separado). No supere
la potencia en vatios recomendada.
OBSERVACIÓN: Retire la cubierta de plástico antes de
utilizar esta pantalla.

5
Mantenimiento y limpieza
Reparación de averías
□Utilice un paño seco y suave para quitar el polvo o limpiar con cuidado.
□No limpie con materiales corrosivos, lejía o solventes.
Problema Posible causa Solución
Las luces no se encenderán. La bombilla está quemada. Sustituya la bombilla.
La alimentación está apagada. Asegúrese de que la fuente de alimentación está encendida.
El cable de alimentación no está
conectado.
Asegúrese de que el cable de alimentación esté conectado a
la toma de corriente.
El disyuntor está apagado. Asegúrese de que el disyuntor está en la posición de
encendido (ON).
El fusible se quema o se activa el
disyuntor cuando se enciende la
luz.
Hay un cable expuesto. Interrumpa el uso de la lámpara. Inspeccione las conexiones
de cables. Póngase en contacto con un electricista cualicado
o llame al 1-800-388-6141, ext. 216, para contactar con el
equipo del Servicio de atención al cliente. Para obtener ayuda
de nuestro Servicio de atención al cliente y la respuesta más
rápida, envíenos un correo electrónico a CustomerSupport@
DSILighting.com.

Piezas de repuesto
6
MODELO: DS18697
A
B
C
D
E
F
G
H
J
I
Pieza Descripción
ARemate
(preinstalado en el arpa (C))
B Pantalla
C Arpa
D Conjunto del casquillo
E Columna de cristal
Pieza Descripción
F Tubo superior
G Tubo medio
H Tubo inferior
I Cable de alimentación
J Base

¿Tiene alguna pregunta o algún problema? ¿Le faltan piezas? Antes de volver a la
tienda, llame al Servicio de atención al cliente de Design Solutions International
De lunes a viernes, de 9.30 a 15 h EST
1-800-388-6141 ext. 216
Para obtener ayuda de nuestro Servicio de atención al cliente y la respuesta más
rápida, envíenos un correo electrónico a
Conserve este manual para futuras consultas.
This manual suits for next models
1
Table of contents
Languages:
Other DSI LIGHTING Outdoor Light manuals
Popular Outdoor Light manuals by other brands

Platek
Platek FESSURA Assembly instructions

Sea gull lighting
Sea gull lighting HC-905 Installation and safety instructions

LightPro
LightPro Tiga DL user manual

Energizer
Energizer 10343-CO-10 Assembly and care instructions

Acuity Brands
Acuity Brands Lithonia KAXW LED installation instructions

John Lewis
John Lewis Harmony user manual