DTC Audio Champ MP3-DVD User manual

- MP3/DVD
PORTABLE WIRELESS AMPLIFIER WITH DVD PLAYER &
MP3 PLAYER/RECORDER
ETS LOGISTICS BV
6. Technical Specication
Amplier Specication
Max. Power Output RMS 100-Watt
No. of Mic Input 1 x Wired Microphone by combination jack
1 x UHF Wireless Microphone (Other frequencies are option)
Volume Control 1 x Wired Microphone
1 x Wireless Microphone
1 x Aux
Tone Control 1 x Treble, Independent
1 x Bass, Independent
Aux. Input/Output 1 x In-RCA / 1 x Out-RCA
Speaker 8” Dynamic Full range + 2” Tweeter
External Speaker >16Ω
Built-In Battery 12V/14A, Rechargeable & Explosion-proof
Charging Approx. 10-hours for a Single charge
Discharge Protection 10.4V (Factory set: Lowest voltage for ABMR)
AC/DC Adapter (SMPS) AC100-240V 50-60Hz / DC15-16V/4.5A UL/CE/CSA/TÜV
Weight Approx. 17Kg-Nett
Dimensions 270mm(L) x 270mm(W) x 420mm(H) Nett
340mm(L) x 340mm(W) x 540mm(H) Gross
DVD Player Specication (Please also refer to the separate manual)
Playable discs DVD/SVCD/VCD/CD-RW/MP3 audio disc.
Video format MPEG1, MPEG2
Audio format Dolby Digital
Signal output
Video signal : NTSC or PAL
Video : 1.0VP-P
Audio: ≥1V
Output interface
1 × RCA output for TV
1 × D-15 VGA output for Monitor
1 × Coaxial digital output
Frequency response DVD : 20HZ~20KHZ
MP3 Player Specication
Internal Memory Built-in 64MB NAND Memory
External Memory Support In-slot SD Card up to 1 GB
USB Version 1.1
Recording About 60min. by Built-in internal memory (Sampling of 48K)
EQ Jazz, Classic, Rock, Pop, Normal
Display LCD with Back-light
Repeat A-B Repeat Function
Driver Plug & Play over Windows98
Wireless Receiver Specication
Carrier Frequency UHF 863 ~ 865MHz (Other UHF/VHF Frequencies are option)
Oscillation Mode PLL Synthesized
No of Channel Single-Ch (Option Dual-Ch)
Preset Frequency 16-Frequencies
Bandwidth 24MHz
Modulation Mode FM (F3E)
S/N Ratio >105dB
THD <0.5% @1KHz
Frequency Response 50Hz~18KHz
Wireless Transmitter Specication
Carrier Frequency UHF 863 ~ 865MHz (Other UHF/VHF Frequencies are option)
Oscillation Mode PLL Synthesized
Bandwidth 24MHz
RF Output 10mW (Depends on regulation)
Spurious <-55dBc
Battery 2 × 1.5V AA Type
Current Drain 30~35mA, Typical
Weight 240g

Contents
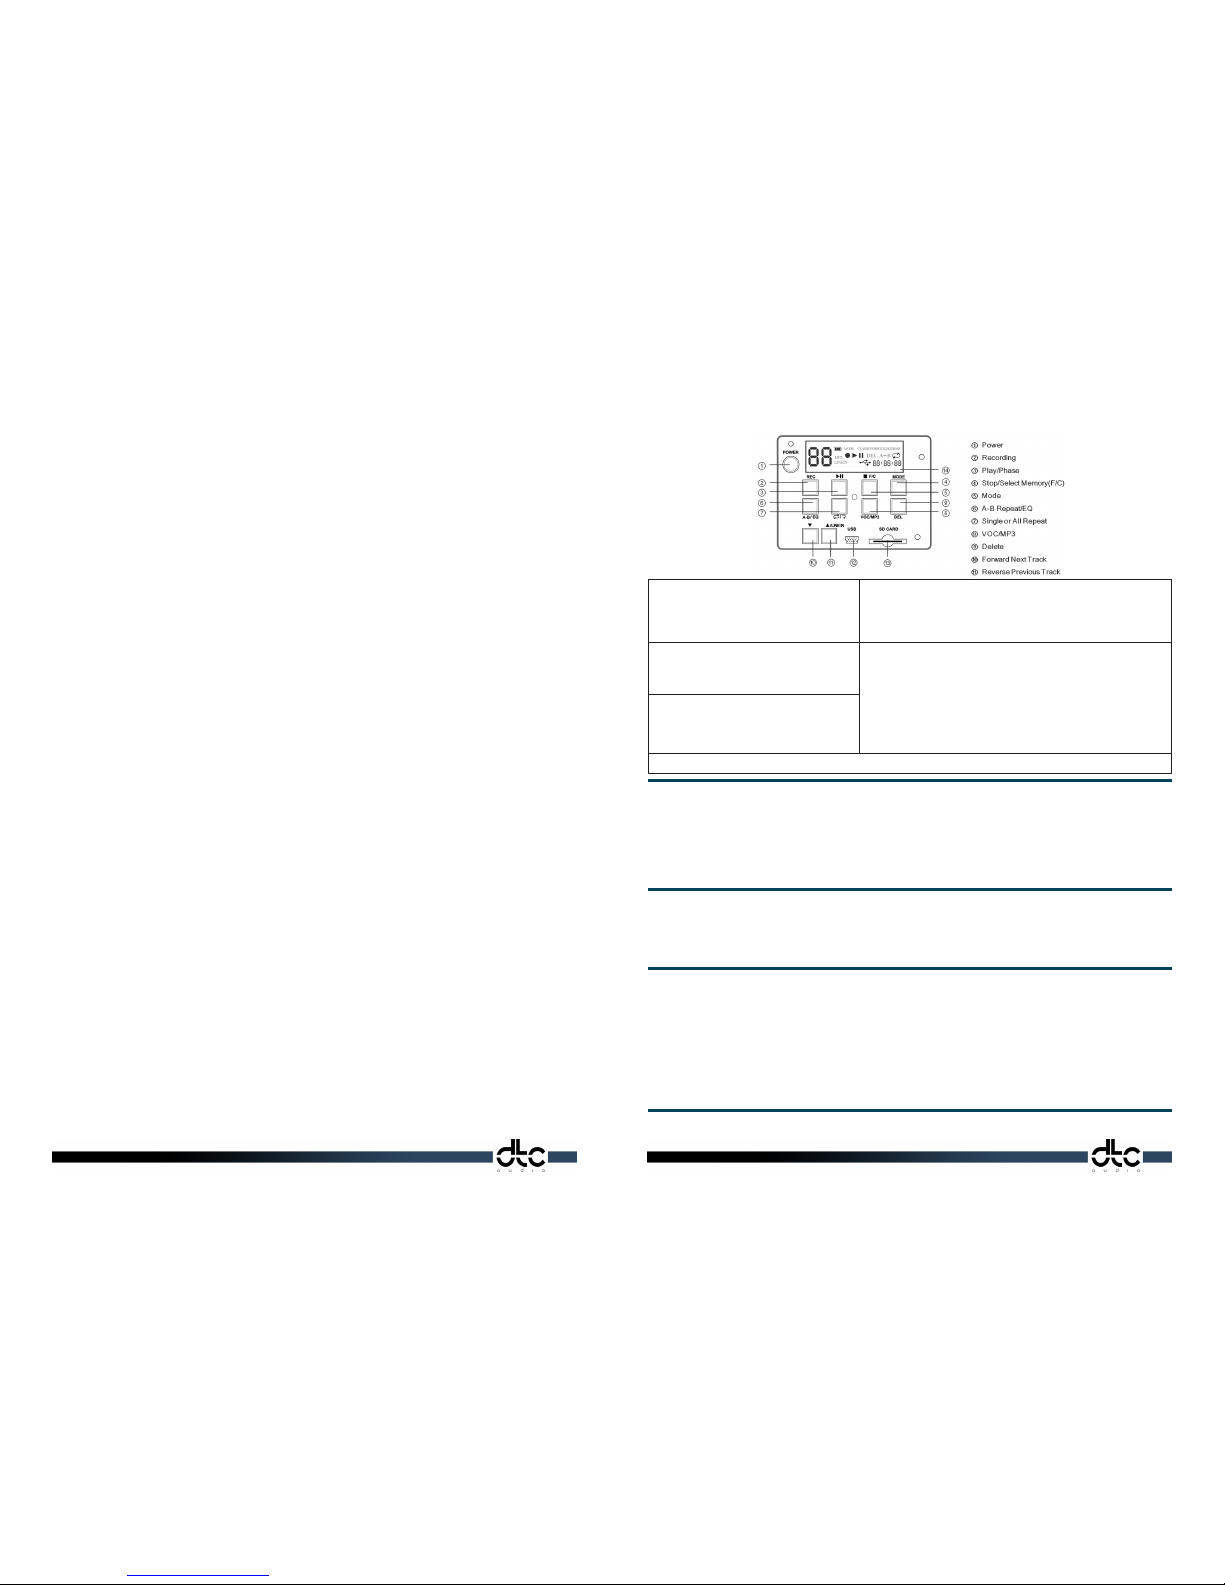
1) Champ-MP3-DVD Panel
2) Operating Instructions
3) Battery Operation & Recharging
4) Important Notes
5) Warranty Information
6) Technical Specication 3. Battery Operation & Recharging
Automatic Battery Monitoring & Recovery System (ABMR)
The main amplier is equipped with an auto battery monitoring and recovery system. This continuously monitors the battery
and will automatically turn-off the amplier completely if the voltage drops to a dangerous level, which might harm
the battery. The system can instantly recover by switching on the supplied AC/DC adapter. When the low-battery LED
illuminates, the built-in battery needs to be charged immediately. Plug in the AC/DC adapter to input jack on the front
panel. The charge LED will illuminate and will automatically turn off when the charging completed in approx. 10h. Continue
to charge some extra hours to ensure battery fully charged.
5. Warranty information
DTC Audio hereby warrants that this product will be free from defects in material and workmanship for a period of one year from the date of
purchase. At our option, we will repair or replace the defective product and promptly return it to you. You should retain proof of purchase to
validate the purchase date and return it with any warranty claim.
If you believe this product is defective within the warranty period, carefully repack the unit, insure it, and return it freight prepaid to your nearest
dealer or authorized service center or direct to us.
This warranty does not apply in case of abuse of the product use contrary to our instructions, or unauthorized repair. All implied WARRANTIES of
MERCHANTABILITY of FITTNESS FOR A PARTICULAR PURPOSE are disclaimed and we hereby disclaim liability for incidental, special or consequential
damages resulting from the use or unavailability of this product.
THIS WARRANTY SUPERSEDES ALL WARRANTIES THAT ARE INCLUDED WITH THIS PRODUCT.
4. Important Notes
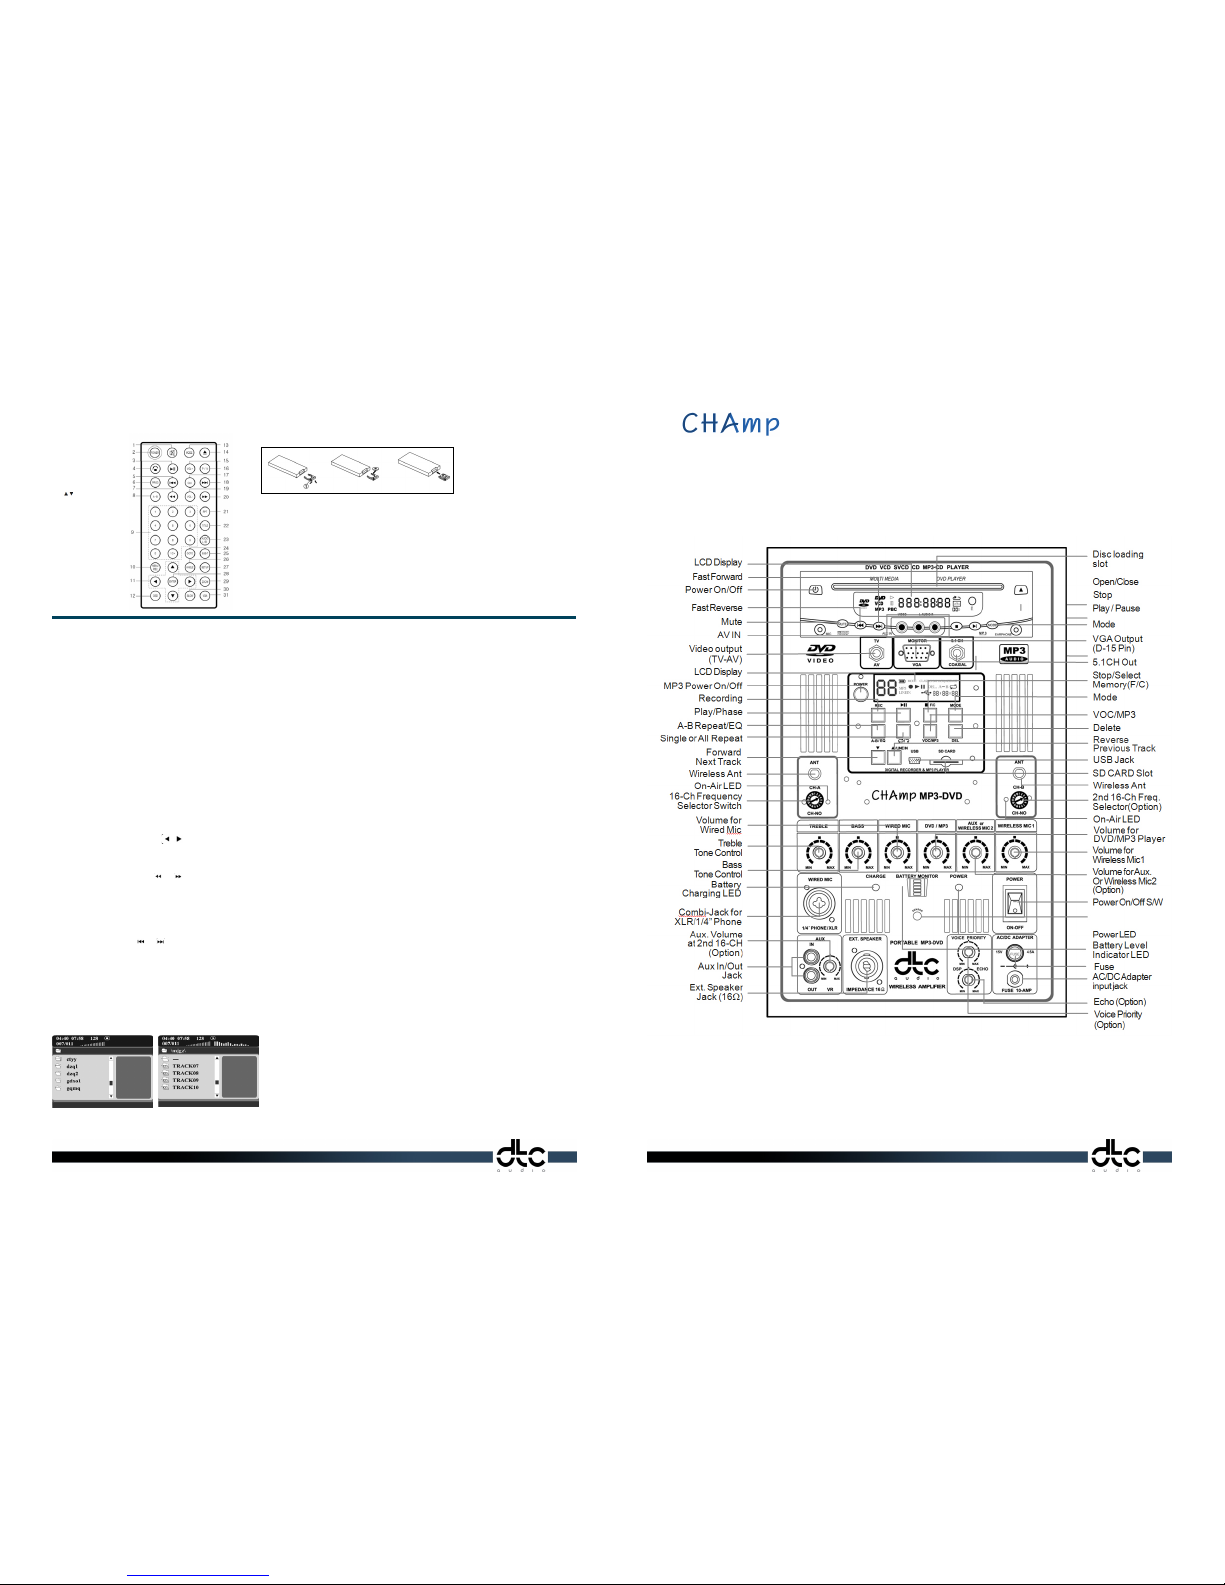
- The impendance of the external speaker should be greater than 16Ω.
- Do not use an AC/DC adapter other than that supplied otherwise guarantee void.
- Please do not use a fuse other than the specied rated one of 250V/5A.
- Charging should be done at regular intervals to conpensate for natural discharging.
Using the MP3 player
Download Files from Computer
Turn on the MP3 system and connect USB jack and PC
by supplied USB cable. The PC will recognize built-in
ash memory as 1st Removable disk and SD card as 2nd
Removable disk. Copy le to download and paste it
to any of Removable disk. Or simply drag & drop les.
*Download and duplication of MP3 le with copyright
ought to be according to relevant law.
Download Termination
Do not remove SD card or disconnect USB cable during data transmission otherwise
data le will be damaged. In case of Windows 2000/XP, click icon of “Hardware
separation” at the right-bottom icon bar before disconnection.
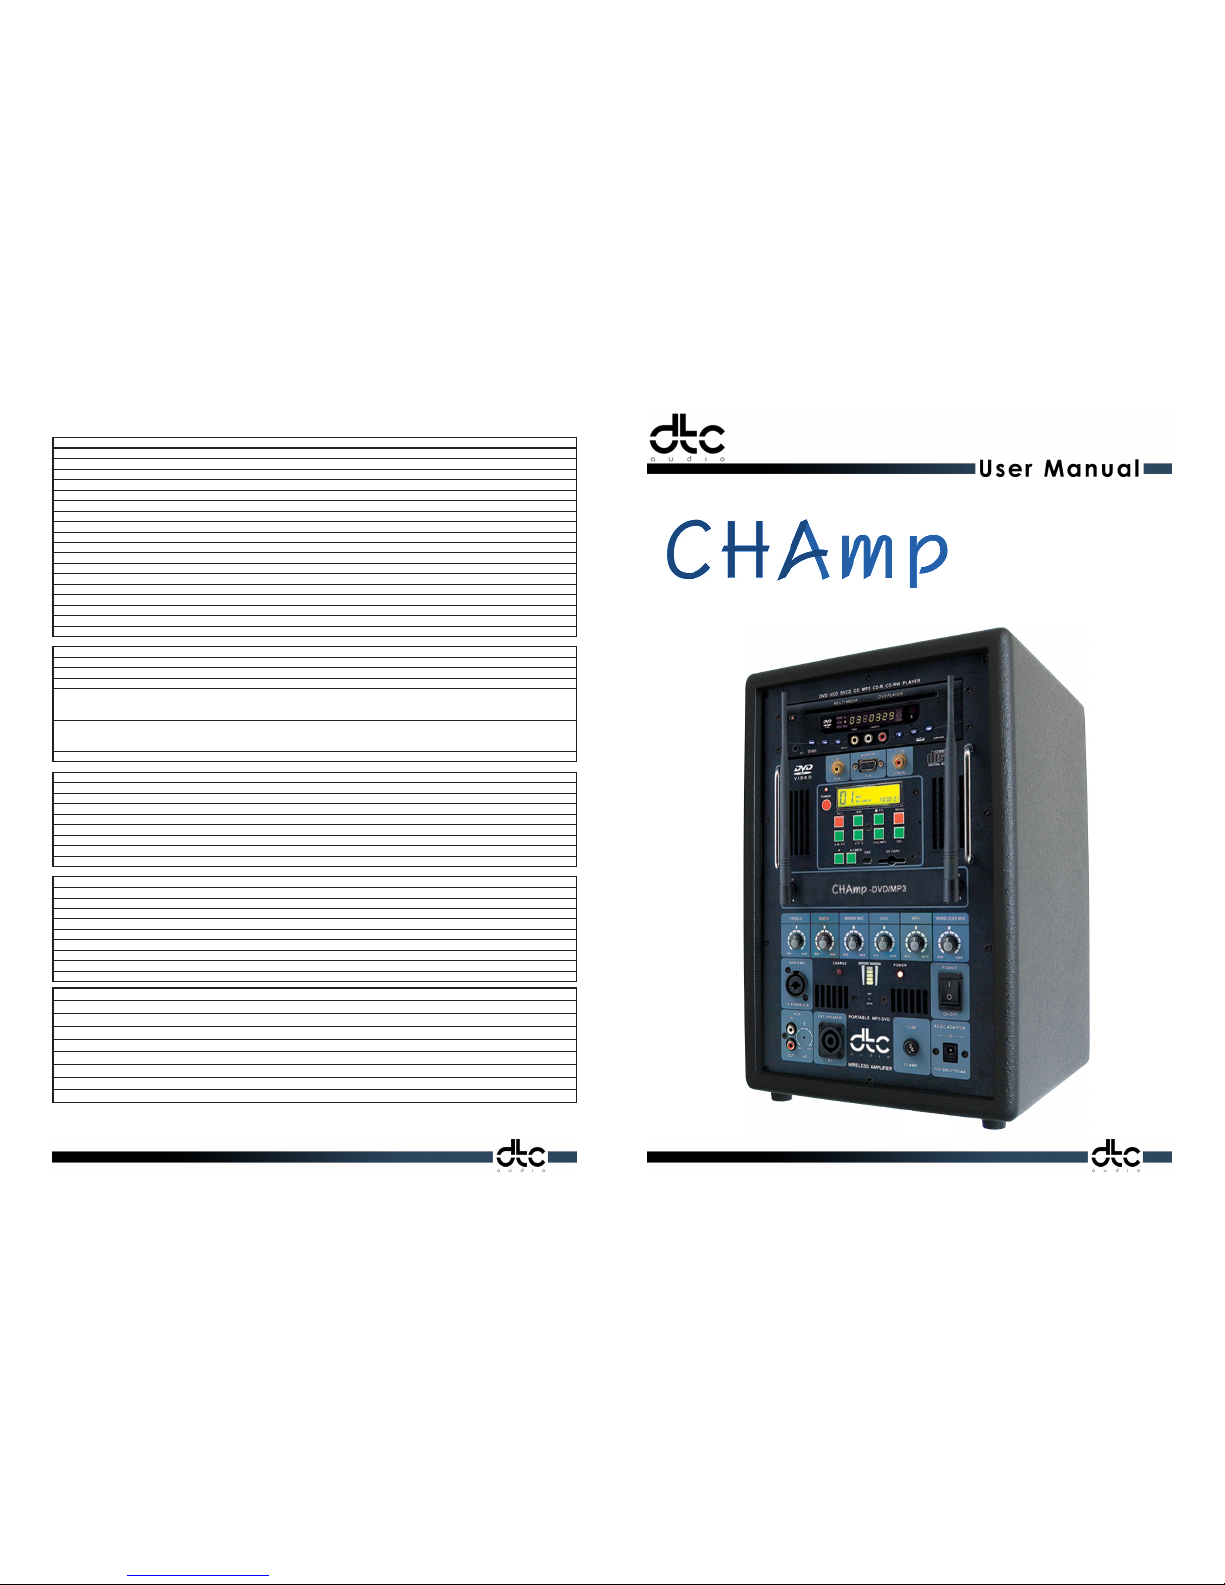
Play
Click [MODE]+[VOC] to select le mode either MP3 or
VOC (Basic mode: MP3)
Click [MODE]+[STOP] to setup Flash memory or SD card.
Click [▲][▼] to choose le to play and press (3) to play.
Consecutive clicking cause Play & Pause in turns.
Record
Click [MODE]+[STOP] to select Flash memory or SD card.
Click [MODE]+[VOC] to change VOC mode.
Click [▲][▼] to select any blank track number you want to record
Click [REC] to start record after record symbol [●] & “LINE-IN” display on LCD.
Click [■] to stop recording.
1) LCD will show [==] when the selected track has been occupied.
2) LCD start to count down from 30, 29, 28… when memory has less than 30 sec.
capacity
*Loudness of recording is adjusted by the volume control of the relevant sound source.
*There are 99 recording tracks both for ash memory or SD card, no limit to number
sequence or recording time within the memory capacity.
A-B Repeat
Click [A-B] during playing to indicate the repeat start
point (A point)
Click [A-B] key again to indicate the repeat nish point
(B point)
The music will play from A to B again and again until you
press the key again to release.
Delete
Select le number by [▲][▼] and click [MODE]+[DEL] Click [DEL] again after “del” on LCD
NOTE: The information contained in this manual is believed to be correct at the time of going to press. However, DTC Audio
reserves the right to change or modify the specication without notice or obligation to update existing units

1. -MP3-DVD Panel
Play related Buttons
: STOP/RETURN Button - Press once to memorize stop position. Press twice to re-play from rst track.
: PLAY/PAUSE Button – For hold or continue play
: OPEN/CLOSE Button – To load or un-load disc.
Display Playing Time and State
Press [OSD] button. TV screen will display current play time state. i.e., playing time,
running time. Press [OSD] each time, the screen will show time alternatively
(the time displayed in the front panel will accordingly change)
The content to be displayed each time will be subject to the type of the disc.
Primal Setting for Video/Audio
The initial setting of the DVD player both for video (VGA or RGB) and
audio (stereo-mono or 5.1Ch) is very important.
Improper setting will cause failure to operate at all.
1) In case the display does not appear on the screen, press [P/N] button of remote control unit to select video output matching with your TV, Monitor
or Projector.
2) In case you do not have audio, press [AUDIO] button to select the correct audio output of stereo (mono) or 5.1Ch If 1) & 2) above have been
done correctly, you will have audio/video output.
How to use the Disc menu
This menu appears when playing DVD
Press [TITLE] button to see the Title menu.
Press [MENU/PBC] button to see disc menu.
- Select desired item by [▲][▼][ ][ ] button and press [ENTER]
- Press [MENU/PBC] button to change PBC function.
- Note the contents of disc menu differs per individual disc.
Play Fast Forward and Backward
While playing, you can press or on the remote control to play fast forward and backward. Five speeds 2X, 4X, 8X, and 32X are available.
If you press once, the speed increases by one shift. When the speed reaches max. speed, press this key again to return to normal state.
Slow Play
While playing, press [SLOW] to play slowly at different speed. You can play slow
forward or backward. Four speeds 1/2, 1/4, 1/8, 1/16X are available.
If you press [SLOW] once, the speed decreases by one shift, nally it returns to normal.
Skip to Next or Previous Track
While playing, press the or button to skip to next or previous track.
Repeat Play
While playing, you can press [RPT] to select different repeat content.
1. For DVD disc, press [RPT] to repeat chapter, press [RPT] again to repeat
title again, press [RPT] again to exit.
2. For non-DVD disc, when PBC is off, press [RPT] to repeat the track content,
press [RPT] again to repeat all discs, press [RPT] again to exit
MP3 Operation
MP3 is a disc which is recorded with an MP3 format audio program.
This DVD player supports MP3 discs, see the following examples:
Press [▲] [▼] button, the yellow band moves to “MP3”,
then press [ENTER] to play the selected track.
Operating the DVD player
Open the battery compartment and pull the battery clip 1 as indicated
by the arrowhead direction. Fit the battery onto the clip taking care of
polarity and push the clip back into the battery compartment.
Inserting the battery into the remote control unit
Remote Control
1. MUTE
2. POWER On-Off
3. PLAY/PAUSE
4. STOP/RETURN
5. PREV BUTTON
6. PROGRAM BUTTON
7. FAST REVERSE
8. A-B BUTTON
9. NUMBER KEYPAD
10. MENU/PBC BUTTON
11. Direction Button
12. OSD LANGUAGE BUTTON
13. MODE Button
14. OPEN/CLOSE Button
15. VOLUME “+”
16. PAL/NTSC Button
17. CLOCK Button
18. NEXT Button
19. VOLUME “-”
20. FAST FORWARD
21. REPEAT PLAYING Button
22. TITLE Button
23. LEFT/RIGHT AUDIO Button
24. GOTO Button
25. SUBTITLE Button
26. ANGLE Button
27. SETUP Button
28. ENTER Button
29. ZOOM Button
30. SLOW PLAYING Button
31. VGA MODE Switch

2. Operating Instructions
Using the UHF Wireless Microphone
1. Open the battery compartment of wireless hand-held mic or belt-pack transmitter mic
and insert supplied 2 x AA type batteries in their correct +/- polarity.
2. Set Ch-number of amplier and microphone both to same number by Ch-selector
switch using supplied plastic “I” screw driver. ( Please see the schematic below )
3. Clockwise insert the supplied BNC wireless antenna into it’s socket on the operating panel.
4. Plug your wired microphone into the combination jack on the operating panel.
5. Turn on the main power on/off switch. Power-on LED will be illuminated.
6. Adjust the volume level of wired mic and try while setting treble/bass to proper level.
7. Adjust the volume level of wireless mic on the amplier. Turn on the switch of wireless
mic and try. The on-air LED next to the Ch-selector switch will be illuminated.
8. In the case of frequency interference occurring, try to set Ch to another Ch-number.
9. Use the aux in/out RCA jack to feed out or feed in audio signals to and from another source.
Using the Wired Microphone
1. Turn on the main power on/off switch, the power-on LED will be illuminated
2. Plug 1/4” plug into the wired mic socket and adjust the volume using the wired mic volume knob.
(see number 6 and 9) on the operating panel.
NOTE: Wired microphones are also as sensitive to feedback as wireless microphones, therefore it is advisable to follow the same advice as in the
above information for optimum performance
Using Auxiliary Equipment
1. Use the Aux in/out jack connection to feed in or out audio signals from another source
2. Typical sources to feed into the amplier are MP3 players, DVD players, laptops and palm devices
etc. where you want to amplify the sound to larger audiences.
3. The feed out socket can be used to connect to ampliers and mixers.
Play
1. With your TV remote control, change connected TV to proper video input mode (VIDEO-IN)
2. Press the remote control of [POWER] or [ ] on the DVD front panel. (Standby to disc open mode)
3. Load a disc in the disc slot with label side up. Place a single disc in the slot. The disc will be inserted
automatically. Then the DVD player begins to read it so as to identify different disc formats, then display on the screen.
4. When directory or menu picture displays on the screen, press the direction
buttons [▲][▼][ ][ ] on the remote control to move lighting band to desired track.
You can also directly press number buttons to select a specic track.
Using the DVD Player
Front Panel Rear Panel
Connection Diagram
Beware : Shut off all power before making connections
Safety Precautions
There are dangerous voltages inside this product. To prevent electric shock do not open the cabinet yourself. For service
please contact our regional representative ofce or direct to us as per the instructions of Limited Warranty
DVD+TV
Connect Video Output (RCA Jack: Yellow) to
Video-in of TV by supplied RCA cable
DVD+VGA Monitor
Connect VGA Output (D-15 Jack) to video-in
of your VGA monitor by supplied VGA cable.
DVD + 5.1Ch Digital amplier
If you have a 5.1Ch digital amplier, you may
connect 5.1Ch RCA Jack (Red) to your digital
amplier by using an optical coaxial cable
(Option) VGA cable.
1. Power on-off switch
2. Mode select
7. Play button
8. Back
10. Stop button
16. Eject
20. A-B repeat
21. Pitch control faster/slower
23. Next
1. Video output
2. Audio output (L)
3. Audio output (R)
4. Digital audio coaxial output
5. Remote controle input
6. Amp. standby controle output
7. VGA output (D-15)
8. DC 12V adapter input jack
9. Power socket
Table of contents
Other DTC Audio Amplifier manuals
Popular Amplifier manuals by other brands

AVGear
AVGear AVG-MA3 user manual

Audio Analogue
Audio Analogue Maestro Settanta Maestro Settanta owner's manual

Soundstream
Soundstream REFERENCE 404s Owner's manual and installation guide

Sansui
Sansui AU-101 Operating instructions & service manual

Episode
Episode EA-AMP-12D-70A owner's manual

JL Audio
JL Audio 500/1 v2 owner's manual