DTEN D7 Operating manual
55” Dual
User and Installaon Manual
TOUCH
CERTIFIED HARDWARE
& Technology Partner

DTEN D7 Dual 55” User Manual v 1.3.0 Page 2
San Jose, CA, USA
DTEN.COM
+1 866-936-3836
CONTENTS
IMPORTANT SAFETY INFORMATION 3
PACKAGE CONTENTS 4
INTRODUCTION 5
CONFERENCE ROOM SETUP 6
HARDWARE 7
SETTINGS 11
CONNECTING TO A NETWORK 12
SETUP, SIGN IN, ZOOM ROOMS ACCOUNTS. 13
WALL MOUNTING 14
ATTACH MOUNTING BRACKET 16
ATTACH CLIPS TO MONITOR 17
HANG MONITOR ONTO WALL BRACKET 18
RACK MOUNTING: 19

DTEN D7 Dual 55” User Manual v 1.3.0 Page 3 DTEN D7 Dual 55” User Manual v 1.3.0 Page 4
IMPORTANT SAFETY INFORMATION
Read and follow the informaon in this manual. Failure to follow
instrucons, warnings or statements of “Important” informaon may
result in damage to the equipment and/or personal injury. Keep these
instrucons for future reference.
྇Verify that all connecons and aachments are correct according to
these instrucons before connecng the power.
྇Only aach the Monitors to walls, surfaces or other equipment that is
designed and mechanically capable of supporng them.
྇Avoid placing the equipment near sources of heat or direct sunlight.
྇Keep all equipment in a dry and safe environment; avoid any contact
with liquids
྇All internal repairs must be performed by qualied personnel.
྇Disconnect equipment from the power source during long periods of
non-use.
྇During cleaning, always disconnect the power; then use a so dry or
slightly damp cloth.
྇Never use damaged equipment.
Secondary Display Package
Contents:
—DTEN D7 HD Interactive
Secondary Display
—Blank Av ller panel
—Mounting brackets (screws,
washers, wall plugs)
—Monitor Mounting Clips
(screws, washers)
—Cables: HDMI, Touch/USB,
RS232, Power (split)
Primary Display Package
Contents:
—DTEN D7 HD Interactive
Primary Display
—4K Video/Sound AV Panel
—Mounting Brackets (screws,
washers, wall plugs)
—Monitor Mounting Clips
(screws, washers)
—Wi-Fi Antenna (x2)
—D7 Stylus
—Cables: Power
—Manual
PACKAGE CONTENTS
55” Dual
User and Installaon Manual
TOUCH
CERTIFIED HARDWARE
& Technology Partner
Unboxing: remove parts and packing material from top of box.
To p
To p
To p

DTEN D7 Dual 55” User Manual v 1.3.0 Page 5 DTEN D7 Dual 55” User Manual v 1.3.0 Page 6
INTRODUCTION
The DTEN D7 Dual is a complete ZOOM ROOMS TOUCH
conferencing installaon, including all hardware and soware. The built-
in, AI enhanced, 16 element microphone array with 4K camera, oers a
best-in-class conferencing, wireless, screen sharing, and white boarding
experience. (All soware is pre-installed.)
The ZOOM ROOMS conferencing applicaon is secure and highly
adaptable, allowing remote aendees on almost any plaorm or
hardware to fully parcipate. With the DTEN D7 conference room
installaon, aendees may also administer meengs or screen-share
from any connected laptop or tablet that is on the same network (with
the ZOOM ROOMS App installed).
Seng up the DTEN D7 is a simple ‘plug-and-play’ process consisng
of only a few basic steps:
1. ATTACH THE CABLES AND ANTENNA
2. MOUNT THE DISPLAY, EITHER ON A RACK, STAND OR WALL
3. CONNECT TO A NETWORK (LAN)
4. CONNECT THE POWER
5. SIGN IN TO AN EXISTING OR OPEN A NEW ZOOM ROOMS
ACCOUNT
CONFERENCE ROOM SETUP
For the best experience and to fully opmize the capabilies of the
hardware, follow these ps and suggesons regarding the layout and
arrangement of the Conference Room Space.
• Monitors should be mounted at approximately eye level when
standing, in a central locaon and in full view of all meeng
parcipants.
• The space should be well lit.
• Fluorescent lighng is not recommended.
• Avoid bright lights, windows, or colors in the background behind
aendees.
• Parcipants’ faces should not be in shadow.
• Rooms with many hard surfaces may be acouscally “ambient”.
Acouscs can be improved by adding thick carpeng, sound
abs`orbing furniture (such as bookcases), or acousc panels/
parons.

DTEN D7 Dual 55” User Manual v 1.3.0 Page 7 DTEN D7 Dual 55” User Manual v 1.3.0 Page 8
HARDWARE SETUP
Note: Only aach power cables aer all other connecons are completed.
HARDWARE
Connecng the Monitors is a quick and simple process.
Follow these important guidelines:
• Only connect the Power Cable to the equipment AFTER
all other parts and cables are connected and assembled
correctly.
• It may be easier to aach cables and accessories to the
display before wall mounng.
• For detailed wall and rack mounng instrucons, see
the
Wall Mounting section in this manual.
You will need:
—An Ethernet or WiFi connecon to a local network
—A Power Outlet (110 - 240v)
—Ethernet Cable (if required)
Primary
Display
Secondary
Display
4K Audio/Video PanelBlank AV Panel
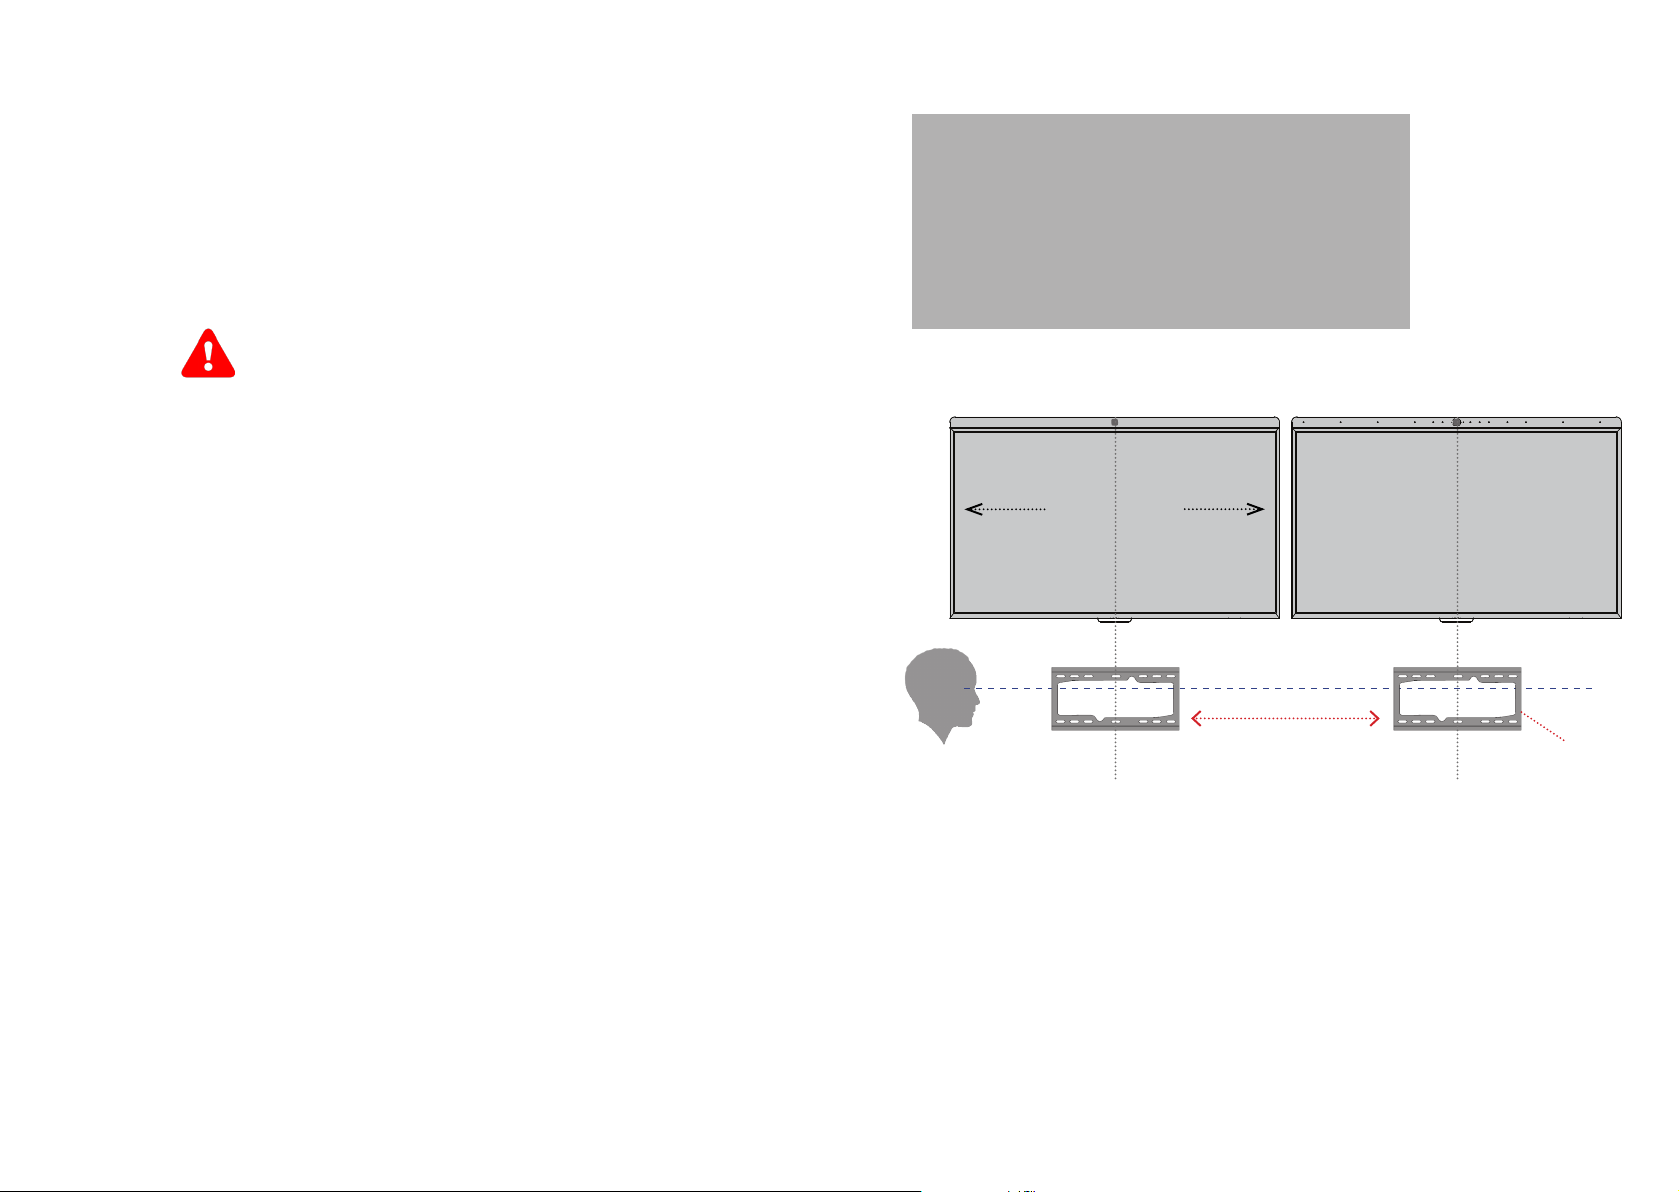
Mount the Primary Display to the right of the Secondary Display
Press AV Panels into place.
Stylus
Antennae
Ethernet
(Recommended – not supplied)
Power
(Y cable)
HDMI
usb
Primary Display Secondary Display
RS232
Hardware Controls
• Volume
• Main Menu
• Power

DTEN D7 Dual 55” User Manual v 1.3.0 Page 9 DTEN D7 Dual 55” User Manual v 1.3.0 Page 10
CABLE CONNECTIONS
1. On the Primary Display:
• If not already aached, insert the Audio/Video Panel into the
monitors, as shown on the previous page.
• Aach the Antennae to the rear panel, as shown opposite.
• The Stylus may be aached to the magnec clip/shoe.
• Connect the following cables which are color coded:
• HDMI cable (Red) to HDMI out.
• Touch/USB (Green) to USB port.
• RS232 (Black) to RS232 port on the lower side of the monitor.
• Ethernet (not supplied) to the Ethernet port.
2. On the Secondary Display:
• If not already aached, insert the AV ller panel to the monitor,
as shown.
Connect the following cables:
• HDMI cable (Red) to HDMI 1 port.
• Touch/USB (Green) to Touch/USB port (Type B).
• RS232 (Black) to RS232 port on the lower side of the monitor.
3. With all connections made:
• Insert the Power Cable into the ports on the lower sides of the
monitors and the power outlet.
• Arrange or dress cables using es or tape.
4. With the power connected:
The monitors will power up and ZOOM ROOMS will launch.
(Note: In the event that the monitor does not power up, it may be
necessary to press the Power buon on the rear right hand of
the Display.)
HARDWARE SETUP
1. Primary Display
Ethernet
(Recommended – not supplied)
HDMI usb
HARDWARE SETUP
usb
(Type B)
Antennae
2. Secondary Display
HDMI
SIDE PANEL
SIDE
BASE PANEL
RS232
RS232

DTEN D7 Dual 55” User Manual v 1.3.0 Page 11 DTEN D7 Dual 55” User Manual v 1.3.0 Page 12
SETTINGS
Use the Soware Sengs Panel to adjust
the video inputs, microphone, sound
performance, and the network connecon.
(Note: Hardware Controls are available on rear of the
Monitor as shown.)
Opening the Software Setting Panel:
• With ZOOM ROOMS acve, touch the
Primary Monitor anywhere on the
desktop to bring up the navigaon tabs
along the boom of the screen.
• Touch the ‘SETTINGS’ tab to bring up
the Sengs Panel.
Power
Menu
Volume -
Volume +
Monor Hardware Controls
(Lower right-hand rear of the Monitor)
For opmal conferencing performance, connect to your Local Area
Network (LAN) using an Ethernet cable. Connect the cable as shown
in the Hardware secon of this manual. With the cable connected, no
other acon should be necessary (Note: Cable not supplied).Alternavely, if
an Ethernet connecon is not an opon, connect to the Internet using a
Wi-Fi connecon and the Antennae.
Connecting to a WiFi network: (Version 4.4 or earlier)
1. With ZOOM ROOMS acve, touch the Monitor anywhere on the
desktop to bring up the navigaon tabs along the boom of the
screen.
2. Click: ‘Sengs’ > ‘Network’.
3. In the Network Tab, Click: ‘Exit ZOOM ROOMS’ to bring up the PC
login screen.
4. Use the ZOOM ROOMS Admin Account sign-in to Windows. (Contact
5. In Windows: Click: ‘Start > ‘Sengs’ > ‘Network &
wireless’ > ‘Wi-Fi’.
6. Select your network and enter a password as directed. (Contact your
IT Dept. for details.)
7. Return to ZOOM ROOMS.
1.
Touch the desktop to bring up the
navigaon tabs .
2.
D7 Wi/Network Conguraon
(Version 4.4 or earlier)
CONNECTING TO A NETWORK
4.
Enter ZOOM ROOMS Admin Password
(Contact Support to receive your Password at: support@
dten.com)
In Windows access the
ZoomAdmin
3.

DTEN D7 Dual 55” User Manual v 1.3.0 Page 13 DTEN D7 Dual 55” User Manual v 1.3.0 Page 14
SET UP, SIGN IN, ZOOM ROOMS ACCOUNTS.
To set up an account, or to sign in to
ZOOM ROOMS
, follow these steps:
1. Create a free account at: hps://zoom.us/signup
2. Or sign into an exisng account at: hps://zoom.us
3. Click: Account Management > Billing.
4. In the Current Plan tab, click: ‘Upgrade Account’.
5. Upgrade as your use demands.
Users new to ZOOM ROOMS should rst open a “Free Account” at: hps://
www.zoom.us/signup before upgrading to an appropriate ZOOM ROOMS
Plan as they require. Exisng Users may simply sign in.
DTEN D7 monitors ship with wall mounng brackets, mounng
clips, plugs, and screws. The brackets should be wall mounted in an
appropriate locaon and the clips aached to the back of the monitors as
shown in the following pages.
The plugs and screws supplied are intended for use on masonry surfaces.
On drywall, it will be necessary to obtain cabinet grade mounng screws
of an appropriate size. And in some cases, it may be necessary to use
a backing board to ensure a structurally secure installaon in locaons
where there are no conveniently placed studs or the wall surface is
uneven or damaged.
WALL MOUNTING
Wall Bracket Mounng Clip
DTEN D7 Dual 55” User Manual v 1.3.0 Page 15 DTEN D7 Dual 55” User Manual v 1.3.0 Page 16
WALL MOUNTING
IMPORTANT
The Monitor must be mounted safely and securely.
Mounng and installaon should only be performed
by experienced or professional personnel.
྇Pay special aenon to the type of wall
construcon.
྇Only use walls or surfaces capable of accepng the
weight of the monitor.
྇On concrete or block/brick walls, mount the
brackets with the masonry screws and plugs
supplied, (M6) using a 13mm masonry drill.
྇Each mounng bracket must be secured with at
least four mounng screws.
྇With Stud/Drywall construcon, each bracket
must be aached to at least two studs with two
cabinet grade mounng screws into each stud.
Make sure to center screws on studs; failure to do
so may be dangerous.
྇If studs are not conveniently located or if the
wall is unsuitable in some other way, it may be
necessary to rst mount a backing board of at least
3/4 inch or 18mm high grade plywood. Aach
the backing board rmly, then use at least eight
suitable wood screws or bolts to aach each
bracket to the backing board.
FAILURE TO PERFORM THIS WORK CORRECTLY
MAY RESULT IN BODILY HARM TO USERS OR
DAMAGE TO THE EQUIPMENT.
ATTACH MOUNTING BRACKET
Before proceeding, ascertain the type of wall construcon in the chosen
locaon. Aach the Mounng Bracket with regard to the ‘Safety Notes’
opposite. The top of the Wall Bracket should be at approximately eye
level when standing. Use a level to align and straighten the mounng
bracket before using at least four screws to aach the bracket to the wall
surface. For masonry walls, use the screws and plugs supplied. For stud
construcon, use cabinet grade mounng screws directly into the studs.
You will need:
—Power Drill with wood or masonry bits
—Screwdrivers
—Level, Tape Measure
—Stud Finder (for drywall construcon)
Min spacing:
100cm/40in
1245cm/490in
Eye Level
Wall Bracket

DTEN D7 Dual 55” User Manual v 1.3.0 Page 17 DTEN D7 Dual 55” User Manual v 1.3.0 Page 18
ATTACH CLIPS TO MONITOR
DTEN D7 Monitors use a standard TV (Vesa 400x300) mounng paern
on the 55” models. (75” monitors use a Vesa 400x800 paern.)
Use the 8mm Screws (supplied) to aach the Mounng Clips to the back
of the monitor as shown.
With the Wall Bracket securely aached to the wall surface, and the
Mounng Clip secured to the rear of the Monitor, li the Monitor into
place and hang it on the Wall Bracket as shown opposite. Pull the release
loop at the base of the Mounng Clip while snapping the base of the clip
into place on the Wall Bracket.
Attaching the Mounting Clips to the Monitors
Mounng Clip
Bracket
Pull loop to release
Mounng Clip.
Mounng Clip
HANG MONITOR ONTO WALL BRACKET
Once mounted the clearance between the back of the monitor and wall is 3½in (89mm)
Other manuals for D7
5
Table of contents
Other DTEN Monitor manuals


