Dual Pumps SprayWash SW116PHR User manual

C
M
Y
CM
MY
CY
CMY
K
spraywash215x75.pdf 1 21/08/2018 09:03:20
Product id & serial number information
793-1208
SW116PHR Washer
User Manual

SW Series Washer User Manual
This manual and any other literature supplied should be read thoroughly before
assembling and operating the Washer. Pay particular attention to any instructions relating
to safety, and the starting, stopping and maintenance of the Washer. Following these
instructions will ensure operator safety and prolong the life of the Washer.
This manual should be kept for future reference as it contains important safety, user
and maintenance information. The model and serial number on the cover of this booklet
must be quoted should you need to contact the dealer or manufacturer regarding usage,
maintenance and warranty queries.
Recommended Safety Standards & Directives
This manual highlights certain safety measures which should be taken in to consideration
when using the Washer. However, each contractor and operator should make their
own risk assessments whilst considering their individual application and environment
and ensure the user is properly trained and wearing protective clothing to the required
regulatory standards. We recommend visiting the Health and Safety Executive website
at www.hse.gov.uk to be properly informed on best practice whilst operating Pressure
Washers in the UK.
Contents Page
1. Safety Information...................................................................................... 1
2. Model Information...................................................................................... 2
3. Intended Use.............................................................................................. 3
4. Component & Accessory Identification ..................................................... 4
5. Pre-Operation Set Up ................................................................................ 5
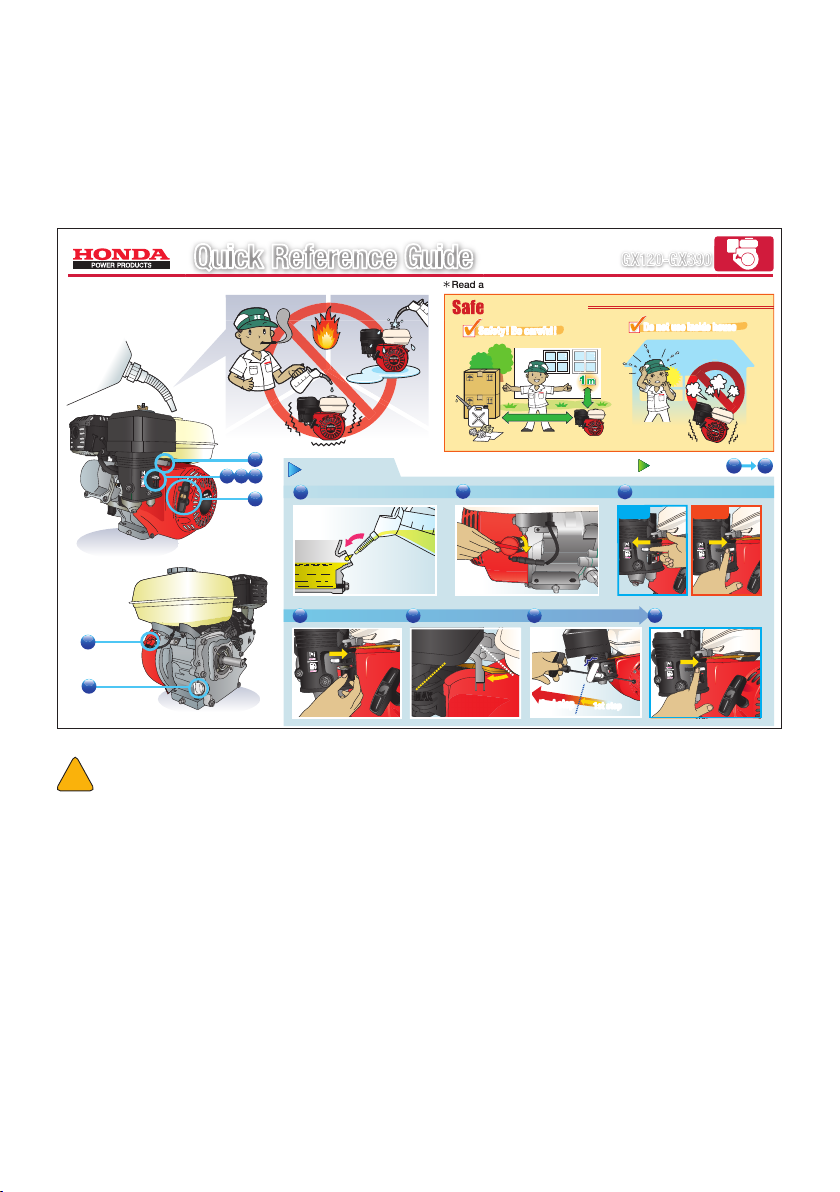
6. Engine Start Up / Shut Down Procedure................................................... 6
7. Operating Information................................................................................ 7
8. Maintenance Schedule .............................................................................. 8
9. Storage Information ................................................................................... 9
10. Troubleshooting ....................................................................................9-10
11. Warranty Information ..........................................................................11-12
12. Environmental Protection ........................................................................ 12
13. EC Declaration of Conformity .................................................................. 13

1. Safety Information
Warning - Engines produce fumes and toxic gases.
Only operate outdoors or in a sufficiently well ventilated area.
Warning – Fuel vapours are flammable.
Allow unit to cool before refuelling at a safe distance from naked flames, ignition
sources & heat. Refer to engine manufacturer’s manual.
Warning – Washers can cause harm to people, animals &
property.
They should only be used by properly trained operators wearing suitable protective
eyewear, clothing, and non-slip footwear and in a safe, open environment.
Warning – Poorly maintained components can lead to
injury.
Before every period of use ensure the Washer is in good working order. All loose
connections should be tightened and worn or damaged components should be
replaced before use.
Warning – The Washer is performance set at factory.
Do not adjust the engine governor or Washer valves unless qualified to do so. Over
loading of engine and components can lead to equipment failure, personal injury
and will void the warranty.
Warning – Damage to Washer can occur if left running.
Do not leave the Washer running in bypass for extended periods as heat build-up
can damage the pump. Do not leave unit running unattended.
Warning – Never pump flammable or explosive liquids.
The Washer must only be used with liquids compatible with the pump, component &
accessories.
Warning – Chemicals can damage the pump and components.
The Washer must be flushed through with clean water after every period of use as
chemicals and detergents can corrode the components.
THE MANUFACTURER CANNOT BE HELD RESPONSIBLE FOR ANY HARM
OR DAMAGE CAUSED BY DISREGARDING THE DESIGNATED USES OF THIS
MACHINE, ITS INSTRUCTIONS AND WARNINGS INDICATED IN THIS BOOKLET.
!
!
!
!
!
!
!
1
!

Model No. SW116PHR
Pump
Information
Pump Comet MC18 Diaphragm Pump
Speed 1450 RPM via Reduction Gearbox
Body Polypropylene
Seals Viton™
Pressure Regulator Integrated PRV with external bypass
Engine
Information
Engine Honda GX120
Fuel Petrol
Net Power 3.5 Hp @ 3600 Rpm in accordance with SAE J1349
Nominal Rpm Engine 3600 - Pump
Starting Method Recoil start
Fuel Tank 2 Litres
Water
Connection
Max Feed Temp 40°C / 104°F
Min Feed Temp 5°C / 41°F
Min Feed Flow Rate 14.3 Lpm
Max Feed Pressure 0.01 MPa - 0.1 Bar - 1.45 psi
Max Suction Depth 1 Metre (3.3 Feet)
High Pressure
Performance
Flow Rate 11 Lpm
Working Pressure 0.6 MPa
6 Bar
Pressure Outlet Single Outlet
Nozzle Jet Size 30 x 4 (PENCIL, 15°, 25°, 40°)
Sound
Levels
Uncertainty K 1 dB
SPL LWA dB* 62
GSPL LWA dB** 99
Oils
Pump Oil ENI Blasia S 150 (ISO-L-CKD)
Gearbox Oil ENI Grease MU EP
Engine Oil Refer to engine user manual
W&D
Dimensions 900L x 600W x 700H (mm)
Weight 46 Kg
2. Model Information
The SW116PHR Washers consist of a diaphragm pump complete with pressure regulating
unit coupled to a 4 stroke combustion engine via a reduction gearbox.
2
*SPL = Sound Power Level on equipment representative of this type
**GSPL = Guaranteed Sound Power Level for this equipment.
Notes
For the engine to reach it’s maximum power, and the unit to achieve full rated
performance, the machine must be run in for at least 10 hours. The engine’s performance
diminishes as altitude and ambient temperature increase. If the machine is to be used
at altitude or with a high ambient temperature please refer to the engine user manual for
guidance and any necessary precautions.

• The washer has been designed and manufactured for:
- wash down of machinery, vehicles, buildings, facades, tools etc using clean, soft water
at a maximum of 40°C and suitable detergents.
- spraying of disinfectants and/or sanitizing products;
- pumping detergents and colours in aqueous solution;
- pumping water for non-edible use.
• The washer must not be used for pumping:
- aqueous solutions with density and viscosity above that of water;
- solutions of chemical products the compatibility of which with the materials making up
the motor pump itself is not known;
- seawater or water with high salt concentration;
- fuels and lubricants of all kinds and types;
- inflammable liquids or liquefied gases;
- edible liquids;
- solvents and thinners of all kinds and types;
- paints of all kinds and types;
- liquids with temperatures above 40 °C/104 °F or below 5°C/41°F;
- liquids containing granules or solid parts in suspension.
• The washer must not be integrated in machines designed to wash: people, animals,
energized electrical apparatus, delicate objects, the motor pump itself or the machine in
which it is integrated.
• The washer is not designed to operate in environments with special conditions such as,
for example, corrosive or explosive atmospheres.
• The washer is not designed to operate on board vehicles, ships, or planes.
All other uses are to be deemed incorrect.
The Manufacturer disclaims all liability for any damage deriving
from incorrect or erroneous uses.
3. Intended Use
3

4
10 Suction hose and filter
11 Bypass hose
12 25m delivery hose
13 Gun & lance assembly
14 0°, 15°, 25° & 40 ° quick release nozzles
Figure 2. Standard accessories
4. Component & Accessory Identification
Figure 1. Washer Components
1Trolley with 10" wheels
2Engine
3Pump
4Mounting Flange/Gearbox
5Pump oil filler cap
6Pressure adjusting knob
7Inlet feed barb
8High pressure delivery outlet
9Bypass outlet
1
2
3
5
6
7
8
9
4
11 12
13
14
10

5. Pre-Operation Set Up
• Unpack and make sure that the Washer is complete and undamaged. If the Washer
appears damaged in any way, do not use the machine and consult your dealer.
• Check engine oil is at correct level as specified in the engine manufacturer’s handbook.
Warning – Engines are not shipped filled with oil
The engine will not start until oil is added. Incorrect engine oil level can result
in serious damage.
• Connect the suction hose & filter assembly (item 10, fig 2) to the inlet feed barb (item 7,
fig 1). Ensure the connection has no air leaks and submerge the filter in water supply
tank. For optimum performance ensure the supply tank is above the Washer to aid
priming and water supply. Ensure the filter is always below the water level.
• Connect the bypass hose (item 11, fig 2) to the bypass outlet on the pressure regulating
valve (item 9, fig 1) and put other end in to the top of the water supply tank.
• Connect the delivery hose (item 12, fig 2) to the delivery outlet (item 8, fig 1).
• Connect the gun and lance assembly (item 13, fig 2) to the delivery hose
• Fit desired quick release nozzle (item 14, fig 2) to the lance assembly outlet. The Washer
is supplied with a selection of nozzles to give different fluid projection.
!
Figure 3. Piped up washer
5
• When the pump is at a standstill, check
the oil level is not above the notch on the
case and is no more than 2-3mm below it.
Always check the oil when the pump is at a
standstill and has cooled down completely.
Refer to Model Information (page 2) for
type of oil to use.

6. Engine Start Up / Shut Down Procedure
• Consult the accompanying Honda user manual for full engine checks and start up and
shut down procedure
Note – Before starting and after stopping the Washer depress the lance trigger to
release system water pressure.
*Read and understand the Owner’s Manual before operating the engine.
Safety! be careful!
How to start
12Choke ON/OFF
3
Throttle lever
5Start
6
Fuel cock ON
4(Choke off)
7
Check engine oil Switch ON
Safety! Be careful!Safety! Be careful!
Do not use inside houseDo not use inside house
*
Read and understand the Owner
Safety! be careful!
Quick Reference GuideQuick Reference Guide
for Operation
3 4
7
6
1
2
1st step1st step
2nd step2nd step
Cold Hot
Fill the oil to
the upper limit.
©Honda Motor Co., Ltd.2012
S2Z0T100
52
How to stop
5
MIN
MAX
MAX
GX120-GX390GX120-GX390
793-1230
Warning – Chemicals can damage the pump and
components.
The Washer must be flushed through with clean water after every period of use
as chemicals and detergents can corrode the components.
!
6

General Use
• Open and close the lance trigger to start/stop the flow of water as required.
• The washer is fitted with a return-to-tank pressure regulating valve which bypasses
excess fluid back to the supply tank during normal use and when the lance trigger is
closed
NOTE – It is normal for a small amount of water to be bypassing even when the lance
trigger is open.
• The pressure can be adjusted using the pressure adjusting knob (item 6, fig 1) on the
pressure regulating valve.
• The Washer is supplied with a selection of nozzles to give different fluid projection.
Warning – Risk of damage to pump
Do not let the pump idle in bypass for long periods of time. Never leave the
Washer running unattended.
!
!
7
Warning
Stopping the Pump
• Always make sure that, once stop operations have been performed, no part of the motor
pump and of the machine in which it is integrated is moving and no pipes contain liquid
under pressure.
a) Turn off the delivery pressure as described in point a) in “Pump Operation” section.
b) Stop the pump.
c) Wait for the motor pump and the machine in which it is integrated to cool down.
7. Operating Information
Initial Priming
• Ensure the suction filter is fully submerged in the supply tank
• Hold lance trigger open and wait for water to make it’s way up the suction hose and in to
the Washer.
• After initial priming from the water supply tank the Washer is ready to run.
Pump Operation
• The motor pump can only be primed if the pressure of the delivery circuit is reset in the
following way:
a) Fully turn the knob of the regulation valve (item 6, figure 1) anti-clockwise.
b) Start the pump to prime it.
c) Turn the knob (item 6, figure 1) until the water is delivered at the required pressure (turn
clockwise to increase the pressure, turn anti-clockwise to decrease the pressure)

(*) Checks must be more frequent if liquids are used with abrasive particles in suspension.
(**) The oil must be changed whenever the diaphragm is changed.
(***) If very aggressive chemical products are used, the diaphragms are best changed
whatever their condition.
Special Pump Maintenance
Warning
Caution
!
!
• Maintenance jobs must only be performed by a Skilled Technician.
• Used oil must be adequately disposed of and not discarded in the environment.
In relation to the pump, remember the following.
• The data shown on the chart are approximate. More frequent jobs may be necessary in
case of particularly heavy-duty use.
Maintenance Schedule Job
Every 300 hours • Check the pump suction/delivery valves and the
control unit regulation valve. (*)
• Oil change. (**)
At the end of the season or
once a year
• Check and if necessary change the diaphragms. (***)
• Check the tightness of the motor pump screws.
• Check the safety devices.
8
Refer to the pump and engine manufacturer’s manuals for more information of service
and maintenance.
Activity Daily Initial 50 hours
or 3 months
Every 100 hours
or 12 months
Inspect / top up engine oil levels
Inspect all hoses and connections for
tightness and damage
Inspect all auxiliaries & accessories
tightness and damage
Inspect/change nozzle jets
Clean water inlet filters
Change Oil
Refer to engine manufacturer’s manual for
oil change & service intervals
Inspect/change engine drive key
General Maintenance
8. Maintenance Schedule
Warning – Danger of personal injury.
Disconnect/remove the engine spark plug and ensure trapped pressure is
released from the delivery hose before carrying out Washer maintenance. All
service/maintenance tasks should be undertaken by a qualified technician.
!

9
Warning
!
10. Troubleshooting
• Before doing any jobs, perform the operations described in the “Stopping the
Pump” paragraph. In the event of not being able to restore the correct operation of
the motor pump with the aid of the information contained on the “Washer & Pump
Troubleshooting” table, contact a Skilled Technician.
General Engine Troubleshooting
Refer to manufacturer’s manual for full engine troubleshooting information.
Problem Possible Cause Remedy
Engine will not start
Engine switch in OFF position Switch to ON position
No or low oil level in engine Fill engine crankcase to required
level
No or low fuel level Fill fuel tank
Stale or contaminated fuel Drain fuel tank and replace with
fresh fuel
Bad spark Check HT lead or replace spark
plug
Over-choking Open choke and crank engine over
Engine falters or not
running smoothly
Choke is opened too soon Close choke until engine runs
smoothly
Engine shuts down
during operation
Out of fuel Fill fuel tank
No or low oil level in engine Fill engine crankcase to required
level
Engine lacks power
Throttle not fully open Open throttle
Dirty air filter Replace air filter
9. Storage Information
The Washer & accessories should be stored in a dry and frost proof location. Frost can
lead to serious component damage which is not covered by warranty.
Disconnect all hoses, lances & accessories and drain water.
Crank the engine over using the recoil start to expel water from pump.
Ensure all equipment is clean and dry.
When storing unit for extended periods of time add a fuel stabiliser to the fuel or drain
the fuel from the tank. Refer to engine manufacturer’s manual for information on how to
prepare the engine for storage

10
Washer & Pump Troubleshooting
Refer to manufacturer’s manual for full pump troubleshooting information.
Problems Causes Remedies
The pump does
not prime.
Suction of air. Check the integrity of the suction circuit.
Regulation valve
positioned under
pressure.
Reset the pressure by means of the knob
(item 6, figure 1)
The pump fails
to reach max
pressure.
Pressure adjustment
knob (item 6, figure 1)
not tightened enough.
Turn the knob clockwise until required
pressure is achieved.
Not enough water supply
or priming too deep.
Make sure the water supply flow rate or
priming depth is in compliance with the
indications in the Model Information (page 2)
Suction circuit
blockages.
Check the suction circuit (especially make
sure the suction filter is clean).
Irregular
pressure
and flow rate
(pulsating).
Air suction. Check the integrity of the suction circuit.
Suction filter dirty. Clean the filter.
Not enough water supply
or priming too deep.
Make sure the water supply flow rate or
priming depth is in compliance with the
indications in the Model Information (page 2)
The motor pump has not
completed priming.
Prime the pump according to the indications
of the “Pump Operation” paragraph.
Too much noise. Suction circuit
blockages.
Check the suction circuit (especially make
sure the suction filter is clean).
Water supply
temperature too high.
Keep to the temperatures indicated in the
Model Information (page 2)
Too much oil
used and/or
whitish coloured
oil (water in oil).
Breakage of one or more
diaphragms.
Seek advice from a skilled technician
Failure to
produce
pressure, failure
to produce flow
or Fluctuating
pressure
No nozzle fitted in lance
assembly outlet
Fit desired nozzle
Pressure regulator valve
backed off
Wind adjuster knob in to pre-set maximum
Blocked / worn nozzle Clean / replace nozzle
Leaks in delivery line Tighten connections / replace damaged
accessories
Blockage in delivery line Check / clear delivery outlet & hose

11
11. Warranty Information
Limited Warranty Supplied by Dual Pumps Ltd
Dual Pumps Ltd as suppliers warrants to the original purchaser, each new unit or other
product supplied from its factory, for the period of twelve (12) months from the date of
shipment from the factory, six (6) months for equipment on hire or rental), to be free from
defects in material and workmanship under normal use and service. “Normal Use and
Service” means not to exceed recommendations on maximum speeds, pressures and
temperatures or handling fluids not compatible materials, as noted in the applicable Dual
Pumps catalogue, technical literature and instructions. This warranty shall not apply to
any pump or other product, which has been repaired or altered, to adversely affect the
performance or reliability of the pump or product. Lance or hoses are not covered by this
warranty due to the adverse conditions of their use.
Neither this warranty nor any implied warranty apply to damage caused by any of the
following:
• Freight damage
• Frost or freezing damage.
• Damage caused by parts and/or accessories or components not obtained from or
approved by Dual Pumps Ltd.
• Any consequential or incidental damage arising from the use of any, pump or other
products supplied by Dual Pumps Ltd.
• Damage due to misapplication and/or misuse. The normal wear of moving parts or
components affected by moving parts
The liability of Dual Pumps Ltd under the foregoing warranty is limited to the repair or
replacement at Dual Pumps Ltd option without charge for labour, mileage costs or
materials of any parts upon return of the entire pump or other product or of the particular
part to the Dual Pumps Ltd factory within the warranty period at the sole expense of the
purchaser, which part shall upon examination appear to Dual Pumps Ltd satisfaction to
have been defective in material or workmanship.
The liability of Dual Pumps Ltd under any theory or recovery (except any express warranty
where the remedy is set forth in the above paragraph) for loss, harm or damage, shall
be limited to the lesser of the actual cost, harm or damage, or the purchase price of
the involved pump or other product when sold by Dual Pumps Ltd to its customer. Dual
Pumps Ltd expressly warrants its pumps or other products as above stated.
There are no other express warranties. Any implied warranties, including implied warranty
of merchantability or of fitness for a particular purpose, are limited in duration to twelve
(12) months from the date of the purchase by the original purchaser, (six (6) months for
the equipment on hire or rental). There is no implied warranty of fitness for a particular
purpose or merchantability when this product is put to rental use.
No person including any dealer or representative of Dual Pumps Ltd is authorised to make
any representation or warranty concerning Dual Pumps Ltd products on behalf of Dual
Pumps Ltd, or to assume for Dual Pumps Ltd the obligations contained in this warranty.
Dual Pumps Ltd reserves the right to make changes in design and other changes and
improvements upon its products without imposing any obligation on itself to install the
same, in its existing products or products then in process or manufacture.
This warranty does not affect any statutory rights that you may have.

12
Procedure for claiming under this warranty
The claimant must despatch the unit, product or part at his own expense to the Dual
Pumps Ltd factory with a full detailed report for inspection, upon receipt Dual Pumps
Ltd will inspect and decide whether the unit, product or part is in fact a genuine warranty
claim. Upon this decision the pump, product or part will be replaced either free of charge
under this warranty or despatched and charged to the original customer together with a
full report should it be found not to be covered by this warranty.
Warranty claimed items, if required urgently will be despatched to the customer and
charged for, on receipt of the claimed defective item Dual Pumps Ltd will decide whether
the claim is valid and if so will issue a credit for the item. Should Dual Pumps Ltd find the
claimed item to be out of warranty declarations the said charge will stand and be paid by
the customer as normal.
The copyright of this manual belongs to Dual Pumps Ltd and must not be copied or
reproduced without the express permission of the company.
12. Environmental Protection
Old appliances contain valuable materials
that can be recycled; these should be sent
for recycling. Batteries, oil, and similar
substances must not enter the environment.
Please dispose of your old appliances using
appropriate collection systems.
Please do not release engine oil, fuel oil,
diesel and petrol into the environment.
Protect the ground and dispose of used oil
in an environmentally-clean manner.
The packaging material
can be recycled. Please do
not throw the packaging
material into household
waste; please send it for
recycling.

13. EC Declaration of Conformity
Declaration of Conformity
Equipment Type
SW116PHR Washer
Relevant EU Directives
2006/42/EC - Machinery Directive
2000/14/EC - Low Voltage Directive
2014/30/EU - Electromagnetic Compatibility (EMC) Directive
Manufacturer
Dual Pumps Ltd, Unit 8 Hudson Road, Saxby Road Industrial Estate,
Melton Mowbray, Leicestershire LE13 1BS. United Kingdom
Person authorised to compile the technical file & declaration
Tom Herridge, Product Manager
Signed -
We hereby declare that the machine described above complies with the relevant
basic safety and health requirements of the EU Directives, both in its basic design and
construction as well as in the version put into circulation by us. This declaration shall
cease to be valid if the machine is modified without our prior approval.
13

Unit 8, Hudson Road
Saxby Road Ind. Est.
Melton Mowbray
Leicestershire LE13 1BS
Telephone: +44 (0)1664 567226 Fax: +44 (0)1664 410127
pumps
DP-SW116PHR-V1.0-09/22
Table of contents
Other Dual Pumps Washer manuals
Popular Washer manuals by other brands

Fisher & Paykel
Fisher & Paykel WH9060P3 user guide

Alliance Laundry Systems
Alliance Laundry Systems UW60TV Troubleshooting

Haier
Haier HW50-1010 Installation and user instructions

Bosch
Bosch WAY28740GR Instruction manual and installation instructions

Electrolux
Electrolux EW 1080F Instruction booklet

Samsung
Samsung WA80N2 manual