Duncan Convertible 2000 User manual

Seymour Duncan
Convertible 2000
Guitar Amp Owner's Manual

Dear Seymour Duncan Convertible 2000 Owner:
If you're like most musicians I know, the first thing you want to do is plug-in your amp and start
playing-the last thing you want to do is read an owner's manual. Go ahead and play the amp and
see what it can do for you.
Once you've completed the "breaking in" experience, please read through this manual. The
Convertible 2000 amp was designed to give you any sound that's in your head. To provide that
versatility, many unique and exclusive features are built-in. This manual will show you the easy
way of getting a wide variety of great sounds just by properly setting up the amp.
Enjoy it. If you have any comments about the design of your amp, I'd like to hear from you If you
have any ideas for modules or other related products, please write to me at the address below.
Thank you,
P.S. If you haven't mailed in your warranty card, please do it now. It may seem like a hassle, but
it's the only way we have to verify warranty status of your amp.
Seymour Duncan
5427 Hollister Avenue
Santa Barbara, CA 93111
Ph. 805-964-9610
fax 805-964-9749

Table of Contents
1Unpacking Instructions and Warnings
2Seymour Duncan Convertible 2000
3Installing & Changing Preamp Modules
6Tubes
7-8Preamp Module Chart
9-10 Front of the Convertible 2000
11-12 Rear Controls of the Convertible 2000
13 Load Resistor Plug Values & Sound Effects
14-16 Trouble Shooting
17 Specifications
18-19 Schematics
Unpacking
Inspect your Convertible amp for hidden damage that may have occurred in
transit your amp was inspected and sound tested before shipment from the
factory.
All claims for shipping damage must be made by the receiver. Save your box and
packing material for evidence of damage if it has occurred.
Packing Materials
The original box and packing materials are specially designed to protect your
amp during shipment.
*SAVE ALL PACKING MATERIALS.
In the unlikely event that your amp needs to be returned to the factory, the original box and
packing material will be necessary for shipment. These are carrier approved packing materials
and they will insure safe transit back to the factory.
Warning
To reduce the risk of fire or electrical shock,
DO NOT expose this amplifier to rain or moisture.

Seymour Duncan Convertible 2000
Tube design
Versatility isn't the only thing considered
with the Convertible amps. I love tone. Pure
and simple. Tube power is the best way to
achieve 'this warmth and fullness. Plus, the
use of quality components help make the
Convertible 2000 sound as good as it does.
Preamp modules
The amp's sound is first shaped in the
preamp. We replaced the hard-wired,
unchangeable preamp with removable
modules. It lets you take our amp from
sweet and clean to radical distortion. Just by
changing the order and type of modules
used and dialing in the settings.
By now you've probably changed them, tried
new arrangements, but if you haven't and
you're not really sure 'now to handle them,
then this section is for you.
There are fifteen different modules available.
See the char', on pages 7-8 for individual
characteristics.
In your amp, the guitar signal runs in series
through three modules per channel in 'U-he
preamp before reaching the amplifier.
The most important module is the input
module-Position 1. (The very closest
position to the outer edge of the amp.) This
module affects both channels.
The modules for Channel 1 are in positions
1, 2 and 4.
The modules for Channel 2 are in positions
1, 3 and 5.
Note on the circuit chart where the modules
are affected by EQ, Overdrive, and Master
Volume.

Installing & Changing Preamp Modules.
Installing modules is quick and easy. Plug the modules into their receptacles located under the"
Quick Access" plate on the top of the amp.
To install your modules just follow these easy steps:
1. Choose the module arrangement you wish to try. (See pages 4-5 for some ideas or the
instruction sheet in your module pack for the suggested order of installation.)
2. Choose the module you want to install and grasp it by its handle.
3. Insert the new module through the "Quick Access "module system opening. It may be
necessary to tilt the module forward before it will fit through the opening. This may seem awkward
at first, but it becomes as easy as changing a cartridge in a video game.
4. Align the module plug to be installed over the receptacle in the position you've chosen.
5. Slowly insert the module connector into the receptacle. Apply moderate pressure until you feel
the module is seated snugly.
6. Repeat steps 2 thru 5 for each module you are installing. When you have finished installing
modules, double check all modules to ensure they are still snug in their receptacles.
7. Align the "Quick Access" cover with the holes in the top of the amplifier cabinet and secure. If
your amp is plugged in and the Standby switch is set, your amp will automatically be turned on
into the "Standby" mode. Give it a minute or two to warm up completely, flip the switch to "On"
and you're ready to play.
*Note: Amplifier will not operate without the module access panel securely fastened. (This
depresses the safety shutoff switch.)
To remove:
1.Turn the "Quick Access" plate screws counter-clockwise. They will pop up.
2. Remove the plate. When this is done, it will automatically shut down the amp.
3. Looking down inside the amplifier, firmly grasp the module you want to replace by its handle
and lift slowly. When the module is free from its receptacle, continue to lift upward. You may have
to turn the module sideways to clear the module opening.

Module Setups
Below are the recommended setups for the module packs. There are also many variations that
can be done with each group of modules. Your dealer has a wide selection of modules for you to
choose from to customize your sound even more.
Rock & Roll
Lead Channel: American Rock & Roll.
Rhythm Channel: Clean contemporary.
Seymour's R & B
Lead Channel: Vintage Rock & Roll.
Rhythm Channel: Sweet vintage rhythm.

Heavy Metal
Lead Channel: Ultra smooth distortion lead.
Rhythm Channel: Bright and ballsy, cuts
through with great distortion.
Fusion
Lead Channel l: Bright cutting distortion.
Rhythm Channel: Glassy rhythm, sparkling,
lots of detail.
Studio
Lead Channel: Low noise lead with
character.
Rhythm Channel: Ultra quiet and clean.

Tubes
Just like all other parts in the Convertible 2000, the tubes were selected for providing the most
musical tones. Tubes can be temperamental, but there are things that can be done to avoid
problems.
Module Preamp Tubes:
The 12AX7 tubes supplied will give you the least amount of noise and the sweetest tone.
However, they may develop a micro phonic ringing when the Overdrive control is set at 5 or
above or when using 2 or more Hi-Gain type Modules.
Typically, the input module (Position 1) is the most sensitive to micro phonics. This module is
shared by both channels.
Here are some ways to eliminate micro phonics:
1. You can swap the tube from another preamp module with the input module. (Due to
variations in internal construction, some tubes are less micro phonic than others.)
2. If you are using two identical modules and one of them is the input module, just switch
and try the other one in the first position.
For example:
Just take the two "Classic” modules and switch their positions. If the second "Classic"
module's tube does not have micro phonics, you've solved the problem.
3. Try using an FET, IC or Hot Mod module in the input. Because neither of these are tube
designs, you'll get no micro phonics. For a warmer tube sound, use an FET or Hot Mod
module in the input stage. If you're after a harder solid-state sound, use an IC module in
the input stage.
If you're involved in a touring schedule and you want to avoid tube related problems, bring
some extra tubes with you for all your equipment.
Spare Tubes
There is a spare 12AU7 tube mounted inside your Convertible 2000. This is a stock replacement
tube for the Cascode and Classic E.Q. module.
We also discovered an interesting sound when replacing the standard 12AX7 tube in the Classic
module with a 12AU7 tube. If you use a Classic module in the input stage (Position 1), try using
the 12AU7 tube there. You'll notice a little less output volume, but it will also allow you to get a
louder, clearer rhythm. Try this setup:
If you play a guitar with a high output humbucker pickup and you're having problems with a loud,
clean rhythm, this could easily provide the sound you're after.

Front of the Convertible 2000
1. Load Resistor Input (Combo only): Guitar pickups have different output voltages. Using the
load resistor plugs supplied with your combo amp you can match your pickups to the amp's input.
Standard Electromagnetic pickups:
Convertible amps have 4.7 meg-ohm input impedance. Some players prefer using no load
resistor plug because they want the brightest sound possible and 4.7 is a good match with their
pickups. You should experiment with the two land plugs provided to find your favorite setup.
It is recommended that the input impedance of the amp be 10 to 20 times higher than the pick-up
output impedance to avoid excessive "loading."
Unique Design Pickups: Low Impedance Pickups (Like Seymour Duncan Live Wires or other
actives.): To optimize signal to noise ratio, input impedance should be fairly low -typically 1K to
500K ohms. Try the 1Ok-330pf load resistor plug for great tone and low noise.
Piezo Transducers (Built Into Acoustic guitars): To avoid loading down Piezo pickups, the
input impedance should be high. Most Players like the sound of these pickups using no load
resistor plug. Electromagnetic Acoustic Guitar Pickup: To get a warm round sound, many players
like using the 1 meg load resistor plug. It gives a smooth high end and quiets the signal.
2. Main Guitar Input: using only one instrument, this is the only jack that is live.
3. Auxiliary Guitar Input: Use this input for a second guitar or other instrument. This is a parallel
input to the Main Guitar Input so they will both play through the "0N" channel.
If you use the Auxiliary Input for a second instrument, the output volume from both instruments
will be reduced. You will have to increase the Master Volume control to compensate. Also, the
instrument that is plugged into the Auxiliary Input will have less volume than the instrument
plugged into the Main Input. If you need both instruments playing at their loudest volume, you can
plug them into a "Y" cord and run them both through the Main Guitar Input.
If you want to use one guitar playing through two amps, plug your guitar into the Main Guitar Input
and run a normal guitar cable from the Convertible 2000's Auxiliary Guitar Input to the main input
on your second amp.
4. Overdrive: This control dictates the amount of preamp distortion and influences the volume
you want to add to your signal. The lowest setting gives the cleanest signal and lowest volume.
The highest setting gives the most distortion and highest volume.
Technically, it controls the gain level applied from Stage 2 to Stage 3 or the preamp.
Although the intensity of overdrive varies with the modules you use, the relative effect is
the same:
-Clockwise increases distortion

-Counter clockwise decreases distortion.
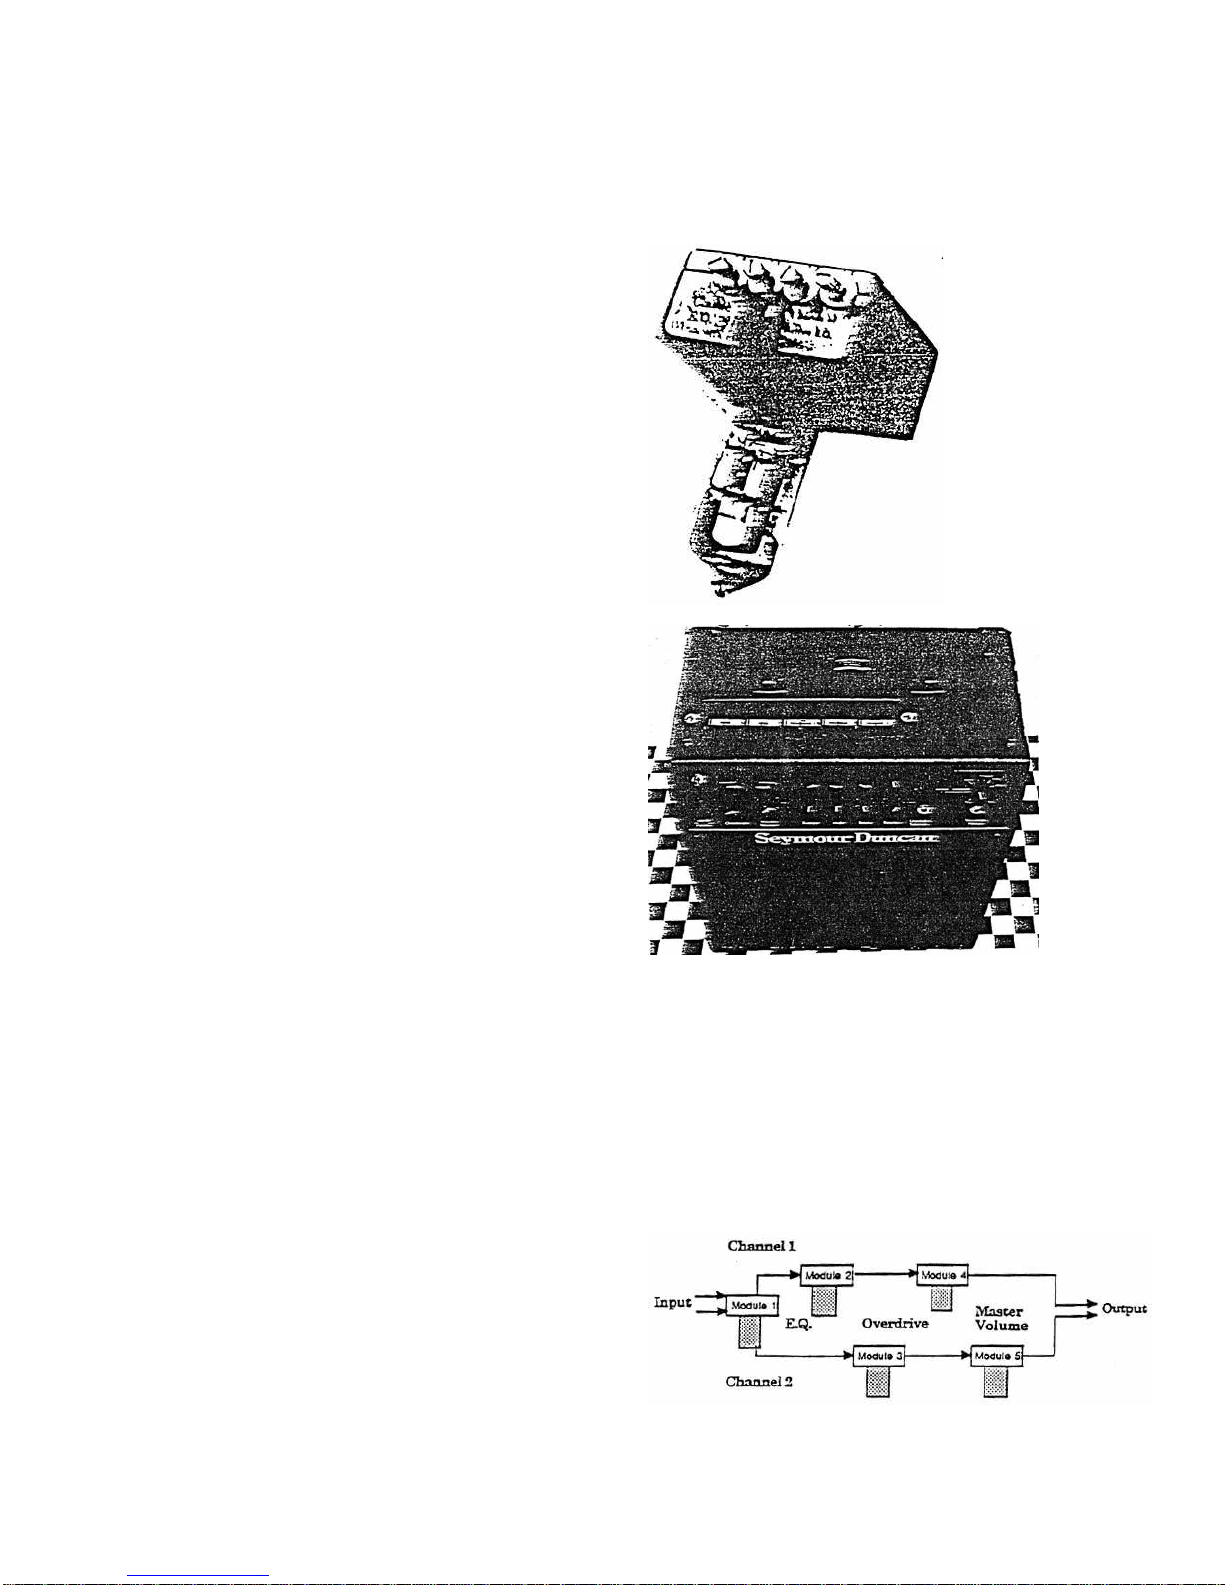
Like all of the preamp controls on this amp, each channel is independent. You can have a clean
setting on one channel and a distorted setting on the other channel.
5. Master Volume: This control sends the signal volume from the preamp to the power amplifier.
For the cleanest signal, turn the Master Volume tip high and keep the Overdrive low (but not off).
For the dirtiest signal turn the Master Volume down (but not off) and the Overdrive up high.
6. Channel 1 Indicator (Red): When your amp is in Channel I and the power is on, this L.E.D.
will glow. It's indicating that only the controls on this row will affect your sound.
7. Channel 2 Indicator (Green): When your amp is in Channel 2 and the power is on, this L.E.D.
will glow. It’s indicating that only the controls on this row will affect your sound.
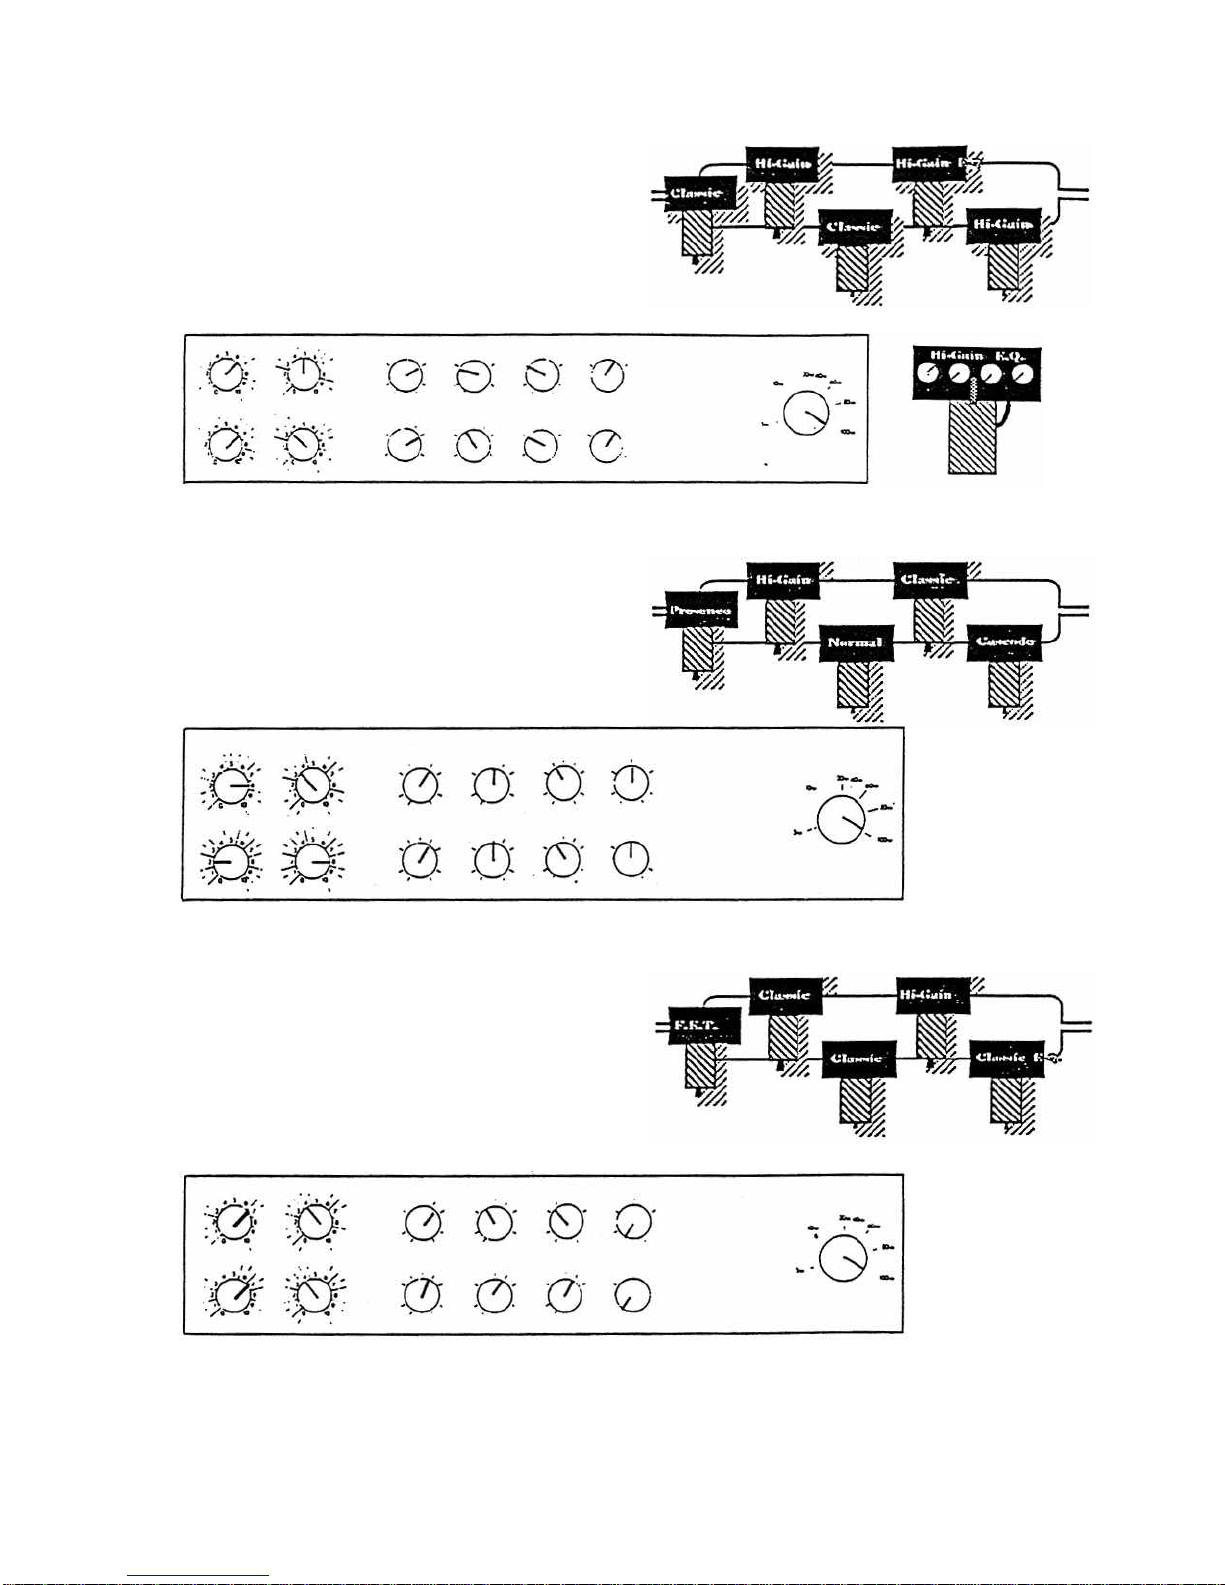
8. Tone Controls: The two sets of tone controls allow you to get tile tone coloration you want
from each channel, without affecting the tone of the other channel. The three tone controls-
Treble, Mid and Bass are a standard interdependent circuit. As you increase the Mid control, the
Treble and Bass will yield less range.
Treble Tone Controls: These controls let you change the high-end response of your amp. Each
is a high-pass passive filter that can reduce the signal level 0-38 db, with a 6 db per octave slope,
-Turn clockwise to increase high-end response.
-Turn counter-clockwise to reduce high-end response.
Mid Tone Controls: These controls lot you change the volume of mid. range within a range of
0-12 db. *Turn clockwise to increase low-end response.
Bass Tone Controls: These controls let you change the low-end response of your amp. Each is
a low-pass passive filter that can reduce the signal level 0-15 db •Turning the dial clockwise
increases the low -end response.
Experiment with these controls to rind where they work beat with your guitar and the room you're
playing in.
(Note: If you turn all tone controls “Off” (farthest to the left), no sound will come out of your amp.)
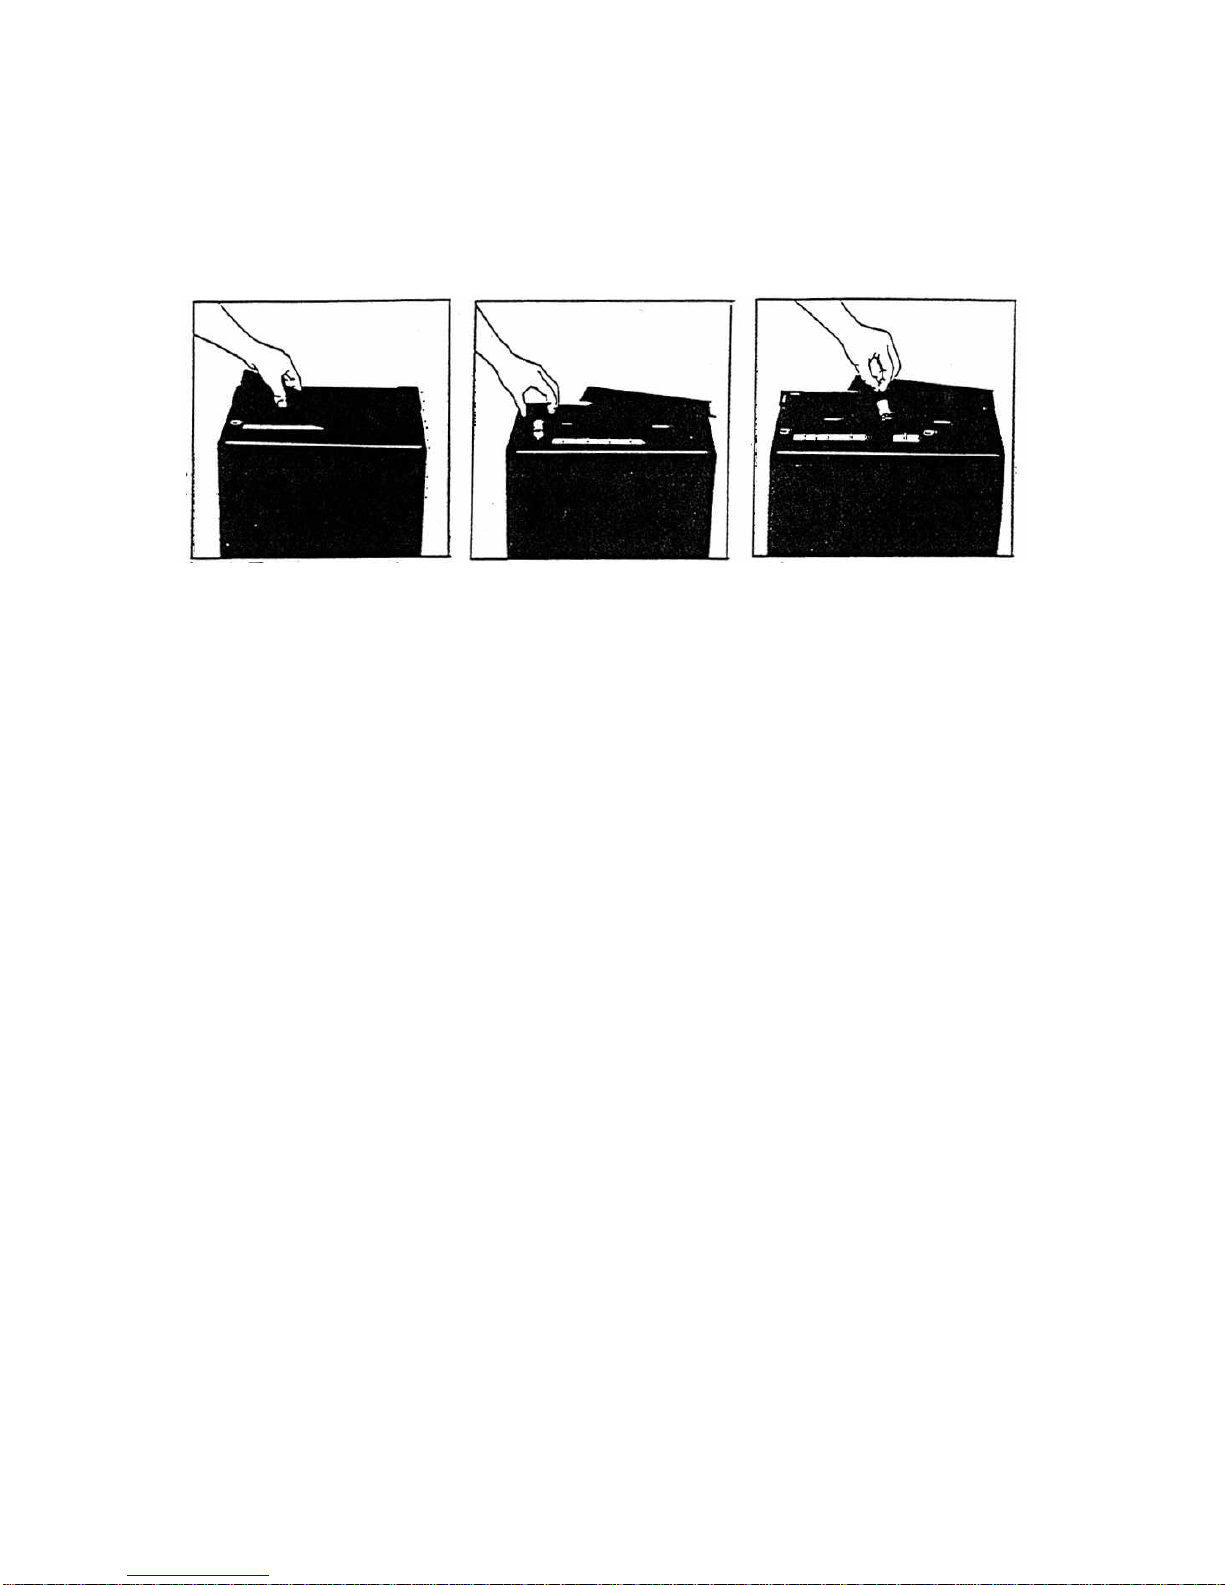
Module Tips:
-When you're using "Low Cut" modules, the Bass controls will have less effect on your sound
because the module is rolling off much of the bass response.
-The "Presence" module will be greatly affected by the treble control. (See pages 7-8 "Preamp
Modules" for more tips.)
9. Reverb: These controls lot you set the amount of reverberation you want in your sound.
-Turn clockwise to increase the amount of reverb.
-Turn counter-clockwise to decrease.
Some players prefer no reverb on one channel only. Can you imagine changing channels with a
footswitch and using another switch to turn the Reverb on and off With two Independent Reverb
controls, you can set as much reverb as you like on one channel and turn the other channel's
Reverb "off" by simply turning the control counter-clockwise.
10. Channel Selector Button: This push button lets you change channels manually The L.E.D.'s
show you, which channel is "On."
If you prefer to use a footswitch, use the Channel Selector Button to put the amp in the green
L.E.D. channel first, then the footswitch will operate.

11. Channel Selector Jack: This jack accepts a standard 1/4" guitar or speaker cord (not
supplied) for connection to the footswitch. When hooked tip the footswitch allows you to change
channels and take advantage of the independent Volume, Overdrive, Tone and Reverb controls.
12. Variable Power Control: This control changes the power amplifier current to reduce or
increase power amplifier wattage 100 watt tube amps are great for playing in large clubs where
you need lots of power, but for smaller places, a low powered amp might be more useful. With the
Convertible 2000, you dial in the amount of power you need, from 100 watts down to 5 watts.
-For the cleanest signal, use oil 100 watts and turn the Master Volume control to adjust loudness.
-To get amplifier distortion, you need to work the power amp section hard-pushing it beyond its
limits. For a distorted sound, turn the Master Volume Control past 1 o'clock and use less power.
You will get a warm round distortion that is heard only on small amplifiers.
Variable Power is not like typical preamp overdrives. The Variable Power circuit actually controls
the output stage of the amp. When the Master Volume control in set low, you will notice little or no
change from the Variable Power control because you are asking the amp to give you very little
wattage. The higher you set the blaster Volume control, the more you will notice the effect of
Variable Power. Experiment to rind where you like it best.
Note: The full power range (6 to 100 watts) is available when running the amp in the Pentode
mode (See Page 11 for Pentode/Triode Switch.) Variable Power iv-ill control 3 to 60 watts in the
Triodo mode.
13. Variable lower Jack: Use this jack with a passive volume pedal (100-500K ohm range) to
remotely change Variable Power.
-CAUTION: An active volume pedal (the type that uses batteries or a.c. power) will not work in
the circuit.
When you turn up the Variable Power, you not only got the most power available, but also less
distortion from the amp. If you want to change Variable Power while you're playing, a volume
pedal lets you do it easily. Many players like to use all 100 watts while playing clean rhythm and
then use Variable Power with a volume pedal to reduce the power and get amplifier distortion for
lead work.
Variable Power can also be changed with a footswitch. When the footswitch is "Off" you will get
all 100 watts. When the footswitch is "on", you will get only 5 watts. When using the footswitch,
the Variable Power Control knob will have no effect. Your only choices are 100 watts or 6 watts.

Rear Controls of the Convertible 2000
1. Fuse Holder: The fuse is located in the cap of the fuse holder. If the fuse fails, it must be
replaced with one that provides proper current protection or you will void the warranty. The proper
fuse rating for the 110-120 v. a c. Convertible 2000 is 5A 250V Slo Blow.
Before removing the fuse cap: UNPLUG THE POWER CORD FROM THE WALL A.C.
OUTLET.
After checking the fuse and replacing the fuse cap, you can plug the amp back into the wall.
To remove the fuse cap, simply grasp the cap with your fingers, push in, and turn counter
clockwise. To replace the cap, grasp the cap with your fingers, push in, and turn clockwise.
Fuses do not wear out. However, they will fatigue after being stressed several times-Fuses are
protection devices that prevent the electronics from damage if there is a serious electrical
problem. If your amp repeatedly has fuse failures, check page 15 under "Fuse Failure" for
troubleshooting tips.
2. On/Off/On Power Switch: switch is designed to turn your amp on and to allow you reverse the
a.c. polarity.
If you're using other equipment like a P.A. and you get a shock when touching the microphone,
place the "On' switch in the other "On" position to eliminate the shock. The middle position is
"Off".
3. Standby: Use this switch when you will not use the amp for a short time period (like
in-between sets). This switch turns off the sound output but keeps the tubes warm and ready to
play.
Standby switches are important on tube amps because the tubes wear out quickest from
temperature change. When the amp is off, the tub" will cool, when they're on, they get hot.
Standby keeps them in operation, so they stay wax= and give you long life. Because of the high
gain circuitry in your amp, it is normal to hear some residual noise through your speaker for one
minute after switching into "Standby."

4. A.C. Convenience Outlets: These outlets let you plug in other equipment for a.c. power. They
can supply a total of 700 watts. To find out how much wattage your equipment uses, look on the
back of the unit, where the power cord is located. Your Convertible 2000 uses 480 watts.
-NEVER PLUG IN UNITS THAT DRAW MORE THAN A TOTAL OF 700 WATTS, OR YOU
WILL RISK THE POSSIBILITY OF AN ELECTRICAL FIRE.
5. Effects Loop: Use this circuit with your effects for the least amount of his& Plug your guitar
into the guitar input jack and run your effects through the Effects Loop.
The "Send Level" control lets you match the Effects Loop output to the input of your effects.
When the level is set too low, too much hiss will come through the speaker and the volume will be
low.
When the level is set too high, you will overload the affect input and cause too much distortion.
Experiment with the setting to find the best match for your effects.
'Effects Send" should be connected to the input of your effect using a normal guitar cable.
"Effects Return" should be connected to the output of your effect using a normal guitar cable.
You want the signal to come OUT of your amp INTO the effect and OUT of the effect INTO your
amp.

6. Reverb: This is where your reverb connects. The return jack accepts the reverb cable with a
red dot on the plug.
Convertible 2000's are designed with Accutronics 2spring reverbs. These are the most natural
sounding reverb units available and they provide a wide range of reverb for your playing styles.
7. Pentode/Triode Switch: This switch changes the operation of the EL-34 output tubes, which
use five components inside each tube. With this switch in the -Up" position, the tubes run in the
Pentode made and all five components operate for full 100-watt power. The sound is brighter and
crisper.
With the switch in the "Down" position, the tubes run in the Triode mode and three components
operate for 60 watt maximum power. The sound is smoother with a little less edge. Experiment
with this switch to find where you like it for your musical style.
Some amps have 50/100-watt switches. What they do is turn off the plate voltage to two of the
four output tubes. This is audible as a slight decrease (-3dB) in loudness. Triode mode actually
changes the harmonic distortion characteristics of the tube, producing lower order distortion.
8. Variable Damping: This circuit is included with the Convertible 2000 to give you more control
over your sound. Damping is the amount of control the amplifier has on the speaker.
High damping (turning the control to the right) increases the control of the speaker. The sound is
crisper and tighter.
* Low damping (turning the control to the left) decreases the control of the speaker. The sound is
looser and fatter, with slightly more presence.
There is no recommended setting because only you can tell what’s best for the sound you want to
produce. We recommend that you start with the Variable Damping control set at 12 o'clock and
adjust from there. Ms control is effective ONLY when the speaker is connected to the “Variable
Damping Out” speaker jack.
9. 4-Ohm, 8-Ohm Speaker Jack: You can use these jacks to match the amp impedance to the
input of the speakers you use. (Proper connection to these jacks will give you maximum power
and maximum damping.)
If you choose to run an 8-Ohm speaker in the 4-Ohm jack, no damage will result in the amp or
with the speaker, it will just sound different from being played through the 8-Ohm jack. The same
situation is possible with a 4 ohm speaker in the 8 ohm jack.

You can also use all three-speaker jacks at the same time with different speakers. The
Convertible 2000's strong transformer can handle almost any load with no damage.
10. Slave Out: Use this jack for patching the output signal of the amp directly into a mixer, tape
recorder, or another amp. Just use a regular guitar cord from Slave Out to the guitar input of the
other unit. The circuit is wired after the output stage so all Tone, Volume, Damping Control
Effects Loop, etc. controls will affect the outgoing signal. Output is one volt at full power.
Load Resistor Plug Values & Sound Effects
The Front Panel section includes suggestions for altering the amplifier input impedance to match
the impedance of the pickup(s) in your instrument. (See the paragraph describing the Load
Resistor Input on Page 9.)
The information in the chart below and the instructions that follow have been provided to enable
you to further customize your sound by making your own load plugs using capacitors, resistors
and RCA input plugs available at most hardware or electronics stores. Various capacitance and
resistance values are given, with a description of their overall effect on your sound.
With each Seymour Duncan Convertible 2000 you receive the following two (2) load resistor
plugs:
Load Input
Value at I khz Capacitance
(In Picofarads) Resistance
(In Ohms) Sound Effect
500K 3300 pf 10k Use with acoustic
pickup to enrich tone.
1 Meg. -0-1 meg Will make tone slightly
smoother sounding.
Other plugs that you can build yourself include:
Load Input
Value at I khz Capacitance
(In Picofarads) Resistance
(In Ohms) Sound Effect
26K .01 10k Slightly rolled off high
end. Use in bright
sounding room or with
pickups that are too
bright.
11.5K .1 10K For mellow, smooth
jazz sounds.
10K -0-10K Quietest operation
when using. Low
Impedance pickups.
How to make a load resistor plug:
Purchase raw RCA plugs and resistors at an electronics hardware store. Using a single resistor
with a value of 1K O -4.7M O 1/8 watt or 1/4 watt, simply solder it to the hot (pin) and to the
ground (crown). You can also try different value capacitors with physical size being your only
limitation. For reference, you may want to examine one of the supplied load plugs and compare.

Trouble Shooting
The following table should enable you with little or no knowledge of electronics, to isolate the
cause of some' problems you may experience with your amplifier and the steps required for
repair. Most causes of impaired amplifier performance are due to minor problems or irregularities,
which can be easily corrected by you.
However, if you cannot identify the cause of the problem using the table below, or if it indicates
your amplifier to be defective and in need of repair, return the unit to an authorized Seymour
Duncan Service Center or call (805) 964-9610 for a Return Authorization number.
Symptom Probable Cause Remedy
Amplifier does not come on
when Power Switch is "On." 1. Power not connected. 1. Ensure power cord is
plugged into power outlet.
2. Blown amp fuse. 2. Check amp fuse; replace if
blown with 250 VAC 5Amp
SLO-BLOW.
3. No source voltage. 3. Verify power source with
something you know works.
4. Defective On/Off power
switch. 4. Return unit to dealer or
factory for repair
No sound coming from
speaker(s), (No audible
amplifier hum).
1. Modules not installed. 1. Install modules.
(See page 3.)
2. Quick Access module cover
is not installed on top of amp. 2. Install Quick Access module
and allow amp to warm up for
one minute.
3. Amplifier in standby (up)
position. 3. Place standby switch in
"On".
4. Master Volume and/or
Overdrive control levels set
too low.
4. Increase control level
settings to "2" and listen.
5. Speaker output plug
disconnected " output wires
shorted.
5. Connect output plug to 4
ohm, 8 ohm or Variable
Damping input.
6. Instrument pickup/
electronics may be defective. 6. Unplug cable from
instrument and touch tip of
plug; if hum is heard, replace
instrument with one known to
operate properly.
7. Defective speakers 7. Verify speakers operate
properly using another amp.
8. Volume controls on your
instrument are down. 8. Increase settings and listen.
No sound coming from
speakers. 9. Defective center driver tube
12AX7. 9. Replace 12AX7
10. Defective 5U4GB rectifier
power tube. 10. Replace tube.
Loud amplifier hum. 1. Amplifier A.C. polarity. 1. Reverse position of power
"on" switch.
2. Instrument connecting cable
not properly grounded 2. See that connecting cable is
plugged into instrument.
3. EL-34 power tube shorted. 3. Replace EL-34.

Amp blows a fuse after several
minutes of operation. 1. Wires from speaker to amp
shorted. 1. Replace speaker cord.
2. M-34 or 5U4GB power rube
defective. 2. Replace tube.
3. Problem persists. 3. Return amp to dealer or
factory for repair.
Amp blows a fuse immediately
after it is switched “On” 1. Defective 5U4GB rectifier
tube 1. Replace tube.
2. Internal short circuit. 2. Return amp to dealer or
factory for repair.
Distorted sound coming from
only one channel. 1. Overdrive control level set
too high. 1. Reduce control level.
2. Defective preamp module. 2. Replace module with one
known to operate properly.
Distorted sound coming from
both channels. 1. Overdrive control levels set
too high. 1. Reduce control levels.
2. Defective first stage preamp
module. 2. Replace module with one
known to operate properly.
3. Speaker output wires to
amplifier shorted. 3. Replace speaker cord.
4. Pickup, instrument or
connecting cable may be
defective.
4. Substitute cable and instru-
ment with one you know
operates properly.
5. Defective speaker(s). 5. Verify speakers operate
properly by connecting
speaker plug to speaker
output jack on another amp. If
speaker is defective return unit
to dealer or factory for repair.
Distorted sound coming from
both channels. 6. Defective Variable Power
tube (12AU7 near power
transformer.)
6. Remove 12-AU7 Variable
Power tube to check and
replace if necessary.
No reverb coming from
amplifier. 1. Reverb control level(s) set
too low. 1. Increase control level(s).
2. Reverb output wires not
connected to Send/Return
inputs.
2. Ensure output wires
properly connected to rear
panel jacks. Cable with red dot
should be connected to Return
Jack.
3. Defective internal spring. 3. Replace reverb unit.
4. Defective reverb Send or
Return circuits. 4. Return to dealer or factory.
5. Springs are stuck. 5. Tap the reverb tank with
your hand.
Channel Selector Footswitch
does not change channels. 1. Channel Selector on amp.
set to Channel 2 position. 1. Use the panel mounted
Channel Selector to set the
amp in Channel 1 (Indicated
by the red L.E.D.)
2. Defective footswitch. 2. Substitute footswitch with
one known to operate
properly. If found to be
defective, return footswitch to
factory or dealer for repair.
3. Defective internal channel
switching in amp. 3. Return amp to dealer or
factory for repair.

Feedback, ringing.
(Guitar NOT plugged in.) 1. Overdrive and Master
Volume controls set too high. 1. Back off Overdrive, Master
Volume and/or Treble controls
until ringing stop.
2, Micro phonic tube. 2. Swap 12AX7 tube in
modules to find the lowest
micro phonic tube, and place it
in the first module. (Seepage
6.)
3. Too many Hi-Gain modules.
(two or more) in one channel.
Remember-the first module is
the most subject to micro
phonic ringing.
3. With two IL-Gain modules in
one channel, we recommend
using an "FET" module in the
first position. If you are
searching for an "ultra FE-
Gain" situation, (3 EE-Gain
modules), try the Hot Mod
mod. We in any of the
position-With the FE-Gain
E.Q. module, simply dial out
the problem frequency on the
module.
Feedback, ringing (With guitar
PLUGGED in.) 1. Micro phonic pickups.
Physical position also effects
this.
1. Have qualified guitar tech
"wax pot" your pickups
Specifications for Convertible 2000 Amplifiers
Combo
Weight. 57 lbs.
Cabinet Dimensions: 19 3/4" H X 21 25/32" W X 11 3/8" D
Head
Weight: 42 lbs.
Cabinet Dimensions: 10 15/16"H X 2125/32" W X 11 l/6" D
Specifications for Both Combo and Head.
Power Requirements: 120 volts a.c. (U.S. Models)
Power Consumption: 480 watts at full rated output.
Power Circuit: All tube, EL-34 tubes 100 watt rms @8 ohm output@ 120 v.a.c. @ 5% @ 1 khz.
Damping Factor: From damping output Low-0.1 into 4 ohms. High-4. 0 into 8 ohms.
Input Impedance: 4.7 meg-ohms adjustable to zero via load resistor plugs.
Input Sensitivity-. 1.2 millivolts. (With Normal-Normal-Normal Modules)
Dynamic Headroom: 4-5 db.
All specifications are subject to change without notice.

International Operation
Your amp is designed for professional usage. This may require changing the amp's electrical
operation when you tour in foreign countries. There are two ways for you to make your amp
compatible with foreign electrical sources:
1. Use an external transformer. These are available for rent or for sale in the countries you visit.
Just plug your U.S. model Convertible amp into the transformer. All voltage conversion and plug
changes are done through the transformer.
2. Use an adapter on the amp’s built-in transformer and change the A.C. plug.
You’ll have to remove the amp chassis from its cabinet and locate the terminal strip next to the
transformer. You’ll also need a molex style plug. (AMP part number 640426-8, eight position IDC
housing on .156 centers.) Wire the molex plug as follows:
• WARNING: ALWAYS MAKE SURF, THE CONNECTOR ATTACHES TO THE
TERMINAL STRIP AS SHOWN IN THE DRAWING ABOVE. FAILURE TO DO SO WILL
VOID THE WARRANTY AND CAUSE ELECTRICAL FAILURE.
If you have difficulty locating the AMP connector, call our Product Service Technician and he can
supply you with one.
Table of contents
Other Duncan Musical Instrument Amplifier manuals