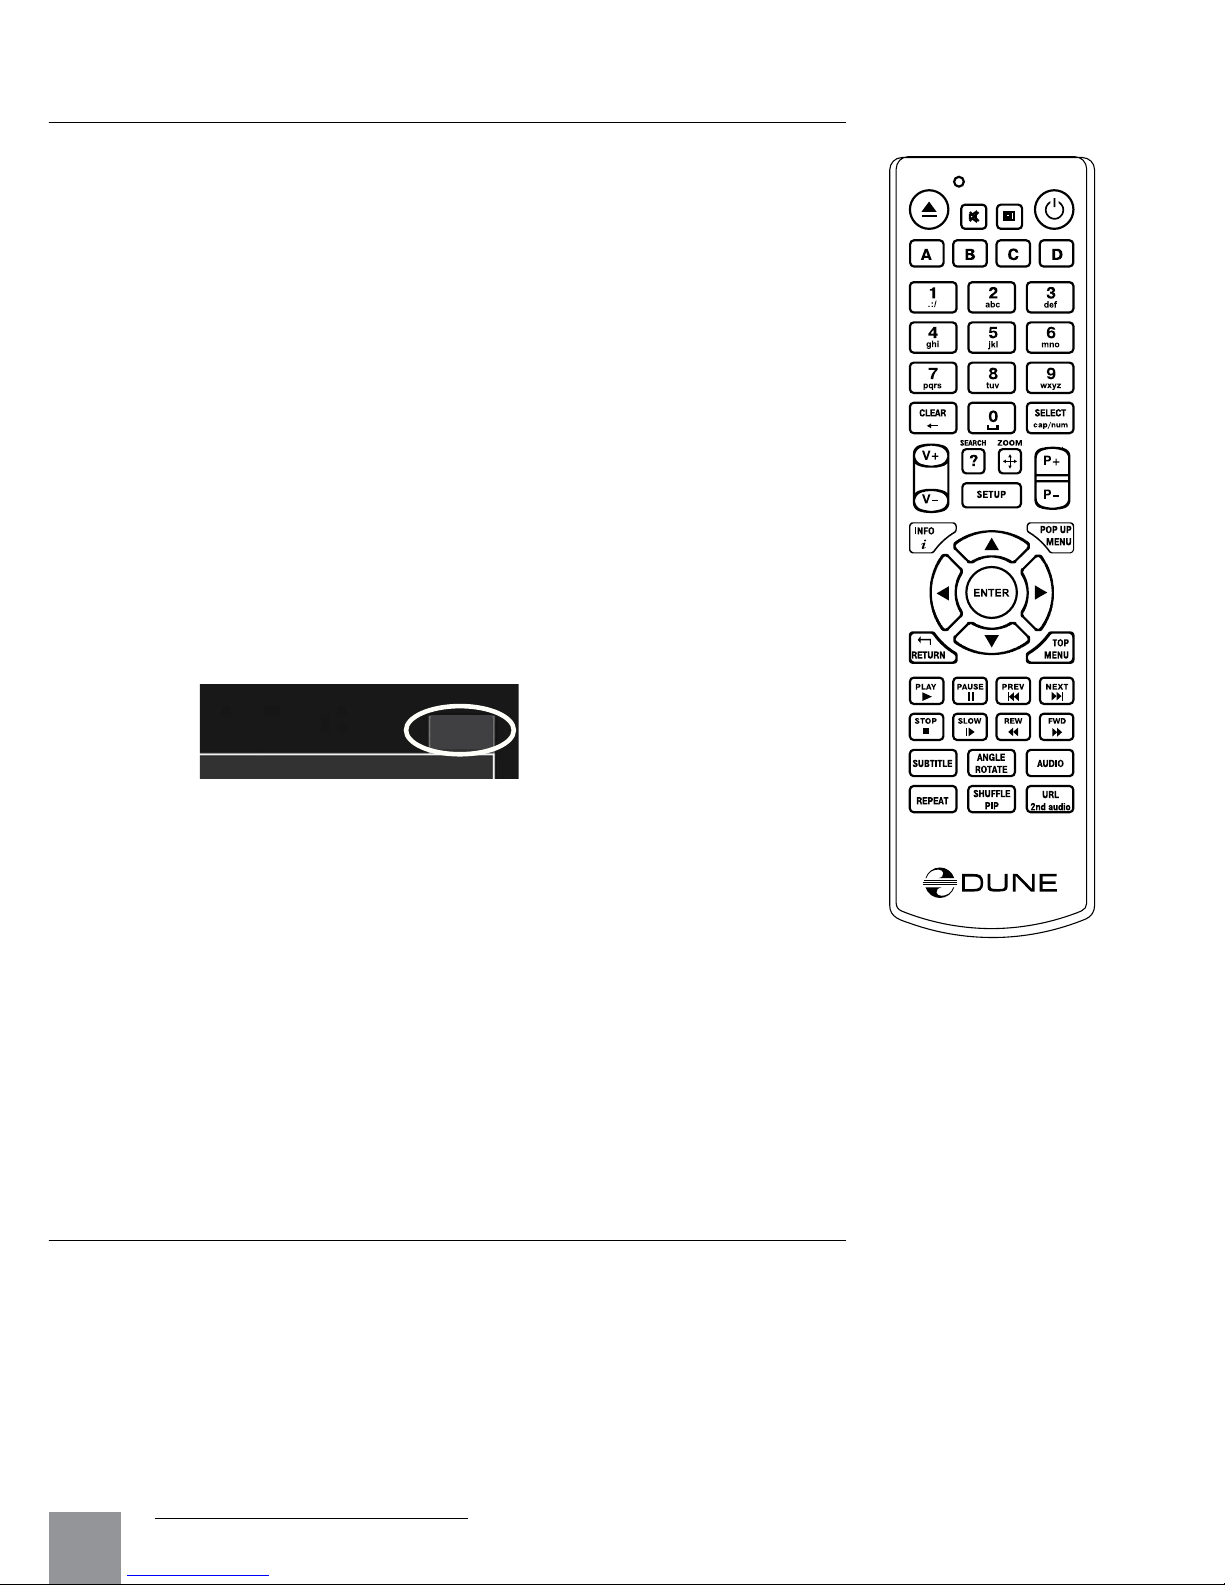
DUNE BD Prime 3.0 User manual

Dune BD Prime 3.0
User Manual


3
Table of Contents
Table of Contents
4 About Player
● Key Features
● Package Contents
● Copyright Notice
● Safety Measures
● Getting Started
● Exterior
9 Remote Control (RC)
● Entering Text with Remote Control
● Standby Mode
11 Connections
● Connecting a TV/Monitor/Projector
with HDMI/DVI Input
● Connecting a TV/Monitor/Projector with
Component (Y/Cb/Cr) Video Input
● Connecting a TV/Monitor/Projector with
Composite Video Input
● Transmission of Digital Audio to AV Re-
ceiver via HDMI Input
● Transmission of Digital Audio to AV Re-
ceiver via Optical/Coaxial Cable
● Transmission of Analog Audio to Exter-
nal Stereo Amplifier (or TV Set)
● Transmission of Analog 7.1 Audio to
External Amplifier (Receiver)
● Connection to LAN and Internet
16 Using Storage Devices
● Connection of USB Drive
● Connection of eSATA Drive
● Using Internal 2.5" SATA HDD
● Formatting HDD
● Correctly Switching Off Player
● Stopping Connected Drives
18 System Setup
● Setup Menu
● Quick Setting of Video Output Mode
● Setup Menu Sections
● General
● Video
● Audio
● Network
● Applications
● Appearance
● Miscellaneous
● Information
24 Playback
● File Browser
● Marking Files and Folders
● Copying and Moving Files and Folders
● File Playback
● Blu-ray Playback
● DVD-Video Playback
● Audio CD Playback
● Internet Radio Playback
● IPTV Playback and Recording
● HTTP Playback
● Photo Viewer
35 Accessing Network Drives
● Connecting via SMB Protocol
● Connecting via NFS Protocol
● Using Network Browser
37 Accessing Player from Network
● Connecting to the Player via FTP from a
Windows PC
● Connecting to the Player via SMB from a
Windows PC
38 Troubleshooting
● General Problems
● Playback Problems
● Network Problems
● Reporting a Problem
42 Firmware Recovery Procedure
43 Player Specifications
44 Notes

Dune BD Prime 3.0 user manual
4
About Player
The newest Sigma Designs 8642 media processor• : enjoy excellent playback and
performance of interactive features.
Blu-ray and DVD player• : play Blu-rays and DVDs (plus Audio CD and data discs with
video/music/photo files).
HDD player• : connect an HDD to the player and play content directly from the HDD.
Network player• : connect the player to a local network and play content directly from PC
or NAS (UPnP, SMB, NFS).
MKV player• : play HD video in a popular MKV format and other modern video file for-
mats, including top quality HD video with very high bitrate.
3 USB ports• : conveniently connect HDDs, USB flash drives, USB card readers and oth-
er USB storage devices.
eSATA port• : connect an HDD via the most efficient eSATA interface.
Internal HDD option• : use an optional 2.5" SATA HDD installed directly inside the play-
er.
HDMI 1.3• : ensure the best possible quality of HD video and HD audio.
7.1 audio decoders and 7.1 audio outputs• : get an excellent surround sound with any
audio equipment.
Full set of standard A/V connectors• : use S/PDIF optical audio, S/PDIF coaxial au-
dio, stereo audio, component video, composite video outputs to easily connect any A/V
equipment.
Video output flexibility• : output video in any resolution and format (from SD to 1080p,
24p/PAL/NTSC).
Upscaling• : high quality upscaling of DVD and any other SD video content to Full HD
(1080p) or other HD resolution.
File browser• : convenient file browser with powerful file management (copy, move, de-
lete, rename, organize).
Extra functions• : Full HD photo viewer, Internet radio, multicast UDP/RTP streams play-
back and recording, playlists, NAS (SMB, FTP), BitTorrent client, media collections with
cover art and icon browsing (with Full HD graphics).
Key Features
Chapter 1
Dune BD Prime 3.0 is an all-in-one solution for up to Full HD (1080p) video playback, com-
bining an universal high definition media player and a modern Blu-ray disc player in one
device.

5
About Player
Package Contents
1. Dune BD Prime 3.0 media player
2. Remote control (batteries may not be included)
3. Power supply cord
4. AV cable
5. HDMI cable
6. Quick start guide
NOTE: Additional items (optional) may be included into the package, depending on player
configuration, region, and distributor, such as CD with additional documentation and/or
demo content, SATA-SATA cable, USB-SATA adapter, etc. Check with your reseller.
Copyright Notice
The law prohibits copying, transmitting, displaying, broadcasting via cable network, public
playback and letting on lease of copyright-protected materials without the rightholder’s au-
thorization. Some video discs are encoded with copy protection, and any picture recorded
from such discs will be distorted. This product incorporates a copyright protection technol-
ogy which is protected by requirements of certain U.S. patents and other intellectual prop-
erty rights owned by Macrovision Corporation and other rights owners. Use of this copyright
protection technology must be authorized by Macrovision Corporation and is intended for
home viewing uses. Reverse engineering or disassembly is prohibited.
1 2 3
4 5 6

Dune BD Prime 3.0 user manual
6
To avoid troubles, please read this manual carefully before using the de-
vice. Keep the manual for future reference.
1. In case of malfunctioning, please contact an authorized service center. There are no user-
serviceable parts inside the device; only a qualified engineer may attempt repairing it.
Opening the device case voids the warranty.
2. To avoid electric shock, do not touch the plugged-in player with wet hands and do not al-
low moisture within the case. If it happened, immediately unplug the device and contact
an authorized service center.
3. Clean the device only with a dry soft cloth. Do not use any liquid detergents or scouring
powder. In case of hard dirt, use special wipes suitable for PC cleaning. Make sure that the
wipe is dry enough (otherwise fluid drops may get inside).
4. The device is intended for indoor use only. Do not expose it to direct sunlight, do not leave
it near a heater or radiator.
5. Do not use the device in rooms with high humidity such as bathroom.
6. Do not plug in the player immediately after moving it from a cold place into a warm one;
unpack it and leave for 1.5−2 hours in order to allow evaporation of condensate on internal
parts.
7. Please make sure to switch off the player and all relevant AV equipment before connecting
them.
8. Do not place any items on top of the player. The device needs some space for proper heat
dissipation. Do not place any vessels with liquid close to the device.
9. Severe voltage surge in AC mains may result in improper operation of the device. In this
case, please unplug the player or turn it off with the POWER button on the front panel of
the player, wait for at least 60 seconds, then turn it back on. The media player will restart,
and its functionality will be restored.
10. If you intend not to use the media player for a long period of time, for safety and power
saving reasons please make sure to unplug it from the AC mains. Please be aware that in
the standby mode the player still consumes significant power
11. After turning the player completely off using the power switch or unplugging it, please
wait for at least 60 seconds before turning it on again.
Safety Measures
10cm
10cm 10cm
If you install your device in a closed space, it is necessary to provide enough
clearance around it for proper cooling. The clearance at each side should
be not less than 10 cm.

7
About Player
Getting Started
Remove the transparent protecting film from the front panel of the player to ensure good
look of the player.
Ensure the RC has batteries installed.
Connect the player to your TV and to other A/V equipment in an appropriate way. Use
HDMI connection to get the best possible quality of video and audio. Make sure to switch off
the player and all relevant A/V equipment before connecting them. Ensure your TV and other
A/V equipment are configured to use proper inputs.
When you switch on the player for the first time, the player will perform its initial loading
procedure, which may take some time (usually up to 30 seconds). During the loading proce-
dure, "DUNE" logo is shown on the TV.
● If you do not see "DUNE" logo on the TV when you switch on the player, it may mean
some problem with the connection between the player and the TV or that a wrong video
input is chosen in the TV or A/V receiver/switch. In such a case, recheck the cables and
the settings of the TV or A/V receiver/switch, or try to use different cables or a different
way of connecting the player to the TV.
● If you see "DUNE" logo on the TV when you switch on the player, but then the picture
disappears and no other picture appears during at least 10 seconds, it may mean that a
wrong video output mode is configured in the player. In such a case, press the MODE RC
button, and then press one of the RC buttons 1, 2, 3, 4 or 5 to switch to a different video
output mode (see "Quick Setting of Video Output Mode").
To choose the language of the player menu, use “Setup / General / Interface language”
setting.
Check here for updated versions of player firmware (which may improve player function-
ing and extend player possibilities): http://dune-hd.com/firmware/.
Check here for more detailed and up-to-date documentation and information on player
usage: http://dune-hd.com/manuals/, http://dune-hd.com/support/.

Dune BD Prime 3.0 user manual
8
Exterior
Front view
Rear view
1
1 2 3
2 3 5 6 7 98 10 114
1. Power switch
2. Display
3. Optical drive
4. EJECT
5. PLAY/PAUSE
6. STOP
7. PREV
8. NEXT
9. USB 2.0 host
1. LAN and USB 2.0 host
2. HDMI 1.3
3. Coaxial digital audio output
4. Optical digital audio output
5. Analog stereo (left/right) audio
output
6. Composite video output
7. Component (Y/Pb/Pr) video output
8. USB 2.0 host
9. eSATA host
10. Multichannel (7.1) analog audio output
11. AC power
4 5 6 7 8 9

9
Remote Control (RC)
1. Command indicator — flashes in response to RC button press-
ing.
2. EJECT — open/close the optical drive tray (if the external opti-
cal drive is connected). MUTE — turn the sound on/off. MODE
— switch the video mode; control some other player functions.
POWER — toggle the standby mode.
3. A (Red), B (Green), C (Yellow), D (Blue) — access Blu-ray disc
features; control some other player functions.
4. 0–9 — enter numbers and text; control some other player func-
tions.
5. SEARCH — jump to a specified playback position. ZOOM —
change the zoom factor for the video content being played. SET-
UP — enter/leave the main Setup menu; adjust playback settings
during playback.
6. V+/V– (volume up / volume down) — adjust the volume.
7. P+/P– (page up / page down) — scroll up and down in various
lists; control some other player functions.
8. Arrows (LEFT, RIGHT, DOWN, UP), ENTER, RETURN, TOP
MENU, POP UP MENU, INFO — main buttons for controlling
the player (navigate across the items on the screen, open/use
the currently selected item, go back to the previous screen, go
to main menu, show popup menu with actions, show information,
control some other player functions).
9. PLAY, PAUSE, STOP, SLOW, REW, FWD, PREV, NEXT —
control the playback.
10. SUBTITLE, URL/2nd audio, ANGLE/ROTATE, REPEAT, SHUFFLE/PIP, AUDIO —
control the playback and some other player functions.
Notes:
● Use alkaline AAA batteries.
● Observe polarity when inserting batteries.
● Direct the remote control to the player. There must be no obstacles between the RC and
the player. If the player is installed behind a tinted glass, the manufacturer may not guar-
antee an undisturbed functioning of RC.
●
If RC functions only at short distances or stops functioning, make sure to replace the batteries.
● Some RC buttons may have several functions depending on the current player mode.
● Some RC buttons may be available only in certain player modes or only during playback of
a certain content.
1
2
3
4
5
6
7
8
10
9
Remote Control (RC)
Chapter 2

Dune BD Prime 3.0 user manual
10
Entering Text with Remote Control
Generally, entering text is carried out the same way as with most cell
phones.
0, 1, 2, 3, 4, 5, 6, 7, 8, 9: Enter a character to the position pointed
by the cursor.
First press: enter the first character from a set of characters related
to this button. Each subsequent press: you may change the entered
character to the next one from this set.
● 0: enter the space.
●1: enter a special character (punctuation marks, etc).
● Up, Down, Left, Right after pressing 1 (special character entering
mode): select the required character.
ENTER — confirm selection; finish text entering.
SUBTITLE — enter the period (for numeric mode); functions like but-
ton 1 (character mode).
CLEAR (<-) — delete a character to the left of cursor.
SELECT (cap|num) — switch input mode:
abc: character mode, small latin letters.
ABC: character mode, capital latin letters.
123: numeric mode, digits.
RETURN — cancel the text changes and finish text entering.
Left/Right — move the cursor one character left/right.
Up/Down — move the cursor to the start/end of a text line.
● If the cursor is already in start/end position: select another user interface element which is
under/over the current text entry area (only for dialogs with several elements of user inter-
face; text changes are confirmed automatically).
POP UP MENU — show context menu with a list of available commands. They allow you to
cut, copy and paste text using the clipboard, much like it is done on a PC.
abc
Standby Mode
Pressing the POWER remote control button switches the player to the Standby mode.
In this mode the internal HDD (if installed) is turned off, as well as the video output,
but the device does not switch off completely.
To activate the player from the Standby mode, press the POWER remote control button once
again. The player will be switched on immediately (within several seconds).
Note: you can also configure the player to power off completely when pressing the POWER
remote control button (see Setup / Miscellaneous / Advanced / "POWER" remote button).

11
HDMI IN
Connections
This chapter describes different possibilities of connecting the media player to AV
equipment.
Depending on the model and the design of a TV/monitor/projector, after connecting it
using one of the provided schemes and plugging in the power, the player initialization may
take up to 10 sec. If after this time there is no picture (a "DUNE" logo) on the screen, then it
is a problem with the cable connection or the TV/monitor/projector. Please check the "Trou-
bleshooting" section in such case.
If, after the initial screen (a "DUNE" logo) disappears, there is no other picture on the screen
in 10 sec and more, then it is most likely a problem of incorrect video mode set in the player.
Please address the "Quick Setting of Video Output Mode" section below in such case.
Connecting a TV/Monitor/Projector with
HDMI/DVI Input
Since the player is designed first of all for playback of high definition (HD) video (up to
1080p), the best way of signal transmission from the player to a TV/monitor/projector
is the HDMI interface. In this case, video and audio streams are transmitted in digital
form, without loss, delivering excellent picture and sound.
If your TV/monitor/projector has no HDMI port but is equipped with the DVI one, you can
use an HDMI-DVI adapter (to be connected to HDMI-HDMI cable) or HDMI-DVI cable (no
adapter needed). In this case, transmission of audio stream via HDMI is not supported, so one
of the analog or digital audio outputs has to be used.
1. Make sure that the player and the TV/monitor/projector is switched off. Do not switch them
on until the connection procedure is finished.
2. Connect the HDMI/DVI cable and (if needed) the HDMI-DVI adapter.
3. Using RC/buttons of the TV/monitor/projector, select the required input port and (for display
mode. For further instructions please refer to the manual of your displaying equipment.
4. Power on the devices. Wait until the initial screen (a "DUNE" logo) is shown.
Connections
Chapter 3

Dune BD Prime 3.0 user manual
12
Connecting a TV/Monitor/Projector
with Component (Y/Cb/Cr) Video Input
For this connection you should use a
3RCA-3RCA video cable and (optionally) a
2RCA-2RCA audio cable for sound trans-
mission to your TV set. Please note that
video cable shall have an impedance of
75 Ohm, i.e. specially designed for trans-
mission of analog video signal.
1. Make sure that the player and the display-
ing device are switched off. Do not switch
them on until the connection procedure is
finished.
2. Connect the component video output of the media player to the relevant TV/monitor/pro-
jector input using a 3RCA-3RCA cable.
3. Optionally connect the analog stereo audio output (AUDIO L/R) of the player to the rel-
evant input of a TV/monitor/projector using a 2RCA-2RCA cable. Instead, you can use
optical cable to transmit digital audio to your AV receiver; in this case better audio quality
may be expected.
4. Using RC/buttons of TV/monitor/projector, select the required input and display mode.
For further instructions please refer to the manual of your displaying equipment.
5. Power on the devices. Wait until the initial screen (a "DUNE" logo) is shown.
Connecting a TV/Monitor/Projector
with Composite Video Input
Since this kind of connection does not pro-
vide a high-quality picture, we recommend
to use it only in case your TV/monitor/pro-
jector does not have High Definition video
interfaces, such as HDMI, DVI or Compo-
nent (Y/Cb/Cr).
1. Make sure that the player the TV/monitor/
projector are switched off. Do not switch
them on until the connection procedure is
finished.
2. Connect the media player to the relevant TV/monitor/projector input using an RCA-RCA
cable.
3. Optionally connect the analog stereo audio output (AUDIO L/R) of the player to the rel-
evant input of the TV/monitor/projector using a 2RCA-2RCA cable. Instead, you can use
optical cable to transmit digital audio to your AV receiver; in this case better audio quality
may be expected.
4. Using the RC/buttons of your TV/monitor/projector, select the required input and display
mode. For further instructions please refer to the manual of your displaying equipment.
5. Power on the devices. Wait until the initial screen (a "DUNE" logo) is shown.
AUDIO IN
RL
COMPONENT
VIDEO IN
RL
AUDIO IN
VIDEO IN

13
An optical Toslink–Toslink or coaxial (75 Ohm) audio cable shall be used (not includ-
ed).
1. Connect digital audio output of the player to the digital audio input of the AV receiver.
2. Select relevant input and sound mode on the AV receiver.
We recommend you to turn down the volume of your audio equipment before con-
nection, in order to protect your hearing from unexpectedly high volume, and to elimi-
nate the risk of damage to your audio system.
Transmission of Digital Audio to AV Receiver via Op-
tical/Coaxial Cable
Transmission of Digital Audio to AV Receiver via
HDMI Input
This media player is equipped with an up-to-date HDMI 1.3 interface, allowing trans-
mission of digital video and audio streams via a single cable. If your AV receiver has
an HDMI 1.3 input and decoders for up-to-date audio formats, you may fully enjoy
an HD multichannel sound.
1.
Make sure that the player and the AV receiver are switched off. Do not switch them on until
the connection procedure is finished.
2. Connect the HDMI output of the media player to the HDMI input of your AV receiver using
an HDMI-HDMI cable.
3. Using the RC/buttons of the AV receiver, select an appropriate mode (refer to your AV
receiver manual).
We recommend you to turn down the volume of your audio equipment before con-
nection, in order to protect your hearing from unexpectedly
Connections
HDMI IN

Dune BD Prime 3.0 user manual
14
Transmission of Analog 7.1 Audio to External
Amplifier (Receiver)
Four analog 2RCA-2RCA cables
shall be used (not included). It
is better to use four identical ca-
bles.
We recommend you to turn
down the volume of your audio
equipment before connection, in
order to protect your hearing from
unexpectedly high volume, and
to eliminate the risk of damage to
your audio system.
Transmission of Analog Audio to External
Stereo Amplifier (or TV Set)
An analog 2RCA-2RCA cable shall be
used (not included).
1. Connect analog stereo audio output (AU-
DIO L/R) of your player to the audio input
of your stereo amplifier.
2. Select a relevant input in your amplifier.
We recommend you to turn down the
volume of your audio equipment before
connection, in order to protect your hear-
ing from unexpectedly high volume, and
to eliminate the risk of damage to your
audio system.
You may send the analog audio signal from your player to the TV set, in case you use
DVI, Component video, or Composite video for video signal transmission and don’t use
an AV receiver for digital audio decoding. In case of connection via HDMI, video and audio
signals will be transmitted using a single HDMI cable, that’s why there is no need of ad-
ditional analog audio connections in this case.
eSATA
RL
AUDIO IN

15
Connection to LAN and Internet
A standard Cat.5, Cat.5e or Cat.6 Ethernet cable with RJ-45 connectors should be
used (not included).
Connections
Alternatively, you can connect the player to the local network using Wi-Fi. To use Wi-Fi con-
nection, you need to have an optional Wi-Fi module. NOTE: Using Wi-Fi is not recommended
if you want to stream high-bitrate media content through network. Ethernet connection en-
sures much better performance of network playback and much better file transfer speed. Do
not use Wi-Fi connection if you can use Ethernet connection.
Depending on the exact way you local network is organized, you may need to adjust net-
work settings in the player settings menu.
See "System Setup / Network" section in this manual for more information.

Dune BD Prime 3.0 user manual
16
Using Storage Devices
Chapter 4
To connect a USB drive, ensure you are on the main screen of the player menu and connect
the USB drive to an USB port of the player. The player will recognize the USB drive, and will
show an item corresponding to the USB drive on the main screen.
When connecting a USB drive requiring significant power (such as USB HDD), use an
external power supply for the USB drive. Power provided by the USB ports of the player may
not be enough for correct functioning of the USB drive.
Do not disconnect or switch off the USB drive when some write operation is in prog-
ress.
To connect an eSATA drive, switch off both the player and the eSATA drive, connect the
eSATA drive to the eSATA port of the player (and connect the eSATA drive to its power sup-
ply), switch on the eSATA drive, and, as the last step, switch on the player. The player will
recognize the eSATA drive, and will show an item corresponding to the eSATA drive on the
main screen of the player menu.
Switch off and disconnect the eSATA drive only after switching off the player.
NOTE: Depending on a particular eSATA drive, it may also be possible to connect/dis-
connect the eSATA drive to the player w/o switching off the player. This possibility is not
guaranteed to work correctly in all cases.
NOTE: Not all eSATA drives may work well the player (may depend on a particular eSATA
drive model and particular usage conditions). The eSATA port is provided for extended flex-
ibility, but without a guarantee that an arbitrary eSATA drive will work well. It is recommended
to test a particular eSATA drive before making a decision on its usage with the player, and
use only those eSATA drives which are known to work well with the player.
When an internal 2.5" SATA HDD is installed, the player shows an item corresponding to this
HDD on the main screen of the player menu.
A possibility to install an internal 2.5" SATA HDD may depend on your reseller. Please
contact your reseller for more information.
Connection of USB Drive
Connection of eSATA Drive
Using Internal 2.5" SATA HDD

Using Storage Devices 17
Formatting HDD
If you intend to write data to a HDD via the player, it is recommended to format the HDD to
EXT2 or EXT3 filesystem. For example, you may need this if you intend to copy data to the
player's attached HDD from network using FTP or SMB accessr, or if you intend to use the
BitTorrent client built-in into the player, or copy data from other storage devices to this HDD
using the file manager of the player.
To format a HDD using the player: choose the item corresponding to the HDD on the main
screen of the player menu, press the INFO RC button, and choose "Format Disk" or "Format
Partition" commands. The player will format the disk using "EXT2" filesystem.
NOTE: To use EXT2/EXT3 formatted disks on a Windows PC, you may need to install ad-
ditional software on the PC, such as "EXT2FSD" (http://www.ext2fsd.com/).
When the player goes into the standby mode (or when the player is switched off using the
RC), the player sends "stop" command to all connected drives. This is done in order to de-
crease power consumption and reduce noise when the player and the connected devices
are not used. When the player leaves the standby mode or when it is switched on again, the
connected drives start working again.
If the player is in standby mode, and it needs to access the stopped drive (e.g. because the
built-in BitTorrent client is running, or because access from the network via SMB or FTP is
performed), the drive will automatically resume its operation.
Some connected drives may not properly cooperate with the player in respect to stop-
ping/resuming, in particular, when entering/exiting the standby or power-off mode. This
may depend on a particular drive model and also on the exact way how the drive is con-
nected to the player and how the power is provided to the drive. It is not recommended to
use such drive models. If proper handling of these things is important, it is recommended to
learn or test in advance whether a particular drive model works correctly with the player.
Do not switch off the player if some drive is connected to the player and some write opera-
tion is in progress. Note that write operation may be performed not only manually (e.g. when
copying files via the file browser of the player), but also in background, e.g. if the built-in Bit-
Torrent client is running, or access to the player from network via SMB/FTP is performed.
Ensure that all write operations are finished or stopped before switching off the player.
If you switch off the player using the power switch on the front panel, first put the player into
the standby mode using the RC to ensure all potentially buffered data is fully written to the
connected drives.
Stopping Connected Drives
Correctly Switching Off Player

Dune BD Prime 3.0 user manual
18
This chapter describes a list of settings of different functions of your media player.
Setup Menu
● The setup menu may be entered only from the file browser mode.
WARNING: During media files playback, an access to the setup menu is dis-
abled. In order to enter the menu you need to stop the playback first.
● To enter the setup menu, press SETUP on your RC or enter the Setup folder in the Main
screen of the player (the file browser showing the root folder).
● To exit the setup menu, press SETUP once again, or press the RETURN button.
● To browse the setup menu, use RC buttons Up, Down, RETURN/Left, ENTER/Right.
Quick Setting of Video Output Mode
T
he MODE button of the RC allows quick setting of video output mode
without entering the setup menu. This type of video output configu-
ration may be required in case after connecting your player to a TV/
monitor/projector you see no picture on the screen.
After pressing the MODE button you will enter the quick video set-
ting mode. In this mode, pressing one of the digit buttons 1, 2, 3, 4, 5
switches to one of the following video output modes respectively:
1. Composite/Component, PAL
2. Composite/Component, NTSC
3. HDMI, 480i, 60 Hz
4. HDMI, 720p, 60 Hz
5. HDMI, 1080i, 60 Hz
To exit the quick video setting mode after successful settings, press
ENTER on your RC.
● After pressing the MODE and a digit button please wait for up to 15
sec. before the new video mode is settled.
● The 5 listed video modes are provided only to ensure that you can
quickly set up some usable video mode for any type of video con-
nection you are using, regardless the previous settings of your play-
er.
● After getting a picture on the screen with one of these modes,
please go to Setup menu and choose the most appropriate video
output and resolution.
System Setup
Chapter 5

19
System Setup
Setup Menu Sections
General
This section descrbes selection of general interface language and timeout for the
screen saver activation.
● During a video playback, the MODE button is deactivated. To change parameters of video
output, stop playback by pressing the STOP button.
In case of any problems, to make sure that the playback is stopped and you are in the file
browser mode, switch the player off and then on, and wait until the player boots completely
for up to 60 sec. Refer to the "Standby Mode" section.

Dune BD Prime 3.0 user manual
20
Video
In this section you will find settings of video output type (digital HDMI or analog) and
adjusting of video resolution on selected output.
● The selected resolution will be used by default for all media files.
● Read carefully the manual for your TV/monitor/projector. Some video modes may not be
supported by your equipment.
● In case of using the HDMI connection, depending on HDMI support in your TV/monitor/
projector, intermediate HDMI equipment (if any) and the player, some video modes may
not be available or may function improperly. In this case, use other video modes or other
connection type.
● To have the best picture quality, it is recommended to use an HDMI connection. Refer to
the "Connection to TV/Monitor/Projector via HDMI Input" section.
Other manuals for BD Prime 3.0
1
Table of contents
Other DUNE Blu-ray Player manuals