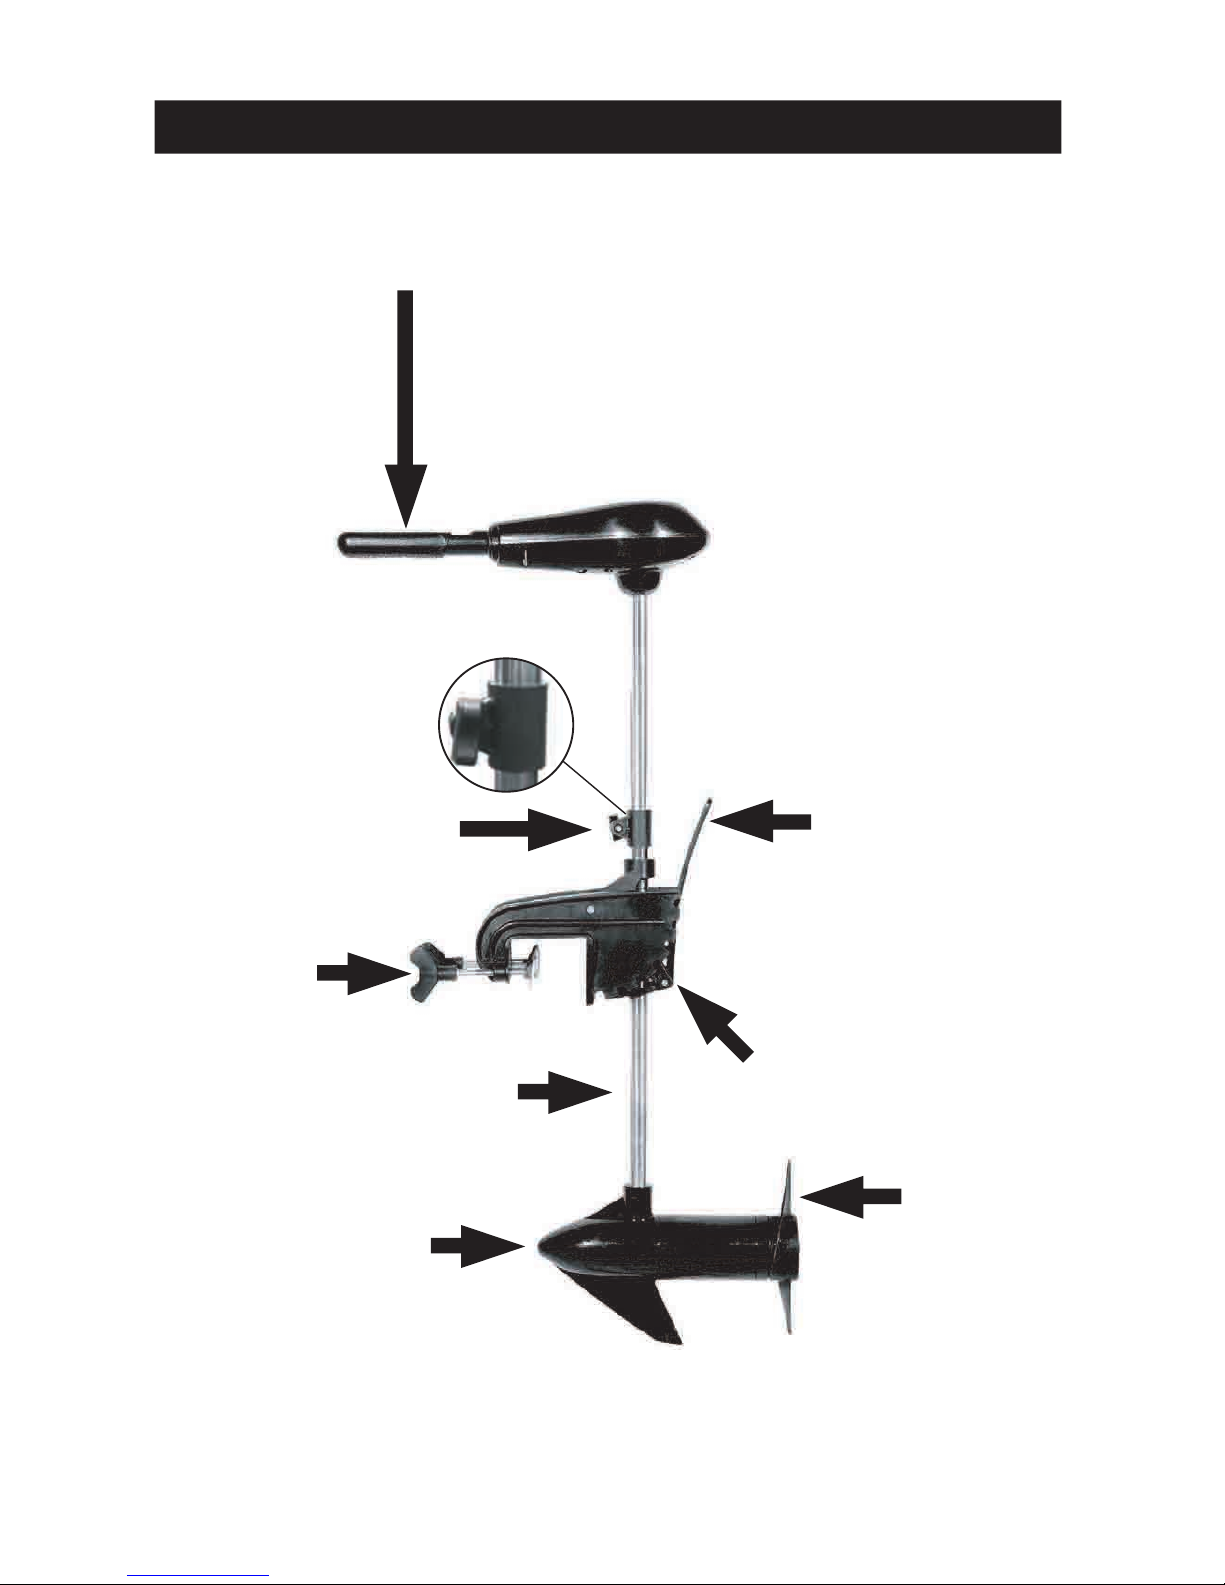
Duramaxx 90000 User manual

32 lbs / 38 lbs
TROLLING MOTOR
OPERATOR'S MANUAL
MODEL: 90000 / 90001
TOLL-FREE HELPLINE: 1 866 523-5218
IMPORTANT: READ THIS MANUAL CAREFULLY BEFORE OPERATNG YOUR NEW
DURAMAXX TROLLING MOTOR. RETAIN FOR FUTURE REFERENCE.
TM

2
TABLE OF CONTENTS
PRODUCT SPECIFICATIONS
90000 (32 lbs) / 90001 (38 lbs)
Motor................................................................................................................................12V
Thrust...............................................................................................................32 lbs / 38 lbs
Prop speeds...............................................................................................1300 - 1800 RPM
Forward speed.........................................................................................................5 speeds
Reverse speed.........................................................................................................3 speeds
NOTE: To be used with Deep Cycle 12V marine battery. (Sold Separately)
PRODUCT SPECIFICATIONS.............................................................................................
FUNCTIONS.........................................................................................................................
ADJUSTMENTS...................................................................................................................
OPERATION........................................................................................................................
BATTERY.............................................................................................................................
PROPELLER........................................................................................................................
MAINTENANCE....................................................................................................................
TROUBLESHOOTING..........................................................................................................
WARRANTY..........................................................................................................................
2
3
4
6
7
8
9
10
11

Tiller speed control: Controls Speed, forward, reverse and steering direction.
Shaft depth adjustment collar
Clamping knobs
Adjustable shaft
12V DC Motor
Prop shaft tilt release lever
Boat mounting bracket
Propeller
3
FUNCTIONS

MOUNT THE MOTOR:
Install the motor on the transom of the boat. Be sure to tighten the clamp screws securely.
DEPTH ADJUSTMENT:
1. Firmly grasp the shaft and hold it steady
2. Loosen the steering tension knob and depth collar knob until the shaft slides freely.
3. Raise or lower the motor to the desired depth.
4. Tighten depth collar knob to secure the motor in place.
IMPORTANT: WHEN SETTING THE DEPTH BE SURE THE TOP OF THE MOTOR IS SUBMERGED AT
LEAST 12" (30 cm) TO AVOID CHURNING OR AGITATION OF SURFACE WATER. THE PROPELLER
MUST BE COMPLETELY SUBMERGED.
CAUTION:
• NEVER OPERATE YOUR MOTOR WHEN IT IS OUT OF THE WATER
• OVER-TIGHTENING THE CLAMP SCREWS CAN DAMAGE THE BRACKET.
BRACKET ADJUSTMENT:
You can lock your motor in a vertical position, angle it for shallow water or tilt it completely out of the water.
• Firmly grasp the control head or or steel shaft.
• Depress and hold the tilt lever.
• Tilt to any of the positions on the mounting bracket.
• Release the tilt lever.
4
ADJUSTMENTS
Tighten
Loose

5
ADJUSTMENTS
Tiller speed control
Clamping knobs
Shaft depth adjustment collar
Prop shaft tilt release lever
WARNING: WHEN MAKING ANY ADJUSTMENTS TO MOTOR OR PROPELLER THE BATTERY
MUST BE DISCONNECTED FROM THE TROLLING MOTOR WIRE LEADS.

6
OPERATION
TWIST TILLER:
• These motors offer a choice of five forward and three reverse speeds.
• The speed control may be operated in either direction, forward or reverse. Turn the tilt twist tiller handle
counterclockwise from O (off) to increase reverse speed and clockwise from O (off) to increase forward speed.
Thrust decreases as you approach O from either direction. The detents printed on the twist grip handle
represent a percentage of maximum thrust.
MIDDLE

7
BATTERY
12V BATTERY INFORMATION:
NOTE: BATTERY SOLD SEPERATELY
Trolling motors will operate with any deep cycle marine 12V battery.
For best results it is recommended to use a deep cycle marine battery with a minimum of 105 ampere hour
rating. (As a general on the water estimate, your 12V motor will draw one ampere per hour for each pound
of thrust produced when the motor is running on high. The actual ampere draw is subject to your particular
environmental conditions and operation requirements.)
Always store battery at full charge when not in use. Battery life will be extended by charging each time battery
is used and every two weeks when not in use. (Use a lamp timer and charge each day for 1 hour even if
battery is not used as this will help maintain a full battery level)
NOTE: ONLY TRICKLE CHARGE YOUR BATTERY TO FULL POWER, DO NOT SPEED/RAPID CHARGE
THE BATTERY AS THIS WILL SHORTEN ITS LIFE.
If you are using a crank battery to start a gasoline outboard it is strongly recommended to use a separate
battery for trolling motor to ensure of enough start up power for the gasoline motor.
BATTERY CONNECTION:
12 Volt System
a. Connect the positive ( + ) red lead to the positive ( + ) battery terminal.
b. Connect the negative ( - ) black lead to the negative ( - ) battery terminal.
NOTE: If installing a leadwire plug, observe proper polarity and follow the instructions in your boat owner's manual.
WARNING:
IMPORTANT: This is supplied as a quick reference guide however battery types, brands and sizes may vary in
performance and abilities. Always read your battery manufacturers manual for specific battery requirements or
contact the manufacturer for best practices and/or advice.
• BEFORE CONNECTING BATTERY, MAKE SURE THE TWIST TILLER HANDLE IS IN THE OFF POSITION.
• USE 6 GAUGE WIRE TO EXTEND POWER LEAD.
• KEEP LEADWIRE CONNECTION TIGHT AND SOLID TO BATTERY TERMINALS.
• LOCATE BATTERY IN A VENTILATED COMPARTMENT.

8
PROPELLER
PROPELLER REPLACEMENT:
1. Using a cloth or glove, hold the propeller and loosen the prop nut with a (1/2") socket.
2. Remove the prop nut and washer.
NOTE: If the drive pin has been damaged or broken you will need to use a standard/slotted screwdriver
to hold the shaft still. The prop shaft has a slot in the center in case of this issue.
3. Once the nut and washer are removed pull the prop straight off.
4. The drive pin is located behind the prop, ensure it has not fallen out and if it has reinstall in position
before reinstalling the prop.
5. When reinstalling the prop tighten the prop nut 1/4 turn past snug (25 - 35 in lbs.)
IMPORTANT: If the prop nut is overtightened it may cause damage to the prop or cause too much
pressure/strain on the motor which may cause overheating or premature battery drain.
WARNING: DISCONNECT THE MOTOR FROM THE BATTERY BEFORE BEGINNING ANY PROP
WORK OR MAINTENANCE.
Fig.A
SLOT END
DRIVE PIN
WEEDLESS PROPELLER
WASHER
PROP NUT

9
MAINTENANCE
1. The propeller must be cleaned of weeds and fishing line. Line can get behind the prop, wear away the seals
and allow water to enter the motor. Disconnect battery and check this after each use.
2. To prevent accidental damage during trailering or storage, disconnect the battery whenever the motor is out
of the water. For prolonged storage, lightly coat all metal parts with silicone or lithium based lubricant spray.
3. For maximum performance, restore battery to full charge before each use.
4. To maintain optimum performance of the propeller it is required to keep the leading edges of the prop blades
smooth. If there are nicks or rough edges it is suggested to correct by using a smooth file or fine sandpaper.
NOTE: Replace propeller if unable to repair.

10
TROUBLESHOOTING
1. MOTOR DOES NOT RUN OR LACKS POWER:
- Check battery terminal connections
- Check battery voltage or battery health/amperes to ensure of correct working levels (this may need to be
done by a technician with a correct voltage meter)
2. MOTOR TILLER IS HARD TO STEER:
- Loosen the steering tension knob on the bracket
- Check to ensure no debris or other foreign materials may be constricting movement

11
LIMITED WARRANTY
2 —Year Limited Warranty
THIS WARRANTY IS NOT TRANSFERABLE AND DOES NOT COVER:
Products sold damaged or incomplete, sold “as is”, sold reconditioned or used as rental equipment.
Delivery, installation or normal adjustments explained in the owner’s manual.
Damage or liability caused by shipping, improper handling, improper installation, incorrect voltage or improper
wiring, improper maintenance, improper modification, or the use of accessories and /or attachments not specifically
recommended. Repairs necessary because of operator abuse or negligence, or the failure to install, operate,
maintain and store the product according to the instructions in the owner’s manual.
Damage caused by cold, heat, rain, excessive humidity, corrosive environments and materials, or other contaminants.
Expendable items that become worn during normal use.
Cosmetic defects that do not interfere with tool functionality.
Freight costs from customer to vendor.
ANY INCIDENTAL, INDIRECT OR CONSEQUENTIAL LOSS, DAMAGE, OR EXPENSE THAT MAY RESULT
FROM ANY DEFECT, FAILURE OR MALFUNCTION OF THE PRODUCT.
Some states or provinces do not allow the exclusion or limitations on how long an implied warranty lasts,
so the above limitations may not apply to you……
WARRANTY REPLACEMENT PARTS are available by calling 1 866 523-5218, 8:30am – 5:00pm EST,
Monday to Friday.
The propeller carries a 15 day warranty against defects in workmanship and materials.
This manual suits for next models
1
Table of contents