DURHAND B72-037 Datasheet

USING INSTRUCTION
IMPORTANT, RETAIN FOR FUTURE REFERENCE: READ CAREFULLY
INcea068_UK_ES
B72-037
FIVE-IN-ONE WORKBENCH
Household & DIY Workstation

WARNING!
Read carefully and understand all ASSEMBLY AND OPERATION INSTRUC-
TIONS before operating. Failure to follow the safety rules and other basic pre-
cautions may result in serious injury.
This machine is designed for certain applications only. The distributor cannot be
responsible for issues arising from modification of the product. We strongly
recommend you do not modify this product and/or use it for any application
other than that for which it was designed. If you have any questions relative to a
particular application, DO NOT use the machine until you have contacted the
distributor to determine if it can or should be performed on the product.
INTENDED USE:
This is a five-in-one portable workbench, sawhorse, scaffold, car creeper and
dolly. The item can be transformed easily between different modes by following
this manual.
This product is intended for DIY and light trade use.
Vice Peg Sawhorse Hole
Compass
Traction Rope
Connection Hole
Ruler
Steel Leg
Handle
Quick Clamp
Connector
Tool Tray
-2-

TECHNICAL SPECIFICATIONS:
Work platform size: L94xW48cm
Work height: 52/66/80cm
Loading capacity:
Workbench /Sawhorse mode – 150KG/330LBS
Scaffold mode – 150KG/330LBS
Car Creeper & Dolly mode – 150KG/330LBS
Net weight: 13KG/15KG
GENERAL SAFETY RULES
WARNING: Read and understand all instructions. Failure to follow instruc-
tions listed below may result in serious injury.
CAUTION: Do not allow persons to operate or assemble this workbench
until they have read this manual and have developed a thorough understanding
of how the unit works.
WARNING: The warnings, cautions and instructions discussed in this
manual cannot cover all possible conditions or situations that could occur. It
must be understood by the operator that common sense and caution are factors
which cannot be built into this product but must be applied by the operator.
SAVE THESE INSRUCTIONS
IMPORTANT SAFETY CONSIDERATIONS
● FAILURE TO FOLLOW THESE SAFETY PRECAUTIONS AND INSTRUC-
TIONS COULD RESULT IN DAMAGE TO THE PRODUCT AND/OR SERIOUS
INJURY!
● Make sure all moving parts are free from interference.
● Keep hands clear of all moving parts.
● Ensure this workbench is used in a dry place, protected from rain. The prod-
uct is for INDOOR use only. Do not store or use outdoors or in a moist environ-
ment.
● Keep work area well lit.
● Be aware of over balancing. When using this product in all modes, please
keep your body or heavy objects in the centre to avoid tilting. Incorrect usage
may topple the product over and cause damage and/or injury.
● When transporting the workbench in a vehicle, always tie it down to keep
secure and prevent possible damage.
● Ensure all fixing screws and knobs are tight and all legs are locked into posi-
tion before operating the workbench.
● DO NOT USE THE SCAFFOLD SETTING WHEN LEGS ARE EXTENTED.
Always use this product on a stable, level surface. Failure to use properly or
overloading may result in damage to the product and/or injury.
-3-

● When using power tools with this product, please refer to the manufacturer's
instructions for guidance on usage.
● The product must be used only for its intended purpose. Any use other than
those mentioned in these instructions will be considered a case of misuse.
The manufacturer shall not be liable for any damage or injury resulting from
such cases of misuse.
● The manufacturer shall not be liable for any modifications made to the product
or for any damage resulting from such modifications.
ASSEMBLY
Your five-in-one workbench comes fully assembled, just take it out of the pack-
aging and follow the steps to get ready for use.
1.Workbench 2.Sawhorse
3.Scaffold 4.Car Creeper & Dolly
-4-
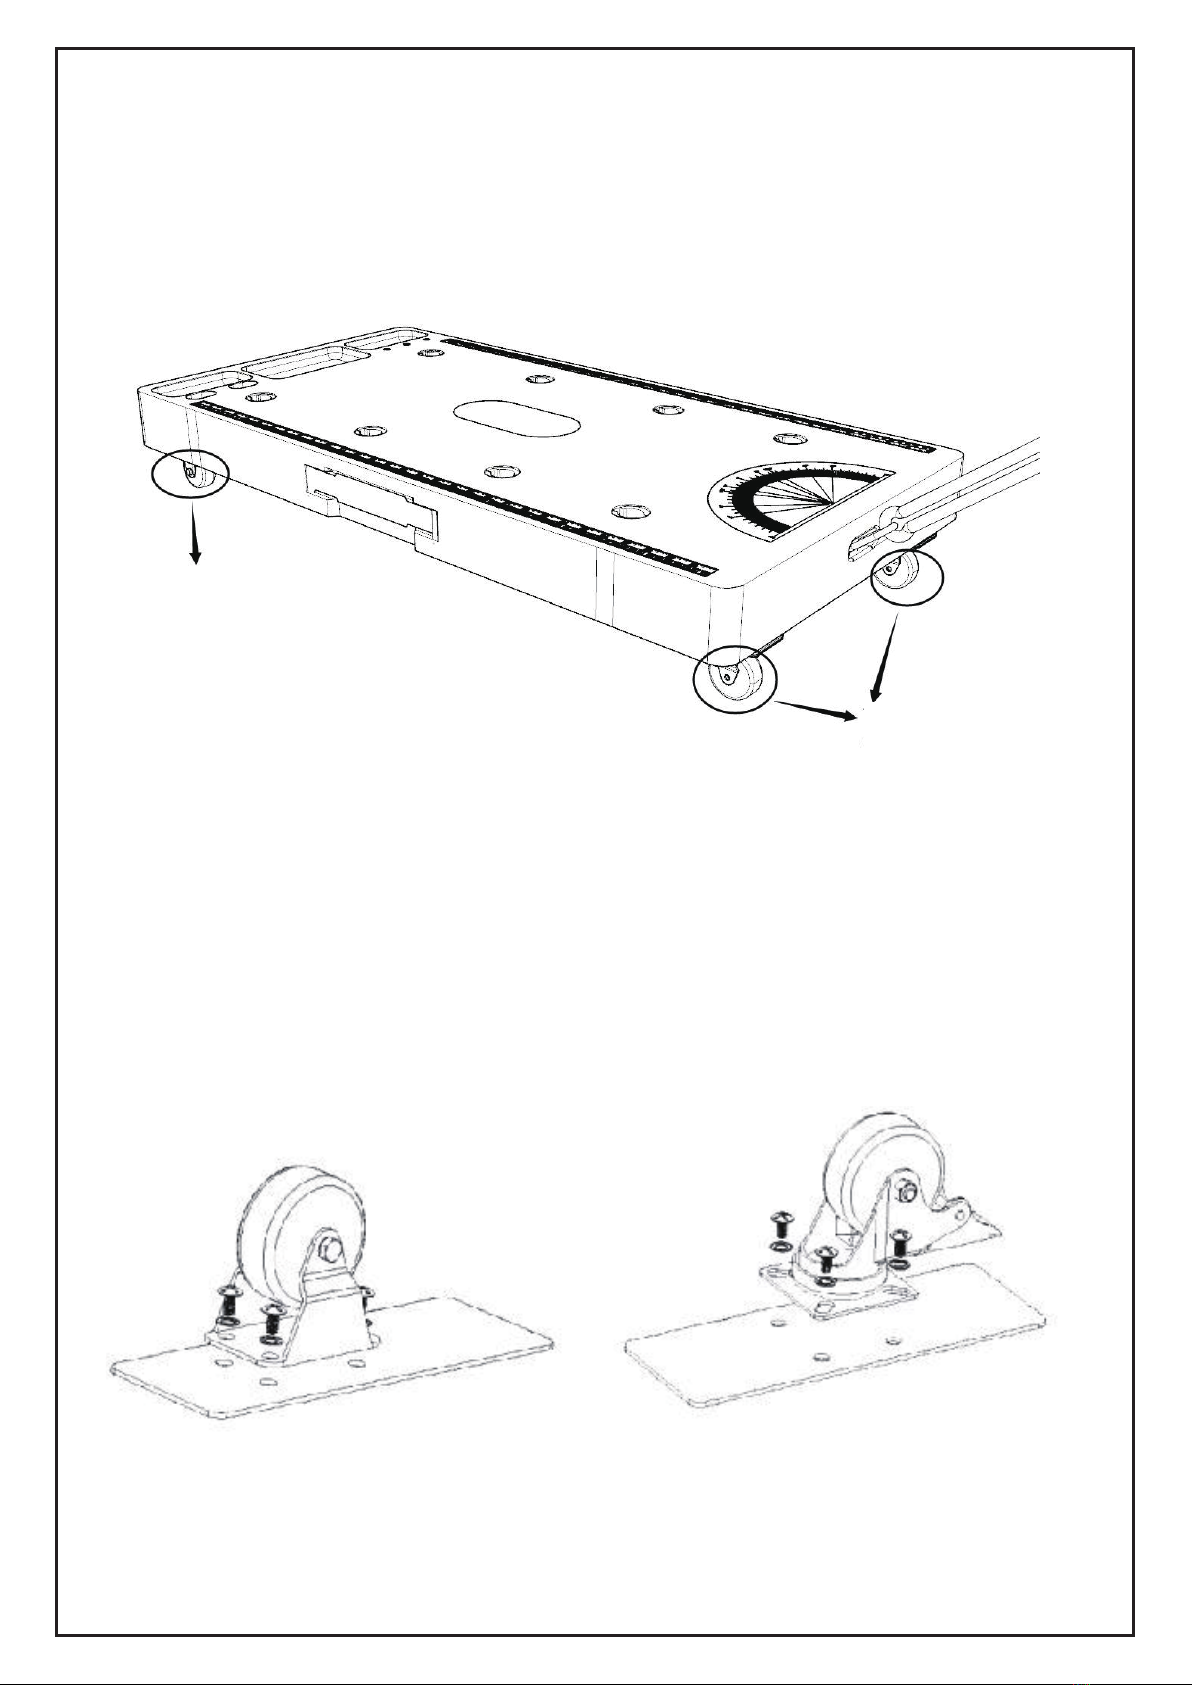
Car Creeper & Dolly Mode
Please follow these steps to install casters in the car creeper & dolly mode:
1.Find the casters, gaskets and screws in the back of the workbench, then line
them up. Notice that the two universal casters with brakes should be installed
under the compass and the left two fixed casters on the other side.
2.Put one gasket on the screw hole – secure using a screwdriver.
3.Rotate the caster to fix the four screws, make sure the casters are fully
secured.
4.Follow steps 1-3 to assemble the other three casters. Your car creeper is
ready to go.
5.Connect a pulling rope to the towing hole. The dolly is completed.
TIP: How to install the casters
The four casters are packed in the back of the workbench and need to be
installed by the consumer after purchase. During installation, please be aware
of the following:
1.Always use the gaskets which are provided. See the illustrations above.
Two fixed casters
Two universal
casters with brakes
-5-

2.There are two universal/steering casters plus two fixed casters in the set.
Each set of casters have their own position. Please refer to the illustration
above.
Scaffold Mode
1.Release all legs from their locking position, then rotate each pair of legs until
you can’t move them anymore.
2.Ensure the gusset brace is locked by pushing it down. Repeat for all the other
gusset braces, forming a scaffold.
WARNING:
DON’T USE THE SCAFFOLD MODE WITH LEGS EXTENDED.
The inner legs are not designed to be used in this function.
1.Leg Locking Buckle 2.Leg Locked 3.Gusset Braces
Workbench & Sawhorse mode
Leg Switch Locking positions
for 3 heights
-6-

WARNING:
DON’T USE THE SCAFFOLD MODE WITH LEGS EXTENDED.
The inner legs are not designed to be used in this function.
1. Set up the legs by following the same steps as the scaffold mode.
2.Pull up the switch on the side of each leg to release them, then pull the inner
legs out to the workbench height - 66cm or 80cm. There are three locking posi-
tions -the lowest is scaffold mode which is 52cm, the second is 66cm and the
highest is 80cm. Gently turn the workbench upright onto a stable, level surface.
3.Please follow the below steps to connect with a quick clamp.
1)Remove the small plastic part of your quick clamp (Fig 1).
2)Put the steel bar into the connector (Fig 2) and push the pin into the lock hole,
make sure they are connected firmly (Fig 3).
3)Put the connector into the Sawhorse hole on the workbench surface and
rotate at least 30 degrees (Fig 4).
4) With the help of the two vice pegs on the workbench, the sawhorse is com-
plete.
NOTE: DO NOT step on the workbench while the legs are extended.
MAINTENANCE
● It is recommended that the general condition of any workbench be examined
before use. Keep your workbench in good condition by regularly checking the
product. Have necessary repairs made by qualified service personnel.
● Clean the workbench on a regular basis.
Vice Pegs
-7-

CINCO EN UNO
BANCO DE TRABAJO
Estación de trabajo para el hogar
& bricolaje
-8-

¡ADVERTENCIA!
Lea cuidadosamente y comprenda todas las INSTRUCCIONES DE MONTAJE
Y OPERACIÓN antes de utilizar el banco de trabajo. El incumplimiento de las
reglas de seguridad y otras precauciones básicas puede causar lesiones
graves.
Este banco de trabajo solo está diseñado para algunas aplicaciones determina-
das. El distribuidor no se hace responsable de los problemas causados por la
modificación del producto. Se recomienda encarecidamente que no lo modi-
fique ni lo utilice para ninguna otra aplicación que no sea su propósito previsto.
Si tiene alguna pregunta sobre la aplicación en particular, NO lo utilice antes de
ponerse en contacto con el distribuidor para determinar si la aplicación se
puede o se debe realizar en este banco de trabajo.
USO PREVISTO:
Se trata de un banco de trabajo portátil cinco en uno, un burro, un andamio,
una enredadera para automóviles y una carretilla, que se puede transformar
fácilmente entre distintos modos de acuerdo con este manual.
Este banco de trabajo está destinado al bricolaje y al uso comercial ligero.
Vice espiga Orificio de burro
Compás
Orificio de conexión
de la cuerda de
tracción
Regla
Pata de acero
Manija
Abrazadera rápida
Conector
Bandeja para herramientas
-9-

ESPECIFICACIONES TÉCNICAS:
Tamaño de la plataforma de trabajo: Longitud 94 x Anchura 48cm
Altura de trabajo: 52/66/80cm
Capacidad de carga:
Modo de banco de trabajo/ Burro– 150KG/330 Libras
Modo de andamio – 150KG/330LBS
Modo de enredadera para automóviles & carretilla – 150KG/330 Libras
Peso neto: 13KG/15KG
REGLAS GENERALES DE SEGURIDAD
ADVERTENCIA: Lea y comprenda todas las instrucciones. El incum-
plimiento de las instrucciones que se enumeran a continuación puede causar
lesiones graves.
PRECAUCIÓN: No permita que ninguna persona opere o instale este
banco de trabajo hasta que haya leído todo este manual y haya comprendido
completamente el principio de funcionamiento del banco de trabajo.
ADVERTENCIA: Las advertencias, las precauciones y las instrucciones
que se describen en este manual no pueden cubrir todas las condiciones o
situaciones posibles. El operador debe comprender que el sentido común y la
precaución son factores que no pueden incorporarse a este producto, pero
deben ser poseídos por el operador.
GUARDAR ESTAS INSTRUCCIONES
CONSIDERACIONES IMPORTANTES DE SEGURIDAD
● ¡EL INCUMPLIMIENTO DE ESTAS PRECAUCIONES E INSTRUCCIONES
DE SEGURIDAD PODRÍA CAUSAR DAÑOS AL PRODUCTO Y / O LESIONES
GRAVES!
● Asegúrese de que todas las piezas móviles estén libres de interferencias.
● Mantenga las manos alejadas de todas las piezas móviles.
● Asegúrese de que el banco de trabajo se utilice en un lugar seco, protegido
de la lluvia. El banco de trabajo solo está diseñado para ser utilizado en interi-
ores. No lo almacene ni lo utilice al aire libre o en un ambiente húmedo.
● Mantenga el área de trabajo bien iluminada.
● Tenga cuidado con el equilibrio excesivo. Cuando utilice el banco de trabajo
en todos los modos, mantenga su cuerpo u objetos pesados en el centro por
motivo de evitar que se inclinen. El uso incorrecto puede hacer que el banco de
trabajo se vuelque y resultar en daños y / o lesiones.
● Cuando utilice un vehículo para transportar el banco de trabajo, siempre debe
fijarlo bien para garantizar la seguridad y evitar los posibles daños.
● Asegúrese de que todos los tornillos y las perillas de fijación estén apretados
firmemente y que todas las patas estén bloqueadas en su lugar antes de utilizar
el banco de trabajo.
-10-
Table of contents
Languages:


