DUTCH Studio 8c User manual

Studio
8c.
Owner’s manual
Version 0.3
November 2016

DUTCH & DUTCH B.V.
THAMES 9
3144 DG MAASSLUIS
THE NETHERLANDS
+31 (0)10 737 0863
WWW.DUTCHDUTCH.COM

Important safety information
Read this manual before rst use and retain it for future reference
Follow all safety instructions
· Electrical safety
This is a Class I appliance which requires a protective earth connection. Always ensure that the device
is properly grounded.
Take care to route the power cord in such a manner that it is unlikely to be pinched, walked on, or
stressed in any other way. If the power cord is damaged, replace it with an equivalent type.
Unplug the power cord during a thunderstorm or when the product is left unused for a long time.
· Moisture
Do not use this product in moist or wet conditions. Make sure that no liquids can be spilled or splashed
on the product. Do not place objects containing liquids on the product. If liquid should spill into the
product, do not use it anymore. Unplug the power cord and have the product serviced by a qualied
technician.
· Heat and ventilation
This product contains components that can get warm and require proper ventilation in order to function
properly. Do not block any of the ventilation openings on the back panel.
Additionally, make sure not to use the product in the direct vicinity of a heat source.
· Sound pressure
Professional audio equipment is capable of producing sound pressure levels that can cause hearing
impairment. Local laws regarding exposure to such sound pressure levels should be observed and
hearing protection should be used if necessary.
· Rigging and mounting precautions
When mounting or installing loudspeakers, use accessories that have been approved by Dutch & Dutch.
This is the only way that safe operation is guaranteed. Furthermore, make sure that all load–bearing
components and structures have suitable load limits, taking legally applicable safety factors into account.
When either mounting accessories or rigging points on the loudspeaker cabinet have visible damage
such as cracks, corrosion, bending or warping, damaged screw threads and so forth, the aected device
should be taken out of service immediately. Safe operation can not be guaranteed when any damage is
present. Perform a thorough visual inspection before use to ensure that this is not the case.
· Cleaning
Use only a dry or damp cloth to clean the product.
· Maintenance and service
This product may only be serviced by a qualied technician. Any attempt at servicing or disassembling
the product beyond the measures explicitly mentioned in this manual will void the manufacturer’s
warranty.
3

IF YOU HAVE A QUESTION ABOUT THE TECHNOLOGY, DESIGN, SPECIFICATIONS, OPERATION,
ACCESSORIES OR APPLICATIONS OF YOUR DUTCH & DUTCH PRODUCT, DO NOT HESITATE TO CONTACT US
AT SUPPORT@DUTCHDUTCH.COM
DUTCH & DUTCH RESERVES THE RIGHT TO CHANGE THE SPECIFICATIONS OF ITS PRODUCTS AND/OR
THE CONTENTS OF THIS MANUAL WITHOUT NOTICE. THE UP-TO-DATE VERSION OF THIS MANUAL CAN
ALWAYS BE FOUND AT DUTCHDUTCH.COM
4

Important safety information 3
Contents 5
General information 6
Introduction 6
Quality assurance & control 6
Contents of the box 6
Accessories 6
Product conguration 7
Tweeter and waveguide 7
Midwoofer and passive cardioid cabinet 7
Cabinet construction 7
Subwoofers and sealed cabinet 7
Crossover and electronics 7
Front panel overview 8
Rear panel overview 9
Product operation 10
Connecting to mains power 10
Status LED 10
Connecting to a local area network 10
Audio input 10
Outputs 10
Settings pushbutton 10
Cooling fan 11
Fuse 11
Sound optimization 12
Basic triangle 12
Listening distance 12
Listening height 12
Toe-in 12
Boundary coupling 13
Limited warranty 15
Coverage 15
Handling 15
Contents
5

Introduction
Congratulations on your purchase of the Dutch &
Dutch Studio 8c. The Dutch & Dutch Studio Series
combines cutting edge acoustical engineering
with unique Clerk™ communications and signal
processing, packaged in a durable product.
The Dutch & Dutch Studio 8c is a powerful studio
monitor for listening distances from 0.5 metre
upwards. Its advanced electronics and software
provide many ltering, system integration, and
equalization options.
This manual contains information on how to handle,
install, use and maintain the product, as well as
important safety instructions.
Quality assurance & control
Every Dutch & Dutch product is thoroughly
inspected and tested before shipping, as certied by
the QC note you will nd enclosed with the product.
If any sign of damage or malfuction is present upon
arrival of the product, please do not throw away any
of the packaging material and immediately contact
your Dutch & Dutch sales representative.
Contents of the box
The box should contain:
··1 Dutch & Dutch Studio 8c loudspeaker;
··1 IEC power cord matching your regional power
outlets;
··1 QC note;
··1 manual (such as this one)
If any of these items is missing, please contact your
Dutch & Dutch representative.
General information
Accessories
Several accessories are available for the 8c. Even if
your application requires special accessories, Dutch
& Dutch may be able to provide them or consult
you on alternative solutions. See dutchdutch.com
or contact your Dutch & Dutch representative for
more information.
6

Product conguration
Tweeter and waveguide
A ferrouid–enhanced 1” aluminium-magnesium
alloy dome tweeter is coupled to an 8” constant
directivity waveguide. Thanks to extensive
optimization of the waveguide, bae dimensions
and bae edge roundovers, its frequency response
is virtually at, both on and o axis. The sti and
light membrane is resonance-free throughout the
audible range.
Midwoofer and passive cardioid cabinet
The 8” woofer has a light, sti woven polypropylene
cone. Its high internal damping and advanced
surround design suppress resonances in the
woofer’s operating range. The long voice coil is
wound on an aluminium former, providing high
power handling and low thermal compression.
The passive cardioid cabinet weakens rearward
radiation by over 15 dB, resulting in low
reverberation and very at power response.
Cabinet construction
The exterior panels of the cabinet are made of 19
mm thick solid oak wood, whereas the internal
construction is made of 18 mm birch plywood. In
combination with rabbeted joints and extensive
bracing, this results in a strong, rigid construction.
The outer bae is made of spray painted ABS and
damped with a special sound deadening compound
to avoid resonances. It is invisibly axed with six
threaded steel rods.
Subwoofers and sealed cabinet
The rear section of the cabinet houses two long-
stroke, high-power 8" subwoofer drivers in a sealed
cabinet. The low-Q alignment results in tight,
controlled, and extended bass.
Crossover and electronics
The midwoofer and tweeter are crossed over with a
4th order Linkwitz-Riley lter slopes at 1250 Hz for
optimal driver integration and minimal interference.
FIR ltering ensures high power handling and
perfect impulse response.
A separate compartment houses the ampliers,
which provide 500 W to the subwoofers, 250 W to the
midwoofer and 250 W to the tweeter, as well as the
signal processing and communication electronics.
Filtering, room correction and equalization options
are accessible through the platform–independent
Clerk™ interface, enabling easy integration into any
system.
7

Front panel overview
1. TWEETER
2. WOOFER
3. STATUS
INDICATOR
8

Rear panel overview
5. FAN OUTLETS
8. SUBWOOFER
OUTPUT
9. NETWORK
CONNECTOR
13. MAINS
INPUT
4. SUBWOOFER
11. INPUT
INDICATOR
10. INPUT
SWITCH
6. AUDIO INPUT
7. AUDIO
THROUGHPUT
9

Product operation
Connecting to mains power
The 8c accepts AC mains voltages between 110 and
230 V and net frequencies between 50 and 60 Hz.
There is no dierence in amplier output power
between 120 V and 230 V mains voltages. An IEC
power cord, suited to your regional power outlets,
is supplied with the 8c. Plug it into the IEC receptacle
(13), then plug the other end into your wall socket.
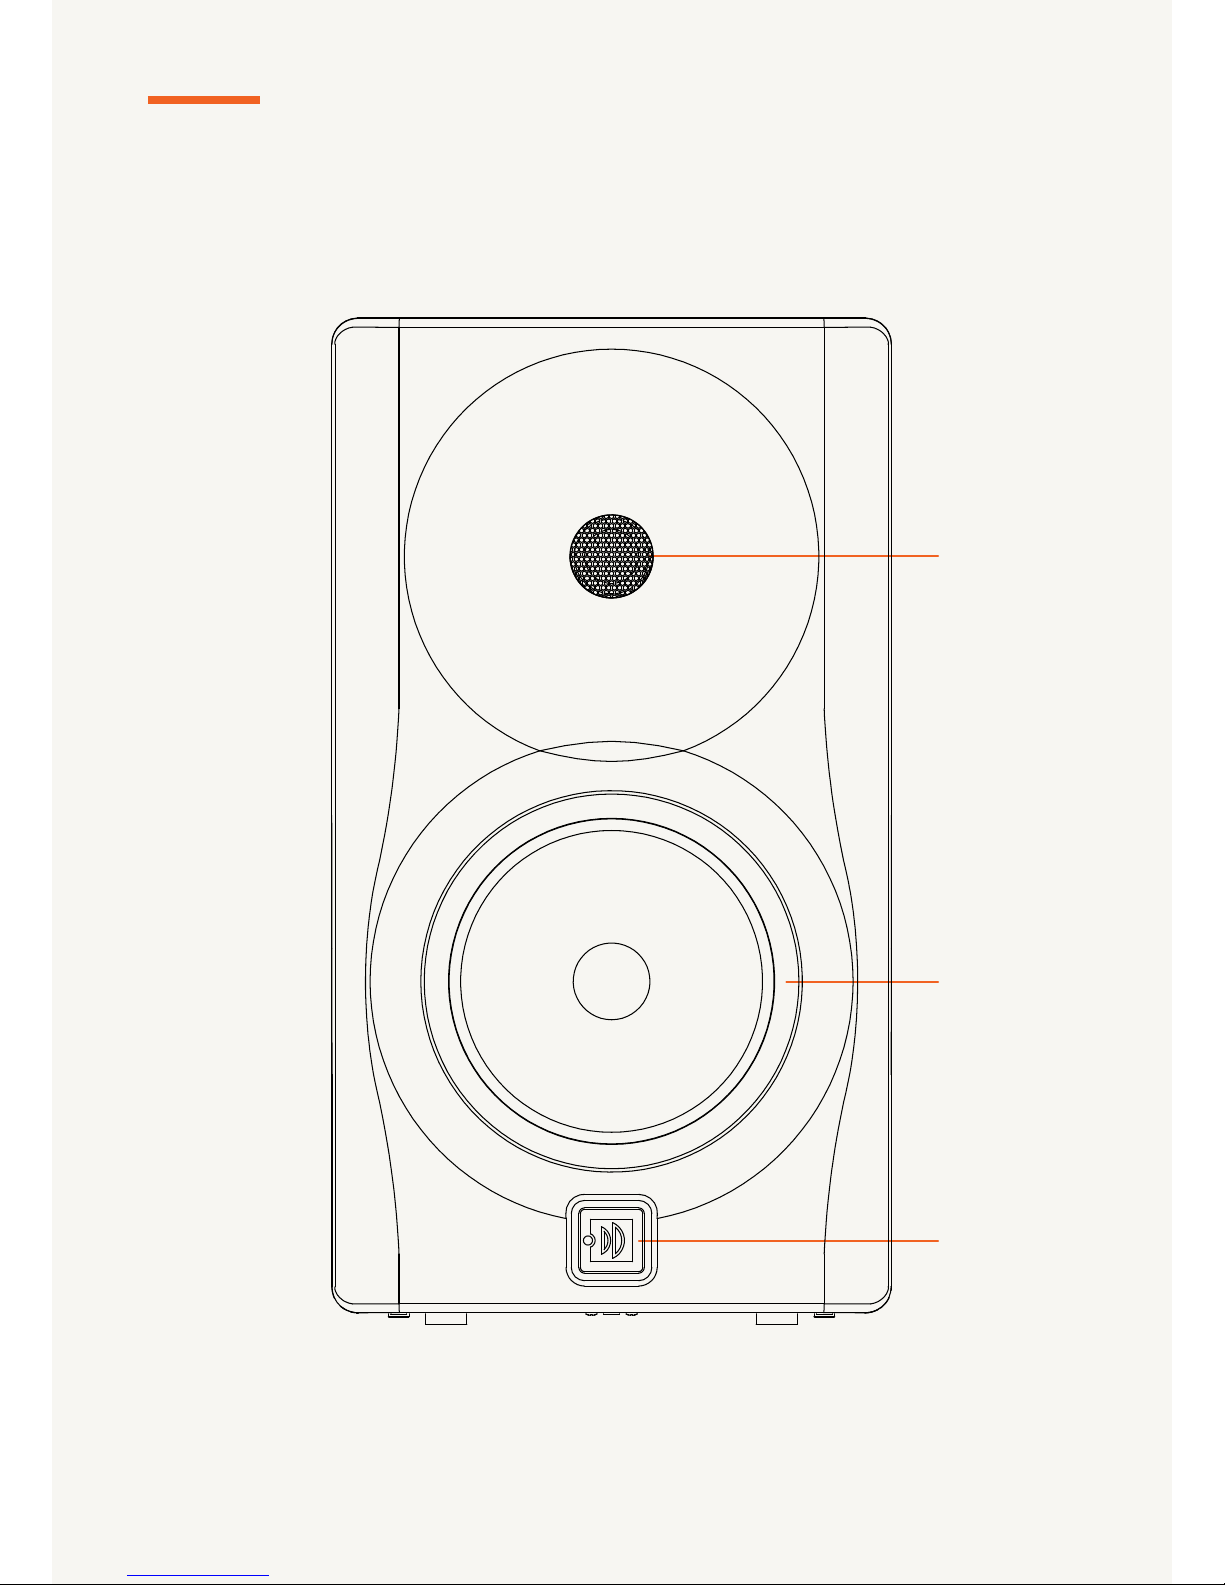
Status LED
The logo on the 8c’s front (3) doubles as a status
indicator.
··O: the loudspeaker is switched o entirely
··Dimmed pulse: the loudspeaker is in standby
mode
··Bright pulse: the loudspeaker is muted
··Quick pulse: there is an error. Open the Dutch
& Dutch app to see what is wrong. Alternatively,
try performing a software reset (see “Settings
pushbutton”). If the fault can not be remedied,
contact your Dutch & Dutch representative.
··On: the loudspeaker is switched on.
In case the illumination of the logo is undesirable,
it can be dimmed or switched o from the
Dutch & Dutch app. Please keep in mind that the
loudspeaker’s status can only be monitored through
the app in this case.
Connecting to a local area network
The 8c has an RJ45 receptacle (9), which can be
used to connect it to your local area network
(LAN), allowing the Dutch & Dutch app to nd your
speakers.
The 8c will work perfectly without a LAN connection:
it is only required in case you wish to access
equalizer settings.
Audio input
The 8c can be connnected to either digital (AES3)
or (balanced) analog sources. There is one female
XLR connector (6) that can be used to present these
signals to the 8c. Make sure the correct preset is
selected (see “Settings pushbutton”).
Although it may be possible to connect unbalanced
sources with adapter cables, proper functioning
with regard to hum and noise is not guaranteed.
Dutch & Dutch strongly recommends that balanced
sources be used in order to obtain optimal gain and
sound quality.
Outputs
There is a male XLR loopthrough (7) connector
that can be used to loop the signal through the 8c.
Make sure that both loudspeakers are set to the
correct AES3 channel in case you are looping an
AES3 signal from one 8c to the other. (See “Settings
pushbutton”).
The second male XLR connector (8) is a balanced
analog output, intended primarily for use with an
external active subwoofer. Various ltering and
equalization options such as high– and low pass
lters, peak lters, delays and phase inversion can
be applied to this output.
Since there is no pre-set low-pass lter on this
output, it can also be used as a fullrange ltered
output.
Settings pushbutton
Basic settings can be adjusted with the "Set input"
pushbutton (10) on the rear panel. Pushing the
button briey will toggle the input setting between
the analog high level (+4 dBu), analog low level (-10
dBV), AES3 left channel, AES3 right channel and
AES3 mono input settings. The four LEDs indicate
the selected setting.
10

··Analog high level (+4 dBu): this setting should be
used with professional audio equipment that
uses the +4 dBu alignment level. The maximum
peak input level before clipping is +24 dBu.
··Analog low level (-10 dBV): this setting can be
used with equipment that has a lower output
level, such as consumer electronics The
maximum peak input level before clipping is
+10 dBV.
··AES3 left (AES3 L): the left channel of a supplied
AES3 signal will be used.
··AES3 right (AES3 R): the right channel of a
supplied AES3 signal will be used.
··AES3 mono (both “AES3 L” and “AES3 R”
indication LEDs are illuminated): the AES3 signal
will be mixed to a mono signal.
In case you which to reset the loudspeaker to its
factory settings, push the button for 5 seconds. This
will also clear all equalizing lters and return the
input to the +4 dBu setting.
Cooling fan
The 8c is equipped with a hybrid cooling system.
During normal use, natural convection cooling
will suce to keep the amplier and electronics
at normal operating temperature range. In case
of heavy use, a fan provides additional cooling as
necessary. The fan speed is regulated to maintain a
low noise level.
During the power-up process, the fan will switch on
at full speed and switch o as soon as the speaker
is booted up. This is a normal function check.
In case of extreme overheating, the 8c will shut
down to prevent damage to its electronics.
Fuse
A 10A fuse is located in the fuse drawer next to
the mains input and power switch (13). If the
loudspeaker should not switch on upon operation
of the power switch, inspect the fuse to make sure
that it is intact. You can pry open the fuse drawer
with a small at screwdriver and, if necessary,
replace the fuse inside. Make sure to use the correct
rating.
However, if a fuse fails, it is most likely due to an
internal electrical fault and replacing the fuse will
not solve the problem. In case the new fuse also
fails, the product needs to be serviced.
11

Sound optimization
Besides being highly directional, the 8c has a very at power
response. These traits make it relatively insensitive to acoustic
imperfections of the listening room.
Carefully positioning and conguring the 8c will result in
remarkable in-room performance.
Basic triangle
When using 8c's in a two–channel stereo setup, position them
in an equilateral triangle with your listening position.
Listening distance
The normal equalizer settings for the 8c yield a perfectly at
response at listening distances of 1 metre (3’3”) or more.
The strength of the (accurate) direct sound from your monitors
decreases by 6 dB per doubling of the listening distance.
However, the strength of the (uncorrelated) reverberant sound
in your room is more or less constant. As such, choosing a
smaller listening distance will usually increase sound clarity.
Listening height
The reference axis of the 8c is perpendicular to the bae and
equidistant to the woofer and tweeter axes. The loudspeakers
should ideally be positioned in such a manner that the axis
is near ear height. However, as long as you are within 15° of
the reference axis, variations in frequency response are near
imperceptible.
Toe-in
The horizontal on and o axis frequency responses of the 8c
are very similar; the 8c sounds virtually the same whether
you’re straight in front of it or at an angle of up to 45°. As such,
the direct sound will not be signicantly aected by toeing
the loudspeakers in (aiming them at your listening position)
or out (aiming them so that they are parallel to each other).
This, in turn, allows you to adjust stereo imaging without
compromising the spectral balance of the sound.
Generally speaking, more toe–in will yield a more focused,
precise, and drier sound by reducing the strength of lateral
reections from 100 Hz upwards. Using less toe-in will increase
lateral reections, usually resulting in livelier sound and a wider
A two–channel stereo setup
Recommended listening distance
Recommended listening height
A setup without toe–in
60°
> 1 M
30°
12

perceived sound stage. You can experiment with dierent toe–
in angles to tweak the stereo image to your requirements or
taste.
Boundary coupling
The rear-ring woofers of the 8c can be used in boundary
coupling mode. This has two advantages:
··Destructive interference between the speaker's direct
sound and the reection from the boundary is avoided
because the speaker and boundary will function as a single
source;
··Low frequency headroom is increased by up to 12 dB.
Using boundary coupling is not advantageous for
conventional speakers, because the midrange usually suers
disproportionately from placement close to a wall. However,
thanks to the high directivity of its passive cardioid cabinet,
the 8c can take advantage of boundary coupling without the
midrange drawbacks.
For boundary coupling to be eective, the subwoofers need
to be less than 80 cm from the nearest boundary. If this is
not possible, select the free-standing mode. The parametric
equalizer can be used to atten the in-room response if
necessary.
If the subwoofers are within 80 cm of the nearest boundary,
use the "boundary" setting to compensate for the presence of
boundaries.
You can further atten the in-room response with the
parametric equalizer if necessary. Dutch & Dutch recommends
that you use in-room measurements to properly optimize the
equalizer settings.
Generally speaking, the closer to the wall, the better boundary
coupling works. However, the subwoofers need some free
space to operate properly. Therefore, make sure that there is
at least 10 cm between the rear wall and the rear of the cabinet.
A setup with toe–in
10-80 CM
Distance range for boundary coupling
13

Technical specications
*IN HALF SPACE RADIATION CONDITIONS
**EXCLUDES RUBBER FEET
DRIVERS:
CROSSOVER:
ENCLOSURE TYPE:
MAX LINEAR SPL @ 1M:
AMPLIFIER POWER:
AMPLIFIER TYPE:
SYSTEM SNR:
MAINS INPUT VOLTAGE:
DIMENSIONS (H X W X D):
WEIGHT:
CABINET CONSTRUCTION:
ANALOG INPUT:
ANALOG OUTPUT:
DIGITAL INPUT:
DIGITAL OUTPUT:
NETWORKING:
PROTECTION FUNCTIONS:
LF: 8” ALUMINIUM CONE
HF: 1” ALUMINIUM / MAGNESIUM ALLOY DOME
1200 HZ, HIGH ORDER, PHASE COHERENT
BASS REFLEX
106 DB CONTINUOUS FROM 35 HZ UPWARDS*
LF: 245 W
HF: 100 W
CLASS D, POWER FACTOR CORRECTION, HYBRID COOLING
>118 DB
100 – 240 V AC, 50 – 60 HZ
480 X 270 X 380 MM** (19 X 10.5 X 15 IN)
15 KG (33 LBS)
ENCLOSURE: 18 MM BIRCH PLYWOOD
OUTER BAFFLE: INJECTION MOULDED ABS, DAMPED
BALANCED AUDIO OVER XLR
SENSITIVITY SWITCH: +4 DBU / -10 DBV
PEAK INPUT LEVEL: +24 DBU / +10 DBV
DSP CONTROLLED OUTPUT
ANALOG LOOP THROUGH OVER XLR
AES3 OVER XLR
LEFT / RIGHT / MONO CHANNEL SWITCH
AES3 LOOP THROUGH OVER XLR
ETHERNET OVER RJ45
THERMAL
DC / CLIPPING
DRIVER OVERLOAD
14

Limited warranty
Dutch & Dutch designs its products for longevity
and uses only the best available components.
However, no amount of care can fully exclude
product failure. In the unfortunate event that the
product malfunctions, we will repair or replace it.
Coverage
The Dutch & Dutch limited warranty on this product
is valid for 2 years after the rst consumer purchase
and covers any defect or failure directly attributable
to faulty design, materials, and workmanship. The
Dutch & Dutch limited warranty does not cover:
··Damage sustained during shipment;
··Damage resulting from improper use, abuse,
accidents, neglect, or failure to comply with the
safety instructions in this manual;
··Damage resulting from repairs or modications
made by anyone who is not a technician
approved by Dutch & Dutch;
··Damage to any product on which the Dutch
& Dutch serial number is missing, illegible or
modied;
··Claims based on misinformation or
misrepresentation by a reseller.
Handling
If your product is faulty, contact Dutch & Dutch
through one of the channels indicated in this
manual. You will receive instructions on how to
ship the aected product to us.
If the fault is covered by warranty, Dutch & Dutch will
pay all expenses involved in repairing or replacing
the product and shipping it back to you.
15
Table of contents
Other DUTCH Speakers manuals
Popular Speakers manuals by other brands

Ibiza sound
Ibiza sound WAVE10 manual

Cambridge Audio
Cambridge Audio Sirocco 530 installation guide

Impecca
Impecca ASB650BT user manual

Bowers & Wilkins
Bowers & Wilkins 600 Series2 owner's manual

Studiomaster Professional
Studiomaster Professional ELAN Series instruction manual

Wisdom
Wisdom Sage L75i owner's manual