DWT ABS-10,8 CLi User manual


2
www.dwt-pt.com
CH Merit Link International AG
Switzerland [0041] 916000888 [0041] 916000888 [email protected]
DE ML Meritlink Hardware Germany GmbH
Deutschland [0049] 3068055522 [0049] 3068055994 [email protected]
BR DWT do Brasil Ferramentas Ltda
Brasil [0055] 4121012600 té[email protected]
PL HANMAR
Polska [0048] 338587829 [0048] 338586100 [email protected]
CZ GARLAND distributor, s.r.o.
GR A. Mattes industrial products SA
Ελλαδα [0030] 2109851000 [0030] 2109839721 [email protected]
RU ООО "БОКС МУВИНГ"
BY ОДО "Планета ДВТ"
Беларусь [00375] 175109545 [00375] 175109545 [email protected]
UA ТОВ "Eдіссон"
Україна [0038] 563749060 [0038] 563749066 [email protected]
LT UAB "Balimpeksas"
Lietuva [00370] 52444077 [00370] 52499280 [email protected]
LV DWT.LV
MD BEM INNA SRL
Moldova [00373] 921180 [00373] 429368 [email protected]
EG
AL Hurria for Suppliers, Trading Agents Public
Import & Export
Egypt [0020] 033919328
IQ Arkan Ali Mohammad Ali Mandalawi
Iraq [00964] 7702975399 [00964] 7702975399
LY Bitrek Company
Libya [00218] 512611882 [00218] 51262812
IR DWT Iran
Iran [0098] 2163498 [0098] 2189787426 [email protected]
KZ ТОО "TECHNOSECTOR"
Қазақстан [007] 7273748325 [email protected]

3
Content / Sommaire / Содержание / Зміст / Мазмұны /
English
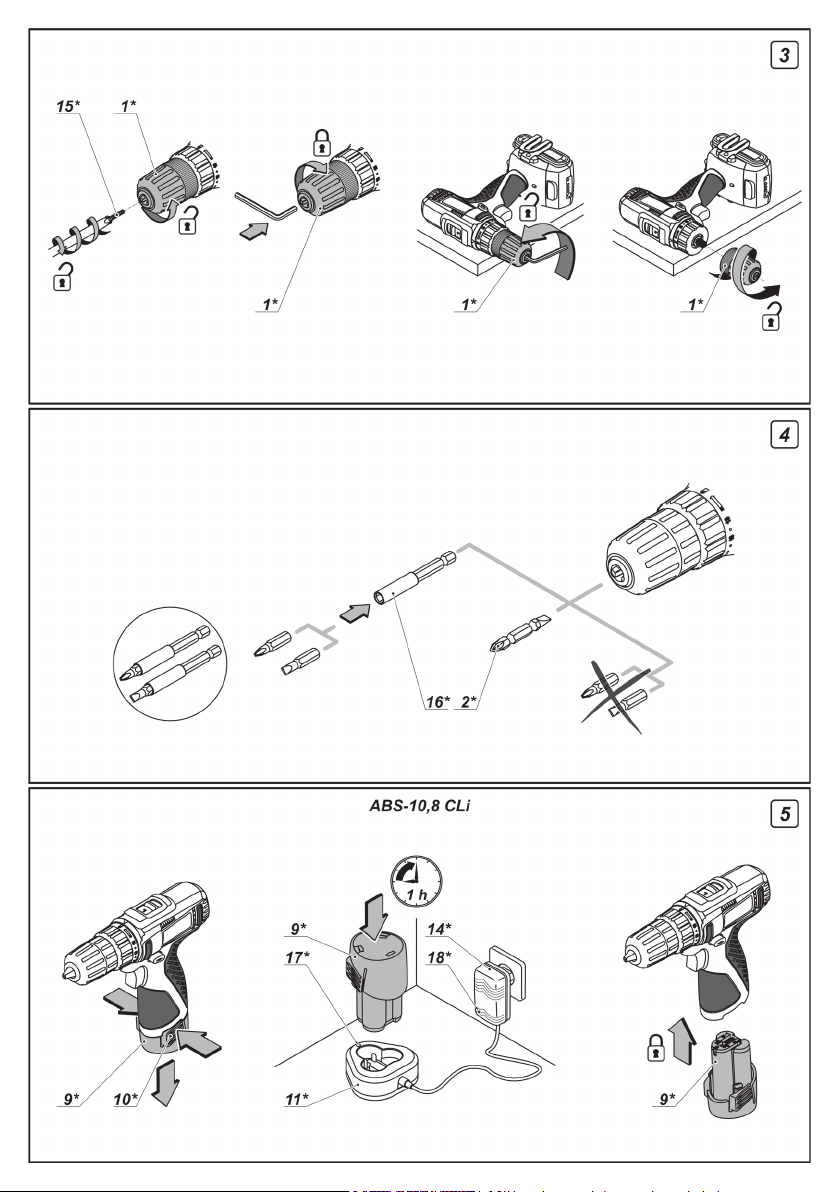
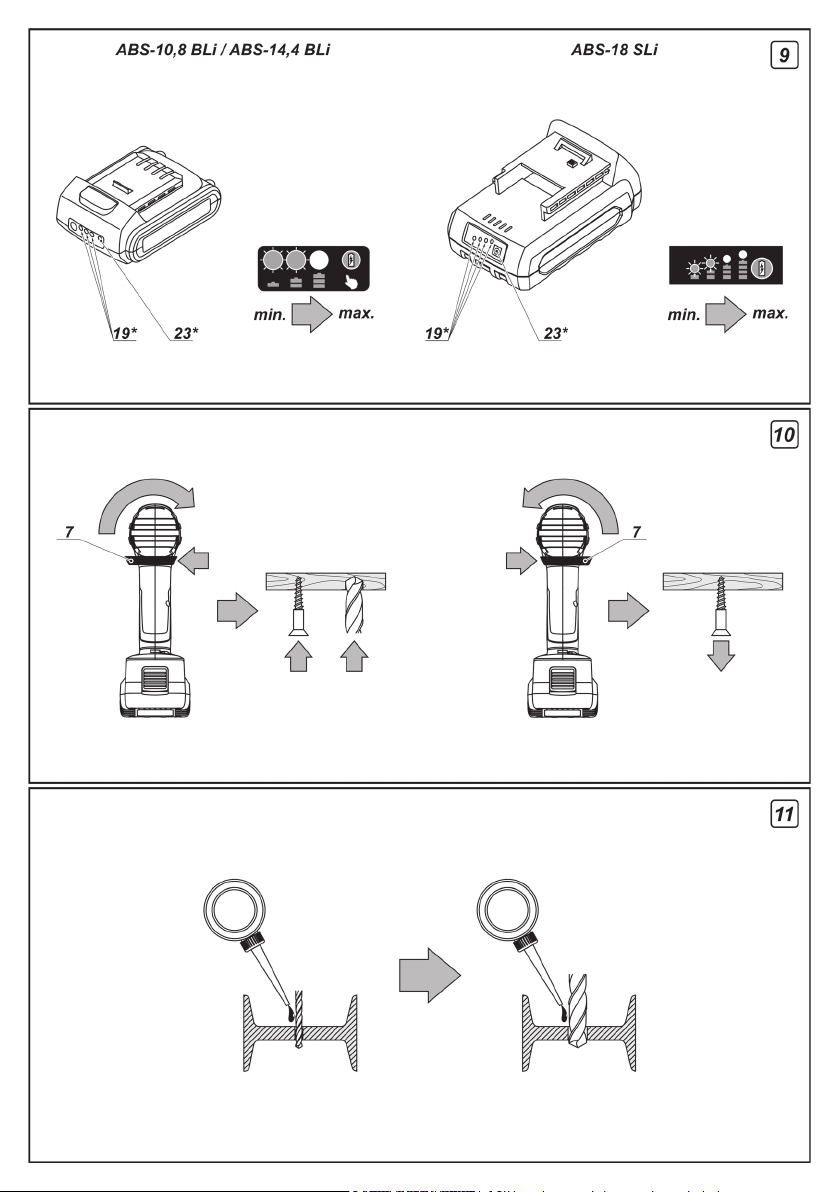
Explanatory drawings .............................................................................................................pages
General safety rules, instructions manual ............................................................................. pages
Parts diagrams ...................................................................................................................... pages
Service centres ...................................................................................................................... pages
DWT warranty .......................................................................................................................... page
Warranty card and service cards ........................................................................................... pages
4 - 10
11 - 17
53 - 54
55 - 59
60
72 - 74
Français
Dessins explicatifs ..................................................................................................................pages
Recommandations générales de sécurité, mode d'emploi .................................................... pages
Schéma des pièces ............................................................................................................... pages
Centres d'assistance ............................................................................................................. pages
Garantie DWT .......................................................................................................................... page
Garantie coupon et cartes de service .................................................................................... pages
4 - 10
18 - 24
53 - 54
55 - 59
61
72 - 74
Русский
Пояснительные рисунки .............................................................................................. страницы
Общие указания по ТБ, инструкция по эксплуатации ............................................ страницы
Схемы запчастей ........................................................................................................ страницы
Сервисные центры ..................................................................................................... страницы
Гарантия DWT .............................................................................................................. страница
Гарантийный талон и сервисные талоны .............................................................. страницы
4 - 10
25 - 32
53 - 54
55 - 59
62
72 - 74
Украïнська
Пояснювальні малюнки ...................................................................................................сторінки
Загальні вказівки по ТБ, iнструкція з експлуатації ..................................................... сторінки
Схеми запчастин ............................................................................................................ сторінки
Сервісні центри .............................................................................................................. сторінки
Гарантія DWT ................................................................................................................. сторінки
Гарантійний талон i сервісні талони ...........................................................................сторінки
4 - 10
33 - 39
53 - 54
55 - 59
63 - 68
72 - 74
Қазақ тілі
Түсіндіргіш әлеміштер ....................................................................................................беттер
Жалпы қауіпсіздік жөніндегі ұсыныстар, пайдалану нұсқаулығы ................................... беттер
Бөлшектер тәсімі ........................................................................................................... беттер
Қызмет орталықтары ................................................................................................... беттер
DWT кепілдігі .......................................................................................................................... бет
Гарантиялы талон және қызмет көрсету карталары ...............................................беттер
4 - 10
40 - 46
53 - 54
55 - 59
69
72 - 74
.........................................................................................................................
...................................................................................................
...........................................................................................................................
...............................................................................................................................
.................................................................................................................................
........................................................................................................
4 - 10
47 - 52
53 - 54
55 - 59
70
72 - 74

4

5

6

7

8

9

10

11
English
Power tool specication
Cordless drill / screwdriver ABS-10,8 CLi ABS-10,8 BLi ABS-14,4 BLi ABS-18 SLi
Power tool code [127 V ~50/60 Hz]
[230 V ~50/60 Hz] see page 10
Rated voltage [V] 10,8 10,8 14,4 18
No-load speed:
- first gear [RPM] 0-400 0-400 0-400 0-350
- second gear [RPM] 0-1400 0-1400 0-1400 0-1200
Battery type Li-Ion Li-Ion Li-Ion Li-Ion
Battery charging time [h] 1 1 1 1
Battery capacity [Ah] 1,5 1,5 1,5 1,5
Turndown of rotation torque [Nm] 1-17 1-17 1-19 1-28
Chuck tightening range [mm]
[inches]
0,8-10
1/32"-25/64" 0,8-10
1/32"-25/64" 0,8-10
1/32"-25/64" 1-10
3/64"-25/64"
Drilling output:
- wood [mm]
[inches]
20
25/32" 20
25/32" 28
1-7/64" 30
1-3/16"
- steel [mm]
[inches]
10
25/64" 10
25/64" 10
25/64" 10
25/64"
Max. screw diameter [mm]
[inches]
6
15/64" 6
15/64" 7
9/32" 7
9/32"
Weight [kg]
[lbs]
1
2.2 1
2.2 1,06
2.34 1,29
2.84
Sound pressure [dB(A)] 64,83 62,2 63,9 71,8
Acoustic power [dB(A)] 75,83 73,2 74,9 82,8
Weighted vibration [m/s2]1,06 0,96 1,02 1,19
Noise
information
Always wear ear protection if the sound
pressure exceed 85 dB(A).
Declaration of
conformity
We declare under our sole responsibility that the
product described under "Power tool specications" is
in conformity with all relevant provisions of the
directives 2006/42/EC including their amendments
and complies with the following standards: EN 60745-1,
EN 60745-2-1, EN 60745-2-2.
Managing director V.Kobzar
Merit Link International AG
Switzerland
Stabio, 23.12.2015
General
safety recommendations
CAUTION! Make sure you have read
and understood all recommendations.
Failure to observe the following recom-
mendations may result in electric shock,
cause re and / or serious injuries. The term "pow-

12
English
er tool", used in this manual refers to the tools
equipped with a power supply cord or a battery.
Working space
•The workstation should be kept tidy and well-lit.
Disorder at the workstation and inadequate lighting
may result in accidents.
• Do not use power tools in environment exposed
to the risk of explosion, e.g. near ammable liquid
vapours, gases or ammable particles in the form of
dusts. During operation, sparks are generated, which
may ignite dust or vapours.
•Do not allow children and unauthorised persons
near places where operations with the use of an
electric tool are carried out. Third parties may distract
the operator's attention, and he may loose control over
the tool.
Electric safety recommendations
•The tool plug should always be inserted to an
appropriate socket. This reduces the risk of electric
shock. Do not use plug adapters with grounding
contacts.
• Avoid touching grounded items, such as metal pipes,
heaters, cookers and refrigerators. If the worker's body
comes into contact with a grounded item, the danger of
electric shock increases.
•Protect the power tool against rain and moisture.
Penetration of water into the tool increases the danger
of electric shock.
•Do not use the power supply cable for purposes
other than designed. Under no circumstances should
one use the cable to carry the tool or pull it; also, it is
forbidden to switch off the tool by pulling the power
supply cable. Protect the cable against heating, contact
with kerosene-based bodies, with sharp edges or
mobile parts of the tool. A power cable that is damaged
or spliced increases the danger of electric shock.
• When working in open air, use extension cords
designed for this type of work, which will reduce the
danger of electric shock.
Personal protection recommendations
•Be cautious when working with power tools, and
carefully plan your actions. Do not use the tool when
fatigued, or under the inuence of drugs, alcohol or
medicines. Careless handling may result in serious
injuries.
•Use personal protection equipment. Always wear
protective goggles. When necessary, use respirators,
non-slipping boots, hard hats and earplugs. The use
of personal protection equipment is one of the factors
that reduce the risk of injuries.
• Avoid incidental activation of power tools. Before
inserting the plug, make sure that the power switch is in
OFF position. When carrying the tool, take your ngers
off the main switch, which will reduce the possibility of
incidental activation.
• Before switching on the tool, remove any wrenches
and other objects from its rotating parts. A wrench left
in the rotating unit may result in serious injuries.
• Do not apply excessive force, take a stable position
and always try to keep balance - this will facilitate
control over the tool.
•Do not wear loose clothes or freely-hanging
jewellery. Hair, parts of garment and gloves should
be protected against contact with moving parts of the
power tool.
• If the tool is equipped with a dust collection device,
make sure that the device has been activated and
used properly. Use of such devices helps reduce the
concentration of dust at the workstation.
Use and handling of power tools
•The persons with lowered psychophysical or mental
aptitudes as well as children can not operate the power
tool, if they are not supervised or instructed about use
of the power tool by a person responsible for their
safety.
• Do not overload the tool. Power tools are to be used
only in operations, to which they have been designed,
which will ensure safety and help achieve better
results.
•Do not use power tools with a damaged power
switch. A tool that cannot be switched on and off in a
controlled manner is potentially dangerous and must
be repaired immediately.
• Before adjustment operations, replacement of
attachments, and during storage, remove the power
tool plug from the mains socket. This eliminates the
risk of the tool being unintentionally activated.
•The tool should be stored out of children's reach.
Do not allow the use of power tools by persons who
have not read this manual and are inexperienced.
In the hands of an inexpert person, the tool may be
dangerous both for the operator and his environment.
•Take proper care of the tool condition. Monitor the
axial run-out and stability of movable parts' joints, and
pay proper attention at any faults that may result in the
tool damage. Bad condition of power tools is a frequent
cause of accidents.
•Cutting tools should be kept clean and must be well-
sharpened. Cutting tools with sharp cutting edges,
which are properly xed reduce the risk of seizure and
facilitate the control over power tools.
•When using power tools and its accessories, follow
the instructions listed in this manual. During work with a
specic type of power tools, follow recommendations,
taking into account operational conditions and the type
of job performed.
Service of power tools
Your power tool should be serviced only by qualied
specialists, with the use of recommended spare parts.
This will guarantee labour safety, when your tool is
being applied.
Safety guidelines during
power tool operation
Specic safety rules for cordless power tools
• Use only original chargers and batteries delivered
by DWT.
• Use power tools only with specically designated
batteries. Use of any other batteries may create a risk
of injury and re.
Attention! Short circuit can cause injuries
to the user, it can cause a re as well. In
order to avoid this, observe the following
rules:
•do not disassemble the battery and do not change
its construction;

13
English
•do not charge the battery in the high humidity
environment or outdoor during rainfall;
• do not charge the battery when a battery jar is
damaged;
•do not short battery poles;
•keep a battery detached from a power tool away
from small metal objects (nails, wire, etc.), which
can short battery poles.
•In the process of charging, the battery gets warm,
therefore, do not cover it and do not place it on
thermal insulation materials (mineral wool, sawdust,
etc.).
• Avoid heating of the battery above 45°С. Prevent
long-term exposure to direct sunlight and never throw
the battery into a re as it might explode.
• Overdraft or overheating may cause discharge
of caustic liquid, which may cause chemical burns,
therefore, avoid contact with skin.
•In case of damage of battery housing or its improper
use, the emission of gas is probable that can be
irritating for the respiratory system do not inhale the
gas, provide supply of fresh air, and consult the doctor
if necessary.
•Do not use damaged batteries and chargers their
use can lead to damage of the power tool and result in
injuries or material damage.
• It is absolutely forbidden to throw defective or
unworkable batteries into household garbage, they
should be collected and brought for recycling or
ecologically clean utilization.
During operation
• Avoid electric tool motor stop, when loaded.
• Removing chips with the power tool engine running
is strictly forbidden.
•Before starting work, make sure where hidden
electric cables and water and gas pipes are situated.
Damaging the electric supply wiring or engineering
communications may cause a severe harm to the
operator's life and health.
• If the working schedule cannot exclude damaging
the main supply cables, they have to be de-energized.
•Use only sharp drills without defects - it will make
working with the power tool easier.
• The modication of the drills design and the use of
removable orices and accessories not envisaged for
this power tool is strictly forbidden.
• Do not apply excessive pressure when operating
the power tool - it can jam the drill and overload the
engine.
• Do not allow drills to jam in the material processed.
If this occurs, do not try to release them by means of
the power tool engine. This can put the power tool out
of order.
• Striking out drills jammed in the material processed
with a hammer or other objects is strictly forbidden -
metal fragments can hurt both the operator and the
people nearby.
• Never treat workpieces containing asbestos.
Asbestos is cosidered carcinogenic.
Symbols used in
the manual
Following symbols are used in the operation manual,
please remember their meanings. Correct interpretation
of the symbols will allow correct and safe use of the
power tool.
Symbol Meaning
Cordless drill /
screwdriver
Sections marked gray - soft
grip (with insulated surface)
Serial number sticker:
ABS ... - model;
XX - date of manufacture;
XXXXXXX - serial number.
Read all safety regulations
and instructions.
Wear safety goggles and ear
protectors.
Wear a dust mask.
Do not heat the battery
above 45°C. Protect from
prolonged exposure to direct
sunlight.
Do not dispose of the battery
in a domestic waste con-
tainer.
Do not dispose of the battery
in the re.
Protect the battery from the
rain.
Battery charging time.
Movement direction.
Rotation direction.
Locked.
Unlocked.

14
English
Symbol Meaning
Attention. Warning of possi-
ble user health damage.
A sign certifying that the
product complies with es-
sential requirements of the
EU directives and harmo-
nized EU standards.
Attention. Important.
Useful information.
Wear protective gloves.
Torque control position:
"Drilling".
Stepless speed control.
Do not dispose of the power
tool in a domestic waste
container.
DWT
power tool designation
Cordless drills / screwdrivers are designed for hole
drilling in wood, plastic and metal, as well as for
screwing in and loosening of threaded fastening
elements (screws, bolts, etc.).
1
Power tool
components
Keyless chuck *
2 Screwdriver bit *
3 LED lamp
4 Torque regulator
5 Step speed selector switch
6 On / off switch
7 Reverse switch
8 Ventilation slots
9 Battery *
10 Battery lock *
11 Charger *
12 Strap *
13 Belt clip *
14 Power unit *
15 Screw *
16 Magnetic holder *
17 Indicator of the charger *
18 Indicator of the power unit *
19 Indicators of the state of battery charge *
20 Charger label *
21 Indicator (red) *
22 Indicator (green) *
23 Control button of the state of battery charge *
* Optional extra
Not all of the accessories illustrated or described
are included as standard delivery.
Installation and regulation
of power tool elements
Before execution of any procedures, centre the
reverse switch 7.
Do not draw up the fastening elements
too tight to avoid damaging the thread.
Mounting / dismounting / setting-up of
some elements is the same for all power
tool models, in this case specic models
are not indicated in the illustration.
Mounting / replacement of accessories (see g. 1)
With long-term use the drill bit may
become very warm; use gloves to
remove it.
• Open the jaws of the keyless chuck 1, rotating its
front part as shown in gure 1.
•Mount / replace the accessory.
•Tighten the keyless chuck 1without skewing the
accessory as it is shown in gure 1.
Mounting / dismounting of the keyless chuck (see
g. 2-3)
•To mount the keyless chuck 1, carry out the operations
in consecutive stages as it is shown in gure 2.
•To dismount the keyless chuck 1, carry out the oper-
ations in consecutive stages as it is shown in gure 3.
Attention: keep in mind that in the
process of mounting / dismounting of
the keyless chuck 1 the screw 15 has a
left-hand thread.
Screwdriver bit / magnetic holder (see g. 4)
For short screwdriver bits use the magnetic holder 16
for their reliable xing (see g. 4).
A magnetic holder 16 is not needed for extended
screwdriver bits 2 (specially purposed for screwdrivers).
Charging procedure
of the power tool battery
Initial operating of the power tool
The power tool is supplied with a partially charged
battery 9. Before the rst use, the battery 9 must
be fully charged.

15
English
Charging process (see g. 5-7)
• Centre the reverse switch 7.
•Press the battery lock 10 (ABS-10,8 CLi - two battery
locks 10) and remove the battery 9 (see g. 5-7).
[ABS-10,8 CLi]
•Connect the power unit 14 to the charger 11.
•Connect the power unit 14 to the power supply.
•Insert battery 9into charger 11 (see g. 5).
•Remove the battery 9from the charger 11 and mount
battery 9in the power tool.
•Disconnect the power unit 14 from power suply.
[ABS-10,8 BLi, ABS-14,4 BLi]
Warning! Do not work under the charging
status!
•Connect the power unit 14 to the power supply.
•Insert plug of the power unit 14 in socket of the
battery 9 (see g. 6).
•Disconnect the power unit 14 from the battery 9and
mount battery 9in the power tool.
•Disconnect the power unit 14 from power suply.
[ABS-18 SLi]
•Connect the charger 11 to the power supply.
•Insert battery 9into charger 11 (see g. 7).
•Remove the battery 9from the charger 11 and mount
battery 9in the power tool.
•Disconnect the charger 11 from power suply.
Charger indicators (see g. 5-6, 8)
[ABS-10,8 CLi]
Indicator 17 (of the charger 11) and indicator 18 (of the
power unit 14) inform about charging process of the
battery 9 (see g. 5).
•Indicator 17 lights green, indicator 18 lights green,
the battery 9is not inserted in the charger 11 - the
charger 11 and power unit 14 are connected to the
power network (ready for charging).
•Indicator 17 lights red, indicator 18 lights red, the
battery 9is inserted in the charger 11 - the battery 9
is being charged.
•Indicator 17 lights green, indicator 18 lights green,
the battery 9is inserted in the charger 11 - the battery 9
is fully charged.
•Indicator 17 lights red, indicator 18 lights green, the
battery 9is inserted in the charger 11 - the charging
process of the battery 9is terminated because of its
failure. Replace the faulty battery 9, its further use is
prohibited.
[ABS-10,8 BLi, ABS-14,4 BLi]
Indicators 19 (of the battery 9) and indicator 18 (of the
power unit 14) inform about charging process of the
battery 9 (see g. 6).
•Indicator 18 lights green, power unit 14 is not
connected to the battery 9- power unit 14 is connected
to the power network (ready for charging).
•Indicator 18 lights red, power unit 14 is connected to
the battery 9, indicators 19 lights red (one by one) - the
battery 9is being charged.
•Indicator 18 lights green, power unit 14 is connected
to the battery 9, indicators 19 lights red (blinking
slowly) - the battery 9is fully charged.
•Indicator 18 lights green, power unit 14 is connected
to the battery 9, indicators 19 not lights - the charging
process of the battery 9is terminated because of its
failure. Replace the faulty battery 9, its further use is
prohibited.
[ABS-18 SLi]
Charger indicators 21 and 22 inform of the battery 9
charging process. Signals of the indicators 21 and 22
are shown on the label 20 (see g. 8.1-8.5).
• Fig. 8.1 - (the green indicator 22 is on, the battery 9
is not inserted in the charger 11) - the charger 11 is
connected to the power network (ready for charging).
• Fig. 8.2 - (the red indicator 21 is on, the battery 9
is inserted in the charger 11) - the battery 9is being
charged.
• Fig. 8.3 - (the green indicator 22 is on, the battery 9
is inserted in the charger 11) - the battery 9is fully
charged.
• Fig. 8.4 - (the green indicator 22 is blinking,
the battery 9is inserted in the charger 11) - the
charging process of the battery 9is terminated due
to inappropriate temperature. When the temperature
conditions are normal, the process of charging will
resume.
• Fig. 8.5 - (the red indicator 21 is blinking, the
battery 9is inserted in the charger 11) - the charging
process of the battery 9is terminated because of its
failure. Replace the faulty battery 9, its further use is
prohibited.
In the process of charging the battery 9
and the charger 11 become hot, it is a
normal process.
Switching the power
tool on / off
Make sure that the reverse switch 7 is not centred,
this blocks on / off switch 6.
Switching on:
Press on / off switch 6.
Switching off:
Release the on / off switch 6.
Design features
of the power tool
Battery (see g. 9)
The battery 9is protected by the safety system against
deep discharge. In case of complete discharge, the
power tool is automatically switched off. Attention:
do not try to switch on the power tool when the
protection system is activated the battery 9 can
be damaged.
[ABS-10,8 BLi, ABS-14,4 BLi, ABS-18 SLi]
With the push of the button 23 the indicators 19 show
the state of charge of the battery 9 (see g. 9).

16
English
Temperature protection
The temperature protection system enables to
automatically deactivate the power tool in case of
excess load or when the temperature of the battery 9is
exceeding 70°C. The system guarantees protection of
the power tool from damage in case of noncompliance
with the operation conditions.
LED lamp
When the on / off switch 6 is pushed, the LED lamp 3
is automatically switched on that allows to carry out
works in low light conditions.
Torque regulator
Rotate the regulator 4in order to set one of the 18
torque values most suitable for the work performed.
It is recommended to set the torque
regulator 4 into the position "Drill" to per-
form drilling.
Stepless speed adjustment
Speed is controlled from 0 to maximum by
pressing force of on / off switch 6. Weak
pressing results in low revolutions, which
enable a smooth power tool switch-on.
Step speed selector switch
Attention: one can only change the
revolutions per minute range after the
engine fully stops.
In order to put in the rst gear, move the switch 5
forward. This mode is used for the fastening of screws
or for large diameter hole drilling.
In order to put in the second gear, move the
switch 5back. This mode is used for speed drilling of
small diameter holes.
Changing the rotational directions (see g. 10)
Change the direction of rotation only after
a full stop of the motor, acting otherwise
may cause damage to the power tool.
Clockwise rotation (drilling, fastening of screws) -
move the reverse switch 7to the left as it is shown
in g. 10.
Counter clockwise rotation (unscrewing the
screws) - move the reverse switch 7to the right as it is
shown in g. 10.
Spindle automatic locking
[ABS-18 SLi]
If the on / off switch 6is not pressed, the spindle of
the power tool is locked this enables to use the power
tool as an ordinary screwdriver (for example it can be
used to tighten manually screws or bolts, if the battery
is low).
Break rundown
Break rundown stops the keyless chuck 1immediately
after the power tool is turned off. This helps to avoid
an excessive tightening of the bolts and screws and
prevents work pieces, screwdriver bits and slots of fas-
tening elements from being damaged.
Recommendations
on the power tool operation
Drilling (see g. 11-13)
•Grease the drill bit regularly when drilling holes in met-
als (except drilling non-ferrous metals and their alloys).
•When drilling hard metals, apply more force to the
power tool and lower the rotation speed.
• When drilling large diameter holes in metal, rst drill
a hole with a smaller diameter and ream it till the nec-
essary diameter (see. g. 11).
• In order to avoid splitting of the surface at an exit
point of a drill bit when drilling holes in wood, follow the
instructions shown in gure 12.
•In order to decrease dust production when drilling
holes in walls and ceilings, take actions indicated in
gure 13.
Screwing the screws (see g. 14)
•To make fastening of screws easier and in order to
prevent cracking of the work pieces, rst drill a hole
with a diameter equal to 2/3 of a diameter of the screw.
•If you are connecting work pieces with the help of
screws, in order to achieve durable joint without get-
ting cracks, fracturing or layering, take actions shown
in gure 14.
Power tool maintenance /
preventive measures
Before execution of any procedures, centre the re-
verse switch 7.
Battery maintenance instruction
•Charge timely before the battery 9 is completely
exhausted. Stop operation in low power and charge
it immediately.
• Do not overcharge when the battery 9is full, other-
wise it will shorten the life time.
•Charge battery 9 in the room temperature of 10°C
to 40°C (50°F to 104°F).
•Charge battery 9 every 6 months without operation
for a long time.
•Replace worn out batteries in time. Decline of pro-
duction or a signicantly shorter runtime of the power
tool after charging indicates aging of the battery 9and
the need for replacement. It should be taken into ac-
count that the battery 9may discharge faster if the
works take place in the temperature below 0°С.
•In case of long time storage without use, it is recom-
mended to store the battery 9at room temperature, it
should be charged to 50%.
Cleaning of the power tool
An indispensable condition for a safe long-term exploi-
tation of the power tool is to keep it clean. Regularly
ush the power tool with compressed air thought the
ventilation slots 8.

17
English
After-sales Service and Application Service
Our after-sales service responds to your questions
concerning maintenance and repair of your product
as well as spare parts. Information about service
centers, parts diagrams and information about spare
parts can also be found under: www.dwt-pt.com.
•
Transportation
of the power tools
Categorically not to drop any mechanical impact on
the packaging during transport.
•When unloading / loading is not allowed to use
any kind of technology that works on the principle of
clamping packaging.
Li-Ion batteries
The contained Li-Ion batteries are subject to the
Dangerous Goods Legislation requirements. The user
can transport the batteries by road without further
requirements.
When being transported by third parties (e.g.: air
transport or forwarding agency), special requirements
on packaging and labelling must be observed. For
preparation of the item being shipped, consulting an
expert for hazardous material is required.
Dispatch batteries only when the housing is
undamaged. Tape or mask off open contacts and pack
up the battery in such a manner that it cannot move
around in the packaging. Please also observe possibly
more detailed national regulations.
Environmental
protection
Recycle raw materials instead of
disposing as waste.
Power tool, accessories and packaging should be
sorted for environment-friendly recycling.
The plastic components are labelled for categorized
recycling.
These instructions are printed on recycled paper
manufactured without chlorine.
The manufacturer reserves the possibility to introduce changes.

18
Français
Bruit
d'information
Portez toujours des protections pour les
oreilles (casque) lorsque le niveau de
pression acoustique est supérieur
à 85 dB(A).
Déclaration
de conformité
Nous declarons sous notre propre responsabilite que
le produit decrit sous "Spécications de l'outil
électrique" est en conformite avec toutes les
dispositions des directives 2006/42/EC et leurs
modications ainsi qu’avec les normes suivantes :
EN 60745-1, EN 60745-2-1, EN 60745-2-2.
Le directeur général V.Kobzar
Merit Link International AG
Suisse
Stabio, 23.12.2015
Recommandations générales
de sécurité
AVERTISSEMENT! Assurez-vous que
vous avez lu et compris toutes les
recommandations. La nonobservation
des recommandations suivantespeut
Spécications de l’outil électrique
Taraudeuse a pile rechargeable ABS-10,8 CLi ABS-10,8 BLi ABS-14,4 BLi ABS-18 SLi
Code de l’outil électrique [127 V ~50/60 Hz]
[230 V ~50/60 Hz] voir la page 10
Voltage gradué [V] 10,8 10,8 14,4 18
Régime à vide:
- première vitesse [min-1]0-400 0-400 0-400 0-350
- seconde vitesse [min-1]0-1400 0-1400 0-1400 0-1200
Type de batterie Li-Ion Li-Ion Li-Ion Li-Ion
Temps de chargement de la batterie [h] 1 1 1 1
Capacité de la batterie [Ah] 1,5 1,5 1,5 1,5
Couple de rotation [Nm] 1-17 1-17 1-19 1-28
Plage de resserrement du
mandrin
[mm]
[pouces]
0,8-10
1/32"-25/64" 0,8-10
1/32"-25/64" 0,8-10
1/32"-25/64" 1-10
3/64"-25/64"
Puissance de perçage:
- bois [mm]
[pouces]
20
25/32" 20
25/32" 28
1-7/64" 30
1-3/16"
- acier [mm]
[pouces]
10
25/64" 10
25/64" 10
25/64" 10
25/64"
Max. diamètre de la vis [mm]
[pouces]
6
15/64" 6
15/64" 7
9/32" 7
9/32"
Poids [kg]
[lbs]
1
2.2 1
2.2 1,06
2.34 1,29
2.84
Pression acoustique [dB(A)] 64,83 62,2 63,9 71,8
Puissance acoustique [dB(A)] 75,83 73,2 74,9 82,8
Vibration [m/s2]1,06 0,96 1,02 1,19

19
Français
conduire à une décharge électrique, un incendie
et / ou de graves blessures. Le terme "outil
électrique" utilisé dans ce manuel fait allusion
aux outils équipés d'un cordon d'alimentation
électrique ou d'une batterie.
Espace de travail
• L'espace de travail devrait toujours être bien rangé
et bien éclairé. Du désordre dans l'espace de travail
et un éclairage insufsant peuvent conduire à des
accidents.
•Ne pas utiliser d'outils électriques dans un
environnement sujet au risque d'explosion, par ex. à
proximité de vapeurs liquides inammables, de gaz ou
de particules inammables sous forme de poussières.
Pendant l'opération, les étincelles sont produites, ce
qui pourrait enammer la poussière ou les vapeurs.
•Ne pas laisser des enfants et des personnes
non autorisées s'approcher des endroits où sont
effectuées des opérations avec un outil électrique. Des
personnes extérieures pourraient distraire l'attention
de l'opérateur et il pourrait perdre le contrôle de l'outil.
Recommandations concernantla sécurité électrique
• La prise de courant de l'outil doit toujours être insérée
dans une prise appropriée. Cela réduit le risque de
décharge électrique. Ne pas utiliser d'adaptateurs de
prise de courant avec des prises de mise à la terre.
• Éviter de toucher des articles reliés à la terre, comme
des tuyaux métalliques, des radiateurs, des cuisinières
et des réfrigérateurs. Si le corps de l'ouvrier entre du
contact avec un article relié à la terre, le danger de
décharge électrique augmente.
•Protégez l'outil électrique contre la pluie et l'humidité.
Si de l'eau pénètre dans l'outil, cela augmente le
danger de décharge électrique.
•Ne pas utiliser le câble d'alimentation électrique pour
un but autre que celui pour lequel il est conçu. Sous
aucune circonstance le câble ne doit être utilisé pour
porter ou tirer l'instrument; ne jamais non plus éteindre
l'outil en tirant sur le câble d'alimentation électrique.
Protéger le câble contre la chaleur, le contact avec des
corps à base de pétrole, avec des bords pointus ou
les parties mobiles de l'outil. Un câble d'alimentation
endommagé ou entortillé augmente le danger de
décharge électrique.
• Lors du travail en plein air, utiliser des rallonges
conçues pour ce type de travail, ce qui réduira le
danger de décharge électrique.
Recommandations de protection personnelle
• Soyez prudent lorsque vous travaillez avec des
outils électriques et planiez soigneusement vos
actions. Ne vous servez pas de l'outil lorsque vous
êtes fatigué ou sous l'inuence de drogues, d'alcool
ou de médicaments. Une manipulation négligente peut
conduire à de graves blessures.
•Utilisez un équipement de protection personnelle.
Portez toujours des lunettes de protection. Si
nécessaire, utilisez un respirateur, des bottes
antidérapantes, un casque et des protèges-
tympan. L'utilisation d'un équipement de protection
personnelle est un des facteurs qui réduit le risque
de blessures.
•Évitez de mettre accidentellement en marche
l'outil électrique. Avant d'insérer la prise de courant,
assurez-vous que l'outil est en position OFF. Lorsque
vous portez l'outil, retirez vos doigts de l'interrupteur
de mise en marche, cela réduira la possibilité de mise
en marche accidentelle.
• Avant d'allumer l'outil, enlevez toute clé et autres
objets laissé dans ses parties rotatives. Une clé
oubliée dans l'unité rotative peut conduire à de graves
blessures.
•Ne forcez pas trop, prenez une position ferme et
essayez toujours de garder l'équilibre; cela facilitera
votre contrôle sur l'outil.
• Ne portez pas de vêtements lâches ou de bijoux qui
pendent. Les cheveux, les parties de vêtement et les
gants devraient être protégés contre le contact avec
les parties mobiles de l'outil électrique.
•Si l'outil est équipé d'un accessoire ramasse-
poussière, assurez-vous que l'accessoire est activé et
utilisé correctement. L'utilisation de tels accessoires
permet de réduire la concentration de la poussière
dans l'espace de travail.
Utilisation et emploi des outils électriques
•Les personnes physiquement ou mentalement
handicapées, ainsi que les enfants, ne peuvent utiliser
cet outil que sous contrôle ou selon instructions des
personnes responsables de leur sécurité.
•Ne surchargez pas l'outil. Les outils électriques ne
doivent être utilisés que pour des opérations pour
lesquelles ils ont été conçus, ce qui garantira que
la sécurité et permettra d'accomplir de meilleurs
résultats.
•N'utilisez pas d'outils électriques avec un
interrupteur de mise en marche endommagé. Un
outil qui ne peut pas être allumé et éteint de manière
contrôlée est potentiellement dangereux et doit être
réparé immédiatement.
•Avant les opérations de réglage, de remplacement
des accessoires et pendant l'entreposage, débranchez
la prise de l'outil électrique. Cela élimine le risque de
mise en marche involontaire de l'outil.
•L'outil devrait être entreposé hors de portée des
enfants. Ne pas laisser des personnes qui n'ont pas
lu ce manuel se servir de l'outil électrique. Dans les
mains d'une personne inexpérimentée, l'outil peut
être dangereux à la fois pour l'utilisateur et pour son
environnement.
•Prenez bien soin de l'état de l'outil. Surveillez
l'usure des axiaux et la stabilité des articulations
des parties mobiles et faites attention aux défauts
qui peuvent conduire à l'endommagement de l'outil.
Un outil électrique en mauvais état est une cause
fréquente d'accidents.
•Les instruments coupants devraient être
gardés propres et bien aiguisés. Les instruments
coupants dont les lames sont bien aiguisées et qui
sont correctement attachées réduisent le risque
de grippage et facilitent le contrôle sur les outils
électriques.
•Lorsque vous utilisez des outils électriques et des
accessoires, suivez les instructions données dans ce
manuel. Pendant le travail avec un type spécique
d'outil électrique, suivez les recommandations, en
tenant compte des conditions opérationnelles et du
type de travail effectué.
Service des outils électriques
L'entretien de votre outil électrique ne devrait être
coné qu'à des spécialistes qualiés, avec l'utilisation
de pièces de rechange recommandées. Cela
garantira la sécurité de la main-d'œuvre appliquée à
votre instrument.

20
Français
Directives de sécurité pendant l'utilisation de
l'outil électrique
Règles de sécurité spéciques pour les outils
électriques sans l
• N'utilisez que des chargeurs et batteries vendus par
DWT.
•N'utilisez que des outils électrique n'ayant que
des batteries bien spéciques. L'utilisation d'autres
batteries peut entrainer des risques d'incendie ou de
blessures.
Avertissement! Le fait de créer un court-
circuit peut de sérieux dommages à l'uti-
lisateur. Veuillez suivre les consignes
suivantes:
• ne pas démonter ou modier l'intérieur de la
batterie;
•ne pas recharger la batterie dans un environnement
humide ou à l'extérieur lorsqu'il pleut;
• ne pas recharger la batterie lorsque sa jauge est
endommagée;
•ne pas court-circuiter les bornes de la batterie;
•lorsqu'on ne sert pas de la batterie de l'outil
électrique, l'éloigner des petits objets métalliques,
par exemple trombones, ls électriques etc. Qui
peuvent créer une connexion entre deux bornes.
•Durant la phase de chargement, la batterie
chauffe ; ne cherchez pas à couvrir ou à la placer
sur des matériaux conducteurs thermiques (bres
minérales, sciure de bois etc.).
• Eviter une surchauffe de la batterie au-delà de 45°С.
Evitez toute exposition prolongée au soleil et ne jamais
jeter la batterie dans le feu, cela peut provoquer une
explosion.
•Une surchauffe ou la manque d'aération peut
provoquer l'émission de liquide caustique ou constituer
un risque de brûlure chimique. Evitez tout contact avec
la peau.
• En cas de dégât du carter de batterie ou d'une
mauvaise utilisation, l'émission de gaz est susceptible
d'irriter le système respiratoire ; ne pas inhaler le gaz,
respirer de l'air frais et consulter un médecin au besoin.
•Ne pas utiliser de batteries et de chargeurs
endommagés car leur utilisation peut nuire à l'outil
électrique et entrainer des blessures ou des dégâts du
matériel.
• Il est strictement interdit de jeter les batteries dé-
fectueuses ou inexploitables dans ses poubelles; elles
doivent être amenées dans des centres de tris écolo-
giques.
Pendant l'opération
• Évitez d'arrêter le moteur d'un outil électrique
lorsqu'il est sous charge.
•Il est formellement déconseillé de retirer les éclats
lorsque le moteur de la perceuse est en marche.
• Avant de commencer un travail, assurez-vous
de savoir où se trouvent les câbles électriques
et les conduites d'eau et de gaz cachés. Le fait
d'endommager le l d'alimentation électrique ou la
construction mécanique peut entraîner des blessures
graves ou mettre la vie de l'opérateur en danger.
• Si le programme de travail ne peut pas exclure le fait
d'endommager les câbles d'alimentation principaux,
ceux-ci doivent être mis hors tension.
•N'utiliser que des mèches aiguisées et sans défauts,
cela facilitera le travail de l'outil électrique.
•Il est formellement déconseillé de modier la concep-
tion des mèches et d'utiliser des orices amovibles et
des accessoires non prévus pour cet outil électrique.
• Ne pas appliquer de pression excessive lors de
l'utilisation de l'outil électrique - cela pourrait bloquer la
perceuse et surcharger le moteur.
•Ne pas laisser les mèches se bloquer dans le
matériau traité. Si cela se produit, ne pas essayer
de les libérer au moyen du moteur de l'outil. Cela
risquerait de l'endommager.
•Il est formellement déconseillé de frapper sur des
mèches coincées dans le matériau traité avec un mar-
teau ou tout autre objet - les fragments en métal pour-
raient blesser l'opérateur ou les personnes à proximité.
• Ne pas travailler les matériaux contenant de l'as-
beste. L'asbeste possède les propriétés cancérigènes.
Les symboles utilisés dans
le manuel d’utilisation
Le manuel d’utilisation utilise les symboles ci-dessous.
Pensez à lire attentivement leur signication. La bonne
interprétation des symboles permet de bien utiliser
l’instrument en toute sécurité.
Symbole Légende
Taraudeuse a pile
rechargeable
Les zones grisées représen-
tent une applique molle (à la
surface isolée).
Etiquette avec le numéro
d’usine:
ABS ... - modèle;
XX - date de fabrication;
XXXXXXX - numéro d’usine.
Lisez attentivement toutes
les consignes de sécurité et
les instructions.
Portez les lunettes et les
casques de protections.
Portez le masque antipous-
sière.
Ne réchauffez pas la batterie
au-dessus de 45°С.Conser-
vez à l’abri des rayons di-
rects du soleil.
Ne jetez pas la batterie avec
les déchets ménagers.
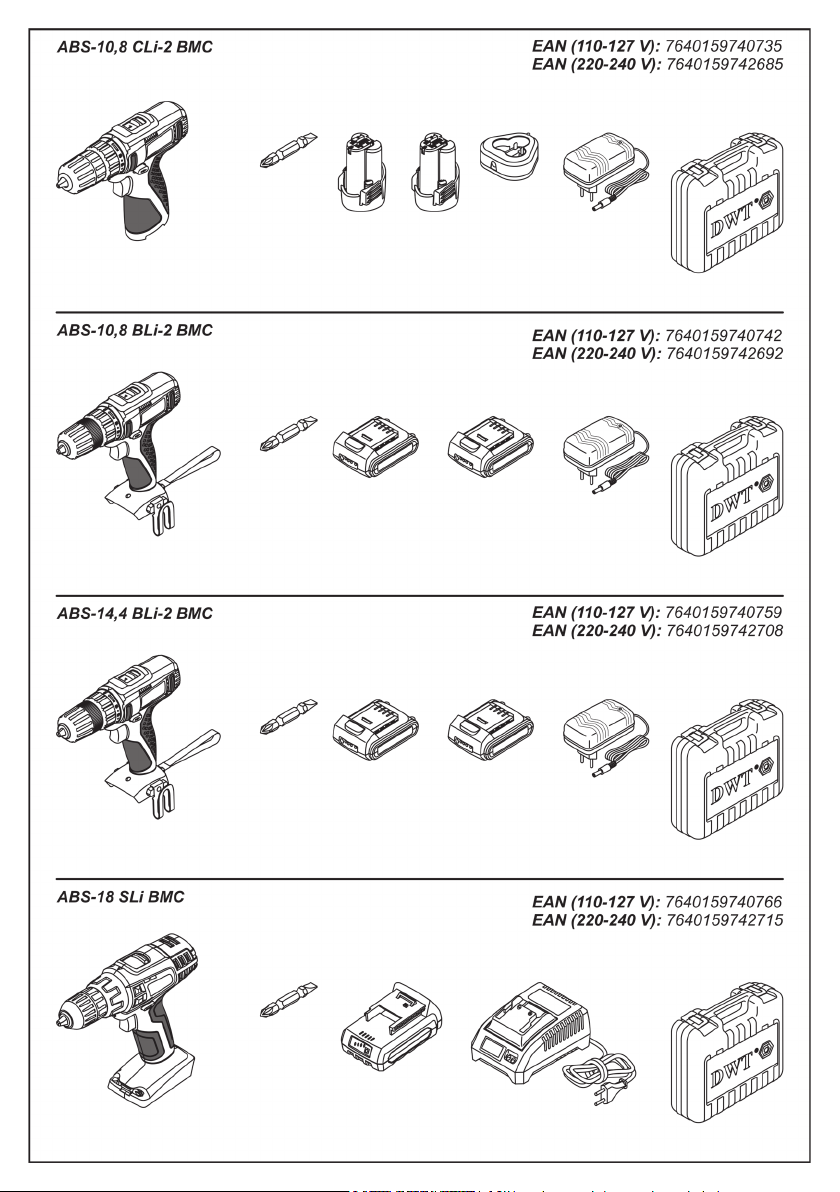
This manual suits for next models
3
Table of contents
Languages:
Other DWT Drill manuals
Popular Drill manuals by other brands

Sumake
Sumake ST-4431 quick start guide

DeWalt
DeWalt XR DCH614N Original instructions

Panasonic
Panasonic EY7542 - CORDLESS IMPACT WRENCH operating instructions

RS PRO
RS PRO 472-2776 quick start guide

Cooper Tools
Cooper Tools Quackenbush 15QDA-RA/5RNAL Operation & service manual

Scheppach
Scheppach DI850 Translation of original operating manual