DX-PWLMSE Wireless Laptop Mouse I I
System requirements
• Windows® 2000, Windows® XP, Windows Vista®, Windows® 7,
or Mac OS X 10.4 or higher
• One available USB port
Setting up your mouse
1Push the EJECT button with Power LED for Battery to open the compartment cover.
2Insert two AAA batteries, making sure that the + and - on the batteries match
the + and - in the compartment.
3Remove the USB receiver, then close the battery/USB receiver compartment.
4Plug the USB receiver into an open USB port on your laptop.
5Slide the power switch on the bottom of your mouse to the ON position. The
laptop automatically detects the mouse.
Note: If your mouse does not connect automatically, press and hold the CONNECT
button on the bottom of the mouse to establish a connection with the receiver.
Cleaning your mouse
Wipe the mouse with a damp, lint-free cloth.
• WindowsMD 2000, WindowsMD XP, Windows VistaMD, WindowsMD 7
ou Mac OS 10.X ou supérieur
• Un port USB disponible
1Ouvrir le compartiment des piles en appuyant sur le bouton d’ouverture (EJECT)
avec DEL de piles chargées.
2
avec le + et le – à l’intérieur du compartiment.
3Retirer le récepteur USB puis refermer le compartiment des piles/du récepteur USB.
4Connecter le récepteur USB à un port USB de l’ordinateur portatif.
5Mettre le bouton marche/arrêt situé sur la partie inférieure de la souris sur
ON (Marche). L’ordinateur portatif détecte automatiquement la souris.
Remarque : Si la souris ne se connecte pas automatiquement, maintenir appuyé
le bouton CONNECT (Connecter) situé sur la partie inférieure de la souris pour établir
une connexion avec le récepteur.
Nettoyage de la souris
Requisitos de sistema
• Windows® 2000, Windows® XP, Windows Vista®, Windows® 7
o Mac OS 10.X o más reciente
• Un puerto USB disponible
Instalación del ratón
1Presione el botón de abertura (EJECT) con el indicador LED de pila cargada para
abrir la cubierta del compartimiento.
2Inserte dos pilas AAA, asegurándose de que los signos + y – de las pilas coincidan
con los signos + y – en el interior del compartimiento de las pilas.
3Remueva el receptor USB, y cierre el compartimiento de las pilas/receptor.
4Conecte el receptor en un puerto USB disponible en su laptop.
5Deslice el interruptor de encendido en la parte inferior del ratón a la posición
ON (Encendido). Su laptop detectará automáticamente el ratón.
Nota: Si su ratón no se conecte automáticamente, mantenga presionado el botón
CONNECT (Conectar) en la parte inferior de su ratón para establecer una conexión con
el receptor.
Limpieza del ratón
Limpie el ratón con un paño húmedo, sin pelusas.
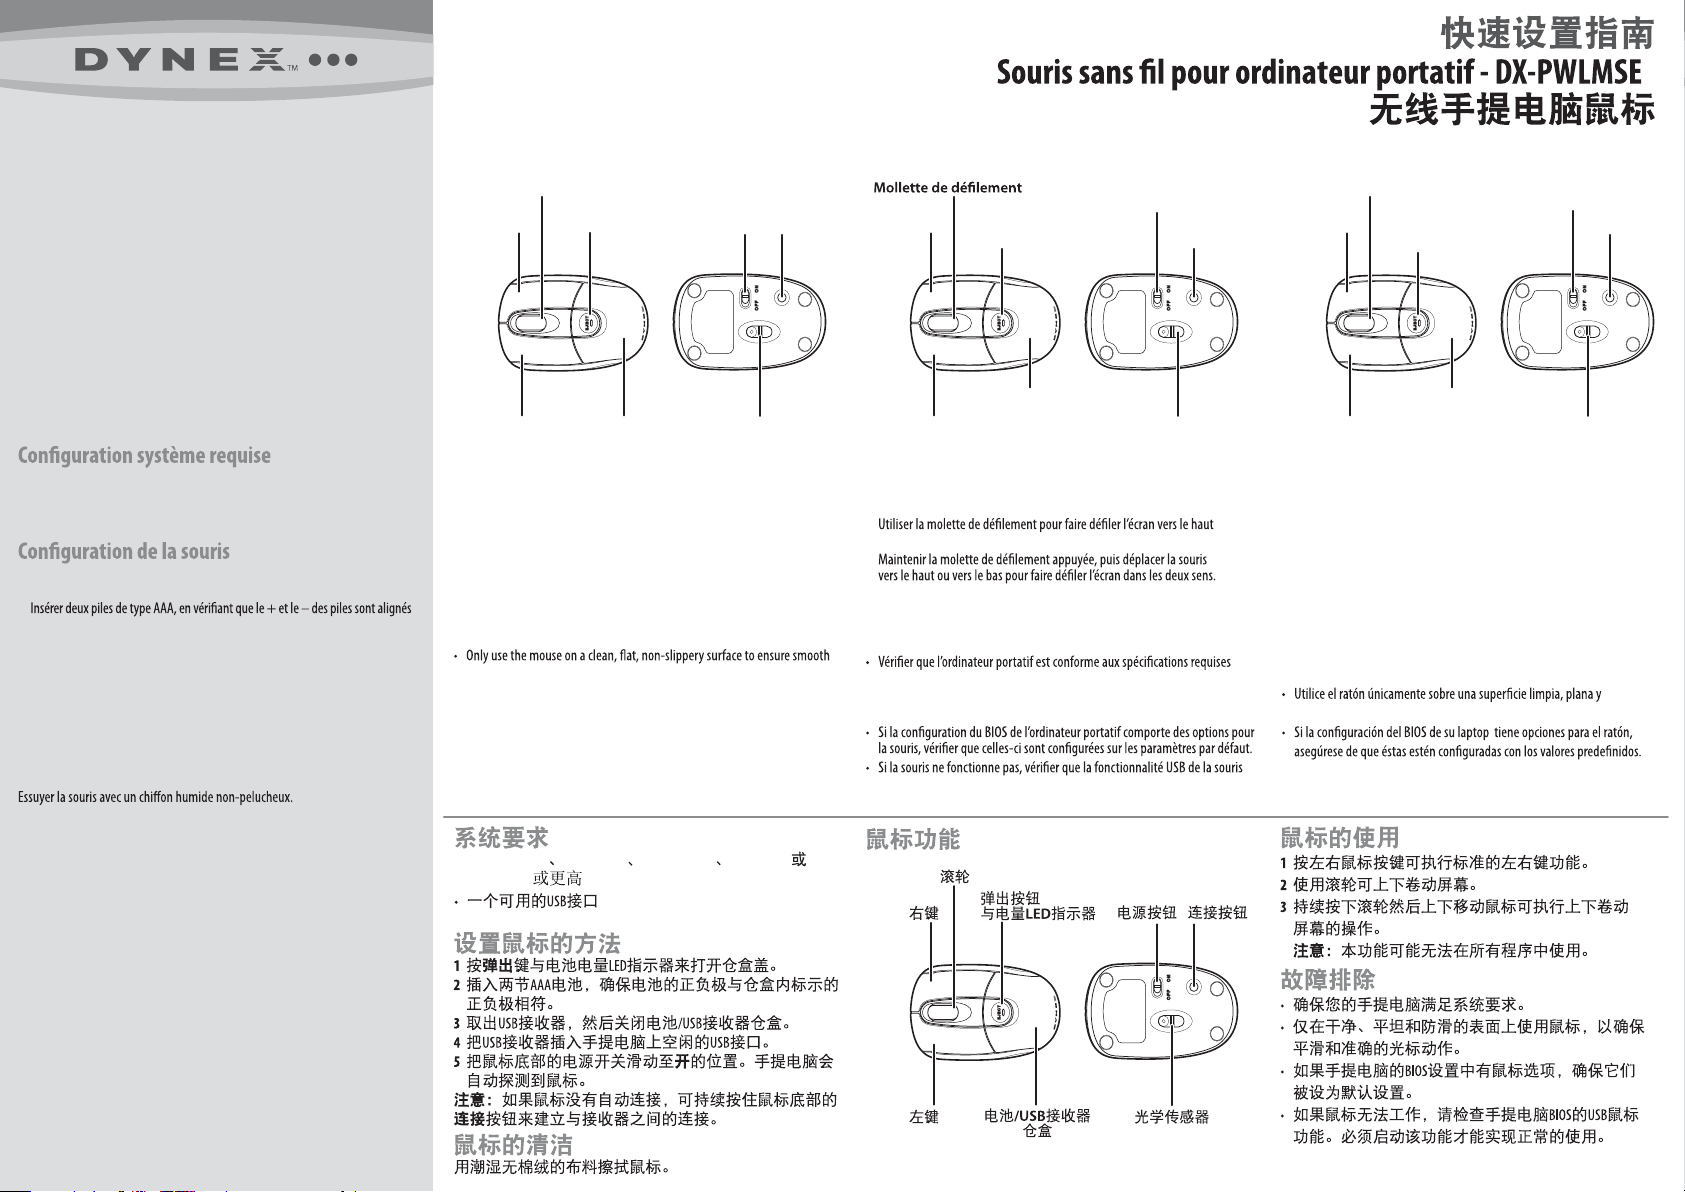
Mouse features
Scroll wheel
Left button
Using your mouse
1Press the left and right mouse buttons to perform standard left and right
button functions.
2Use the scroll wheel to scroll up and down the screen.
3Press and hold the scroll wheel down, then move the mouse up and
down to scroll up and down the screen.
NOTE: this feature may not be available in all programs.
Troubleshooting
• Make sure that your laptop meets the system requirements.
and accurate cursor action.
• If your laptop BIOS setup has mouse options, make sure that they are set to
default settings.
• If your mouse fails to work, check the USB mouse function in your laptop’s
BIOS. The function should be enabled for normal use.
Right button
Eject button
with power LED
Battery/USB receiver
compartment Optical sensor
Power
button
Connect
button
Caractéristiques de la souris Características del ratón
Bouton gauche
Utilisation de la souris
1Appuyer sur les boutons gauche et droit de la souris pour obtenir les
fonctions classiques de ces boutons.
2
ou vers le bas.
3
REMARQUE : cette caractéristique peut ne pas être disponible dans toutes
les applications.
Problèmes et solutions
du système.
• Utiliser la souris uniquement sur une surface propre, plane et
non-glissante pour assurer un mouvement régulier et précis du curseur.
est activée dans le BIOS de l’ordinateur portatif. Cette fonctionnalité doit
être activée pour une utilisation normale.
Bouton droit Bouton d’ouverture
avec DEL d’alimentation
Compartiment des
piles/du récepteur USB Capteur optique
Bouton
marche/arrêt
Bouton de
connexion
Rueda de desplazamiento
Botón primario
Uso de su ratón
11 Presione los botones izquierdo y derecho de su ratón para obtener las
funciones normales de estos botones.
2Use la rueda de desplazamiento para desplazar la pantalla hacia arriba
y hacia abajo.
3Mantenga presionado la rueda de desplazamiento, y luego mueve el
ratón hacia arriba y hacia abajo para desplazar la ventana hacia arriba
y hacia abajo.
NOTA: esta característica puede no estar disponible en todas las aplicaciones.
Localización y corrección de fallas
• Asegúrese de que su laptop cumple con los requisitos de sistema.
antideslizante para garantizar la acción uniforme y exacta del cursor.
• Si el ratón no funciona, compruebe la función del ratón USB en el BIOS de
su laptop. La función deberá estar habilitada para uso normal.
Botón
secundario Botón de abertura
con indicador LED
de alimentación
Compartimiento de las
pilas/del receptor USB Sensor óptico
Botón de
Encendido Botón de
conexión
Quick Setup Guide I Guide d’installation rapide I Guía de instalación rápida I
DX-PWLMSE
Ratón inalámbrico para laptop - DX-PWLMSE I
• Windows® 2000 Windows® XP Windows Vista® Windows® 7
Mac OS 10.X


