Dyon ENTER 40 User manual

EN
ENTER 40
1
Content
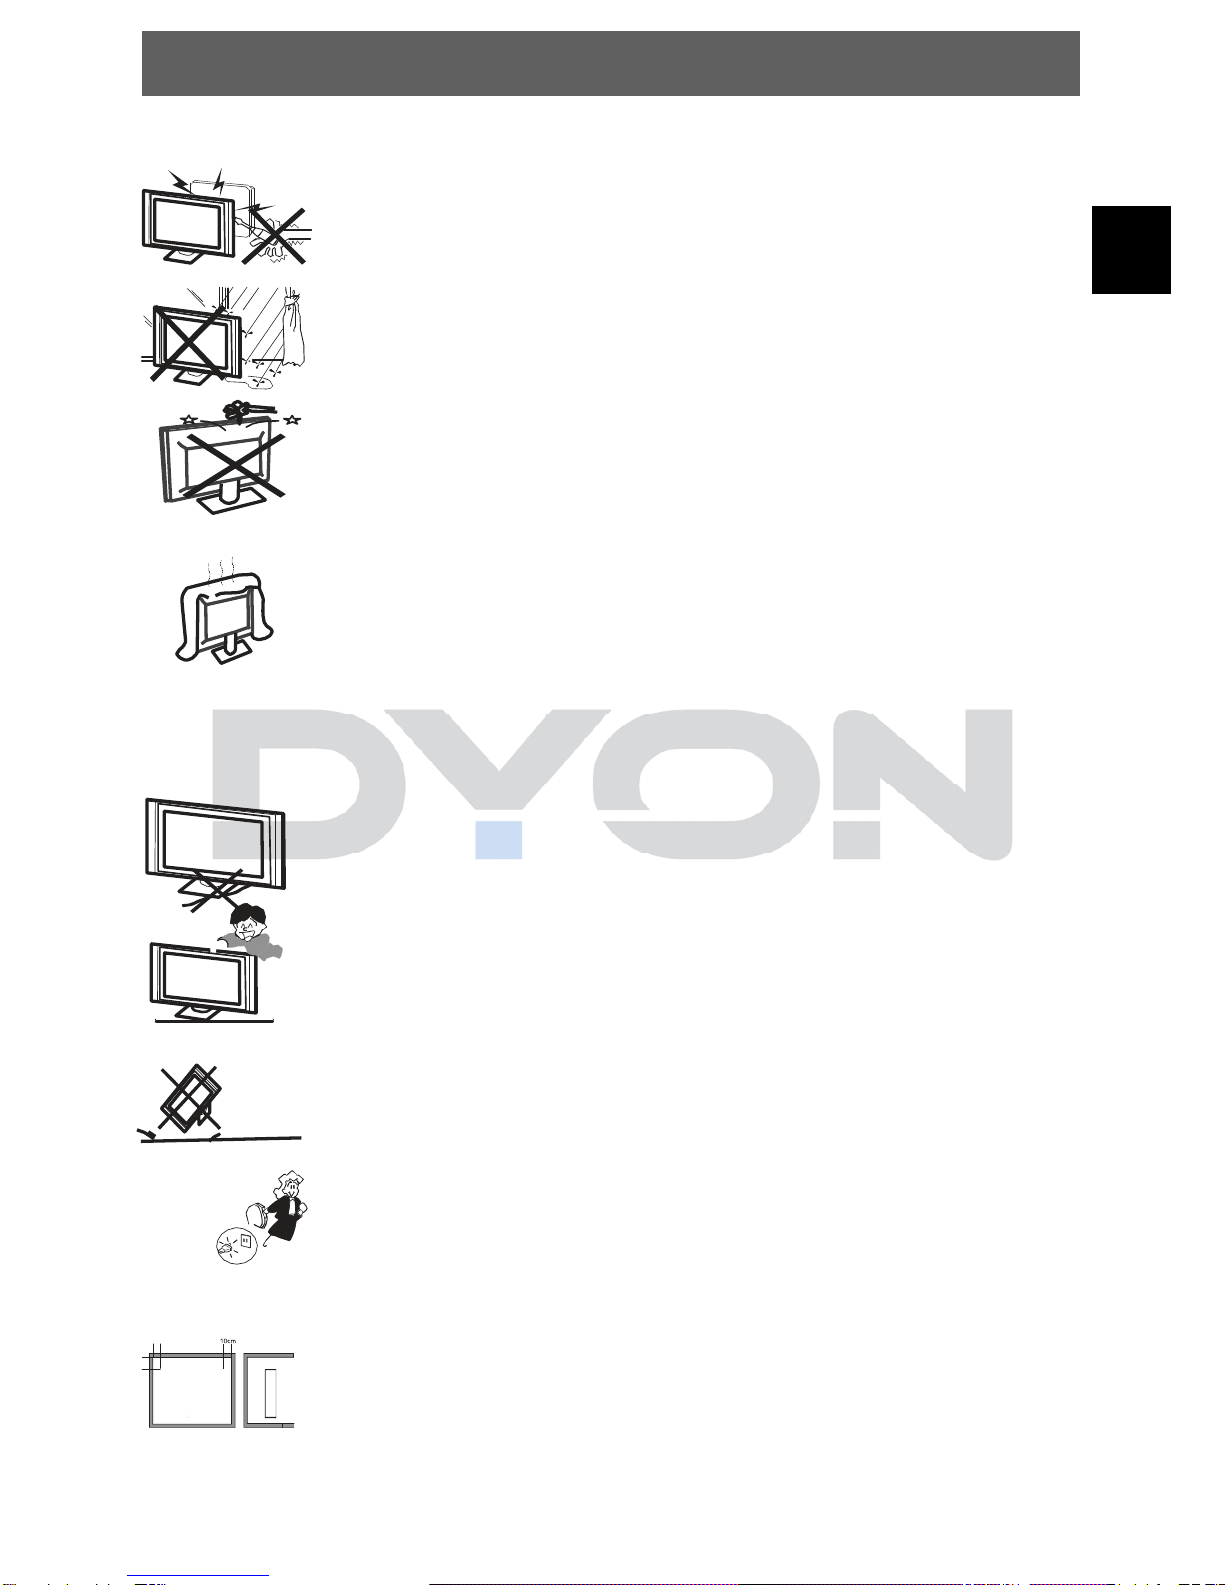
1Important Safety Instructions.................................................................. 3
1.Conformity.............................................................................................. 7
2Mounting – dismantling .......................................................................... 8
2.1Stand mounting ........................................................................................8
2.2Stand dismantling .....................................................................................8
2.3Wall mounting...........................................................................................9
3Front and Rear Panel Illustration .......................................................... 10
3.1Switch on:...............................................................................................10
3.2Front panel and Keyborad ......................................................................11
3.3Rear connection board ...........................................................................12
3.4CI/CI+ Slot..............................................................................................13
3.5Remote Key Function .............................................................................15
4System Connections ............................................................................ 17
VIDEO EQUIPMENT with YPbPr .....................................................................17
4.1Connecting to TV-Signal Input................................................................18
4.2Connecting to Satellite-Signal Input........................................................19
5TV operation and System Setup .......................................................... 20
5.1Installation Guide (DVB-T)......................................................................20
5.2OSD Settings (Main Operations) ............................................................21
5.2.1CHANNEL MENU ............................................................................21
5.2.2PICTURE MENU..............................................................................25
5.2.3SOUND MENU ................................................................................25
5.2.4TIME MENU.....................................................................................26
5.2.5OPTION MENU................................................................................27
5.2.6LOCK MENU....................................................................................27
5.3Hotel Mode .............................................................................................28
5.4EPG Menu (Electronic Program Guide). .................................................29
5.5Trouble shooting.....................................................................................30
6DVB-S Operation ................................................................................. 31
6.1First Time Installation .............................................................................31
6.2Satelliten Managment.............................................................................31
6.2.1Satellite settings...............................................................................32
6.2.2Transponder.....................................................................................32
6.2.3Channel search................................................................................32
6.3Program Edit ..........................................................................................33
6.4Signal information...................................................................................33
6.5CI information .........................................................................................34
6.6EPG (Electronic program guide) .............................................................35
7TELETEXT Function Keys ................................................................... 36
8Selection of Source Input ..................................................................... 37
8.1Connecting a USB Devices for playing media files .................................38
8.2Movie Playback ......................................................................................39

EN
ENTER 40
2
9Connecting to PC ................................................................................. 40
10Troubleshooting ................................................................................... 41
11Specifications ....................................................................................... 42
12Warranty condition ............................................................................. 444

EN
ENTER 40
3
1 Important Safety Instructions
1) 1) Read these instructions.
2) Keep these instructions.
3) Heed all warnings.
4) Follow all instructions.
5) Do not use this apparatus near water.
6) Clean only with dry cloth.
7) Do not block any ventilation openings, install in accordance with the
instructions.
8) Do not install near any heat sources such as radiations, heat registers,
stoves, or other apparatus (including amplifiers) that produce heat.
9) Do not defeat the safety purpose of the polarized plug. If the provided plug
does not fit into your outlet, consult an electrician for replacement of the
obsolete outlet.
10) Protected the power cord from being walked on or pinched particularly at
plugs, convenience receptacles, and the point where they exit from the
apparatus.
11) Only use attachments/accessories specified by the manufacturer.
12) Unplug this apparatus during lighting storms or when unused for long
periods of time.
13) Refer all servicing to qualified service personnel. Servicing is required when
the apparatus has been damaged in any way, such as power-supply cord or
plug is damaged, liquid has been spilled or objects have fallen into the
apparatus, the apparatus
has been exposed to rain or moisture, does not operate normally, or has been
dropped.
14) Mains plug is used as the disconnect device, the disconnect device shall
remain readily operable.
15) The ventilation should not be impeded by covering the ventilation openings
with items, such as newspapers, table-cloth, curtains, etc.
16) No naked flame sources, such as lighted candles, should be placed on the
apparatus.
17) Attention should be drawn to the environmental aspects of battery disposal.
18) The use of apparatus in moderate climate.
WARNING: To reduce the risk of fire or electric shock, do not expose this
apparatus to rain or moisture.

EN
ENTER 40
4
WARNING: The batteries shall not be exposed to excessive heat such as
sunshine, fire or the like.
The symbol indicates that dangerous voltages constituting a risk of electric
shock are present within this unit.
The symbol indicates that there are important operating and maintenance
instructions in the literature accompanying this unit.
The symbol indicates that this product incorporates double insulation
between hazardous mains voltage and user accessible parts. When
servicing use only identical replacement parts.

EN
ENTER 40
5
Warning
High voltages are used in the operation
of this television receiver. Do not remove the cabinet back from
your set. Refer servicing to qualified service personnel.
To prevent fire or electrical shock hazard, do not expose the
television receiver to rain or moisture
Do
not
drop
or
push
objects
into
the television
cabinet
slots
or
openings. Never
spill
any
kind
of
liquid
on
the television
receiver.
Do not block the ventilation holes in the back cover. Adequate
ventilation is essential to prevent failure of electrical
components.
Caution
Do
not
trap
the
power
supply
cord
under the
television
receiver.
Never
stand
on,
lean
on,
or
suddenly
push the
television
or
its
stand.
You
should
pay special
attention
to
children.
Serious
injury may
result
if
it
should
fall.
Do not place your television on an unstable cart, stand, shelf or
table. Serious injury to an individual , and damage to the
television,
may result if it should fall.
When the television receiver is not
used for an extended period of time, it
is advisable to disconnect the AC power cord from the AC
outlet.
If
the
television
is
to
be
built
into
a compartment
or
similar
enclosure,
the minimum
distances
must
be
maintained. Heat
build-up
can
reduce
the
service
life
of your
television,
and
can
also
be
dangerous.

EN
ENTER 40
6
Tips regarding environmental protection
At the end of its operating life, this product may not be disposed of by
way of your normal household waste. Instead it must be delivered to
a collection point for recycling electrical and electronic equipment.
The icon on the product, in the operating instructions or on the
packaging, indicates this.
The materials used in manufacturing this product are recyclable,
depending on their identifying markings. By recycling this equipment,
by recycling its components, or through other procedures of re-using
outdated equipment, you are making an important contribution to
protection our environment. Please ask you local municipal
administration for the location of the corresponding recycling point.
Battery Recycling
In order to ensure the environmentally friendly disposal of batteries,
please do NOT dispose of used batteries through normal household
waste. Please take the batteries to your local retail or community
collection point for recycling.
The following may be an indication of a discharged battery: The device
cannot be switched on. The device switches off automatically
and "Battery Empty" is shown in the display. The device and or battery
do not function properly.
Support
URL: http://www.dyon.eu
See our website for the latest information on this engine, on other products by
our company and on our company itself. If you have questions or problems,
please read the FAQs on our website or contact our customer support service
Manufacturer
Axdia International GmbH
Formerweg 9
D-47877 Willich (Germany)
Tel: +49(0) 2154 / 8826-0
Fax: +49(0) 2154 / 8826-100
Support-Hotline: +49 (0)2154 / 8826-101
Web: www.dyon.eu
E-Mail: [email protected]

EN
ENTER 40
7
Appropriate use
The device is designed for receiving and watching encrypted and unencrypted
DVB-S, DVB-T and DVB-C Cable TV channels for private use. It is exclusively
meant for this purpose and must only be used for the same. This also includes
paying attention to all information contained in this operating manual, especially
in the safety instructions. Any other usage is considered to be improper and
may lead to material damages and even personal injuries. Moreover, it will
result in the immediate loss of guarantee. The manufacturer does not bear any
liability for damages caused due to improper use.
1. Conformity
We, Axdia International GmbH, hereby declare that this
device corresponds to the basic requirements and relevant
regulations outlined in guidelines 2004/108/EC, 2006/95/EC
and 2009/125/EC.
The CE declaration of conformity for this product may be found on the following
link:
www.dyon.eu – Service – Downloads

EN
ENTER 40
8
2 Mounting – dismantling
2.1
Stand mounting
1. Mount the engine on the provided stand.
2. Use the extended screw to fix the stand
2.2
Stand dismantling
Unmount the 4 screws they are fix the stand with the engine. Now you can take
it off.

EN
ENTER 40
9
2.3 Wall mounting
Use the four thread on the back to connect the tv with your wall retainer.
200x100 mm

EN
ENTER 40
10
3 Front and RearPanel Illustration
3.1 Switch on:
To switch ON or OFF the TV, please use the ON-/ OFF Button which you will
find at the bottom of the TV (as illustrated).
Note
The ON-/ OFF button you will next to the middle of stand at the
lower side.
ON-/ OFF Button

EN
ENTER 40
11
3.2 Front panel and Keyborad
1: Remote control sensor.
2: Indicator LED:
No lights = POWER ON
RED = STAND-BY.
1 SOURCE
Display the input source menu.
2 MENU
Display main MENU.
3 VOL+/VOL-
Adjustsound level.
In MENU, adjust the item that
you selected.
4 CH+/CH-
In TV mode press CH+ or CH-
to change the channel up and
down.
In MENU, press CH+ or CH- to
select items .In standby mode,
it can Turn on the TV.
5 STANDBY

EN
ENTER 40
12
3.3
Rear connection board
1. Video/ Y Connection
2. pb
3. Pr
4. Audio In Left
5. Audio In right
6. SPDIF
7. LNB In
8. Scart
1. USB
2. HDMI 2
3. HDMI 1
4. Headphone In
5. Common Interface (CI)
6. PC Audio IN
7. VGA
8. Antenna (75 Ohm)
45678
1
2 3
1 2 3 4567 8

EN
ENTER 40
13
3.4
CI/CI+ Slot
This device is equipped with a CI+ slot for use with cam modules and smart
cards which allow for the viewing of encrypted Pay-TV channels.
The corresponding modules may be purchased from the Pay-TV provider or
specialized dealer.
Installation
1. Disconnect the TV set from power.
2. Before inserting the module into the device, insure that the smart card has
been properly installed into the module (). Pay close attention to the
direction when inserting.
The printing on the module and the chip of the smart card must be on top.
3. Insert the Module with inserted smart card with the printing of the module
facing backwards ().
Insert the module carefully into the slot of the device until a little resistance
is felt.
Using a little pressure, carefully press the module into the slot until it sits
firmly.
4. Reconnect the power source.
Remove the module
2. Disconnect the TV set from power.
3. To take the module out carefully.

EN
ENTER 40
14
Notice
Module and smart card are not including in the packaging.
Install the CI+ module after the channel scan has been accomplished and all
other settings have been set.
The activation of the card may take several minutes for the first time it is used.
When necessary, the device will check the module every time the device is
switched on.
Pay close attention to the manual of the CI+ module and smart card.
Notice to CI+
Please note that the recording and time shift function may be limited on some
channels.
Recorded files of channels, which are encrypted by the CI+ card are only
workable on this device.
These limitations are determined by the broadcaster. The manufacturer takes
no responsibility.

EN
ENTER 40
15
3.5 Remote Key Function
1. POWER: to switch the set device to on or standby.
2. NUMBER KEYS: used to select channel numbers or
input numbers in menus.
3. TV MENU: open the menu of the current title.
4. ARROW KEYS: Move within the menus.
5. DVB-S2: Switch to DVB-S Mode
6. VOL+/-: Adjust the volume level.
7. PIC: To switch picture mode.
8. SLEEP: Set timer to turn off the TV.
9. REC: Start Record in DTV / DVB-S mode.
10. EPG: To display information about the program being
viewed and what’s on next in DTV and DVB-S mode.
11. FAV: Used to access your favorite channels.
12. : Fast rewind for USB file playback
13. forward for USB file playback
14. PLAY: Play the media player in USB mode.
15. PAUSE: Pause the media player in USB mode.
16.-19. REVEAL HOLD SUBPAG:SIZE
20. MUTE: To disable or enable the sound output.
21. TV/AUDIO: to switch the soundtrack
22. RECALL: to show the last view channel
23. SOURCE: select input source.
24. OK: Used to confirm a selection within a menu.
25. EXIT: Used to return to the previous screen or menu.
26. SOUND: To switch sound mode.
27. CH+/-: Used to changing the channels in normal play.
28. ASPECT: to switch the apsect ration
29. TEXT: to open teletext OSD display if teletext available in
the broadcasted stream.
30. TV/RADIO: It is used to switch between digital TV
channels and radio stations.
31. INFO: Used to display information about the channel
being viewed or further information about the program
when in DTV / DVB-S mode.
32. : go to the next file in USB mode
33. : got to the last file in USB mode
34. SUBTITLE: Used to switch among different subtitles that
are broadcasted in DTV and DVB-S mode.
35. STOP: Stop the media player in USB mode.
37./38. Open the programm list / freeze the picture.
36./39. INDEX MIX, and open PVR list of DTV / DVB-S mode.
Colour keys (RED/GREEN/YELLOW/BLUE): Teletext functions

EN
ENTER 40
16
Notes on batteries
If the remote control is not used for a long period of time, please
remove the battery from the compartment.
Do not heat batteries or dispose of them in fires.
Do not dismantle, deform or modify batteries.

EN
ENTER 40
17
4 System Connections
Do not connect the power cord until all other connections have been made.
VIDEO EQUIPMENT with YPbPr
V
IDEO E
Q
UIPMIENT
TO AUDIO OUTPUTS
TO VIDEO OUTPUTS

EN
ENTER 40
18
4.1
Connecting to TV-Signal Input
Connect the TV signal cable (the antenna cable, for example) to the Antenna
Input Jack on the back of the unit so that you can receive television
programmes.
After connection, turn on the power of the unit. Then press the SOURCE button
to select TV or DTV mode and conduct program selection.
Note
Whether and how many DVB-T channels can be received by this
device, is strongly depending on the operational place, and the DVB-T
signal strength in this Area.
DVB-T radio in particular is very limited and not available in most
locations
Please note that for using of DVB-T after each larger local changes, a
new channel search should be accomplished. Since the frequency of
the Channels may Vary from region to region.

EN
ENTER 40
19
4.2 Connecting to Satellite-Signal Input
Connect the satellite cable with the LNB In Port on the back.
After that, you can turn on the engine. Press „Source“ to switch into the DVB-S2 mode and
start the channel search.
LNB In

EN
ENTER 40
20
5 TV operation and System Setup
5.1
Installation Guide (DVB-T)
This screen only appears when the TV first time turns on or reset to factory etc.
You can select language and country, auto turning programs. And after turning
the screen will skip to the first DTV program.
(1): Select the OSD menu language and press OK to confirm.
(2): Select your desire mode, press ◄► ▲▼and OK button.
(3): Press▲▼ to select an antenna source.
(4a): Select the country for DVB-C / DVB-T reception and press OK to confirm.
The channel search starts now with DTV.
Press “Exit” or “Menu” to exit the channel search. Press -key to exit or
-key to proceed searching.
(4b): Press EXIT to use the preinstalled ASTRA 19.2E channel list or use the
blue key to set up your
desired satellite settings.
Table of contents
Other Dyon TV manuals

Dyon
Dyon SMART 40 XT V3 User manual

Dyon
Dyon SMART 40 XT V2 User manual

Dyon
Dyon SMART 40 XT V2 User manual

Dyon
Dyon SMART 32 AD User manual

Dyon
Dyon SMART 40 XT V2 User manual

Dyon
Dyon SMART 22 XT V2 User manual

Dyon
Dyon SMART 32 XT User manual

Dyon
Dyon LIVE 32 PRO User manual

Dyon
Dyon SMART 42 AD User manual

Dyon
Dyon SMART 42 XT User manual