manuals.online logo
Brands
  1. Home
  2. •
  3. Brands
  4. •
  5. Dyon
  6. •
  7. TV
  8. •
  9. Dyon LIVE 22 PRO User manual

Dyon LIVE 22 PRO User manual

V1.1.0
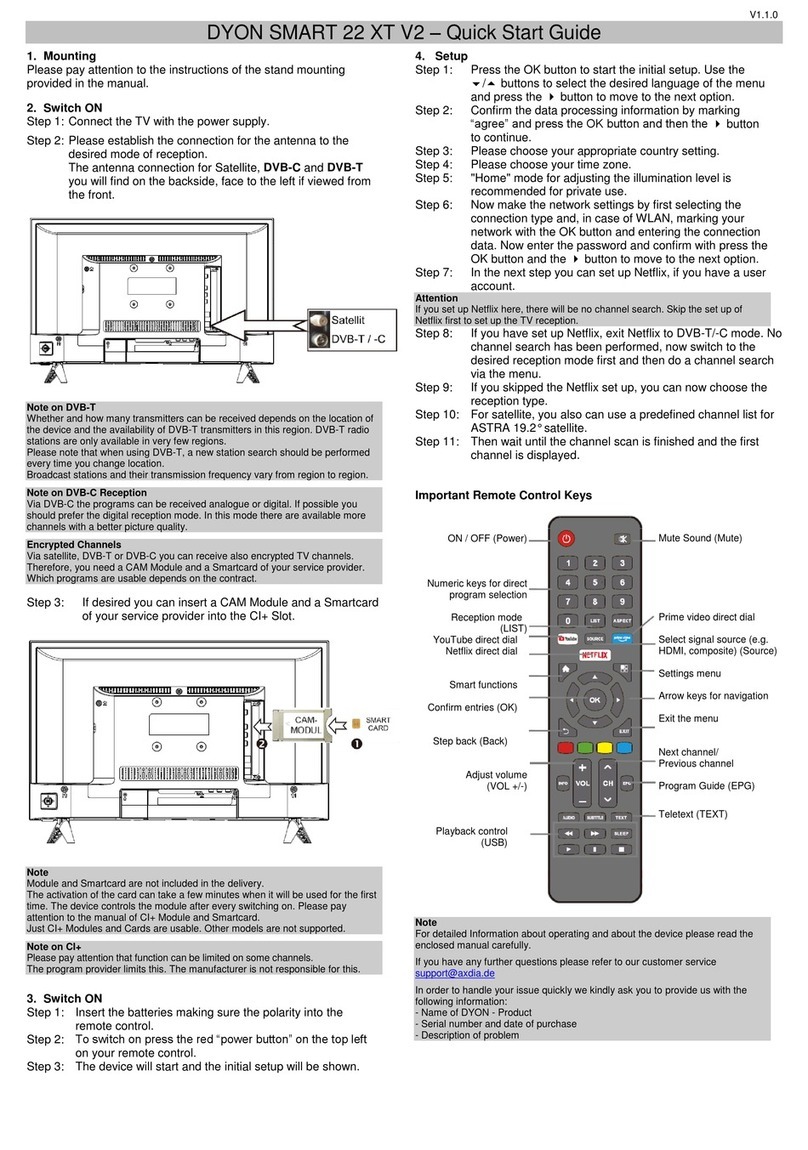
DYON LIVE 22 PRO –Quick Start Guide
1. Mounting
Please pay attention to the instructions of the stand mounting
provided in the manual.
2. Switch ON
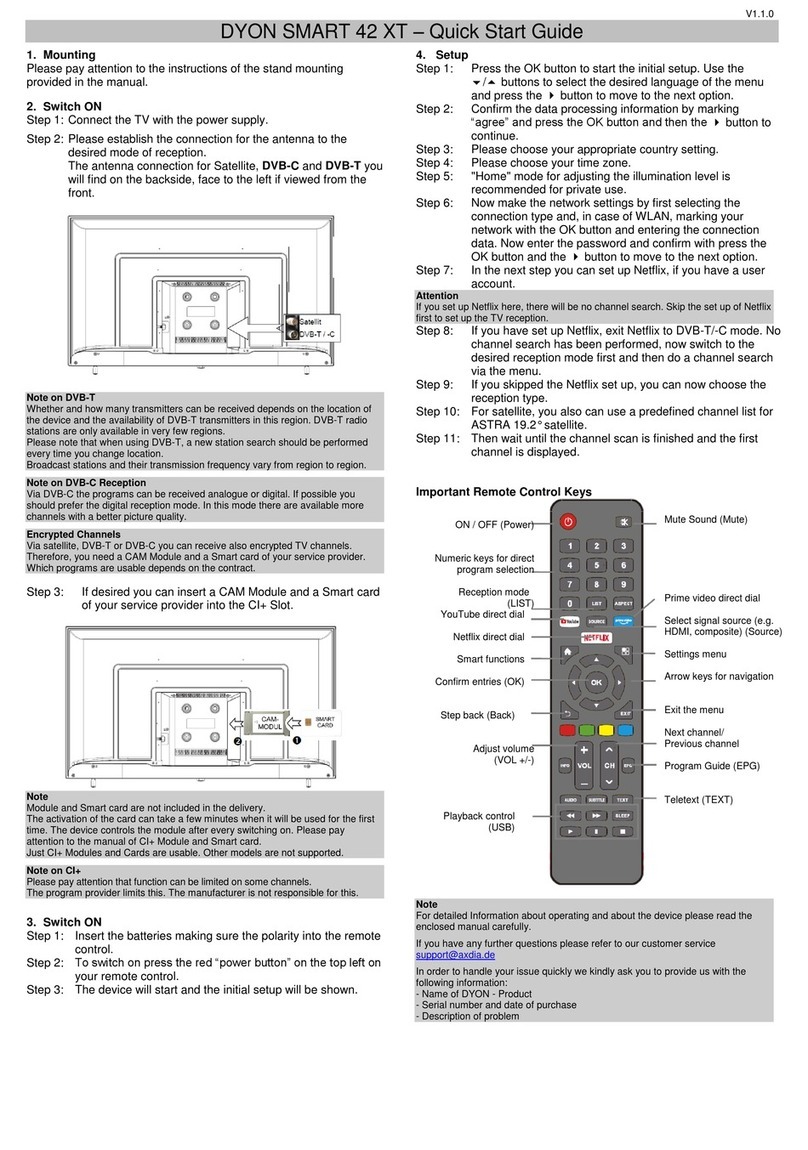
Step 1: Connect the TV with the power supply.
Attention!
The On-/OFF button you will find next to the middle of stand at the lower side.
Please make sure that the button is turned on and the LED flashes red.
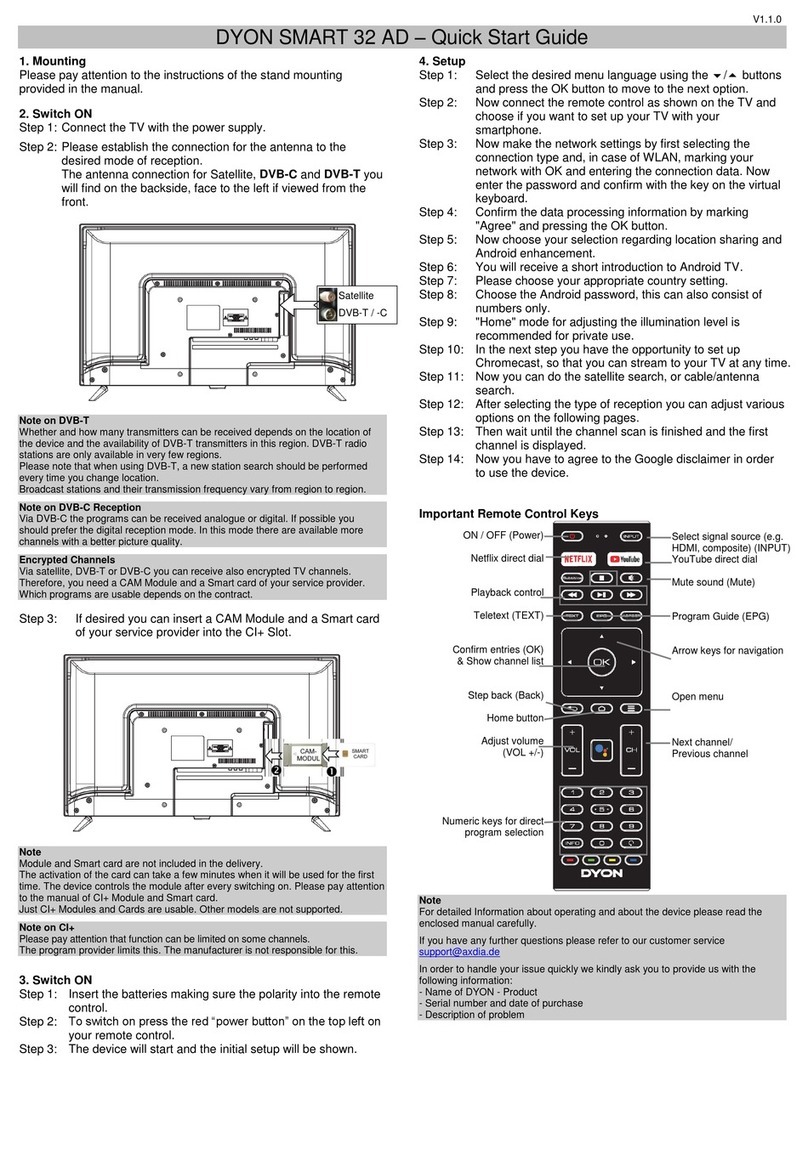
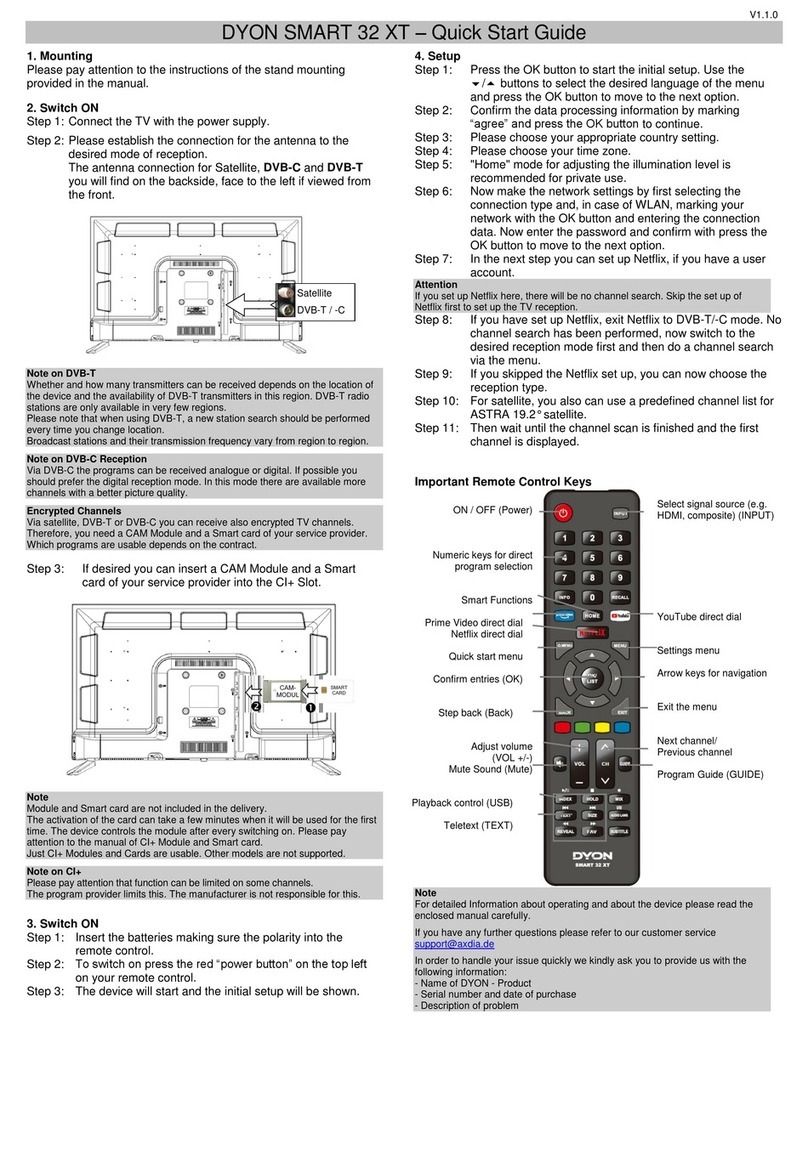
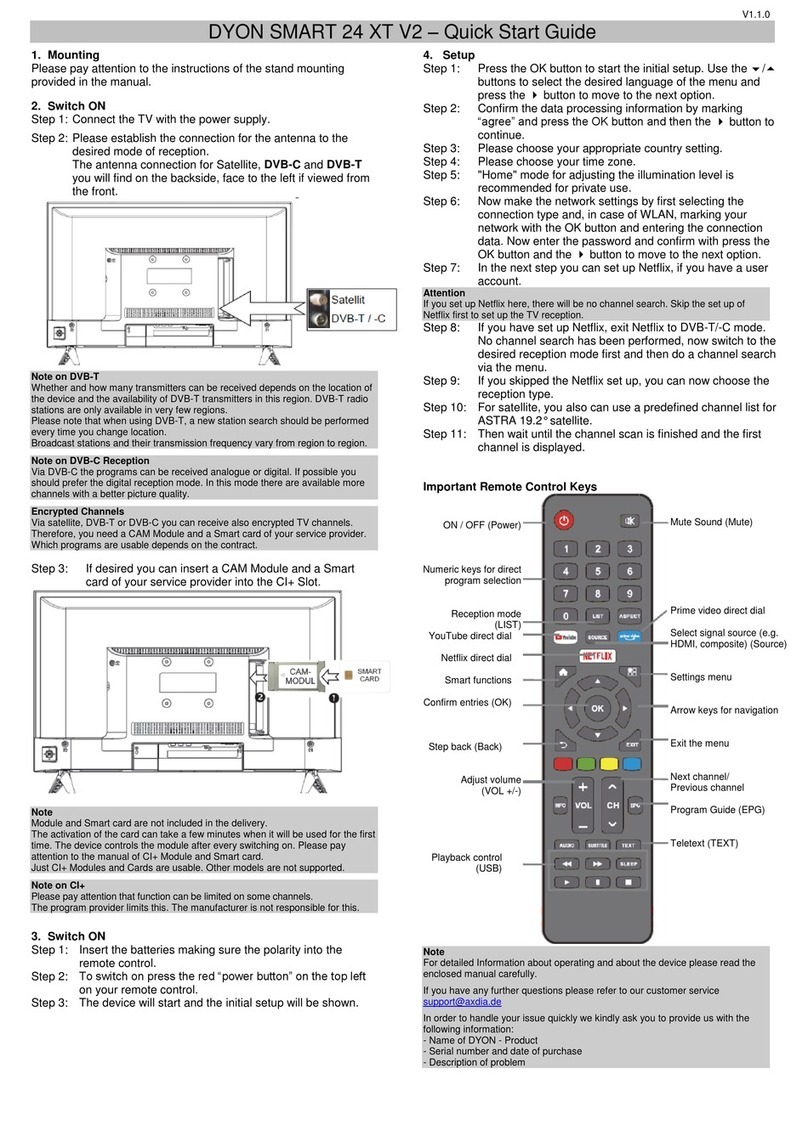
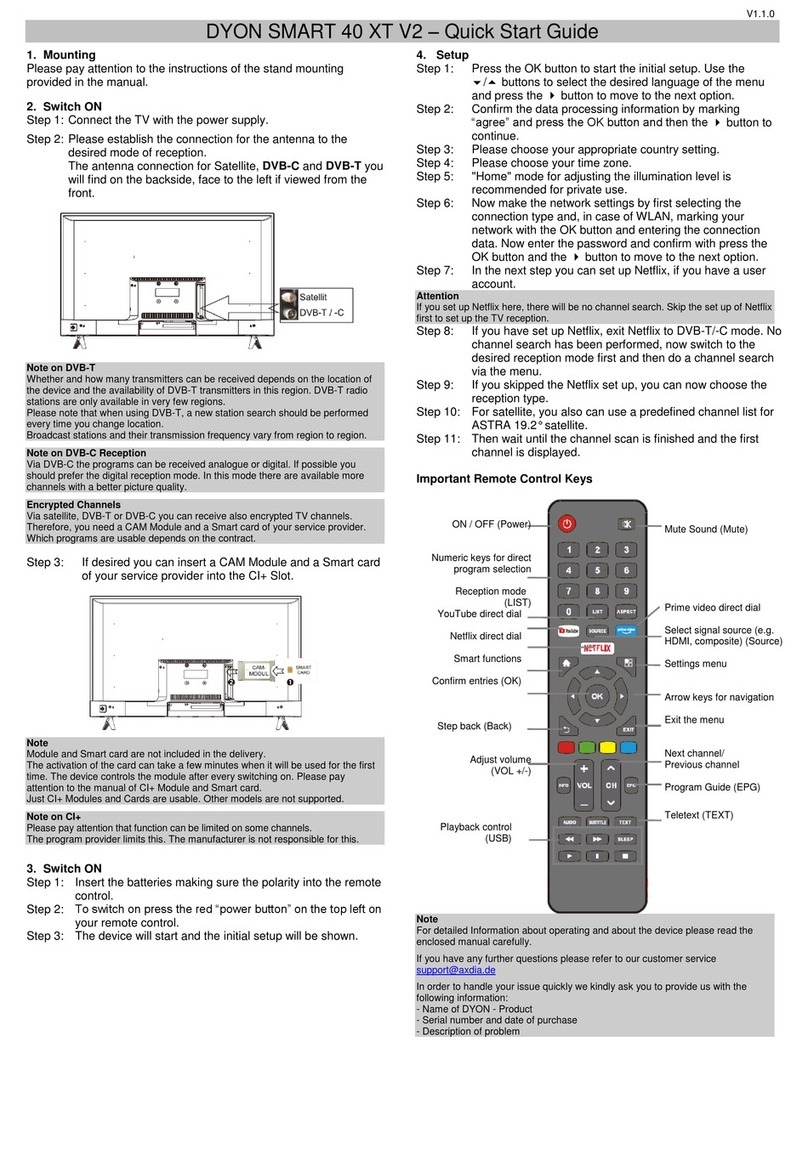
Step 2: Please establish the connection for the antenna to the
desired mode of reception.
The antenna connection for Satellite, DVB-C and DVB-T2
you will find on the backside, face to the left if viewed from
the front. For DVB-S reception please use the corresponding
connection on the backside connection panel.
Note on DVB-T2
Whether and how many transmitters can be received depends on the location of
the device and the availability of DVB-T2 transmitters in this region. DVB-T2 radio
stations are only available in very few regions.
Please note that when using DVB-T2, a new station search should be performed
every time you change location.
Broadcast stations and their transmission frequency vary from region to region.
Note on DVB-C Reception
Via DVB-C the programs can be received analogue or digital. If possible you
should prefer the digital reception mode. In this mode there are available more
channels with a better picture quality.
Encrypted Channels
Via satellite, DVB-T2 or DVB-C you can receive also encrypted TV channels.
Therefore, you need a Cam Module and a Smart card of your service provider.
Which programs are usable depends on the contract.
Step 3: If desired, you can insert a CAM Module and a Smart card of
your service provider into the CI+ Slot.
Note
Module and Smart card are not included in the delivery.
The activation of the card can take a few minutes when it will be used for the first
time. The device controls the module after every switching on. Please pay
attention to the manual of CI+ Module and Smart card.
Just CI+ Modules and Cards are usable. Other models are not supported.
Note on CI+
Please pay attention that function can be limited on some channels.
The program provider limits this. The manufacturer is not responsible for this.
3. Switch ON
Step 1: Insert the batteries making sure the polarity into the remote
control.
Step 2: To switch on press the red “power button” on the top left on
your remote control.
Step 3: The device will start and the initial setup will be shown.
4. Setup
Step 1: Please select the desired language of the menu with
the/button and press the button to proceed to the
next setting.
Step 2: Select the country where you are located.
Step 3: Select “on” for usage at home for home mode.
Step 4: Select the mode of reception
Step 5: With the help of /button select, if analogue (ATV),
digital (DTV), or both type of programs should be searched.
The LCN setting will be set automatically. If DVB-S was
selected as reception mode, please press the EXIT button
to use the preinstalled channel list.
Step 6: Select “Start” and confirm with the OK button.
Step 7: Wait until channel search is finished and the first channel
will be displayed.
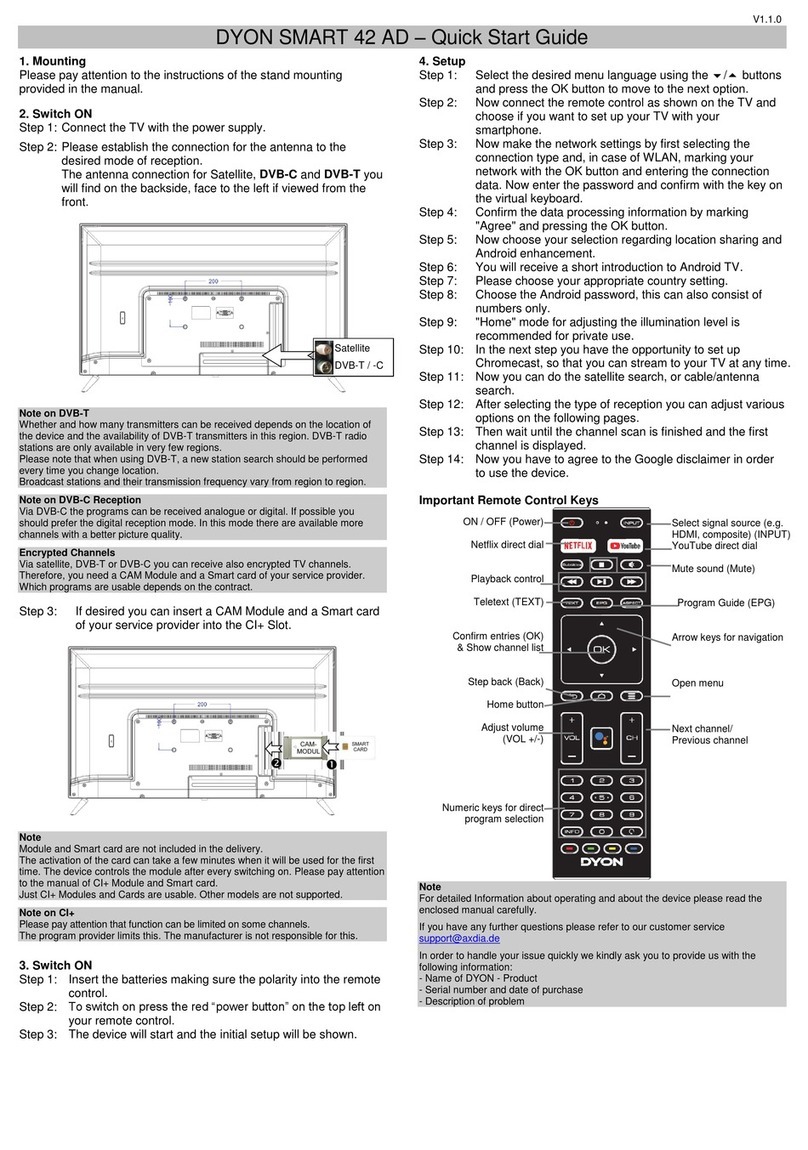
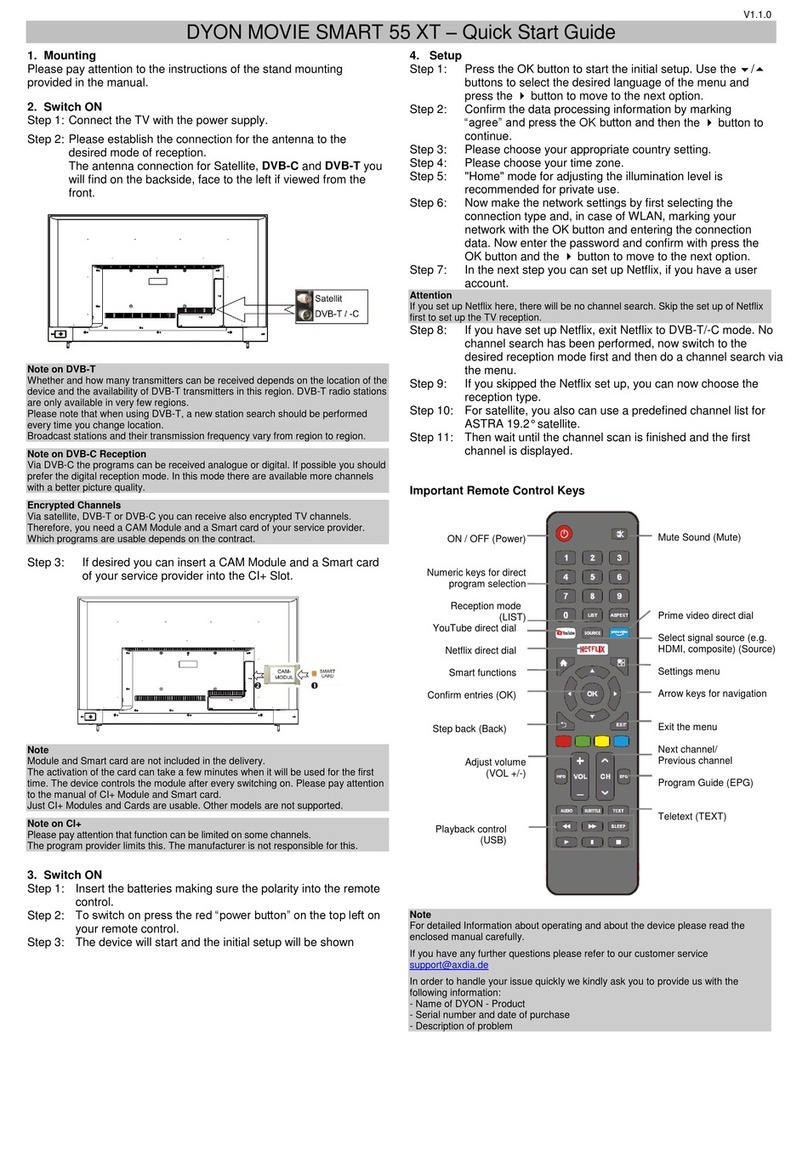
Important Remote Control keys
Note
For detailed Information about operating and about the device please read the
enclosed manual carefully.
If you have any further questions please refer to our customer service
[email protected]e
In order to handle your issue quickly we kindly ask you to provide us with the
following information:
- Name of DYON - Product
- Serial number and date of purchase
- Description of problem
Mute
Change the aspect rate
(Aspect)
Signal source selection (e.g.
Satellite, DVB-T/-C, Scart,
HDMI, USB) (Source)
Arrow keys for navigation
Exit the menu (Exit)
Adjust the volume
(VOL +/-)
Program guide (EPG)
On / Off (Power)
Numeric keys for direct
program selection
Channel list (List)
AUTO-Audjustment
Confirm selection (OK)
settings menu
Next Channel/
Previous Channel
Playback control in
USB mode
Teletext (TEXT)
V1.1.0
Important Safety Instructions
1) Read these instructions.
2) Keep these instructions.
3) Heed all warnings.
4) Follow all instructions.
5) Do not use this apparatus near water.
6) Clean only with dry cloth.
7) Do not block any ventilation openings, install in accordance with
the instructions.
8) Do not install near any heat sources such as radiations, heat
registers, stoves, or other apparatus (including amplifiers) that
produce heat.
9) Do not defeat the safety purpose of the polarized plug. If the
provided plug does not fit into your outlet, consult an electrician for
replacement of the obsolete outlet.
10) Protected the power cord from being walked on or pinched
particularly at plugs, convenience receptacles, and the point where
they exit from the apparatus.
11) Only use attachments/accessories specified by the
manufacturer.
12) Unplug this apparatus during lighting storms or when unused for
long periods of time.
13) Refer all servicing to qualified service personnel. Servicing is
required when the apparatus has been damaged in any way, such
as power-supply cord or plug is damaged, liquid has been spilled or
objects have fallen into the apparatus, the apparatus
has been exposed to rain or moisture, does not operate normally, or
has been dropped.
14) Mains plug is used as the disconnect device, the disconnect
device shall remain readily operable.
15) The ventilation should not be impeded by covering the ventilation
openings with items, such as newspapers, table-cloth, curtains, etc.
16) No naked flame sources, such as lighted candles, should be
placed on the apparatus.
17) Attention should be drawn to the environmental aspects of
battery disposal.
18) The use of apparatus in moderate climate.
Warning
To reduce the risk of fire or electric shock, do not expose this apparatus to rain or
moisture.
The batteries shall not be exposed to excessive heat such as sunshine, fire or the
like.
Tips regarding environmental protection
At the end of its operating life, this product may not be disposed of by way of your
normal household waste. Instead it must be delivered to a collection point for
recycling electrical and electronic equipment. The icon on the product, in the
operating instructions or on the packaging, indicates this.
The materials used in manufacturing this product are recyclable, depending on
their identifying markings. By recycling this equipment, by recycling its
components, or through other procedures of re-using outdated equipment, you are
making an important contribution to protection our environment. Please ask you
local municipal administration for the location of the corresponding recycling point.
Battery Recycling
In order to ensure the environmentally friendly disposal of batteries, please do
NOT dispose of used batteries through normal household waste. Please take the
batteries to your local retail or community collection point for recycling.
Product information about the energy efficiency of this device
according to EU Regulation (EU) 2019/2013 can be found on the
following website of the European Union. Please scan the following
QR code with your cell phone, for example, to open the page.
Maximum Transmission Power
Function
Frequency (MHz)
Output power (dBm)
Wi-Fi
2412-2472 (802.11b/g)
2412-2472
(802.11n(HT20))
2412-2472
(802.11n(HT40))
17.8
Manufacturer
Axdia International GmbH
Formerweg 9
D-47877 Willich (Germany)
Web: www.axdia.de
Conformity We, Axdia International GmbH, hereby declare that this
device corresponds to the basic requirements and
relevant regulations outlined in guidelines 2014/53/EU,
2014/30/EU, 2014/35/EU and 2009/125/EG.
The CE declaration of conformity for this product may be found on
the following link:
www.dyonhilfe.de/konform

Other Dyon TV manuals

Dyon ENTER 40 User manual

Dyon

Dyon ENTER 40 User manual

Dyon SMART 40 XT V2 User manual

Dyon

Dyon SMART 40 XT V2 User manual

Dyon MOVIE SMART 55 XT User manual

Dyon

Dyon MOVIE SMART 55 XT User manual

Dyon SMART 22 XT V2 User manual

Dyon

Dyon SMART 22 XT V2 User manual

Dyon SMART 42 XT User manual

Dyon

Dyon SMART 42 XT User manual

Dyon SMART 40 XT V3 User manual

Dyon

Dyon SMART 40 XT V3 User manual

Dyon SMART 40 XT V2 User manual

Dyon

Dyon SMART 40 XT V2 User manual

Dyon SMART 40 XT V2 User manual

Dyon

Dyon SMART 40 XT V2 User manual

Dyon SMART 42 AD User manual

Dyon

Dyon SMART 42 AD User manual

Dyon SMART 42 AD User manual

Dyon

Dyon SMART 42 AD User manual

Dyon SMART 32 AD User manual

Dyon

Dyon SMART 32 AD User manual

Dyon SMART 32 XT User manual

Dyon

Dyon SMART 32 XT User manual

Dyon LIVE 32 PRO User manual

Dyon

Dyon LIVE 32 PRO User manual

Popular TV manuals by other brands

IKEA UPPLEVA user manual

IKEA

IKEA UPPLEVA user manual

Toshiba 19A20 Service manual

Toshiba

Toshiba 19A20 Service manual

Sony XBR-100Z9D reference guide

Sony

Sony XBR-100Z9D reference guide

Sony Trinitron KV-HR36M90 Service manual

Sony

Sony Trinitron KV-HR36M90 Service manual

JVC AV-14AG16 instructions

JVC

JVC AV-14AG16 instructions

Loewe Table Stand Reference 55 user guide

Loewe

Loewe Table Stand Reference 55 user guide

Panasonic Genus TX-G10 operating instructions

Panasonic

Panasonic Genus TX-G10 operating instructions

Samsung LN26C350D1D Service manual

Samsung

Samsung LN26C350D1D Service manual

BBK LT1516D Service manual

BBK

BBK LT1516D Service manual

Samsung 55S9 B Series Quick setup guide

Samsung

Samsung 55S9 B Series Quick setup guide

Sharp LC-40FI5012E user manual

Sharp

Sharp LC-40FI5012E user manual

Evervue BN185 Operation manual

Evervue

Evervue BN185 Operation manual

North State TV2GO user guide

North State

North State TV2GO user guide

Toshiba CX35F70 owner's manual

Toshiba

Toshiba CX35F70 owner's manual

Magnavox PS1980 owner's manual

Magnavox

Magnavox PS1980 owner's manual

Philips 20HF5335D manual

Philips

Philips 20HF5335D manual

Panasonic QuintrixF TX-29AS1D operating instructions

Panasonic

Panasonic QuintrixF TX-29AS1D operating instructions

Samsung 4 Series Quick setup guide

Samsung

Samsung 4 Series Quick setup guide

manuals.online logo
manuals.online logoBrands
  • About & Mission
  • Contact us
  • Privacy Policy
  • Terms and Conditions

Copyright 2025 Manuals.Online. All Rights Reserved.