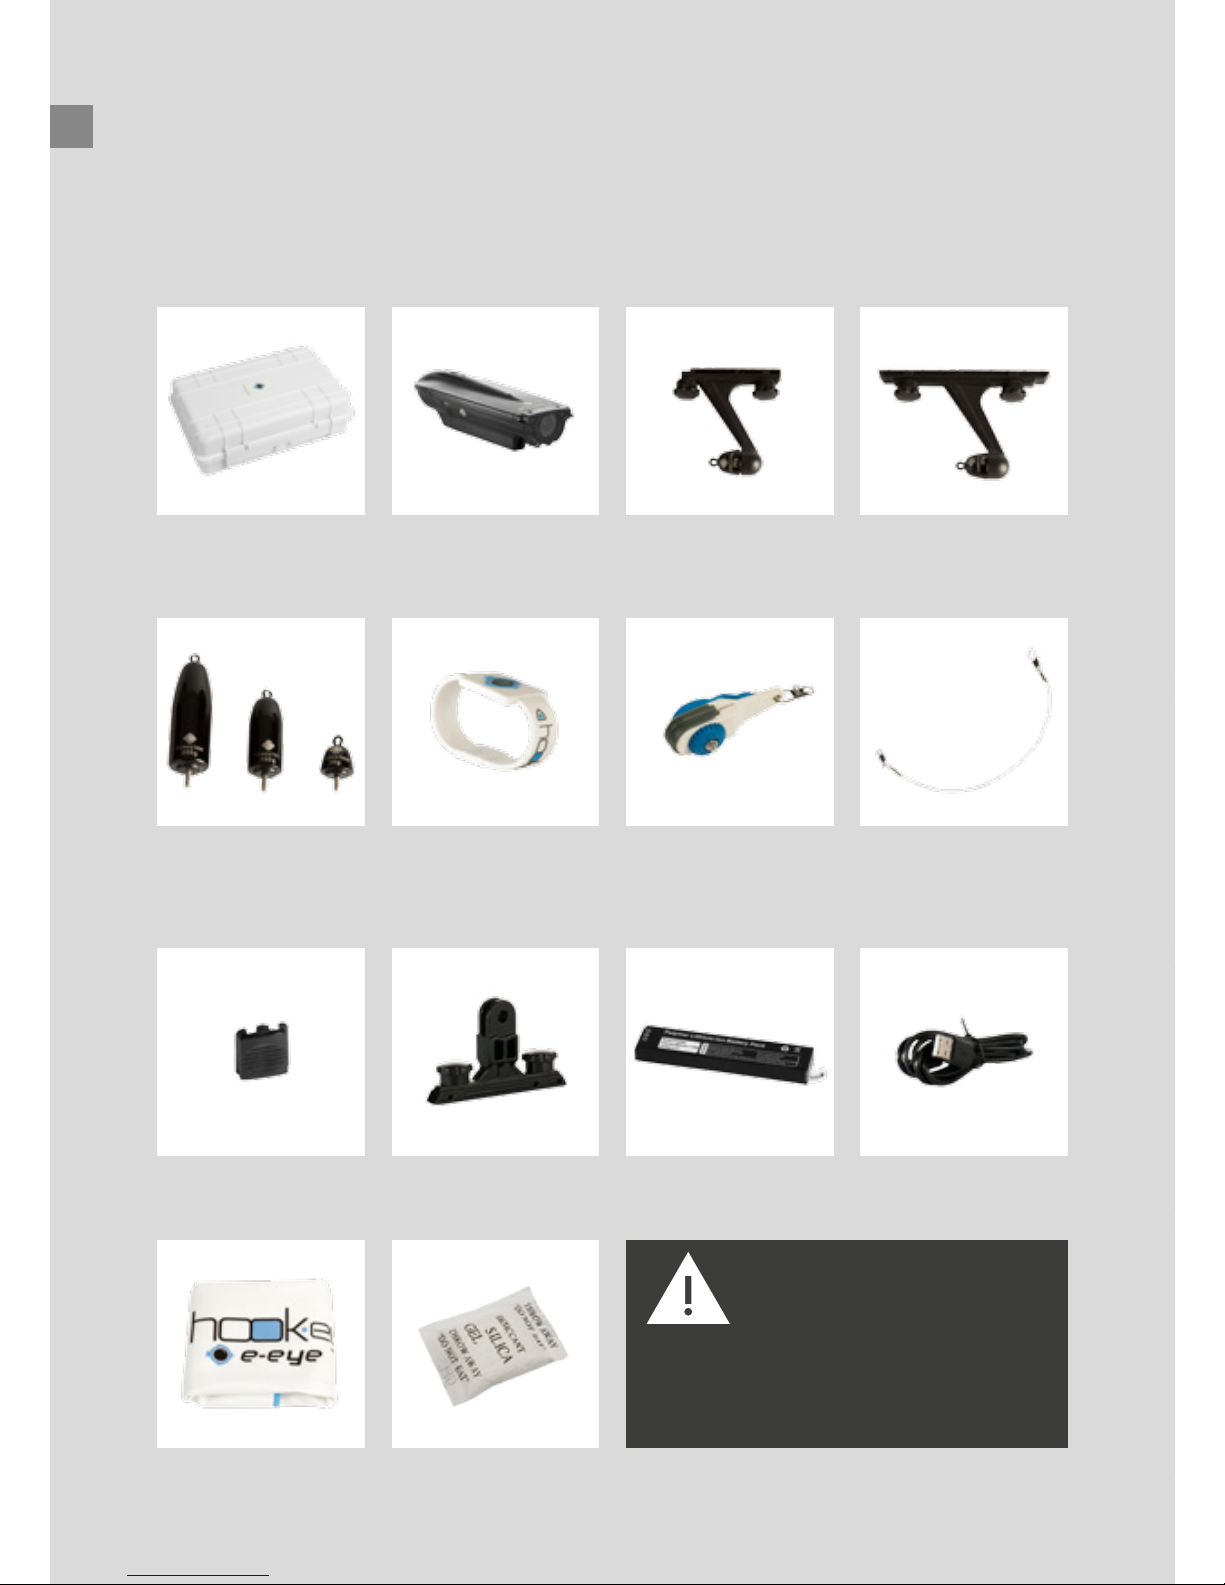
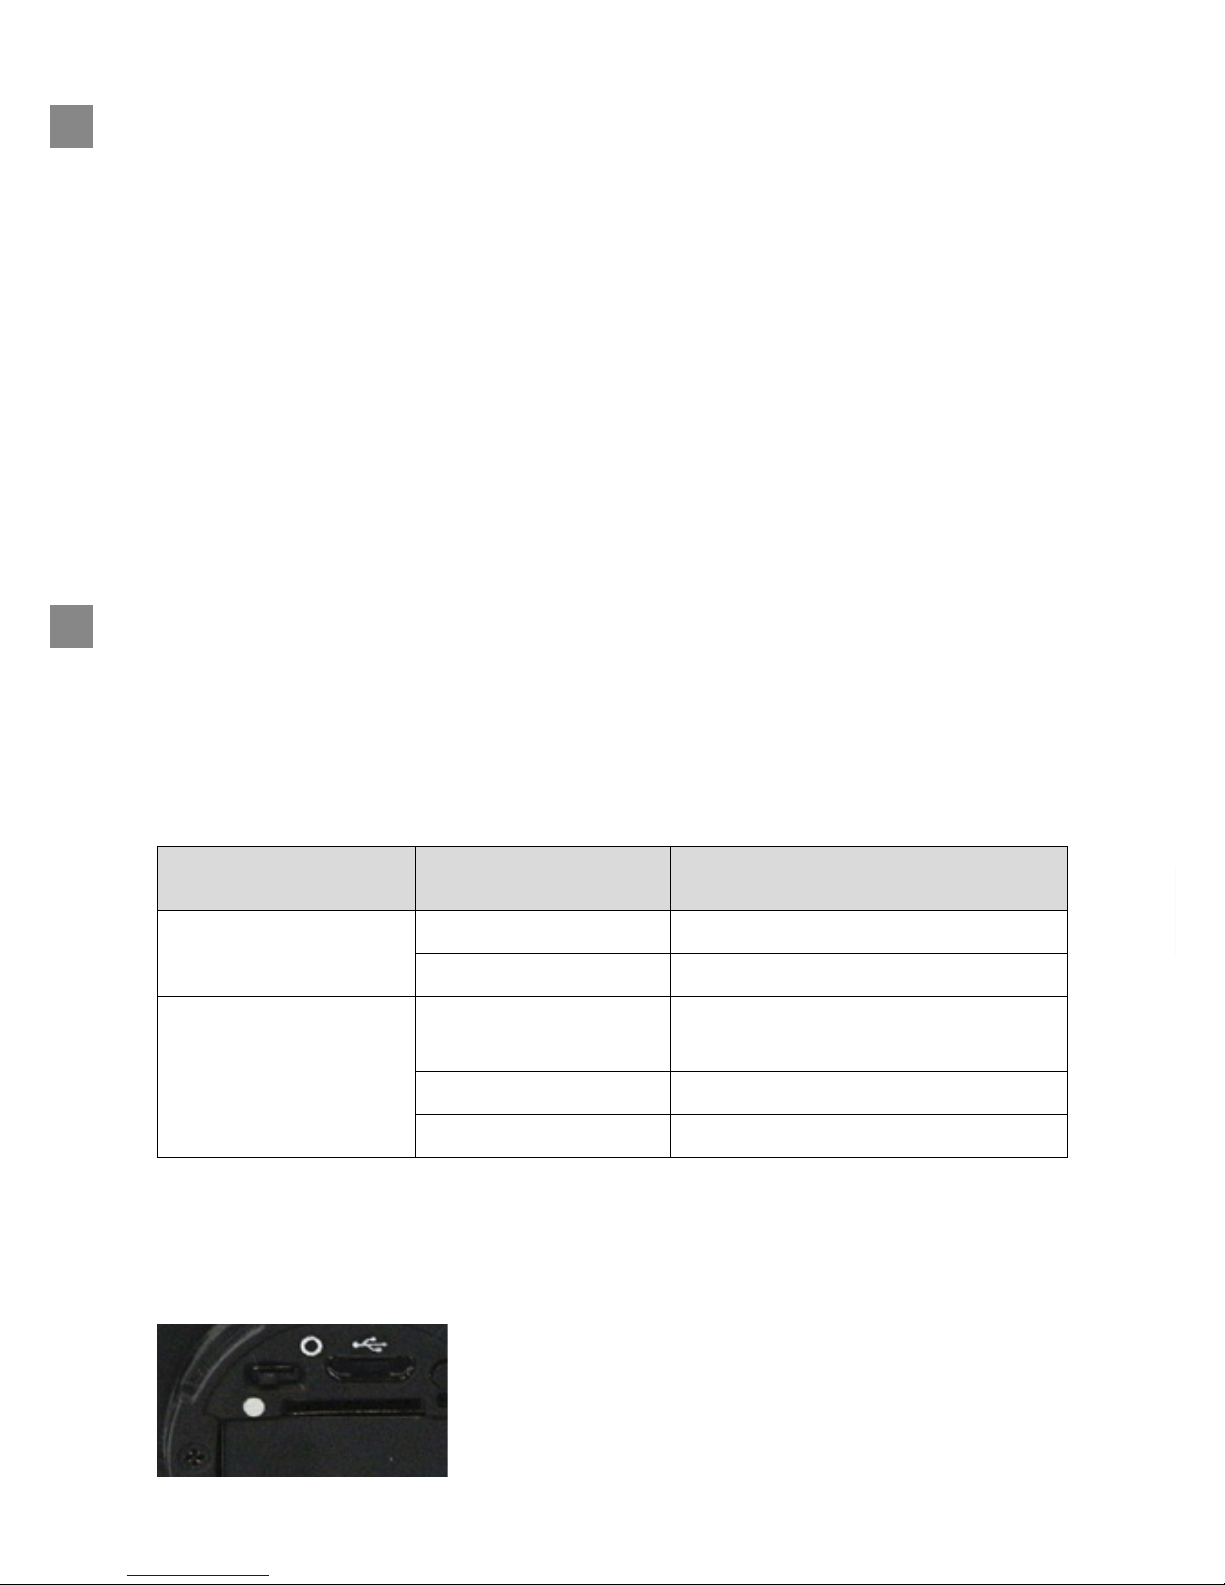
e-eye HOOK-EYE User manual

English
HOOK-EYE
User’s Manual
Download the updated
manual and access all functions on
support.hook-eye.us

2
CONTENTS
Introduction
Package 3
Items check list 4
Quick Start guide 5
Settings
Video mode 10
Digital Image Stabilization 10
Loop Recording 11
Other Settings 11
Anatomy of the Product
Front
Smooth Pad
6
9
Back
USB
7
9
O-Ring Holder
Micro SD Card Slot
8
9
Front Panel
On/O Button
Battery
8
9
10
1
2
3

3
INTRODUCTION
Congratulations for your purchase.
Hook-Eye is the revolutionary Sportshing Underwater Camera
designed to shoot high-denition videos and capture fast action
even in extreme conditions, such as Marlin ght. Attached to any
standard wire and monolament leaders, Hook-Eye can deliver
unprecedented images of the strike and the ensuing ght in full
HD. Thanks to an adjustable centerboard equipped with dierent
sized tungsten sinkers, the cam can be trolled up to 10 knots
speed while remaining very stable. Its rugged body, the absence
of external buttons and the double o-ring seal allow it to withstand
high pressure and reach an operating depth of more than 400 feet
(120 meters).
Hook-Eye believes in being responsible to the environment. The
packaging is made to be used as a oating waterproof accessory
case and comes free with your purchase. The case contains the
camera and the quick-start guide. Nothing gets disposed in the
environment.
Packaging Includes :
• Hook-Eye camera
• Battery pack
• Standard Centerboard
• Marlin Centerboard
• 30,100,200 grams sinkers
• Line clip
• Universal accessory connector
• Hook Eye bracelet
• Waterproof Floating Case
Microber Cloth
Use the cloth to dry the camera each time you get it out of the
water before opening it. Before using the microber cloth for the
rst time it is recommended to rst rinse it. Wash separately.
Packaging

ITEMS CHECK LIST
What is included in the package
Anti-Shock Floating
Waterproof Case
1 Hook-Eye
Sportshing Cam
1 Centerboard
for heavy duty
(3mm shing wire)
1 Centerboard
for light tackle
1 Sinker 30 grams
1 Sinker 100 grams
1 Sinker 200 grams
(tungsten)
1 Wristband Magnet 1 Steel Cable1 Line Clip
1 Smooth Pad 1 Universal Accessory
Connector
1 LiPo Battery Pack 1 USB Standard Cable
1 Microber Cloth 1 g Silica Gel
WARNING
Small components: keep away from
children.
Do not leave Hook Eye under the sun for a long
period. Do not use Hook-Eye at depths which
exceed 400 feet.
If you see water inside the camera after an high
depth immersion do not attempt to open it.
4

5
QUICK START GUIDE
1. Open
Log In to www.hook-eye.us to register and
access all functions. Open the camera: twist
the upper part of the camera in order to open
it. Check that the battery is locked in position.
2. Check Status
Insert the Micro SD into the camera (we
recommend a Class 10 SD). Check the Led
Lights Status: leave on (switch on the left side)
if you wish that they automatically switch on in
case of low light condition.
4. Start Recording
Start recording by pressing the button or
placing the BRACELET magnet ON THE ICON
until vibration and orange led ash.
When the green light is ashing, the camera
is recording.
5. Download Video
After recording, to download the videos on
your computer simply connect them via the
included USB cable and access your les.
Share your best videos with your friends on
social networks!
3. Attach Hook-Eye to the shing line.
Pass the line in the channel below the camera
and insert the appropriate centerboard. Use
Marlin centerboard for shing line of more
than 2 mm. Press and slide to insert or remove
the centerboard.

6
ANATOMY OF THE PRODUCT / FRONT
1. LED Lights Switch:
Left On / Right O
2. Slot USB Micro B
(Samsung)
3. Camera Switch Button
4. Micro SD Card Slot
5. Battery Slot
9. O-Rings

7
/ BACK
6. LED Lights
7. Camera Lens
8. Status Light

8
O-RINGS
The double O-ring on Hook-Eye guarantees the camera to be waterproof.
ATTENTION
Dirt and fragments on the O-ring’s may compromize the camera water tight,
letting water enter
into the camera, damaging the device.
THIS KIND OF CAMERA DAMAGE IS NOT COVERED BY THE WARRANTY
Must always check the O-ring’s cleanliness, if damaged please replace with
an original one.
In order to clean it, use your nger wet with clean water or saliva. Do not
attempt to use salt water.
All Hook-Eye products are tested for endurance and quality.
Led Lighting System (6)
Hook-Eye has a smart integrated LED lighting system.
FRONT PANEL
The front panel contains Status LED, the slot SD, USB, on and o button
and battery.
Status Led (8)
The dual led indicates the current Hook-Eye operating status. One led is
located on the front panel, the other just below the lens on back end.
Action Led indication State
IN USE Green Flashing Recording
Red Flashing Out of batteries
IN CHARGE
Red Steady SD Card not present
or to be formatted
Red Flashing Charging
Green Steady Charge Completed
Position 1 (left): this position allows Hook-Eye to
automatically switch On and O the LED’s when needed.
Position 2 (right): this position powers o the LED.
Please refer to the setting le section for more details.

9
USB
The USB connector allows you to charge the camera’s battery and
download your videos into the computer. Connect the cable to the camera
plugging it into the USB slot (2).
MICRO SD SLOT
The Micro SD Card Slot (4) allows you to use standard memory cards up
to 32GB.
SD card formatting
It is recommended to keep your SD cards formatted and updated in order
to avoid any damage originating from the le system.
If you see steady red light and power on it means a SD card problem please
proceed to formatting.
In order to format the SD card please keep pressed the power button until
you see red light ashing, then key up for few seconds then press again
until the red light stop ashing and stays steady on.
The red light will ash slowly until format completion. Once the formatting
has occurred the led will switch o.
ATTENTION
Formatting eliminates any data in the SD card.
SMOOTH PAD
The upper smooth pad allows the user to get a completely smooth and
obstacles free Hook-Eye surface when using the lower hook for the shing
line, in order to avoid an accidental shing line break.
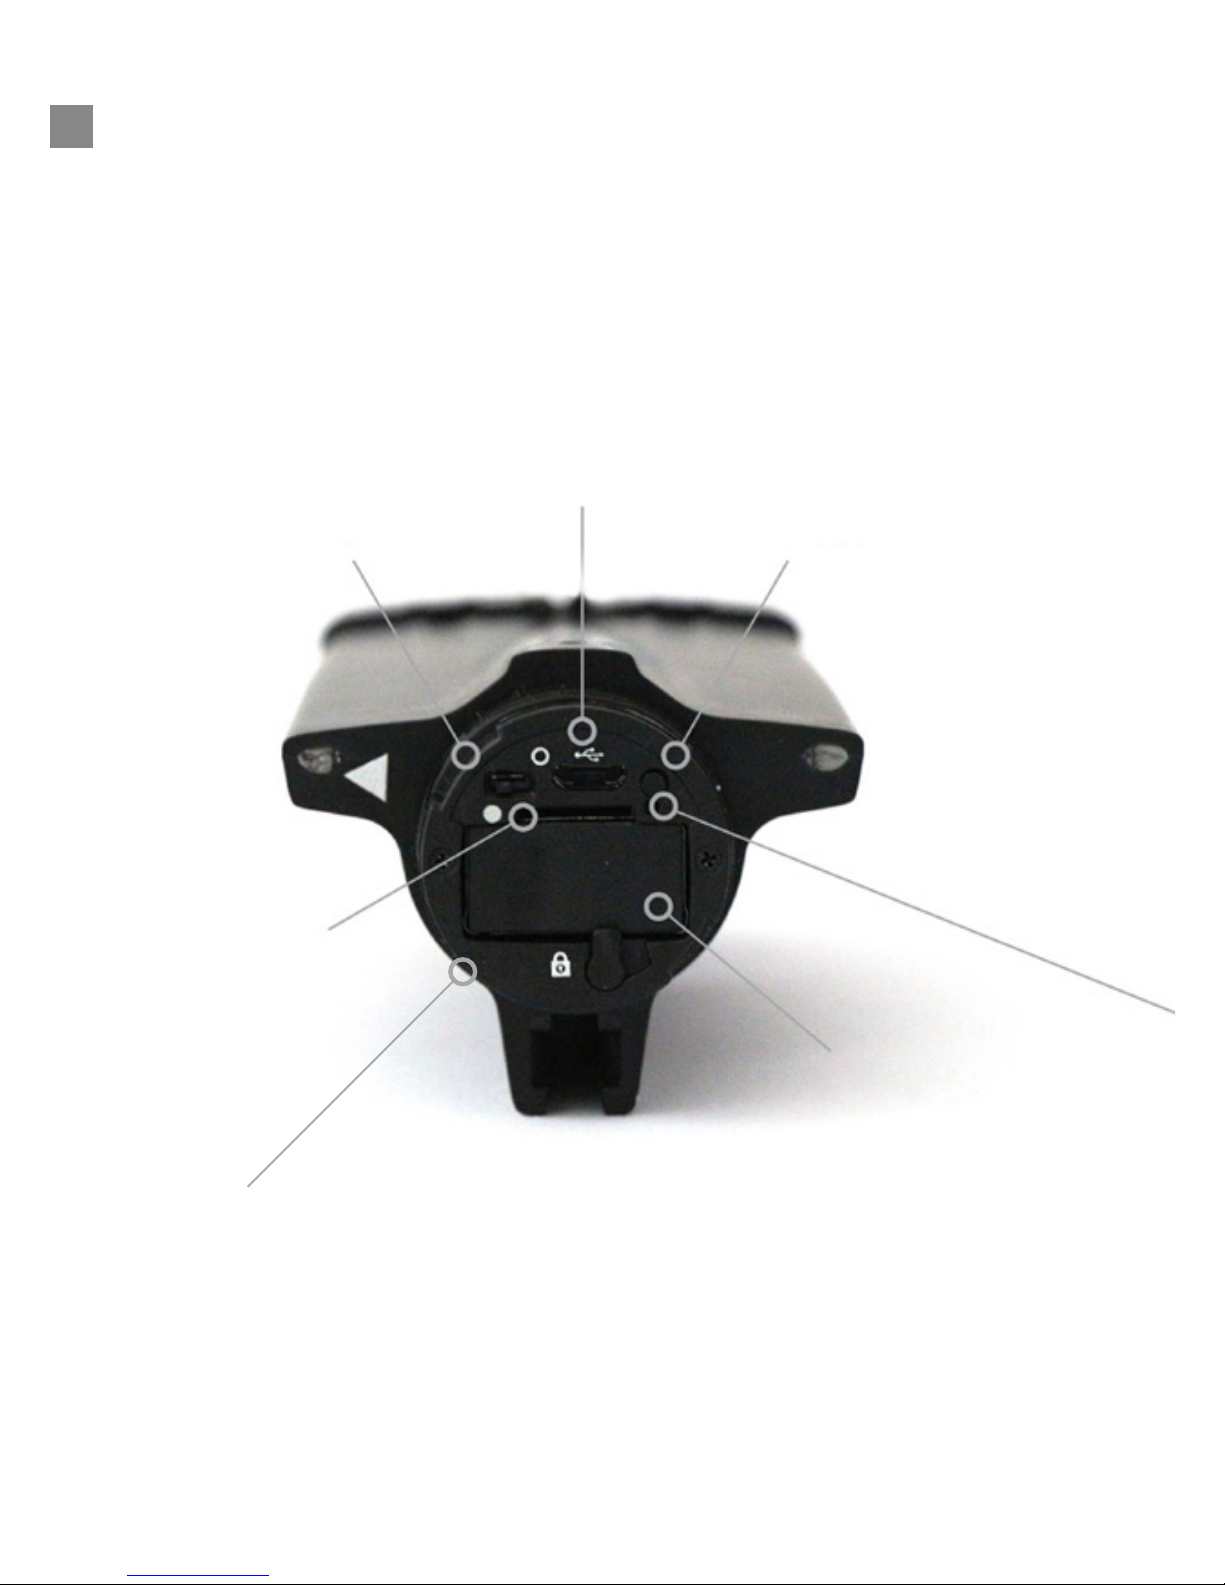
ON/OFF BUTTON
Hook-Eye is a “One Button Camera”, that means that you only have to press
one button to start recording and power o the camera.
The Button is located on the front panel (3), but if you want to operate Hook-
Eye without open the cap there is a magnetic sensor on the left side of the
camera body, indicated by the icon.
Placing our wristband magnet on the icon or pushing the button have the
same eect.

10
SETTINGS
Hook-Eye is an extremely easy to use camera with a simple on and o touch
command. One single command to start and stop recording as well.
Hook-Eye is designed to make the usage of the camera easy and simple
and allows you to be fully concentrated in your shing action.
Settings proles are stored in SD card, we recommend you to have few SD
cards with dierent saved proles on to quick switch between them. The
camera will use last valid setting parameters if no setting le is present on
SD root.
We invite you to visit our settings proles library in our website
support.hook-eye.us
and download the last one created by our expert
shing sta.
NOTE: formatting will erase setting le too!
Video modes
Video Mode Resolution Frame rate Description
1 1920 x 1080p 30 fps Full HD NTSC Video
2 1920 x 1080p 25 fps Full HD PAL Video
3 1280 x 720p 30 fps HD NTSC Video
4 1280 x 720p 25 fps HD PAL Video
5 1280 x 720p 60 fps Slow motion NTSC HD video
6 1280 x 720p 50 fps Slow motion PAL HD Video
Digital Image Stabilization
Hook-Eye has a digital Stabilization system useful when vibrations may arise.
Value Eect
OFF Normal Video
ON DIS Active
BATTERY
Hook-Eye uses last generation LiPo battery.
Please do not expose the battery to the sun or to the water. Keep battery
and cables dry. Always check that the battery slot (5) is locked.
First Use
Hook-Eye’s battery comes partially charged. We suggest to re-charge it
completely before the rst use.

11
Loop Recording
Hook-Eye keeps saving new data automatically canceling old data in your
SD card even if memory is full.
You can deactivate this mode and the data will stop saving as soon SD is full.
Value Eect
1 to 5 Loop recording in fragments of specied length,
old les are deleted when memory full
0Normal Recording
White Balance
Hook-Eye’s video quality system provides a white balance AUTO set and
adjustable values to match any light conditions.
Shutter Speed
Low – Medium – Fast.
Denoise
Video Noise Filter: ON/OFF.
Stealth
When set to ON the camera records without green ashing light.
Sleep Mode
You can set minutes of standby between each le in loop recording.
Exposure
Hook-Eye exposure control can be fully automatic in AUTO mode or
manually set with an oset from -2 Fstop to +2.
Invert
Hook-Eye can record video upside down when invert is ON to allow inverse
mounts.
Name Prex
Hook-Eye is compliant DCF standards, ling the videos into the folder
NNNE-EYE under the name of XXXXNNNN.
XXXX is the name prex and NNNN the le number. By setting the name
prex is possible to use dierent le names prexes for dierent cameras.
Date & Time
Hook Eye can be set by a single click on the exact date and time, just enter
in our website and reach the time tool.
ATTENTION
Date & Time will be updated in the camera rmware when disconnected
from computer.

info@hook-eye.us
www.hook-eye.us
© E-Eye Inc. 2017
Table of contents
Popular Digital Camera manuals by other brands

Marshall Amplification
Marshall Amplification CV355-30X-NDI user manual

Panasonic
Panasonic DC-GH5M2BODY user manual

Sony
Sony Cyber-shot DSC-S5000 instruction manual

Ricoh
Ricoh pentax KP operating manual

Insta360
Insta360 FarSight User and safety guidelines

Meiji Techno
Meiji Techno HD1500MET-AF quick start guide