E-one clinic User manual

User Manual
2
TABLE OF CONTENTS
PROHIBITED HANDLINGS
USING THE ACCESSORIES
MAINTENANCE
MARKINGS
ERROR MESSAGES
STANDARDS
SHOWROOM
WARRANTY CONDITIONS
CHANGING THE CARTRIDGE
RETURNING USED CARTRIDGES
SOFTWARE OPTIONS
HAIR REMOVAL WITH THE
PACKAGE CONTENTS
PRECAUTIONS FOR USE
GLOSSARY
INFORMATION PROVIDED BY
TOUCH SCREEN
4
8
12
14
18
44
46
32
40
38
48
50
52
53
54
55

3
Dear client,
You have just purchased an and I thank you for your cus-
tom.
Habits change and is evidence of this. You can now
safely have access to a hair removal technology that uses pro-
fessional quality pulsed light in the comfort of your home.
I have personally ensured that the utmost attention be paid to
the implementation of each ; you will see, that is
an exceptional product.
I hope that you will be completely satisfied with your
and that you will share your experience on our company’s offi-
cial website at www.e-swin.com.
Yours Sincerely,
Yves Vincent Brottier
Creator of
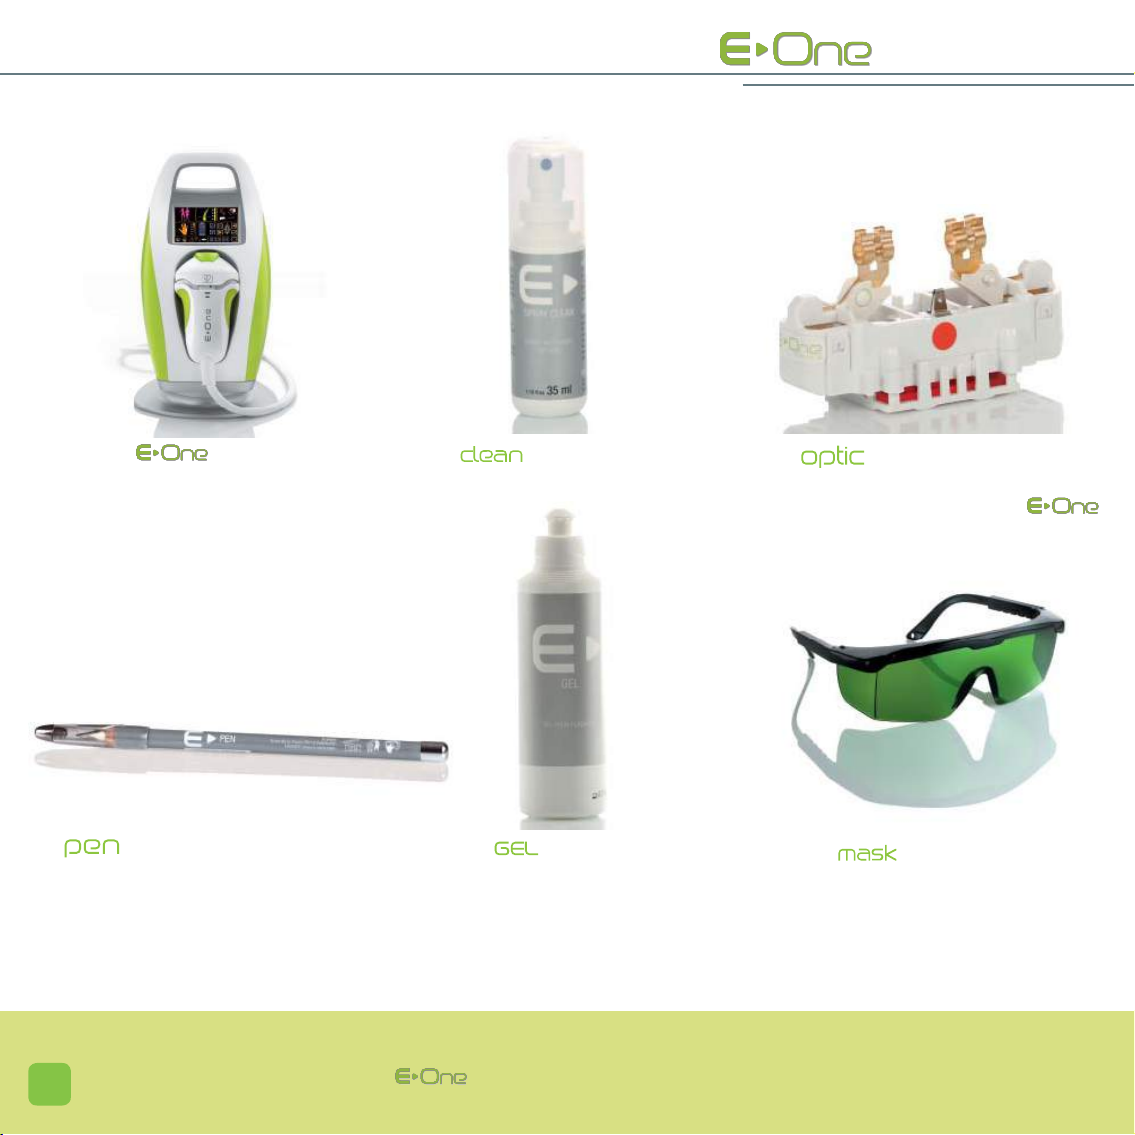
1 - optical Spray
See details on page 43.
4
WARNING:
Using the is exclusively restricted to use at home and
must not be used for professional purposes.
1 Base and applicator.
See details on pages 12-13. 1 with filter included -
consumable cartridge and its optical filter
(included in the applicator of your ).
1 - pencil of work and sharpener.
See details on page 42.
1 -working gel.
See details on page 42. 1 - safety glasses.
See details on page 42.
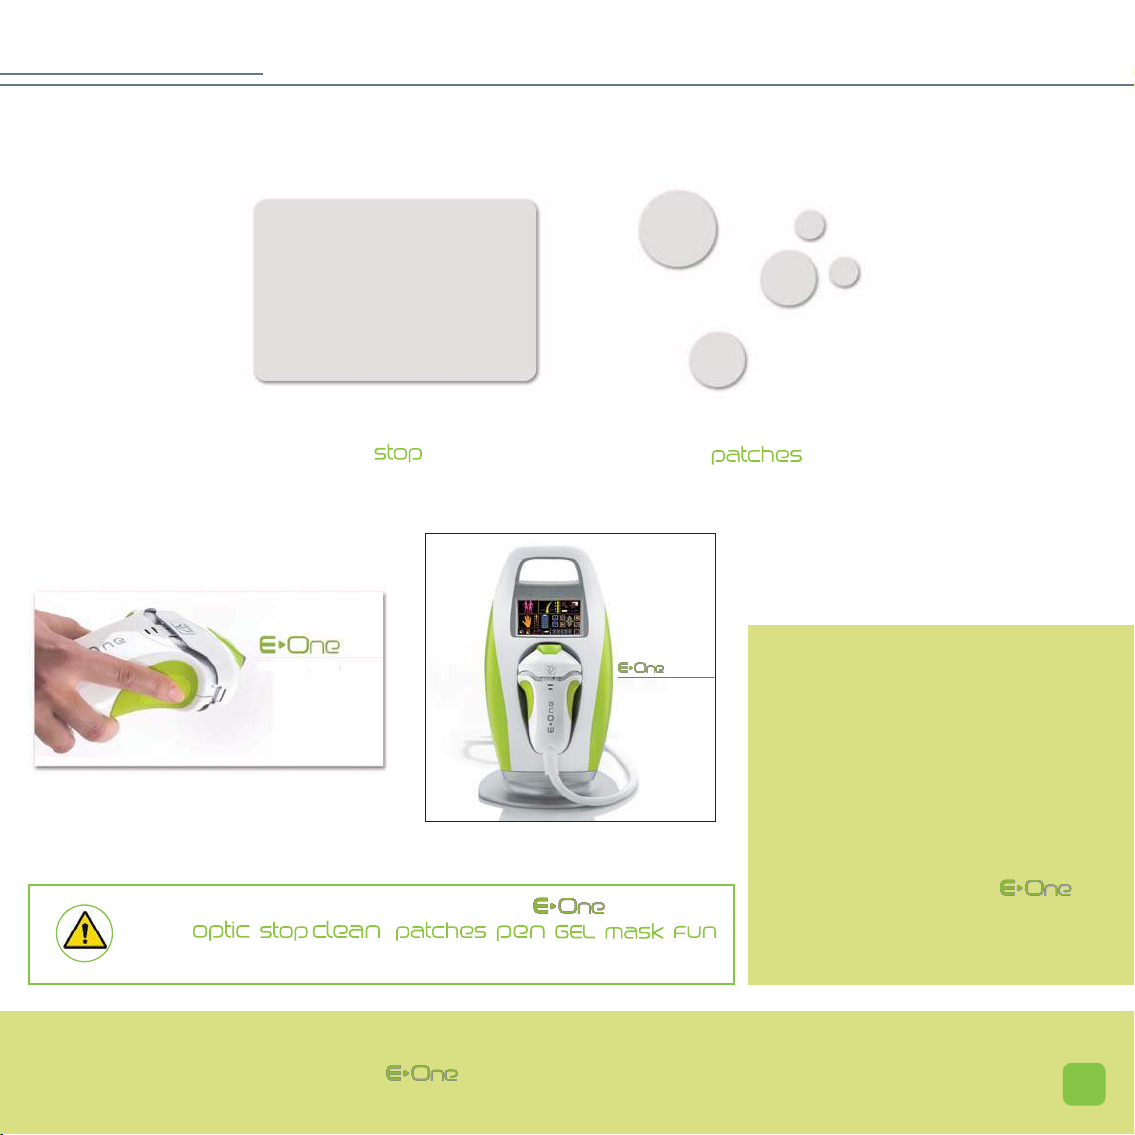
1
Guide plate.
See details on page 42.
1
self-adhesive patches.
See details of page 43.
Hair removal follow-up
1 Hair removal follow-up.
User Manual
Clinic
1 user manual.
1
5
All manufacturer’s warranty will be voided if the device is used for professional purposes or if the optic cartridges
are used at an abnormally high rate. An device that has lost its warranty will not be able to recover it
REMINDER: Only E-Swin is authorised to sell and its acces-
sories: , , , , , , , ,
etc. on its own website www.e-swin.com.
CAUTION:
YOU MUST KEEP ALL THE ELEMENTS
OF THE ORIGINAL PACKAGING
(BOXES, PACKAGING ETC.).
The manufacturer’s 2 year warranty will cover
parts and labour only if the device is returned
with all its elements in its original packaging.
You must therefore carefully maintain the entire
original packaging in which your was
delivered to you.

7

8
FOR YOUR SECURITY
Before using your please read the following information carefully:
USAGE PRE
• Voltage: 100 -240 V.
• Nominal frequency: 50-60 Hz.
• Maximum power consumption: 240 VA.
• Make sure that the voltage corresponds to that of your installation. Any improper
connection may cause permanent damage not covered by warranty.
• Make sure that the power outlet to which you are connecting your is
undamaged, in perfect working condition and that it does not interfere with the proper
use of your (the power outlet must be easily accessible).
• This device is intended for personal use at home only and not for professional purposes.
• Do not unplug by pulling the cable of the .
• Never use with wet hands.
• must never be used in the shower, bath or in any place where water can
splash the device (applicator or base).
• Never immerse the base of , its applicator or the cartridge in water.
• Never use if damaged, never use in case of a functional anomaly appearing
on the touch screen, or following a fall (non-visible damage can be detrimental to your
safety).
• This device can be repaired only with special tools. For any problems after delivery,
please contact us on our website www.e-swin.com through your personal page.
• cartridges and, more generally all accessories, must be ordered only via our
website www.e-swin.com, in the “Customer” section, “New Order of accessories”. We
disclaim any responsibility for the use of consumable cartridges and accessories from
another manufacturer.
Only people who can read and understand this user manual are authorised to use the .

9
CAUTIONS
• When using the device, make sure to place it on a flat surface, in a place where the
potential of a fall can be avoided.
• E-Swin SAS disclaims any responsibility for any damage resulting from improper
use of the device or use other than described in this manual.
• One pair of safety glasses ( ) is provided with the device: these glasses must
be worn at all times when using the device. If other people are around you when
using the , they should also wear the glasses .
• When the is being used, it must not come into contact with hair, the
periocular region delimited by the safety glasses (for example: eyebrows
and eyelashes must never be flashed with ), clothes or any other object, so
as to prevent all risk of injury, blockage or impairment.
• The applicator tip must not touch the at the time of the flash.
• Never use near an aerosol, a heat source, or any other electronic devices.
• Do not stack on top of other electrical devices.
• Your is provided with a power cord (2 meters long) and an applicator cable
(2 meters long). Do not use any extension cables or any cable other than those
provided by E-Swin SAS, as this could render the equipment non-compliant from an
electromagnetic point of view.
• The wireless communication equipment must be kept away (about 3 meters) because
they may interfere with the proper functioning of the device.
• The device must be installed in an environment unpolluted by electromagnetic
Only people who meet the criteria for use as described in this manual are able to use
the on their body.

NEED HELP?
To contact our sales department or technical support, please visit your personal customer space
on www.e-swin.com, and click on “Contact us and After Sales”.
10
DO NOT USE
• If you are pregnant or have diabetes.
• To treat white, grey or red hair. Specifically, certain people are born as red phototype
I (red hair type). As adults these people may experience a reduction of this essentially
orange colour. However, the melanin structure of this hair retains characteristics that
render light technologies ineffective for hair removal.
• On very dark skin or black skin (please refer to our website www.e-swin.com, “Clinic”
section).
• On an injured, burned, or infected skin.
• On skin that has been sunburnt and whose recovery time is less than one month.
• On skin lesions of unusual aspect, you must first have a medical consultation with your
doctor.
• On high-risk areas (blemishes, birthmarks, warts, unhealed wounds...).
• On moles: if they are located on the zone to be treated, they must first be protected,
specifically by covering them with the self-adhesive provided with your
.
• On tattooed areas: permanent makeup (e.g. lip tattoos) or cosmetic tattoos, whatever
their colour. If this is the case, use the delimitation plate that came with your
.
• Any use of by an under aged person must be performed under the supervision of
an adult.
• Always store away the after each use, out of reach of children. Unplug the power
cord in its original bag, and wind back the applicator cable around the applicator support
cables provided for this purpose.
USAGE PRE
PEOPLE SUFFERING FROM HIRSUTISM
has been certified for its use in case of hirsutism (hormonal or idiopathic). 11
• If you have a skin condition (eczema, inflammation, acne...).
You must only use the pencil of work , the gel , the self-
adhesive patches , the guide plate and the safety
glasses provided with your . The use of any other
products may cause skin burns.
Cautions regarding UV:
Artificial UV in a beauty parlour: you should take care about when using and
also using artificial UV radiation.
Regarding high pressure UV dispensed by high powered machines, it is advisable to
wait a few days before or after such a session before starting treatment with .
Natural UV: when exposed to sunlight after a treatment session with the , it is
imperative to use a sunscreen of very high protection on the treated areas for 2 weeks
following the session.
Self-tanning products:
Do not use if you have applied a self-tanning product on the area to be treated;
wait until the effects of the self-tanning product have disappeared completely before
using .
CAUTIONS
GLOS
12
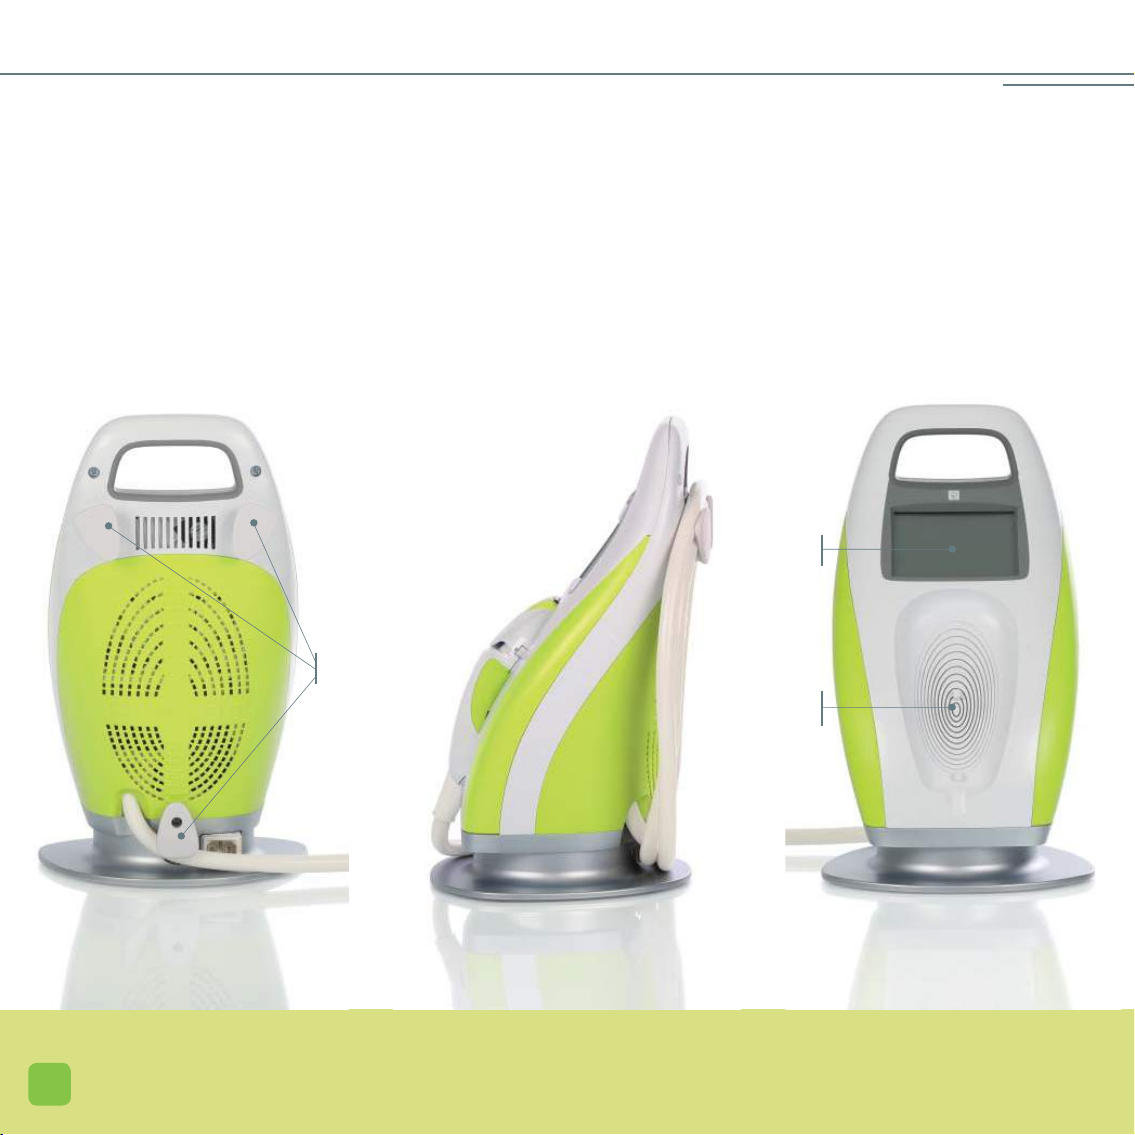
THE BASE
Applicator
Colour
touch screen
Applicator
support area

SARY
13
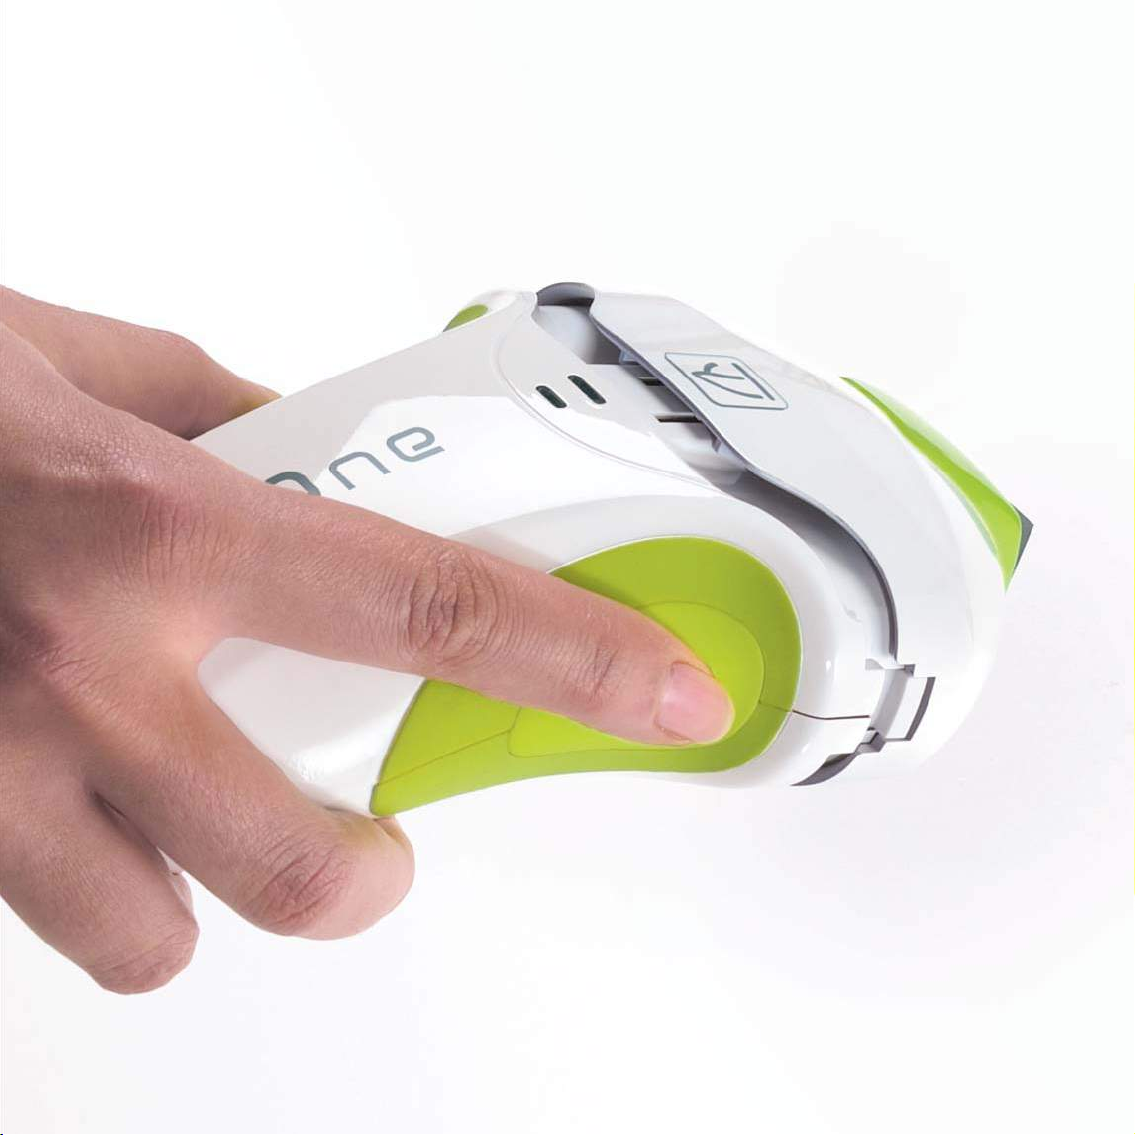
THE APPLICATOR
Tip of optical
guide
Lower
casing
Air
vents
Mobile head
Mobile head locking
tab
Start
button
Flash
availability
Upper
casing

6
8
201918171615
ON / OFF OF THE DEVICE
1On / off switch.
AREAS OF SAFETY ICONS
2Take care not to splash the device with water, use near
water or immerse in water. Projection of water on any part of
the device is strictly prohibited.
3must not be used in certain physiological or med-
icated contexts (pregnant women, photosensitive drugs...).
4Reading this instruction manual before using is
mandatory.
5Wearing the safety glasses ( ) is mandatory.
HOW TO PROGRAMME A HAIR REMOVAL SESSION
6Silhouette of man / woman. This area allows you to
choose
between “woman” and “man.”
7Thickness of the hair. This area allows you to select the
thickness of the hair, from the thinnest (bottom) to the thick-
est (top).
8Skin colour.
This area allows you to select the colour of the skin, from the
lightest (bottom) to the darkest (top).
9Level of intensity.
The gauge represents the 6 levels of intensity of the issued
flash. The arrows adjacent to this gauge enable you to
increase or decrease the level of intensity.
10 Pause. This icon is displayed on the touch screen through-
out the duration of the hair removal session. Pressing on it
allows you to put the device in pause mode.
11 Play. Enables you to cancel the pause mode and to resume
the hair removal session.
14
INFORMATION PROVID
THE BASE OF THE IS
For Access version, the

7 4 5
2 3
12
14
13
119
10
22 121
15
ED BY TOUCH SCREEN__
EQUIPPED WITH A TOUCH SCREEN
screen is monochrome (without any color)
BROWSING AREA
12 These buttons enables you to move from one character to
another (22), and to increase or decrease the digits of each
character.
13
Go back to the previous menu. This icon enables you to
modify any selection made previously. It is available only when
icons 16 and 20 have been selected.
14 Validation of input data (
22
).
INFORMATION IN REAL TIME
15 Volume activation / deactivation.
16 Lock / unlock. This icon enables you to secure your
with a PIN code.
17 Warning. A number is displayed on the touch screen when
this icon is active; it corresponds to an error message (see
page 52.)
18 Detection of the activation card (this icon is only
visible in case of RC and RC Multi).
19 Temperature of the applicator. This icon is not active dur-
ing normal functioning of the device. If it blinks, please refer
to the corresponding error message (page 52).
20 Cartridge tube. When it blinks, it means that you can issue
a flash. Clicking on this icon enables you to enter the 2 succes-
sive activation codes of a new cartridge (this does not concern
the RC and RC Multi).
21 Numbers 1 and 2 correspond to the 2 successive
activations codes that need to be entered when changing
the
cartridge (
this does not concern the
RC
and RC Multi).
22 All these characters enables you to enter the cartridge
activation codes, the secure PIN code of , and also
to display the remaining number of flashes at any moment.

18
BEFORE EACH USE
REMOVING HAIR WITH
123
• Check the power cord (must not be pinched or crushed, wire must not be bare).
• Check the cable connecting the base to the applicator (no visible impairment).
• Check the external optical parts of .
> Check that the glass tip of the applicator (optical guide) is intact, and if this is not the case (if the opti-
cal guide is cracked or chipped), changing the whole mobile head is essential. Ordering this part is possible at
www.e-swin.com * (go to “Customer Centre “, “New Order of accessories” then “mobile head applicator”).
• Verification and maintenance of the internal optical parts.
- In all cases, the device must be unplugged before you start disassembling the mobile head.
- Before each use, and before plugging-in the , you must check the integrity of the internal optical parts: tube,
filter (flat red piece of glass), and optical guide. The filter must be cleaned systematically before each hair removal
session with the . It must be clean and free of dust.
To proceed to the verification code:
> Press simultaneously on the 2 locking tabs of the mobile head, and remove it (1).
> Delicately place the mobile head on a flat surface.
Once you have completed your treatment, you must wait for the fan to come to a complete stop (it
may take more than 10 minutes), before switching it off and unplugging it. This procedure enables the
internal optical parts to cool down. The other fans, located in the base of , will only stop once
the device is unplugged.
VERIFICATION
S
S
S
S

19
THE ______
4 5
6 7
8 9
10 11
12 13
• Removing the cartridge with filter (video available
on your personal customer page).
> Once the mobile head is removed, the cartridge
with filter is then visible in the applicator (2).
> Remove the cartridge from the applicator: press fir-
mly on the filter support (3) and pull (4). The
cartridge with filter now presents itself to you (5); it is
imperative to hold it only by the plastic parts.
• Cleaning of the internal optical parts.
> Once the filter cartridge is removed, the transparent
optical glass is also accessible (6).
> Using the spray : spray it on a lint-free cloth
beforehand (7).
NOTE: Never spray directly on the optical parts.
> Afterwards clean only the accessible side of the filter
with this cloth (8). Repeat the same procedure for the
accessible part of optical glass (9).
NOTE: The filter must never be separated from its
cartridge.
> When cleaning is complete, take the cartridge
and align it with the applicator with the help of the red
dots (10). Push it into the slide way of the applicator by
pressing on it (11), so as to ensure that it is properly in
position (12).
> Re-attach the mobile part of the applicator by pres-
sing simultaneously on the locking tabs of the mobile
head (13), making sure to align the internal red dot of the
head with the red dot of the applicator.
NOTE: For better efficiency of the , t is recommended to clean the filter before each use with the spray
provided when you purchased the . Any damaged filter due to non-compliance with the
procedure for use is not covered by the manufacturers warranty.
S
S
S
SS

20
HAIR REMOVAL WITH
T
STEP 1
CHOOSING THE BEST TIME TO USE THE
If your previous hair removal method was:
- Razor:
You can use the immediately.
- Depilatory creams:
You should only use the
1 week after your last
depilatory cream treatment.
- Waxing, electric epilator, tweezers:
You should only use the 3 weeks after your last
depilation treatment.
- Laser technology, flash lamp or other method:
You should only use after hair re-growth has star-
ted.
STEP 2
PREPARE YOUR SKIN
• Your skin should be clean, dry and free of any cosmetic
product.
• Do not apply any cream, moisturiser, oil or any other
substance on your skin.
• Shave the area to be flashed on the same day of the ses-
sion with .
It is imperative that the areas of the skin to be flashed are
completely free of all hair by shaving (and not by waxing,
depilation cream, electric epilator or by any other hair
removal procedure). Shaving must be done preferably on
damp skin in order to reduce the aggressive effect of the
razor.
• Rinse your skin with water. After shaving, the skin should be
thoroughly rinsed to remove all the hairs that have been cut.

21
STEP 3
STARTING AND SETTING UP YOUR
REMINDERS:
The definitions of the icons are indicated on pages 14 and 15.
Your is already equipped with an Optic cartridge.
Therefore you do not need to enter any activation code to run
your device.
• Connect the to its power cord.
issues 3 beep sounds; the screen is black (screen A).
Just press anywhere on the screen to enable all icons to
appear (screen B). These icons are explained on pages
14 and 15. The menus are displayed temporarily. Only the
safety icons keep blinking.
• Unlock the safety features (screen C).
It is mandatory to validate each safety feature by pressing
one by one on each safety icon (the order of validation does
not matter).
Once all the safety icons are validated, all the other settings
icons for the flash will be available.
If an icon has not been validated, it will continue to
blink. You will not be able to set up or use your
so long as all the safety features have not been confir-
med and pressed.
A
B
C
T
HE ______

22
Very dark skin and black skin are not represented here
because they are not compatible with the .
• Setting up your hair removal session.
Simply give some information to each blinking icon to set
up your hair removal session. You do not need to press on
the validation icon to select each one of them (14). All the
settings must have been pressed to be able to use
. If one of them has not been selected, the icon will continue
to blink.
- IDENTIFY YOUR SILHOUETTE (screen D).
Select man / woman silhouette by clicking alternately on
the frame (6). The selected silhouette stays on the screen:
the other silhouette disappears.
- IDENTIFY THE THICKNESS OF THE HAIRS TO BE
REMOVED (screen E).
Choose the thickness of the hair (7), among the 4 thic-
knesses of hair proposed, from the thinnest (bottom) to the
thickest (top).
- IDENTIFY THE COLOUR OF THE SKIN (screen F)
Choose the colour of the skin (8), from the lightest
(bottom) to the darkest (top).
D
E
F
HAIR REMOVAL WITH
T
Other manuals for clinic
1
Table of contents


