manuals.online logo
Brands
  1. Home
  2. •
  3. Brands
  4. •
  5. Eagle
  6. •
  7. Amplifier
  8. •
  9. Eagle P660 User manual

Eagle P660 User manual

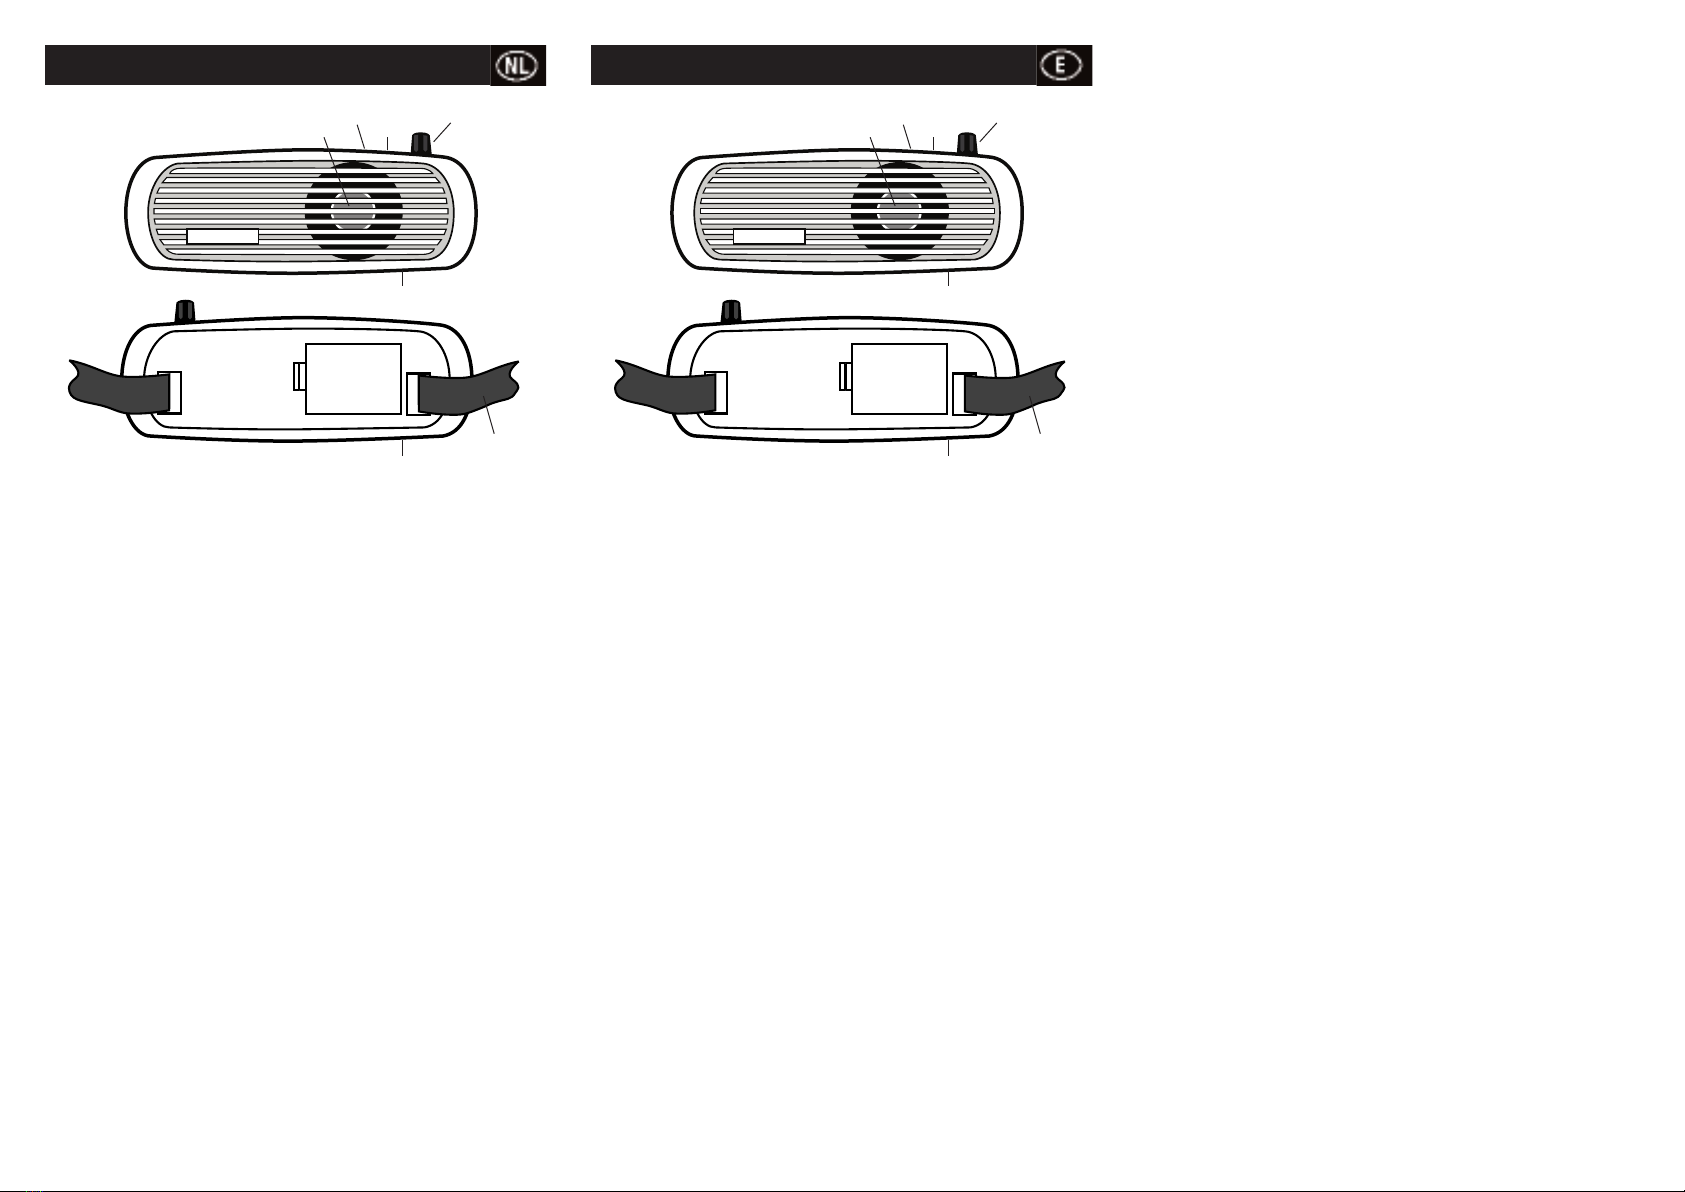
N/ FF/Volume control
LED Battery indicator
Headband microphone input socket
Loudspeaker
Nickel-cadmium battery charger input socket
Adjustable waistband
Battery compartment
Operation
1 Unclip and remove battery compartment cover . Insert 6 x ‘AA’ size alkaline
or rechargeable nickel-cadmium batteries, observing correct polarity as
indicated in the base of the battery compartment.
Refit the cover.
CAUTION: T e AC/DC adaptor supplied is for c arging Ni-Cad batteries ONLY
and NOT for use as an external power source for t e amplifier.
2 Put on headband microphone and position microphone head within a distance
of 13-25mm to mouth for best pickup and clarity.
Connect to microphone input socket .
3 Turn the volume control clockwise to power on the unit and indicator will
illuminate. Increase volume to desired level.
N TE:
(i) If feedback (howling) occurs reduce the volume level.
(ii) If battery indicator does not light, replace batteries or if Ni-Cad type
fitted, recharge using AC/DC charger supplied. Connect charger into
AC outlet and plug lead into CHARGER INPUT S CKET .
(See battery specification for charge time).
Specification
Power output . . . . . . . . . . . . . . . . . . . . . . . . . . . . . . . . . . . . . . . . . . . . . . .5W (max.)
Power requirement . . . . . . . . . . . . . . . . .9Vdc (6 x ‘AA’ alkaline or Nickel-Cadmium)
AC/DC charger . . . . . . . . . . . . . . . . . . . . . . . . . . . . . . . . . . . . . . . . . .Input AC 230V
utput . . . . . . . . . . . . . . . . . . . . . . . . . . . . . . . . . . . . . . . . . . . . . . . .DC12V, 300mA
Current consumption . . . . . . . . . . . . . . . . . . . . . . . . . . . . . . . . . . . . . . . .1.2A (max.)
Frequency response . . . . . . . . . . . . . . . . . . . . . . . . . . . . . . . . . . . . . . . .300Hz-5kHz
Weight (exc. batteries) . . . . . . . . . . . . . . . . . . . . . . . . . . . . . . . . . . . . . . . . . . . .350g
Dims . . . . . . . . . . . . . . . . . . . . . . . . . . . . . . . . . . . . . . . . . . . . . . . .200 x 73 x 48mm
Bouton Marche/Arrêt/Volume
Voyant de batterie
Fiche d’entrée micro
Haut-parleur
Fiche d’entrée du chargeur de batteries au Ni-Cad
Ceinture réglable
Compartiment à piles
Fonctionnement
1 uvrez le compartiment à piles . Insérez 6 piles alcalines ou batteries
rechargeables au Ni-Cad de type R6. Respectez la polarité indiquée au fond
du compartiment. Remettez le couvercle en place.
ATTENTION: L’adaptateur AC/DC fourni est prévu UNIQUEMENT pour la
c arge de batteries au Ni-Cad et NON PAS pour servir d’alimentation externe à
l’amplificateur.
2 Ajustez le micro à serre-tête de façon à ce que la tête du micro se trouve à une
distance de 13-25mm de la bouche afin d’assurer la meilleure qualité sonore.
Connectez le micro à la fiche d’entrée .
3 Tournez le contrôle de volume vers la droite afin de mettre l’amplificateur
sous tension. Le voyant s’allumera. Réglez le volume sur le niveau désiré.
N TE:
(i) Si un effet larsen se produit, réduisez le volume.
(ii) Si le voyant de batterie ne s’allume pas, remplacez les piles ou, en cas
de batteries au Ni-Cad, chargez les batteries au moyen du chargeur
AC/DC fourni. Branchez le chargeur sur une prise secteur et connectez le
cordon à la FICHE D’ENTREE CHARGEUR .
(Durée de charge, voir caractéristiques des batteries).
Caractéristiques techniques
Puissance de sortie . . . . . . . . . . . . . . . . . . . . . . . . . . . . . . . . . . . . . . . . . .5W (max.)
Alimentation . . . . . . . . . . . . . . . . . . .9Vdc (6 piles alcalines ou batteries Ni-Cad R6)
Chargeur AC/DC . . . . . . . . . . . . . . . . . . . . . . . . . . . . . . . . . . . .Alimentation 230Vac
Sortie . . . . . . . . . . . . . . . . . . . . . . . . . . . . . . . . . . . . . . . . . . . . . . . . .12Vdc, 300mA
Consommation de courant . . . . . . . . . . . . . . . . . . . . . . . . . . . . . . . . . . . .1.2A (max.)
Bande passante . . . . . . . . . . . . . . . . . . . . . . . . . . . . . . . . . . . . . . . . . . .300Hz-5kHz
Poids (sans batteries) . . . . . . . . . . . . . . . . . . . . . . . . . . . . . . . . . . . . . . . . . . . . .350g
Dim . . . . . . . . . . . . . . . . . . . . . . . . . . . . . . . . . . . . . . . . . . . . . . . . .200 x 73 x 48mm
EIN/AUS/Lautstärkeregler
Batterieanzeige
Mikrofoneingangsbuchse
Lautsprecher
Eingangsbuchse für das NC-Akkuladegerät
Verstellbares Gurtband
Batteriefach
Bedienung
1 Batteriefachdeckel öffnen. 6 ‘AA’ Alkali-Batterien oder NC-Akkus
polungsrichtig einlegen (die Polung ist im Fachinneren angegeben).
Batteriefach schließen.
ACHTUNG: Der mitgelieferte AC/DC Adapter ist NUR für das Aufladen von
NC-Akkus vorgese en und NICHT als Netzteil für den Verstärker.
2 Das Mikrofon mit Tragebügel aufsetzen und den Ausleger in einem Abstand
von ca. 13-25mm vor dem Mund ausrichten.
Das Mikrofon an die Eingangsbuchse anschließen.
3 Den Lautstärkeregler nach rechts drehen, um das Gerät einzuschalten. Der
Betriebsanzeiger leuchtet auf. Gewünschte Lautstärke einstellen.
HINWEIS:
(i) Wenn Feedback (Heulen) auftritt, Lautstärke vermindern.
(ii) Wenn der Batterieanzeiger nicht aufleuchtet, Batterien wechseln oder,
im Fall von NC-Akkus, diese mit dem mitgelieferten AC/DC Ladegerät
aufladen. Das Ladegerät in eine Netzsteckdose und in die EINGANGS-
BUCHSE DES LADEGERÄTS  stecken.
(Für die Ladedauer s. Technische Daten der Akkus).
Technische Daten
Ausgangsleistung . . . . . . . . . . . . . . . . . . . . . . . . . . . . . . . . . . . . . . . . . . . .5W (max.)
Versorgung . . . . . . . . . . . . . . . . . . . . . .9Vdc (6 x ‘AA’ Alkali oder Nickel-Cadmium)
AC/DC Ladegerät . . . . . . . . . . . . . . . . . . . . . . . . . . . . .Eingangsspannung 230V AC
Ausgangsspannung . . . . . . . . . . . . . . . . . . . . . . . . . . . . . . . . . . . . .12V DC, 300mA
Stromverbrauch . . . . . . . . . . . . . . . . . . . . . . . . . . . . . . . . . . . . . . . . . . . .1.2A (max.)
Frequenzbereich . . . . . . . . . . . . . . . . . . . . . . . . . . . . . . . . . . . . . . . . . . .300Hz-5kHz
Gewicht (o. Batterien) . . . . . . . . . . . . . . . . . . . . . . . . . . . . . . . . . . . . . . . . . . . . .350g
Abm . . . . . . . . . . . . . . . . . . . . . . . . . . . . . . . . . . . . . . . . . . . . . . . .200 x 73 x 48mm
WAISTBAND AMPLIFIER Cat. No. P660
Waistband Amplifier Illust 1
Waistband Amplifier Rear View Illust 2







AMPLIFICATEUR DE CEINTURE N° Réf. P660
Waistband Amplifier Illust 1
Waistband Amplifier Rear View Illust 2







TRAGBARER VERSTÄRKER Art.Nr. P660
Waistband Amplifier Illust 1
Illust 2







AAN/UIT/Volume regelaar
Batterij indicator
Ingangsconnector voor de microfoon
Luidspreker
Ingangsconnector voor de nickel-cadmium batterij lader
Verstelbare riem
Batterijvak
Werking
1 Batterijvakdeksel openen. 6 x ‘AA’ alkaline of oplaadbare NiCad batterijen
met de correcte polariteit (zie binnen het batterijvak) plaatsen.
Deksel sluiten.
LET OP: De meegeleverde AC/DC adapter is ALLEEN voor et opladen van
NiCad batterijen. NIET als een externe voedingsbron voor de versterker
gebruiken.
2 Zet de hoofdband microfoon op en plaats de microfoon op een afstand van
13-25mm voor uw mond om de beste geluidskwaliteit te bereiken.
Sluit de microfoon op de ingangsconnector aan.
3 Draai de volume regelaar rechtsom om de versterker in te schakelen. De
indicator licht op. Stel het gewenste volume in.
PMERKING:
(i) In geval van rondzingen, het volume verminderen.
(ii) Indien de batterij indicator niet oplicht, vervang de batterijen of, in geval
van ni-cad batterijen, laad deze d.m.v. de meegeleverde lader op. Lader op
een stopcontact en op de INGANGSC NNECT R aansluiten.
(Laad duur zie specificaties van de batterijen).
Specificaties
Uitgangsvermogen . . . . . . . . . . . . . . . . . . . . . . . . . . . . . . . . . . . . . . . . . . .5W (max.)
Voedingsspanning . . . . . . . . . . . . . . . . .9Vdc (6 x ‘AA’ alkaline of Nickel-Cadmium)
AC/DC lader . . . . . . . . . . . . . . . . . . . . . . . . . . . . . . . . . . .Voedingsspanning 230Vac
Uitgangsspanning . . . . . . . . . . . . . . . . . . . . . . . . . . . . . . . . . . . . . . . .12Vdc, 300mA
Stroomverbruik . . . . . . . . . . . . . . . . . . . . . . . . . . . . . . . . . . . . . . . . . . . . .1.2A (max.)
Frequentiebereik . . . . . . . . . . . . . . . . . . . . . . . . . . . . . . . . . . . . . . . . . . .300Hz-5kHz
Gewicht (zonder batterijen) . . . . . . . . . . . . . . . . . . . . . . . . . . . . . . . . . . . . . . . . .350g
Afm. . . . . . . . . . . . . . . . . . . . . . . . . . . . . . . . . . . . . . . . . . . . . . . . .200 x 73 x 48mm
Control N/ FF/Volumen
Led indicador Batería
Base entrada micrófono cabeza
Altavoz
Base entrada cargador batería Níquel-cadmio
Cinturón ajustable
Compartimiento baterías
Funcionamiento
1 Abra y quite la tapa del compartimiento de baterías . Introduzca 6 baterías
alcalinas o recargables níquel-cadmio tamaño 'AA', observando la correcta
polaridad tal como se indica en la base del compartimiento de baterías.
Vuelva a colocar la tapa.
ADVERTENCIA: El adaptador AC/DC suministrado es SOLAMENTE para
cargar baterías Ni-Cad y NO para utilizar como fuente de alimentación externa
para el amplificador.
2 Póngase el micrófono de cabeza y coloque la cabeza del micrófono a una
distancia de entre 13-25cm. de la boca para óptima recepción y claridad..
Conecte a la base entrada del micrófono .
3 Gire el control de volumen en el sentido de las agujas del reloj para poner
en marcha la unidad y se encenderá el indicador Aumente el volumen al
nivel deseado.
N TA:
(i) Si se produce un acoplamiento ('aullido'), reduzca el nivel de volumen.
(ii) Si no se enciende el indicador de batería reemplace las baterías o si
son de tipo Ni-Cad recárguelas utilizando el cargador AC/(DC
suministrado. Conecte el cargador a una toma AC y conecte el cable a la
BASE ENTRADA CARGAD R .
(Ver especificación baterías para tiempo de carga)
Especificación
Potencia salida . . . . . . . . . . . . . . . . . . . . . . . . . . . . . . . . . . . . . . . . . . . . . .5W (max.)
Alimentación . . . . . . . . . . . . . . .9Vdc (6 x baterías ‘AA’ alcalinas o níquel-cadmio)
Cargador AC/DC . . . . . . . . . . . . . . . . . . . . . . . . . . . . . . . . . . . . . . .Entrada AC 230V
Salida . . . . . . . . . . . . . . . . . . . . . . . . . . . . . . . . . . . . . . . . . . . . . . . . .DC12V, 300mA
Consumo corriente . . . . . . . . . . . . . . . . . . . . . . . . . . . . . . . . . . . . . . . . . .1.2A (max.)
Frecuencia respuesta . . . . . . . . . . . . . . . . . . . . . . . . . . . . . . . . . . . . . . .300Hz-5kHz
Peso (menos baterías) . . . . . . . . . . . . . . . . . . . . . . . . . . . . . . . . . . . . . . . . . . . .350g
Dims . . . . . . . . . . . . . . . . . . . . . . . . . . . . . . . . . . . . . . . . . . . . . . . .200 x 73 x 48mm
DRAAGBARE VERSTERKER
Cat. nr. P660
Waistband Amplifier Illust 1
Waistband Amplifier Rear View Illust 2







Waistband Amplifier Illust 1
Waistband Amplifier Rear View Illust 2







AMPLIFICADOR CINTURON Cat. No. P660

Other Eagle Amplifier manuals

Eagle PA6060T User manual

Eagle

Eagle PA6060T User manual

Eagle PA5060E User manual

Eagle

Eagle PA5060E User manual

Eagle P650C User manual

Eagle

Eagle P650C User manual

Eagle P650A User manual

Eagle

Eagle P650A User manual

Eagle UHF 250 WATT POWER AMPLIFIER User manual

Eagle

Eagle UHF 250 WATT POWER AMPLIFIER User manual

Popular Amplifier manuals by other brands

BASSFACE BlackDB1.1 instructions

BASSFACE

BASSFACE BlackDB1.1 instructions

Audio Press Box APB-116SB owner's manual

Audio Press Box

Audio Press Box APB-116SB owner's manual

UNI electronic UBA 1224 user manual

UNI electronic

UNI electronic UBA 1224 user manual

Benchmark HPA4 instruction manual

Benchmark

Benchmark HPA4 instruction manual

Tree Audio BRANCH II user guide

Tree Audio

Tree Audio BRANCH II user guide

WorxAudio PDA2000 owner's manual

WorxAudio

WorxAudio PDA2000 owner's manual

Xtant X604 Installer's reference guide

Xtant

Xtant X604 Installer's reference guide

Onkyo A-933 instruction manual

Onkyo

Onkyo A-933 instruction manual

Hama 00044139 operating instructions

Hama

Hama 00044139 operating instructions

Bryston 875 Z Specifications

Bryston

Bryston 875 Z Specifications

Yamaha DSP-A700 Operation manual

Yamaha

Yamaha DSP-A700 Operation manual

Chord SPM 600 user guide

Chord

Chord SPM 600 user guide

PDA Range PDA200E installation guide

PDA Range

PDA Range PDA200E installation guide

Rotel RA-1060 owner's manual

Rotel

Rotel RA-1060 owner's manual

Rockford Fosgate Power 351M Installation & operation

Rockford Fosgate

Rockford Fosgate Power 351M Installation & operation

Altec Lansing 4200A POWER AMPLIFIER Specifications

Altec Lansing

Altec Lansing 4200A POWER AMPLIFIER Specifications

NAD 306 Service manual

NAD

NAD 306 Service manual

Crown VRACK Operation manual

Crown

Crown VRACK Operation manual

manuals.online logo
manuals.online logoBrands
  • About & Mission
  • Contact us
  • Privacy Policy
  • Terms and Conditions

Copyright 2025 Manuals.Online. All Rights Reserved.