Model No. 8003
375 Power 50mm Wide Angle Sport Telescope
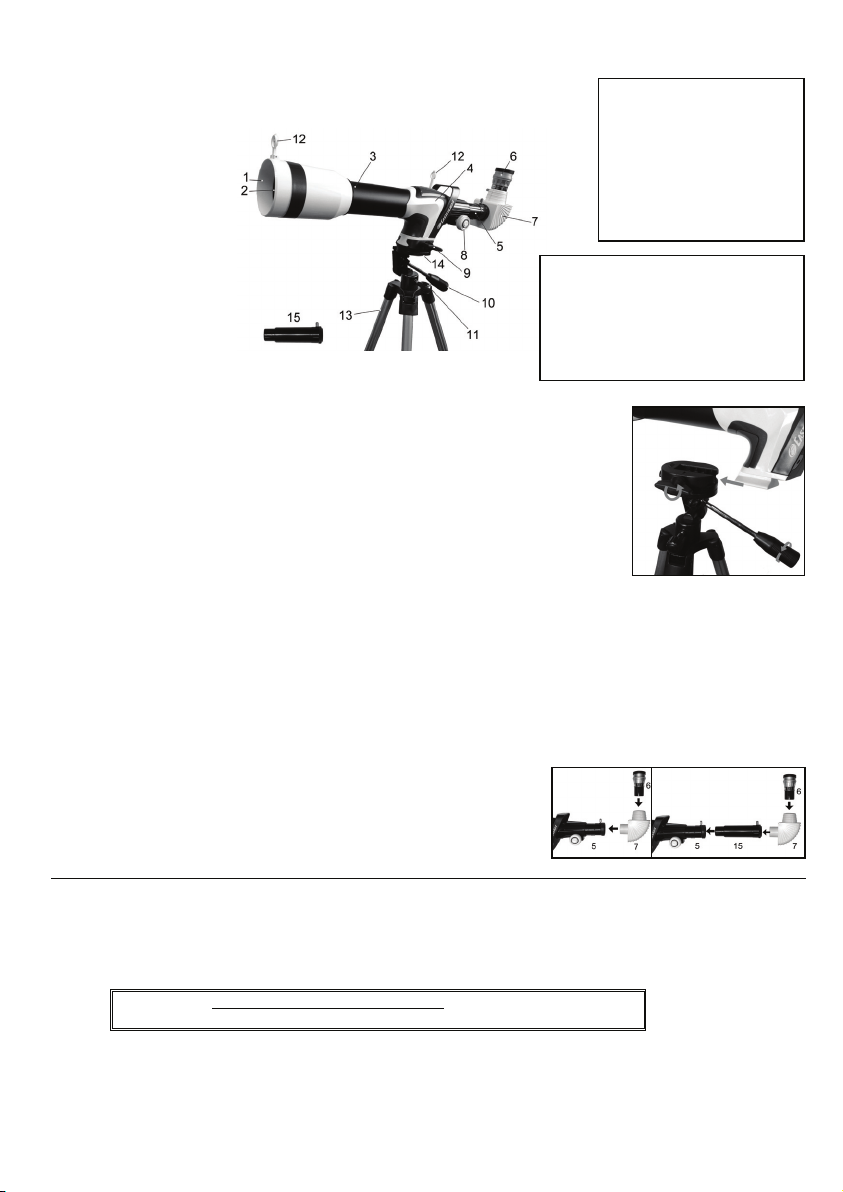
COMPONENTS OF THE TELESCOPE
1 Lens hood
2 Objective lens
3 Telescope tube
4 Telescope tube holder
5 Focusing tube
6 Eyepiece
7 Diagonal mirror
8 Focusing knob
9 Knob bolt
10 Altitude adjustment handle
11 Azimuth locking knob
12 Viewfinder
13 Tripod legs
14 Bracket
15 3X Barlow Lens
HELPFUL HINTS FOR SETTING UP YOUR TELESCOPE
1) Unpack the tripod from the box.
2) Stand the tripod up vertically and spread the tripod legs fully apart. Then drag out the extension of the
tripod legs to the desired height (at equal lengths) and tighten the locking lever in each leg to maintain
it in position.
3) Loosen the knob bolt (9) and the Altitude adjustment handle (10) of the tripod.
4) Put the telescope on the tripod by sliding the base of the telescope to the corresponding bracket (14)
on the tripod head (as shown).
5) Secure the telescope by tightening the Telescope knob bolt (9) and the Altitude adjustment handle (10).
6) The relatively high magnifying power of the telescope results in a limited field of view. Therefore,
finding a particular star or planet desired to observe could be a little hard.
7) Look through the two viewfinders (12) to aid in correctly aiming your telescope. Locating a celestial
body via the main telescope becomes less difficult.
OBSERVING ASTRONOMICAL OBJECTS THROUGH YOUR TELESCOPE
1) Glance through the main telescope's eyepiece (6) for your object. (Note: You may have to alter the angle of the telescope slightly.) The
object will most likely seem to be blurry at this stage, but that is normal. You are just trying to get the object in the viewing field of your
telescope lens. Once you have accomplished this task, fasten the Altitude adjustment handle (10) to keep the accuracy of your telescope
steady.
2) Now adjust the focusing tube (5) by turning the focusing knob (8) slowly back and forth until the blurred object becomes sharp.
3) If you are going to be looking through the telescope for a short period of time, you can insert the eyepiece (6) directly into the focusing tube
(5). To be more comfortable when using your telescope for longer periods of time, place the diagonal mirror (7) into the focusing tube (5)
and the eyepiece (6) into the diagonal mirror.
PUTTING IN THE BARLOW LENS
1) Remove the diagonal mirror (7) and insert the Barlow Lens (15) into the Focusing Tube.
2) Now the Eyepiece can then be inserted into the Barlow Lens. If needed, the diagonal
Mirror should be installed between the Barlow Lens and the Eyepiece.
HOW MUCH POWER: CHOOSING THE EYE LENS
Power refers to the ability of a telescope to enlarge an image, or, in effect, bring it closer to the viewer. Amount of magnifying power is signified
by a number followed by an X (read "power"). So if you view an object at 20X, you are seeing it as if you are 20 times closer to that object.
Power is calculated by dividing the focal length of your telescope's objective lens (probably indicated on the focus tube) by the focal length of
the eye lens you select. The focal length of the eye lens is usually indicated on the eyepiece itself.
Example: 500mm (focal length of objective lens) = 20X (Power)
25mm (focal length of eyepiece)
The longer the focal length of the eyepiece, the less the magnifying power of the telescope; the shorter the focal length, the greater the power.
So when you select an eye lens to insert into the diagonal prism, you're really choosing what magnifying power you wish to use for
observation.
DO NOT VIEW SUN THROUGH TELESCOPE
AS SERIOUS INJURY TO EYE MAY RESULT.
FRE
Télescope Sportif HD Grand Angle 50 mm 375
ELEMENTS DU TELESCOPE
1 Capuchon de lentille
2 Lentille
3 Tube de télescope
4 Support de tube de télescope
5 Tube de mise au point
6 Oculaire
7 Miroir diagonal
8 Bouton de mise au point
9 Boulon de molette
10 Poignée de réglage panoramique
11 Bouton de verrouillage azimut
12 Viseur
13 Pieds du trépied
14 Attache
15 Lentille de Barlow x3
CONSEILS UTILES POUR INSTALLER VOTRE TELESCOPE
1) Déballez le trépied du carton.
2) Tenez le trépied à la verticale et étirez complètement les pieds du trépied. Puis,
faites glisser l'extension des pieds du trépied jusqu'à la hauteur souhaitée (à
longueurs égales) et resserrez le levier de verrouillage de chaque pied pour les
maintenir tous en position.
3) Desserrez la molette du télescope (9) et la poignée de réglage de la hauteur (10)
du trépied.
4) Placez le télescope sur le trépied en faisant coulisser la base du télescope sur le
support d'attache (14) de la tête du trépied (comme illustré).
5) Fixez le télescope en resserrant la molette de verrouillage du télescope (9) et la
poignée de réglage de la hauteur (10).
6) La puissance d'agrandissement relativement élevée du télescope résulte d'une
limitation du champ de vision. Ainsi, trouver une étoile ou une planète particulière
que vous désirez observer peut être un peu difficile.
7) Regardez à travers les deux viseurs (12) pour régler correctement votre
télescope. De cette façon, localiser un corps céleste avec le télescope principal
devient moins difficile.
OBSERVATION D'OBJECTS ASTRONOMIQUES A TRAVERS LE
TELESCOPE
1) Recherchez l'objet à travers l'oculaire principal du télescope (6). (Remarque: il peut
s'avérer nécessaire d'incliner légèrement l'angle du télescope.) L'objet apparaîtra très
probablement peu clairement à ce stade, mais ceci est normal car vous essayez
simplement de cadrer l'objet dans le champ de vision de la lentille d'objectif Une
fois que vous avez accompli cette tâche, serrez la poignée de réglage de la tête
panoramique (10) pour stabiliser le télescope en position.
2) Ajustez maintenant le tube de focalisation (5) en tournant lentement le bouton de
mise au point (8) en avant et en arrière jusqu'à ce que l'objet flou devienne net.
3) Si vous prévoyez de regarder dans le télescope pendant un court moment, vous
pouvez insérer l'oculaire (6) directement dans le tube de mise au point (5). Pour
utiliser le télescope pendant une durée prolongée, il est plus confortable de placer le
miroir à prisme (7) dans le tube de mise au point (5) et l'oculaire (6) dans le miroir à
prisme.
SPÉCIFICATIONS TECHNIQUES:
Diamètre de lentille : 50mm
Longueur focale: 500mm
Oculaires: 4mm
20mm
Accessoire: Miroir diagonal, Lentille de Barlow X3, Adaptateur pour smartphone
MONTAGE DE LA LENTILLE DE BARLOW
1) Enlevez le miroir diagonal (7) et insérez la lentille de Barlow (15) dans le tube de
mise au point.
2) Insérez l’oculaire dans la lentille de Barlow. Si nécessaire, installez le miroir
diagonal entre la lentille de Barlow et l’oculaire.
QUELLE PUISSANCE: SELECTION DE LA LENTILLE
La puissance se rapporte à la capacité du télescope à agrandir une image ou, en fait, à la
rapprocher de l'observateur. La quantité de puissance de grossissement est représentée
par un nombre suivi d'un X (lire "puissance"). Ainsi, si vous observez un objet à 20X, vous
le voyez comme si vous étiez 20 fois plus près de lui.
La puissance est calculée en divisant la longueur focale de la lentille d'objectif du télescope
(généralement indiquée sur le tube de mise au point) par la longueur focale sélectionnée.
La longueur focale de la lentille est normalement indiquée sur l'oculaire même.
Exemple: 500mm (longueur focale de la lentille) = 20X (puissance)
25mm (longueur focale de l'oculaire)
La puissance de grossissement du télescope est inversement proportionnelle à la
longueur focale; plus la longueur focale est courte et plus la puissance est forte. Quand
vous sélectionnez une lentille à mettre dans le miroir à prisme, vous sélectionnez en fait la
puissance de grossissement que vous désirez utiliser pour l'observation.
ENTRETIEN DU TELESCOPE
Il est important de conserver votre télescope à l'abri de la poussière et de l'humidité. Si les
lentilles sont sales, soufflez sur les particules de poussière avant de nettoyer. Nettoyez les
lentilles à l'aide d'un chiffon à lunettes humidifié. Rangez le télescope dans sa boîte quand
il n'est pas en cours d'utilisation.
NE JAMAIS REGARDER LE SOLEIL A TRAVERS UN TELESCOPE
CAR DE GRAVES BLESSURES AUX YEUX PEUVENT EN RESULTER
DUT
375 Krachtige 50 mm groothoek HD sporttelescoop
ONDERDELEN VAN DE TELESCOOP
1 Lenskap
2 Oculaire lens
3 Telescoopbuis
4 Telescoopbuishouder
5 Scherpstellingsbuis
6 Oculair
7 Diagonale spiegel
8 Focusknop
9 Knopbout
10 Kinoaanpassingshendel
11 Azimut vastzetknop
12 Beeldzoeker
13 Statiefpoten
14 Steun
15 3X Barlow Lens
HANDIGE WENKEN VOOR HET OPSTELLEN VAN UW TELESCOOP
1) Haal het statief uit de verpakking.
2) Stel het statief verticaal op door de poten volledig open te spreiden. Trek
de statiefpoten naar de gewenste lengte uit (op gelijke lengte) en maak de
vastzethendel op elke poot vast om de poten in positie te houden.
3) Maak de knopbout (9) en de aanpassingshendel (10) van het statief los.
4) Plaats de telescoop op het statief door de onderkant van de telescoop op
de overeenkomstige steun (14) op de kop van het statief te schuiven
(zoals weergegeven).
5) Zet de telescoop stevig vast door de knopbout (9) en de
aanpassingshendel (10) opnieuw vast te maken.
6) De relatief hoge vergrotingssterkte van de telescoop resulteert in een
beperkt gezichtsveld. Het vinden van een bepaalde ster of planeet kan
aldus enige tijd vergen.
7) Kijk door de twee beeldzoekers (12) om uw telescoop op een juiste
manier te richten. Het vinden van een hemellichaam via de telescoop
verloopt aldus eenvoudiger.
HET OBSERVEREN VAN ASTRONOMISCHE OBJECTEN DOOR UW
TELESCOOP
1) Zoek uw object door het oculair (6) van de hoofdtelescoop. (N.B. U
dient de hoek van de telescoop misschien iets te veranderen.) Het object
lijkt op dit ogenblik waarschijnlijk wazig, maar dat is normaal. U
probeert nu eerst om het object in het zichtveld van uw telescooplens te
krijgen. Eens je deze taak hebt uitgevoerd, maak je de cilindervormige
aanpassingshendel (10) vast om de nauwkeurigheid van je telescoop
stabiel te houden.
2) Pas de scherpstellingsbuis (5) nu aan door de focusknop (8) langzaam
naar voren en achteren te schuiven totdat het wazig beeld duidelijk
wordt.
3) Als u de telescoop maar kort gebruikt, kunt u het oculair (6) direct in de
focusbuis (5) steken. Indien u de telescoop voor een langere tijd
gebruikt, zet u voor meer comfort de diagonale spiegel (7) in de
focusbuis (5) en het oculair (6) in de diagonale spiegel.
TECHNISCHE SPECIFICATIES:
Objectieve diameter: 50mm
Brandpuntafstand: 500mm
Oculairen: 4mm
20mm
Accessoires: Diagonale spiegel, 3X Barlow Lens, Smartphone-adapter
DE BARLOW LENS INSTEKEN
1) Verwijder de diagonale spiegel (7) en steek de Barlow lens (15) in de
scherpstellingstube.
2) Het oculair kan nu in de Barlow lens gestoken worden. Indien nodig, moet
de diagonale spiegel tussen de Barlow lens en het oculair geplaatst
worden.
HOEVEEL STERKTE : HET KIEZEN VAN DE LENS
Sterkte betekent de capaciteit van een telescoop om een afbeelding te
vergroten, of deze feitelijk dichterbij te halen. De sterkte van de vergroting
wordt aangegeven door een getal gevolgd door een X (= “sterkte”). Als u dus
met 20X een object bekijkt, ziet u het alsof u 20 keer dichterbij dit object bent.
De sterkte wordt berekend door de brandpuntsafstand van de objectieflens van
uw telescoop (deze wordt gewoonlijk op de focusbuis aangegeven) te delen
door de brandpuntsafstand van de lens die u kiest. De brandpuntslengte van
de lens wordt meestal op het oculair zelf aangegeven.
Voorbeeld: 500mm (brandpuntslengte van objectieflens) = 20X (sterkte)
25mm (brandpuntslengte van oculair)
Hoe langer de brandpuntslengte van het oculair, des te lager de
vergrotingssterkte van de telescoop; hoe korter de brandpuntslengte, des te
hoger de sterkte. Wanneer u dus een lens kiest om in het diagonale prisma
te zetten, kiest u eigenlijk welke vergrotingssterkte u voor uw observatie wilt
gebruiken.
HET ONDERHOUD VAN UW TELESCOOP
Houd uw telescoop weg van stof en vocht. Indien de lenzen vuil worden,
blaast u eerst het stof eraf alvorens ze met een vochtig lensdoekje schoon te
maken. Bewaar uw telescoop altijd in de doos wanneer hij niet wordt
gebruikt.
NIET DOOR DE TELESCOOP IN DE ZON KIJKEN
DIT KAN ERNSTIG OOGLETSEL TOT GEVOLG HEBBEN.
M-8003-7L V.2
TECHNICAL
SPECIFICATIONS:
Objective Diameter: 50mm
Focal Length: 500mm
Eyepieces: 4mm
20mm
Accessories: Diagonal Mirror
3X Barlow Lens,
Smartphone
ada