DO NOT VIEW SUN THROUGH
TELESCOPE AS SERIOUS INJURY
TO EYE MAY RESULT.
Read the following information and instructions
before use. Follow them and keep them for
reference.
M-32015-ENG V.2
A) HOW TO CARE FOR YOUR
TELESCOPE
Appropriate care of the telescope will allow many years of
pleasant viewing enjoyment.
Cleaning The Lens
Clean the lens only when it is required. The first step is to
remove the dust with a camelhair brush or an ear-type
syringe. Set few drops of ether or isopropyl alcohol on a
piece of clean cotton that has been washed several times
and wipe the lenses very delicately, avoiding a circular
motion. In addition, blow any remaining lint or dust off with
an ear-type syringe.
Sudden Temperature Changes
If possible, avoid taking the telescope from cold outside air
into a warm room. This will make the objective lens to be
covered with condensed moisture, which must be
removed at once. To do this, place the objective lens at a
safe distance from heat source and let it warm slowly until
the moisture has vanished.
It is important to note that any stains left on the
lenses must be delicately wiped off after the lenses
are completely dry.
Features:
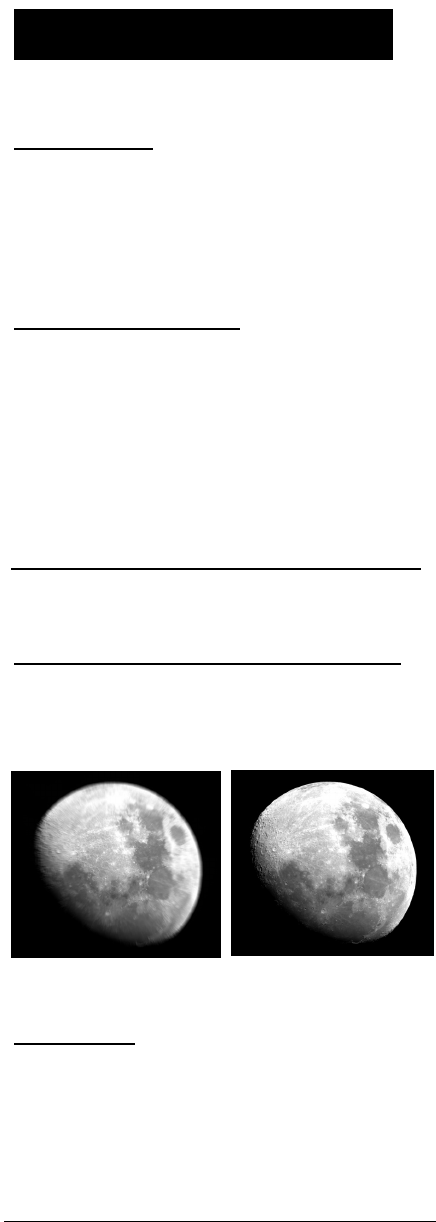
Professional aspherical lens for super sharp images
This telescope employs aspherical lenses to reduce image
aberration often found in conventional spherical lens
elements, producing a sharp and less distorted image
from the center to the edge of the field of view.
Image from spherical lens Image from aspherical lens
Wide angle view
This telescope employs wde angle eyepieces, which offer
a larger view of the sky while still retaining the same
magnification, giving a greater area of sky coverage.
B) HELPFUL HINTS FOR SETTING UP
THE TEELSCOPE
Tripod Set-Up
1. Remove the tripod from the box.
2. Spread tripod legs (6) so that the leg braces are fully
extended and rest safely at the base of the tripod
center post.
3. Fastened all locks to hold legs securely in place.
4. Temporarily remove the knob bolt.
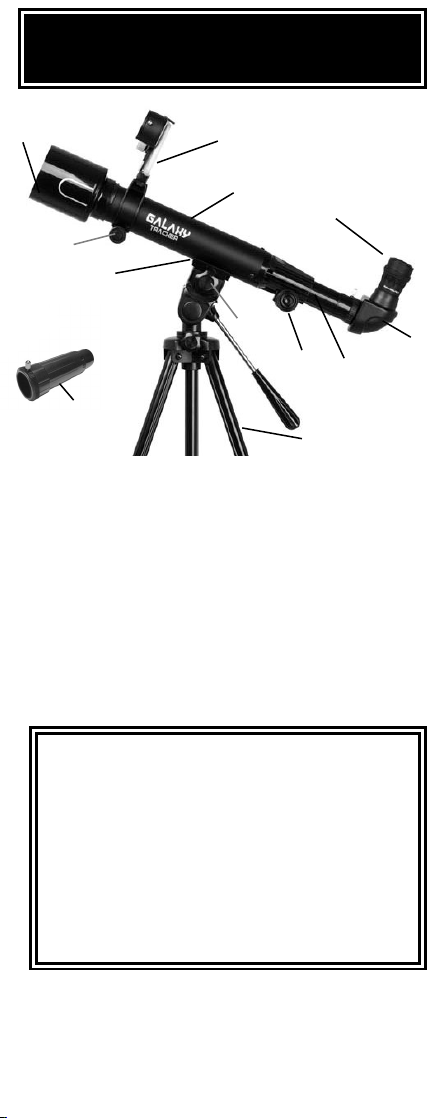
Telescope Set-Up
1. Take out the Telescope Tube (5) from the box.
2. Put the telescope on the tripod such that the holes of
the bracket (9) align with the tripod’s knob bolt position.
Re-install and tighten the knob bolt.
Putting In Diagonal Mirror & Eyepiece
1. Insert diagonal mirror (3) into focusing tube (2).
Secure by tightening the small retaining screw.
2. Install the soft eyepiece cap over the eyepiece (4) if
needed. Insert eyepiece (4) into diagonal mirror (3).
Secure by tightening the small retaining screw.
Putting In The Barlow Lens
1. Remove the diagonal
mirror (3) and insert the
Barlow lens (10) into the
focusing tube (2).
2. Now the eyepiece can then
be inserted into the Barlow
lens. If needed, diagonal
mirror should be installed
between the Barlow lens
and the focusing tube.
C) OBSERVING ASTRONOMICAL
OBJECTS THROUGH YOUR
TELESCOPE
1. Glance through the main telescope’s eyepiece (4) for
your object. (Note: You may have to alter the angle of
the telescope slightly.) The object will most likely seem
to be blurry at this stage, but that is normal. You are
just trying to get the object in the viewing field of your
telescope lens. Once you have accomplished this task,
fasten the knobs to keep the accuracy of your
telescope steady.
2. Now adjust the Focusing Tube (2) by turning the
Focusing Knob (1) slowly back and forth until the
blurred object becomes precise.
3. If you are going to be looking through the telescope for
a short period of time, you can insert the Eyepiece
directly into the Focusing Tube. To be more
comfortable when using your telescope for longer
periods of time, place the Diagonal Mirror (3) into the
Focusing Tube and the Eyepiece into the Diagonal
Mirror.
D) HOW TO USE THE TELESCOPE
Our telescope offers an extensive selection parts and
accessories for your telescope to further enhance the
exploration of worlds beyond. As well, it is a precision
optical instrument certain to give many years of enjoyment
and entertainment.
i. Viewing
What you see through a telescope and how accurate you
see it is a function of three factors;
•Power / Magnification
•Brightness
•Resolution / Clarity of image
It is a common misunderstanding that the more power you
have, the better it is. Indeed, essential functions of a
telescope are to magnify the image, or give the effect of
being closer to object of observation. However, there are
limits to how much power to use effectively. With every
increase in magnification, there is a corresponding
reduction of brightness and resolution. Too much
magnification and the image will become dim and blurry so
that the features of the object become vague. For best view
of any astronomical body, you must strike a balance
between the three viewing qualities.
Furthermore, with every increase in power, there is a
decrease in field of view. The field of view is the circle of
sky you see as you look through your telescope. The more
you increase magnification, the smaller that circle becomes.
You will also notice that celestial bodies seem to move fast
across the field of view even at low powers. That movement
is still more recognizable at high powers. High power will
provide some dramatic views of lunar or planetary features,
but can also be somewhat frustrating until you acquire a
certain level of expertise at tracking objects smoothly.
ii. Power Strength: Selecting The Eye Lens
Power means the ability of telescope to increase an image,
or appear to bring the image closer to the viewer. Value of
magnifying power is distinguished by a number followed by
an X (read power). Therefore, If you view an object at 125X,
you are seeing it as though you are 125 times closer to that
object.
Power is calculated by dividing the focal length of objective
lens of your telescope by the focal length of the eye lens
you choose. The focal length of the eye lens is usually
indicated on the eyepiece itself. For example: 4mm
500 mm (focal length of objective lens)
Example: ------------------------------------------ = 125 X (power)
4 mm (focal length of eyepiece)
The longer the focal length of the eyepiece, the less the
magnifying power of the telescope. Whereas the shorter the
focal length, the greater the power. Therefore, when
choosing an eye lens to insert the diagonal prism, you are
actually selecting what magnifying power you wish to use
for inspection.
1 2