manuals.online logo
Brands
  1. Home
  2. •
  3. Brands
  4. •
  5. Ebro
  6. •
  7. Power Tools
  8. •
  9. Ebro AL103 User manual

Ebro AL103 User manual

© Copyright by ebro Electronic GmbH & Co. KG page 1 of 2 10/07
Batterie austauschen
Wenn die Batterie verbraucht ist, muss sie ausge-
tauscht werden.
Beugen Sie durch geeignete Vor-
sichtsmaßnahmen wie z. B. durch
ein geerdetes Handgelenkband
elektrostatischen Entladungen
während des Batteriewechsels vor! Elek-
trostatische Entladungen können das Gerät
zerstören!
Um die Batterie auszutauschen, gehen Sie folgen-
dermaßen vor:
- Öffnen Sie das Gehäuse des Datenloggers mit
der Aufdrehhilfe (Bild 1).
- Entfernen Sie die Halteklammer (Bild 2) der
Batterie (Schraube lösen, Halteklammer hoch-
klappen und vorsichtig abziehen).
- Ziehen Sie den Stecker der Batterie von der
Platine ab (Bild 3/4).
- Entnehmen Sie die leere Batterie.
- Legen Sie eine frische Batterie lagegleich zu der
entnommenen Batterie in das Batteriefach.
Entsorgen Sie die verbrauchte Batterie
umweltgerecht an den dafür vorgesehenen
Sammelstellen!
- Stecken Sie die Halteklammer vorsichtig so in
die beiden Haltenuten, dass der rote Batteried-
raht darunter bleibt und weder gedrückt noch
verletzt wird (Bild 3/4).
- Stecken Sie den Batteriestecker vorsichtig in
die Buchse auf der Platine.
- Schrauben Sie die Halteschraube wieder fest
(Bild 5).
Führen Sie diesen Vorgang mit Gefühl
aus und wenden Sie keine große Kraft
an. Der Stecker ist verpolungssicher
und paßt nur in einer bestimmten Ausrichtung
in die Buchse auf der Platine.
Replacing the Battery
Once a battery is spent, it must be replaced with
another one.
Whilst changing the battery they
must protect themselves against
electrostatic discharges using
suitable precautionary measures
such as an earthed wristband! Electrostatic
discharges may destroy the device!
To swap out a battery:
- Use the opening tool to open the housing of
the data logger (see Figure 1).
- Remove the battery retaining clip (Figure 2).
(Loosen the screw, lift the retaining clip and
remove it carefully.)
- Pull the battery plug out of the circuit board
(Figure 3/4).
- Remove the empty battery.
- Place a new battery in the battery compartment
in exactly the same position as the one you
have just removed.
Dispose of the used battery in an envi-
ronmentally friendly way at a suitable
re-cycling point!
- Insert the retaining clip carefully in the two slots
so that the red battery wire lies below it, so that
it cannot be crushed or damaged (Figure 4).
- Plug the battery plug carefully into the socket
on the circuit board.
- Tighten the retaining screw again. (Figure 5).
Take great care throughout this proce-
dure and do not use excessive force at
any point. The plug is polarized and can
only fit into the socket on the circuit board in
one direction.
Remplacement de la batterie
La batterie doit être remplacée lorsqu’elle est
vide.
Lors du remplacement de la batte-
rie, veillez à vous protéger d’éven-
tuelles décharges électrostatiques
en portant par exemple un bracelet
antistatique. Les décharges électrostatiques
peuvent détruire l’appareil !
Pour remplacer la batterie, procédez comme
suit :
- Ouvrez le boîtier de l’enregistreur avec la clé
de desserrage (fig. 1).
- Enlevez les ergots de fixation (fig. 2) de la bat-
terie (desserrez la vis, redressez les ergots de
fixation et soulevez-les avec précaution).
- Débranchez la fiche de la batterie de l’appareil
(fig. 3/4).
- Enlevez la batterie vide.
- Placez une batterie neuve dans le comparti-
ment, dans la même position que la batterie
que vous venez de retirer.
Eliminez la batterie usagée de manière
écologique, à savoir dans une poubelle de
tri sélectif prévue à cet effet.
-
Insérez avec précaution les ergots de fixation dans
les deux rainures correspondantes, en veillant à ce
que le fil rouge de la batterie reste en dessous et
ne soit ni comprimé ni endommagé (fig. 4).
-
Branchez la prise avec précaution dans la prise
femelle située sur l’appareil.
-
Revissez la vis de fixation à fond (fig. 5).
Effectuez cette opération en douceur et
sans appliquer de force excessive. La
prise mâle est munie d’un détrompeur et
ne peut donc être branchée que d’une certaine
manière dans la prise femelle de l’appareil.
(1)
(2)
(3)/(4)
(5)
© Copyright by ebro Electronic GmbH & Co. KG page 2 of 2 10/07
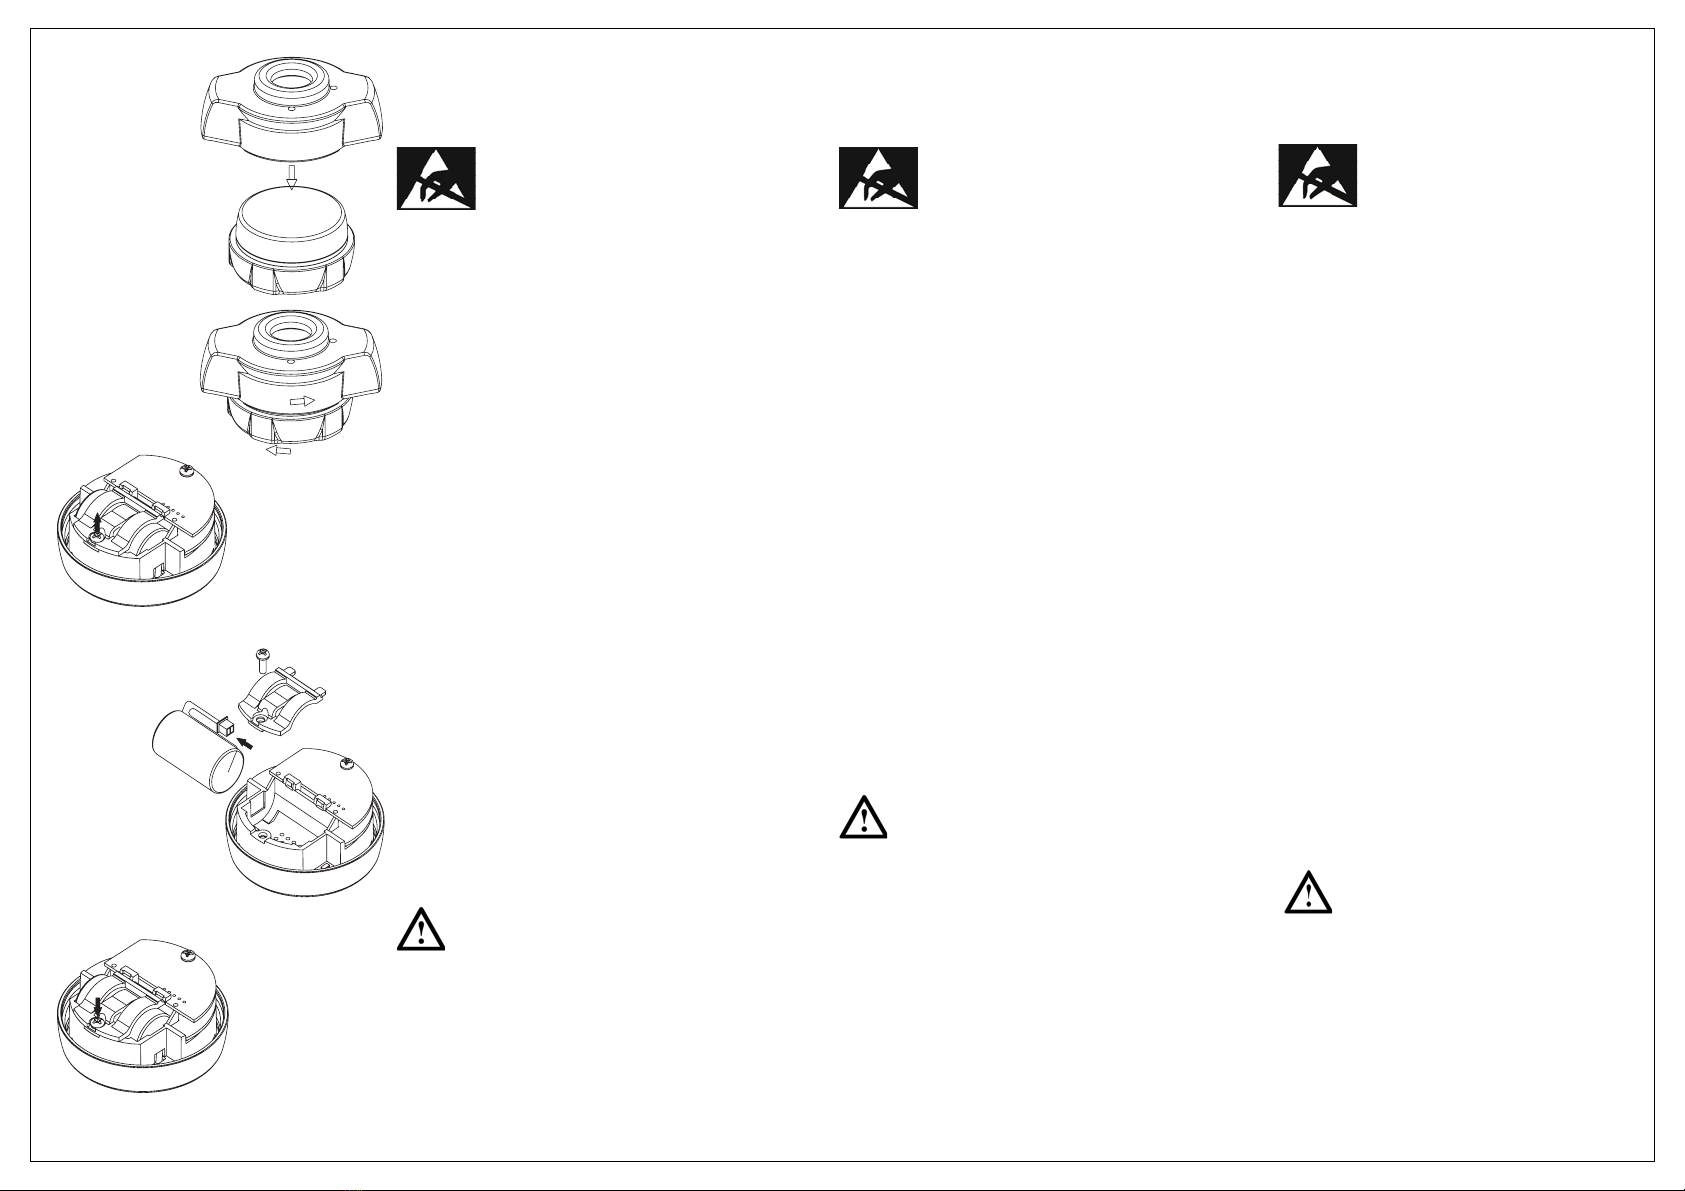
Rechts neben dem Batteriefach befindet sich eine
Leuchtdiode. Sobald wieder die Batteriespannung
an der Platine anliegt, blinkt diese Leuchtdiode
einige Male (Bild 6).
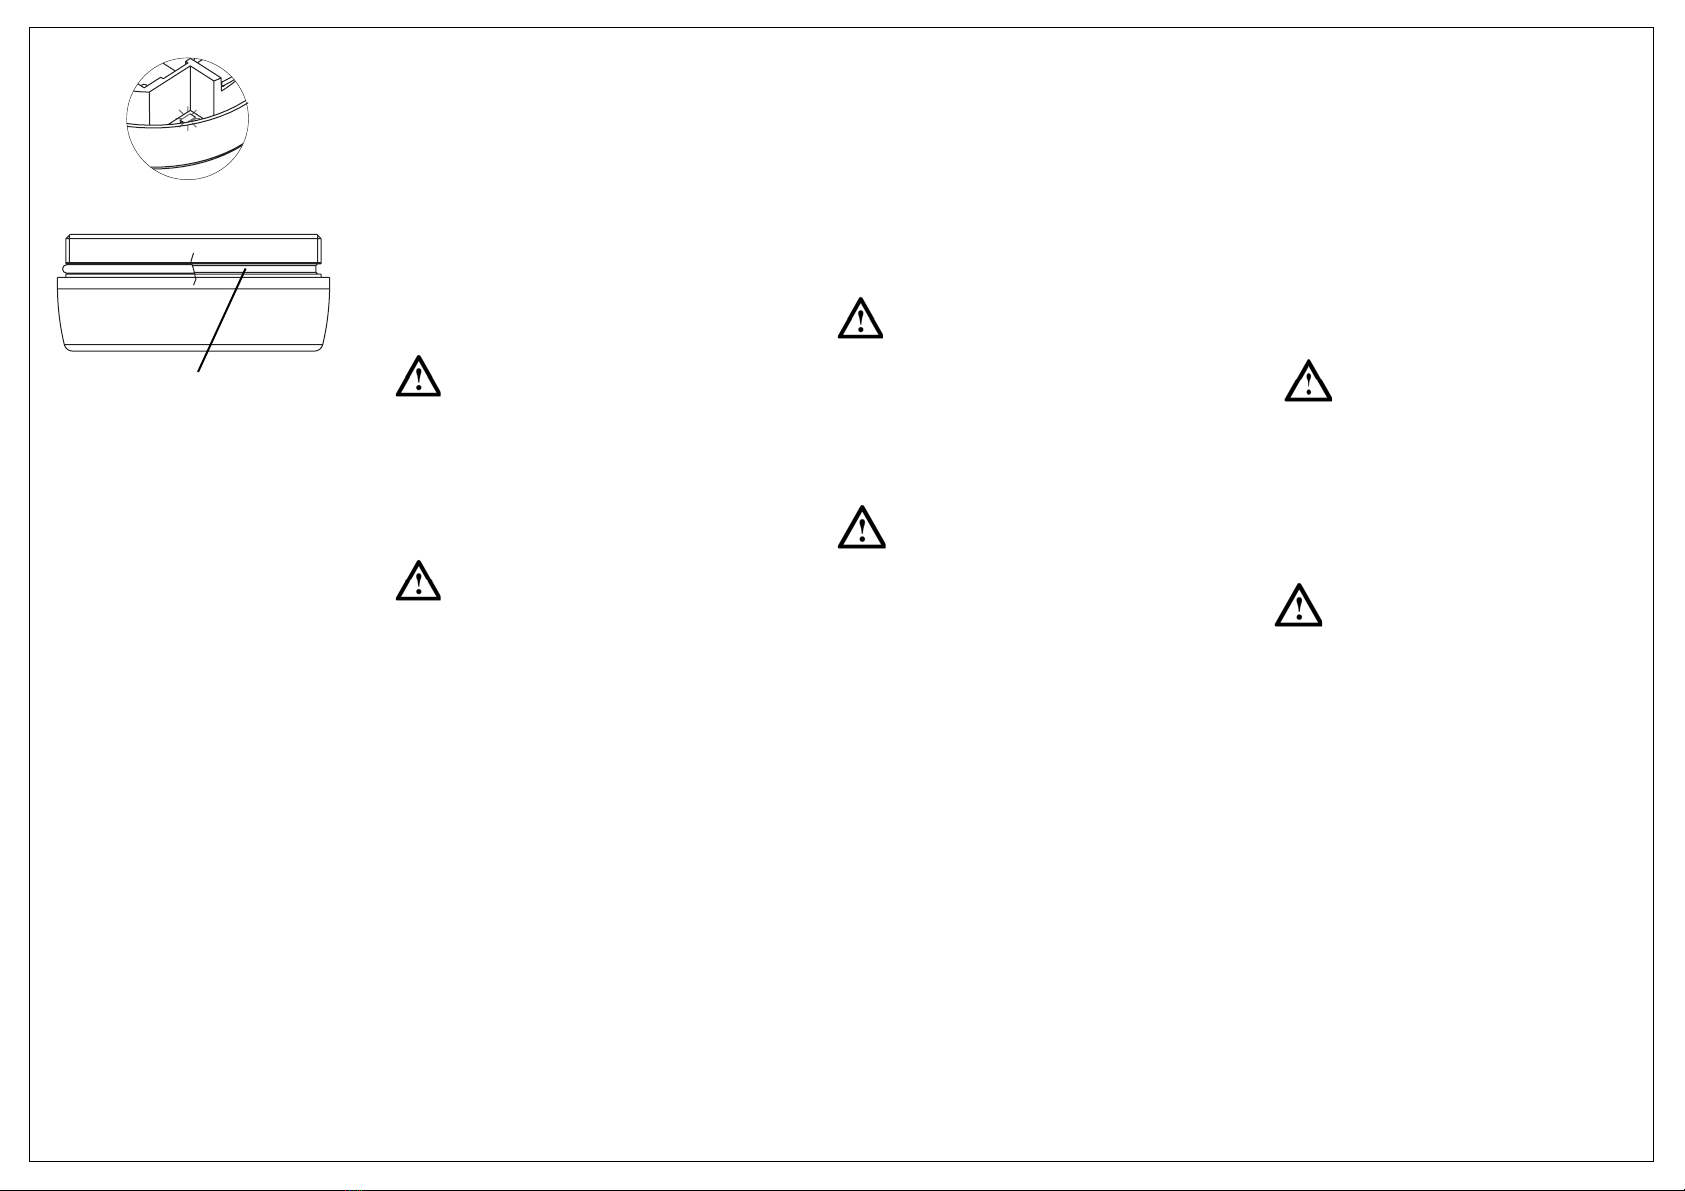
- Entfernen Sie den elastischen Silikon-O-Ring
vom roten Kunststoffteil des Loggergehäu-
ses.
- Reinigen Sie die Nut, in der sich der O-Ring
befunden hat (Bild 7).
- Nehmen Sie einen neuen Silikon-O-Ring, fetten
Sie ihn dünn ein und legen Sie ihn in die Nut
ein.
Nehmen Sie nur so viel Fett, dass der
Ring zwar überall glänzt aber keine
Fettklümpchen entstehen.
Ein einmal verwendeter Silikon-O-Ring muss
entsorgt werden und darf keinesfalls wieder
benutzt werden! Er wird beim Zusammen-
schrauben der beiden Gehäuseteile verformt
und dichtet daher bei einer Wiederbenutzung
nicht mehr richtig ab!
Achten Sie darauf, den elastischen Ring
keinesfalls zu überdehnen und nicht zu
beschädigen!
- Schrauben Sie die beiden Gehäuseteile des
Datenloggers Hand-fest zusammen.
- Entfernen Sie gegebenenfalls ausgetretenes
überschüssiges Fett.
- Setzen Sie mit Hilfe der Programmiersoftware
den Batterie-Zähler zurück. Näheres dazu
finden Sie in der Gebrauchsanleitung Ihrer
Programmiersoftware.
Beim Batteriewechsel oder beim Ausfall der
Batterie gehen gespeicherte Daten nicht verlo-
ren. Bei längerem Stromausfall stimmt jedoch
die Uhrzeit der eingebauten Uhr nicht mehr.
Der Datenlogger ist dann auszulesen und neu
zu programmieren, wobei Datum und Uhrzeit
wieder synchronisiert werden.
Nach dem Einlegen der neuen Batterie wird die
Aufzeichnung fortgesetzt.
(6)
(7)
To the right of the battery compartment, you will
see a LED. This LED will flash as soon as the
circuit board is receiving power from the battery
again (Figure 6).
- Remove the elastic silicone O-ring from the red
plastic part of the logger housing.
- Cleaning the slot in which the O-ring was lo-
cated (Figure 7).
- Take a new silicone O-ring, cover it with a thin
layer of grease and place it in the slot.
The layer of grease should cover the O-
ring completely (so that it glistens) but
not leave lumps of residue on it.
A used silicone O-ring must always be dis-
posed of. Under no circum-stances should
it be reused! This is because it is deformed
when the two parts of the housing are screwed
together. If it is used again it will not make a
proper seal!
Take care not to overstretch the elastic
ring and not to damage it!
- Screw the two parts of the logger housing
together so they are hand-tight.
- Wipe away any grease that may be squeezed
out.
- Use the programming software to reset the
battery counter. For more information, please
refer to your programming software’s operating
instructions.
No data is lost when you change a battery or
if the battery fails. However, if a longer power
failure occurs, the built-in clock will no longer
show the correct time. In this situation, ex-
tract the data from the data logger and then
reprogram it. This resynchronizes the date
and time.
Recording continues immediately after you
insert a new battery.
Une diode lumineuse se trouve à droite, à proximité
du compartiment de la batterie. Dès que la charge de
la batterie parvient à l’appareil, cette diode lumineuse
clignote plusieurs fois (fig. 6).
- Détachez le joint torique d’étanchéité en silicone
de l’élément en plastique rouge du boîtier de
l’enregistreur.
- Nettoyez la rainure dans laquelle était placé le
joint torique d’étanchéité (fig. 7).
- Prenez le nouveau joint torique d’étanchéité
en silicone, graissez-le légèrement et placez-le
dans la rainure.
N’utilisez pas trop de graisse ! L’ensemble
du joint doit être luisant mais sans qu’il y
ait formation de petites boules de grais-
se.
Tout joint d’étanchéité en silicone utilisé une
fois doit être jeté : il ne doit être en aucun cas
réutilisé ! Lors du vissage des deux parties du
boîtier, le joint est en effet déformé et ne peut
donc pas assurer une véritable étanchéité lors
d’une seconde utilisation !
Veillez à ne jamais détendre ni endomma-
ger le joint élastique !
- Vissez soigneusement les deux parties du
boîtier de l’enregistreur.
- Le cas échéant, enlevez l’excédent de grais-
se.
- Avec l’aide du logiciel de programmation, re-
placez le compteur de batterie. Vous trouverez
des détails supplémentaires à ce sujet dans la
notice d’utilisation du logiciel de programma-
tion.
Lors du remplacement de la batterie ou en cas
de dysfonctionnement de cette dernière, les
données enregistrées ne sont pas perdues.
A la suite d’une coupure de courant prolon-
gée, l’heure indiquée par l’horloge intégrée
n’est toutefois pas exacte. Dans ce cas, il
faut extraire les données de l’enregistreur et
le reprogrammer, puis resynchroniser la date
et l’heure.
L’enregistrement des données reprend dès
qu’une nouvelle batterie a été installée.

Popular Power Tools manuals by other brands

Stanley SRR1200 Original instructions

Stanley

Stanley SRR1200 Original instructions

Sealey CP20VJS instructions

Sealey

Sealey CP20VJS instructions

Metabo HPT M 1808DA Safety instructions and instruction manual

Metabo HPT

Metabo HPT M 1808DA Safety instructions and instruction manual

Huck 246 instruction manual

Huck

Huck 246 instruction manual

Stanley STGL2018 Original instructions

Stanley

Stanley STGL2018 Original instructions

Makita DPJ140 instruction manual

Makita

Makita DPJ140 instruction manual

Makita DHG181RT instruction manual

Makita

Makita DHG181RT instruction manual

Makita AN613 instructions

Makita

Makita AN613 instructions

AEG 413605 instructions

AEG

AEG 413605 instructions

DeWalt DCF899H Original instructions

DeWalt

DeWalt DCF899H Original instructions

Avid Power ACD318-DB Operator's manual

Avid Power

Avid Power ACD318-DB Operator's manual

EINHELL PRESSITO Original operating instructions

EINHELL

EINHELL PRESSITO Original operating instructions

ATD Tools ATD-5165 quick start guide

ATD Tools

ATD Tools ATD-5165 quick start guide

Rosenberger 08CK001-150 user manual

Rosenberger

Rosenberger 08CK001-150 user manual

Atlas Copco LTV39-2 R37-B10 Product instructions

Atlas Copco

Atlas Copco LTV39-2 R37-B10 Product instructions

Makita BTS130 instruction manual

Makita

Makita BTS130 instruction manual

Jegs 81035 installation instructions

Jegs

Jegs 81035 installation instructions

Avdel 71404 instruction manual

Avdel

Avdel 71404 instruction manual

manuals.online logo
manuals.online logoBrands
  • About & Mission
  • Contact us
  • Privacy Policy
  • Terms and Conditions

Copyright 2025 Manuals.Online. All Rights Reserved.