ECG Heat BlackLine ETF 80 User manual

ETF 80 Heat BlackLine
English
Always read the safety&use instructions carefully before using your appliance for the rst time. The user´s manual must be always included.
CLOTHES DRYER
INSTRUCTION MANUAL


English
English
3
CLOTHES DRYER
SAFETY INSTRUCTIONS
Read carefully and save for future use!
Warning: The safety measures and instructions, contained in this
manual, do not include all conditions and situations possible. The user
must understand that common sense, caution and care are factors
that cannot be integrated into any product. Therefore, these factors
shall be ensured by the user/s using and operating this appliance. We
are not liable for damages caused during shipping, by incorrect use,
voltage uctuation or the modication or adjustment of any part of
the appliance.
To protect against a risk of re or electric shock, basic precautions shall
be taken while using electrical appliances, including the following:
1. Make sure the voltage in your outlet corresponds to the voltage
provided on the appliance label and that the socket is properly
grounded. The outlet must be installed in accordance with
applicable electrical codes according to EN.
2. Do not operate the device if the cord is damaged. All repairs or
adjustments including cord replacements must be carried out by
a professional service centre! Do not remove the protective covers
from the appliance; there is a risk of electric shock!
3. Do not plug and unplug the power cord from the outlet using wet
hands. You will avoid risk of electric shock.
4. Do not touch the appliance with wet hands or feet.
5. The power cord must remain accessible once the device is installed.
Do not shorten the cable and do not use power strips, adapters,
or extension cords. Do not allow the cord to touch hot surfaces or
place the cord over sharp edges.
6. Do not switch the device on or o by inserting or pulling out the
power cable plug. Do not remove the power cord from the outlet
by yanking the cord. Unplug the power cord from the outlet by
grasping the plug.
Clothes dryer
English

English
English
4
7. Disconnect the dryer if not in use for a long time, and before
installation, maintenance, cleaning and repair, otherwise it may be
damaged.
8. The appliance must not be powered by an external switching
device, such as a timer, or connected to a circuit that is periodically
switched on and o.
9. Any intervention in the appliance by a person other than an
authorized service provider results in loss of warranty.
10.The warranty does not cover damage caused by outside eects
(ood, chemicals, re, etc.).
11.The manufacturer is not liable for any damage caused by improper
grounding/use. DANGEROUS VOLTAGE, RISK OF INJURY!
12.This appliance can be used by children aged 8 years and older and
people with lower physical or mental abilities or lack of experience
and knowledge, if they are supervised or have been instructed to
use the product in a safe manner and understand the potential
dangers. Cleaning and maintenance performed by the user should
not be done by children unless they are older than 8 years and
under supervision. Children under 8 years old must keep away from
the appliance and its power supply. Children may not play with the
appliance.
13.This dryer is intended for domestic and internal use only. The
warranty will be void in the event of commercial use.
14.Use this product only for laundry with a label that indicates it is
suitable for drying.
15.The manufacturer is not liable for any damage caused by improper
use or transportation.
16.Do not allow oor coverings to obstruct ventilation openings.
17.Installation and repairs of the appliance may only be carried out by
an authorized service centre. The manufacturer is not liable for any
damage caused by unauthorized repairs.
WARNING: Never splash or pour water into the dryer to wash it!
There is a risk of electric shock!

English
English
5
18.Leave at least 3 cm of space between the side and rear walls of
the product. This also applies to the top, if you plan to place the
appliance under the worktop.
19.Assembly / disassembly in the case of under the worktop installation
must be carried out by an authorized service technician.
20.Check that the product is not damaged before installation. Never
install and operate a damaged product.
21.Keep pets away from the dryer.
22.This device may not be used by persons (including children) with
limited physical, sensory or mental capabilities, or persons without
appropriate knowledge and experience, unless supervised or
instructed in the use of this device by a person responsible for their
safety.
23.Do not leave children unattended near the appliance.
24.Children under 3 years of age should be kept away unless they are
supervised at all times.
25.Children could get stuck in the appliance, with risk of death. Do
not allow children to touch the glass door when the appliance is
operating. The surface becomes extremely hot and can cause skin
damage.
26.Keep packaging material out of the reach of children.
27.Poisoning and irritation may occur if the washing and cleaning
detergents are consumed or come into contact with skin and eyes.
Keep cleaning products out of the reach of children. Electrical
products are dangerous to children.
28.Keep children away from the product when in use.
- You can use the child lock to avoid to prevent children from
interrupting the drying cycle and changes in the running program.
- Do not allow children to sit on or inside the product.
Children under 3 years of age should not be allowed access unless
they are under constant supervision.
29.Due to the risk of re, the following clothes and products must
NEVER be dried in the dryer:
- Do not dry unwashed laundry in the dryer.

English
English
6
- Laundry that has been soiled with materials such as cooking oil,
acetone, alcohol, gasoline, kerosene, stain remover, turpentine,
wax, and wax remover must be washed in hot water with extra
amount of detergent before drying in the dryer.
- Dishtowels and mats that have residues of ammable cleaning
agents or acetone, gas, kerosene, stain remover, turpentine,
candles, wax, wax removers or chemicals.
- Laundry that has hair spray remnants, nail polish removers, and
the like.
- Laundry on which industrial cleaning chemicals have been used
(for example, dry cleaning).
- Laundry, which contains any kind of foam, rubber or rubber part.
These include foam rubber (latex foam), bathing caps, waterproof
textiles, clothing or cushions with rubber support or rubber foam
items.
- Items with lls and damaged items (pillows or jackets). The foam
rising from these articles may ignite during drying.
- Operating the dryer in environments that contain coal or our
dust may cause an explosion.
WARNING: Underwear that contains metal reinforcement must not
be dried in the dryer. The dryer may be damaged if the metal parts
are loosened or broken when dried.
30.Fabric softeners or similar products must be used in accordance
with the manufacturer's instructions as specied in the fabric
softener‘s instructions.
- Remove all objects from the pockets, e.g.
lighters and matches.
This product contains an environmentally safe
but ammable gas R290. Protect the product
from open ames and sources of re.
WARNING: Never stop the appliance until the
drying program stops. If you have to stop the
appliance, remove the laundry quickly and
unfold it so that it cools down.
Risk of re and
damage!

English
English
7
WARNING: Make sure pets can not get into the dryer. Look inside the
dryer before use.
WARNING: The laundry in the dryer may overheat if the program is
stopped or in the event of a power failure while the dryer is running.
This concentration of heat can cause spontaneous combustion, so
always run the Refresh program to cool the laundry or quickly remove
any laundry from the dryer and hang it to cool it.
Only use the dryer for drying at the home and for drying fabrics
marked as suitable for drying. All other uses are outside the intended
use range and are prohibited. The warranty will be void in the event of
commercial use.
This appliance is intended for domestic use only and should be placed
on an even and stable surface.
- Do not sit or lean on the dryer door. The dryer could tip over.
- To maintain the temperature that does not damage the laundry
(e.g. to prevent the ignition of the laundry), the cooling process
starts after heating. Then the program ends. Always remove the
laundry immediately at the end of the program.
WARNING: Never use the dryer without a textile bre lter or with a
damaged lter.
The textile bre lters must be cleaned after each use as described in
section Cleaning the textile bre lter.
The textile bre lters should be dried after wet cleaning. Wet lters
could cause a malfunction during drying.
You must not allow the accumulation of bres around the dryer’s drum
(not applicable to appliances, which are ventilated to the exterior of
the building)
INSTALLATION
In the room where the appliance is to be installed, there must be no lockable, sliding doors or hinged doors on
the opposite side of the tumble dryer door, which could block the full opening of the dryer‘s door.
WARNING: Keep the air vents unobstructed in the appliance cabinet or a built-in structure.
Before calling the nearest authorized service center for the dryer installation, make sure that the electrical
installation and water drain are suitable and in accordance with the instruction manual. If not, contact a
qualied electrician and plumber to take the necessary measures.

English
English
8
It is the customer's responsibility to prepare the location for the dryer, as well as the electrical installation and
wastewater installation. Check that the dryer is not damaged before installation. Do not install the dryer if it is
damaged. Damaged products can endanger your health.
Install the dryer on a stable, level surface.
Use the dryer in a well-ventilated, dust-free environment.
Do not reduce the space between the dryer and the oor with materials such as carpets, boards and mats.
Do not cover the ventilation grilles located on the dryer stand.
• After installing the dryer, leave it in the same place where it was connected. When installing the dryer,
make sure that its rear wall does not touch anything (tap, socket, etc.).
• The operating temperature of the dryer is from +5°C to +35°C. When operating outside this temperature
range, the performance of the dryer will be negatively aected and the product will be damaged.
• Be careful when transporting the product because it is heavy. Always use protective gloves.
• Always install the dryer at a wall.
• The rear of the dryer must be positioned against the wall.
• If the dryer is placed on a stable surface, use a spirit level to check that it is fully stable. If it is not, adjust the
feet until the dryer is stable. Repeat this procedure each time the dryer is moved.
• Do not place the dryer on the power cable.
IMPORTANT NOTE: Do not reduce the gap between the dryer and the oor with materials such as carpets,
boards and mats, otherwise the air dryer will not receive sucient air intake.
Do not place the dryer in rooms where there is a risk of freezing. Freezing temperatures negatively aect the
dryer‘s performance. Condensed water that freezes the pump and hose can cause damage.
Installation above the washing machine
WARNING: You cannot place a washing machine on the dryer. Observe the following precautions when
installing the dryer above the washing machine.
WARNING: The dryer can be only placed on washing machines that have the same or greater capacity.
In order to be able to use the dryer on the washing machine, a strengthening part must be provided between
the two products. This strengthening part has to be installed by an authorized service technician.
When the dryer is placed on a washing machine, the total weight of these products can reach nearly 150
kilograms (fully loaded). Place the appliances on a solid oor that has sucient load capacity!
Installation table for washing machine and dryer
Dryer
(Depth)
Washing machine
37-41 cm 42-45 cm 46-49 cm 50-56 cm 57-63 cm
52.5 cm X
56 cm X X
61 cm X X X
64 cm X X X X
Drain connection (with optional drain hose)
In products equipped with a heat pump the water accumulates in the water tank during the drying cycle. You
must drain the accumulated water after each drying cycle. You can drain the accumulated water directly into
the drain through the drain hose that is supplied with the appliance instead of regularly pouring out the water
collected in the water tank.
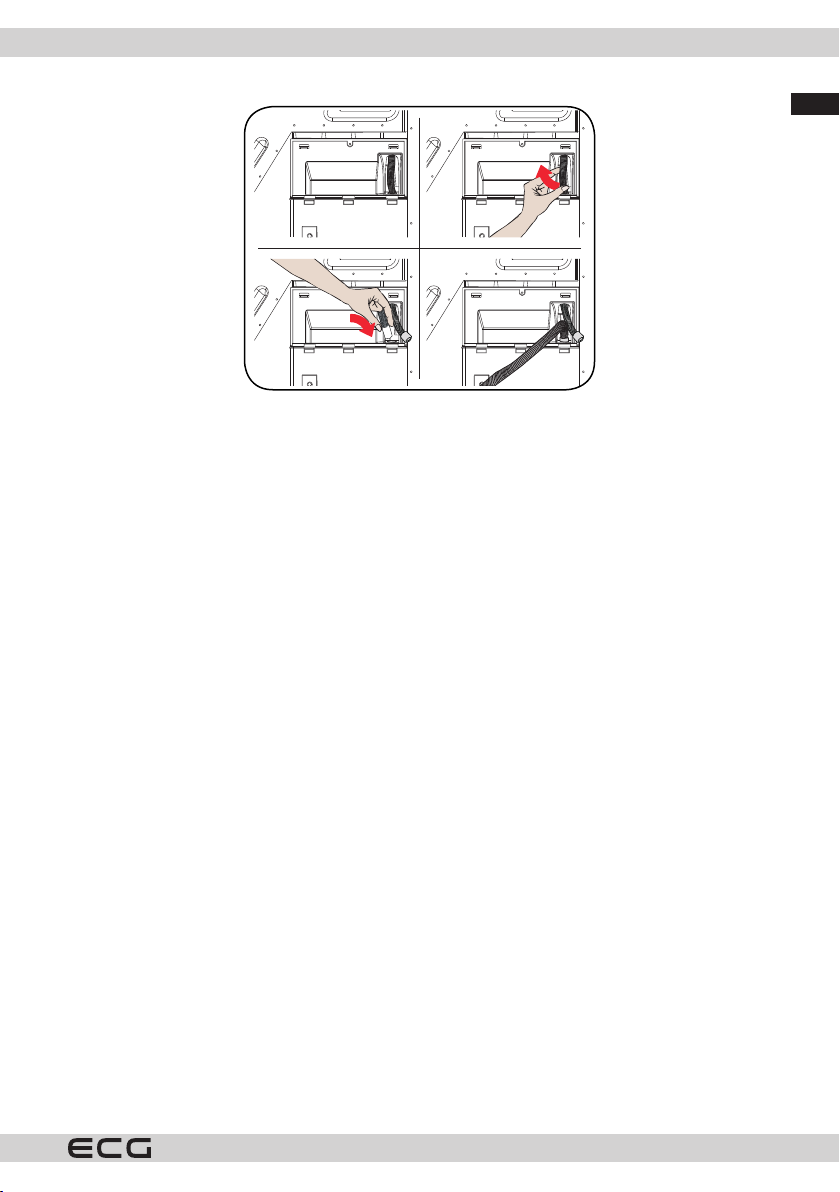
Connecting the drain hose
1. Pull out and remove the hose end from the rear of the dryer. Do not use any tools to remove the hose.
2. Connect one end of the drain hose supplied with the dryer to the connection point from which you
removed the hose in the previous step.

English
English
9
3. Connect the other end of the drain hose directly to the drain or sink.
2
1
3
WARNING: The hose must be connected so that it can not come loose. If the hose is disconnected during
draining, the house may be ooded.
IMPORTANT NOTE: Fasten the drain hose at the maximum height of 80 cm.
IMPORTANT NOTE: Make sure that the drain hose is not bent and is not wedged between the drain and the
appliance.
Adjusting the feet
• To operate the dryer with less noise and vibration, it must be stable and balanced on the feet. Adjust the
feet to ensure the proper product balance.
• Turn the feet to the left or right until the dryer is in a horizontal position.
IMPORTANT NOTE: Never remove the adjustable feet.
Electrical wiring
WARNING: There is a risk of electric shock.
• Your dryer is set to use 220-240 V and 50 Hz.
• The dryer power cable is equipped with a special connector. This connector must be connected to a
grounded socket protected by a 16 amperes fuse as indicated on the rating plate. The fuse for short-circuit
protection of the power line where the socket is connected must also be 16 amperes. If you do not have
such a socket or fuse, contact a qualied electrician.
• Our company is not liable for damages caused by use without grounding.
IMPORTANT NOTE: Operating the equipment at low voltage will shorten the life and reduce the performance
of your appliance.
Installation under the worktop
• Leave at least 3 cm of space between the side and rear walls of the product.This also applies to the top wall
if you intend to install the appliance under the worktop.
• Assembly / disassembly in the case of under the worktop installation must be carried out by an authorized
service technician.

English
English
10
DESCRIPTION
1
2
3
4
5
6
7
8
9
10
11
1. Top plate
2. Control panel
3. Door
4. Heat exchanger
5. Exchanger door fuse
6. Ventilation grilles
7. Adjustable legs
8. Exchanger door
9. Rating plate
10. Textile bres lter
11. Water tank
LAUNDRY PREPARATION
Sorting laundry for drying
Always follow the instructions on the garment labels. Dry only the laundry with a label indicating that it is
suitable for drying in the dryer.
• Do not use the dryer with the quantity and types of laundry, which are not listed in section „Kapacita
sušičky“.
Suitable for tumble
drying Ironing is not necessary Delicate/Fine drying Not suitable for dryer
Do not dry Do not dry clean At any temperature At high temperatures
At medium temperatures At low temperatures Without heating Hang to dry
Spread to dry Hang wet to dry Spread to dry in the
shade Suitable for dry cleaning

English
English
11
Do not dry thin, multi-layered, or thick fabrics together as they dry at dierent temperatures. For this reason,
dry together the garments of the same fabric structure and type. This ensures uniform drying. If you think the
laundry is still wet, you can choose a time program for further drying.
Please dry large items (such as bedding) and small items separately so that you don't have damp clothes.
IMPORTANT NOTE: Wool, silk clothing, ne and valuable fabrics, airtight pieces and tulle curtains are not
suitable for machine drying.
Preparing laundry for drying
Danger of explosion and re!
Remove all objects such as lighters and matches from your pockets.
WARNING: The dryer drum and the fabric can be damaged.
• The laundry after washing can be entangled with each other. Separate the laundry items before placing
them in the dryer.
• Remove all items from your pockets and do the following:
• Tie together the textile straps, apron strings and the like, or use a laundry bag.
• Fasten the zippers, buckles and fasteners, and the buttons on the bed linen.
• To get the best drying result, sort the laundry by the type of fabric and drying program.
• Remove clips and similar garment metal parts.
• Fabrics such as t-shirts and knitted garments usually shrink when rst dried. Use a protective program.
• Do not overdry synthetics. This causes the laundry to be wrinkled.
• When washing the laundry you want to dry, adjust the fabric softener according to the washing machine
manufacturer's instructions.
Dryer capacity
Follow the instructions in section„Tabulka programů aspotřeby“. Do not load more than is the capacity listed
in the table.
IMPORTANT NOTE: We do not recommend to load the dryer with the amount of laundry exceeding the value
shown in the picture. If the appliance is overloaded, its drying performance is reduced. In
addition, the dryer and laundry may be damaged.

English
English
12
Laundry Dry laundry weight (g)
Bed linen (double) 725
Pillow case 240
Dishtowels 700
Towels 225
Shirts 190 190
Cotton shirts 200
Jeans 650
Linen pants 400
T-shirts 120
USE OF THE DRYER
Control panel
1. Rotary programme selector
2. Electronic display and additional functions
Rotary programme selector
Use the selector to choose the desired drying programme
Display and additional functions*
Button 1: Delayed start
Button 2: Drying level
Button 3: Gentle drying (sound signal o - hold for approx. 3 seconds)
Press buttons 2 and 3 simultaneously: Child lock
Button 4: Start/Pause
* Additional features may vary depending on the model.

English
English
13
Screen symbols:
Water tank alert indicator
Indicator for textile bre cleaning alert
Indicator alert for cleaning the heat exchanger
Program and consumption table
Press the Start/Pause button to start the program. The Start/Pause indicator shows that the program has
started and the drying light indicator comes on.
Programme Load (kg)
Spinning speed
in the washing
machine
Approximate
amount of moisture
remaining
Drying time
(minutes)
Cotton
Extra drying 8 1000 60 % 198
For the closet 8 1000 60 % 189
For ironing 8 1000 60 % 156
Synthetics
For the closet 4 800 40 % 80
For ironing 4 800 40 % 59
Delicates 2 600 50 % 55
Mix 4 1000 60 % 115
Baby clothes 3 1000 60 % 86
Jeans 4 1200 60 % 125
60 min - - - 60
40 min - - - 40
20 min - - - 20
Refresh - - - 10
Express 34' 1 1200 50 % 34
Shirts 20' 0.5 1200 50 % 20

English
English
14
Energy consumption values
Programme Load (kg)
Spinning speed
in the washing
machine
Approximate
amount of
moisture
remaining
Energy
consumption
values (kWh)
Cotton to Closet 8 1000 60 % 1.91
Cotton for ironing 8 1000 60 % 1.47
Synthetics for the closet 4 800 40 % 0.78
Energy consumption in the“O” mode PO(W) 0.5
Energy consumption in the“On”mode PL(W) 1
The “Cotton to Closet” program used at full and partial load is the standard drying program
for which information on the label and information sheet is relevant. This program is the most
energy ecient program for drying normal wet cotton laundry.
* Energy label standard program (EN 61121: 2013)
All values in the table have been determined in accordance with EN 61121: 2013. Consumption values may
dier from the values in the table depending on the type of fabric, the method of spinning, ambient conditions
and variations in voltage.
Additional functions
The table below summarizes the options that can be selected in the programs is provided below.
Option Description
Gentle drying Delicate fabrics are dried for a longer period of time at a low temperature.
Drying level The humidity obtained after drying can be increased up to 3 levels above the
standard setting. In this way, the desired level of residual moisture can be selected.
Once selected, the corresponding drying level indicator lights up - 1,2 or 3.
Delayed start You can delay the start time of the selected programme by 1 to 23 hours. The
desired delayed start time can be activated by pressing the Start/Pause button.
After the set time has elapsed, the selected programme will start automatically.
During the delay period, options compatible with the program can be activated/
deactivated. By holding down the "Delayed start" button you can change the delay
time repeatedly.
Cancelling the sound
alert
Cancels all sound signals (when turning the programme selection knob, button
sounds and end of programme notications). To cancel the audible alert, press the
number.5" button for 3 seconds. When you press the button, you will hear a sound
alert that this option is cancelled. Press button 5 again for 3 seconds to resume the
audio signals.

English
English
15
Option Description
Child lock The appliance is equipped with a child lock to prevent changing the current
program, The child lock is activated by pressing buttons 4 and 5 at the same time
for about 3 seconds.
If the child lock is activated, all buttons will be deactivated. WARNING: The
child lock is not automatically deactivated when the programme is nished. To
deactivate the child lock, turn the selector lever to OFF.
Then rotate them to the rst position (program 1). The child lock is still active. To
deactivate the child lock, press buttons No. 4 and 5 simultaneously for approx. 3
seconds. When the child lock is activated/deactivated, the display will show "CL"
for 2 seconds and an audible warning will sound. Warning: When the dryer is in
operation or the child lock is active and you turn the program selection knob, you
will hear an audible warning and the display will show "CL" for 2 seconds
If you turn the programme selection knob, an audible warning sounds. Even if you
set the program selection knob to a dierent program, the previous program will
continue to run. To select a new programme, you must deactivate the child lock
and then adjust the programme selection knob.
Program start
The Start/Stop LED ashes during program selection. Press the Start/Pause button to start the selected
program. The Start/Pause LED lights up to indicate that the selected program is running. At the same time, the
drying LED lights up.
Programme Description
Cotton Extra
Drying
This programme dries high weight or multi-ply fabrics (e.g. cotton towels, bed
linen, pillows, bathrobes) at high temperature. The dried laundry can be stored
directly in the wardrobe.
Cotton to Closet This programme dries cotton pyjamas, underwear, tablecloths etc. This way, you
can store the dried linen directly in the wardrobe.
Cotton for ironing This program dries cotton linen and prepares it for ironing. Laundry dried in this
way is damp when the cycle is complete, but irons better.
Synthetics to
Closet
This program dries synthetic materials such as shirts, t-shirts, blouses, at a lower
temperature compared to a cotton program, and allows you to place the clothes in
the closet.
Synthetics For
ironing
This programme dries synthetic materials such as shirts, T-shirts and blouses at a
lower temperature than cotton programmes. Laundry dried in this way is damp
when the cycle is complete, but irons better.
Delicates This program dries thin clothing such as shirts, blouses and silk garments at low
temperature to be ready for wear.
Mix This programme dries garments made from a mixture of cotton and synthetic
materials that are not dyed, so that they are ready to wear immediately.
Baby clothes This programme dries delicate baby and children's clothes at a low temperature so
that they are ready for immediate wear.
Jeans Programme for drying jeans
60 min. Drying at low temperature. Regardless of the drying level, the programme will stop
at the desired time.
40 min.
20 min.
Refresh The drying time can be selected between 10 and 120 minutes without hot air
supply. This refreshes the laundry and eliminates odours.

English
English
16
Programme Description
Express 34' 1 kg of cotton shirts, washed at high speed in the washing machine, will be dry in
34 minutes.
Shirts 20' 2 to 3 shirts will be ready for ironing in 20 minutes.
IMPORTANT NOTE: Do not open the door when a program is running. If you have to open the door, do not
leave it open too long.
Selecting the standby mode
After 15 minutes without intervention in the program selection, the device enters energy saving mode to
reduce energy consumption. For this model, the "- - -" indication will ash as follows during power saving
mode: 0.5 s on, 3 s o. In power saving mode, the "- - -" indication will decrease in luminance. To restart the
device, you must switch the selector switch to OFF and select the program again.
Program progress
During program
If you open the door while the program is running, the dryer will switch to standby mode. After closing the
door, press the Start/Pause button to continue the program.
Do not open the door when a program is running. If you have to open the door, do not leave it open too long.
End of program
When the program is over, the indicator lights of Start/Pause, the water tank level, the lter cleaning and the
heat exchanger will light up. In addition, an alert will be sound at the end of the program. You can remove the
laundry to prepare the dryer for a new batch.
IMPORTANT NOTE: Clean the lter after each program. Empty the water container after each program.
IMPORTANT NOTE: if you do not remove the laundry after the end of the program, the 1 hour Anti Crease
phase is activated.This program rotates the drum at regular intervals to prevent wrinkling.
Information about the drum light
• This appliance is equipped with a LED light located in the drum.The LED lights up automatically when you
open the door. It automatically goes o after a while.
• The user can not set up turning the light on or o by himself.
• Do not try to replace or modify the light yourself.
PROGRAM
Option
Delayed start
End of cycle
Cancelling the sound
alert
Child lock
Drying level
Delicates
Cotton Extra Drying
Cotton to Closet
Cotton for ironing
Synthetics to Closet
Synthetics For ironing
Delicates X
Mix

English
English
17
PROGRAM
Option
Delayed start
End of cycle
Cancelling the sound
alert
Child lock
Drying level
Delicates
Baby clothes
Jeans
60 min X X
40 min X X
20 min X X
Refresh X X
Fast 34' X X
Shirts 20' X X
X Not optional
Optional

English
English
18
MAINTENANCE AND CLEANING
IMPORTANT NOTE: Do not use industrial chemicals to clean the dryer. Do not use a dryer that has been
cleaned with industrial chemicals.
Cleaning the textile bres lter
IMPORTANT NOTE: DO NOT FORGET TO LEAN TEXTILE FIBERS FILTER AFTER EACH PROGRAM RUN.
To clean the textile bres lter:
1. Open the loading door.
2. Pull out and remove the lters.
3. Open the outer lter.
4. Use hands or soft cloth to clean the outer lter.
5. Open the inner lter
6. Use hands or soft cloth to clean the inner lter.
7. Close the lters and put the hooks back in place.
8. Place the inner lter inside the outer lter.
9. Reinstall the textile bres lter back in place.
After using the drier for a period of time, if you encounter a layer
which creates an obstacle on the top of the lter, clean the lter with
warm water. Dry the lter thoroughly and reinstall it.

English
English
19
Emptying the water tank
1. Pull out the compartment cover and carefully remove
the tank.
2. Empty the water from the tank.
3. If bres collect on the tank cover, clean it with water.
4. Replace the water tank back in place.
IMPORTANT NOTE: Never remove the water tank while a
program is running. Water condensed in the water tank is
not suitable for human consumption.
IMPORTANT NOTE: DO NOT FORGET TO CLEAN THE WATER
TANK AFTER EACH PROGRAM RUN.
Cleaning the heat exchanger
IMPORTANT NOTE: If you see warning “Heat exchanger
cleaning”, clean the heat exchanger.
IMPORTANT NOTE: EVEN IF THE INDICATOR “HEAT
EXCHANGER CLEANING” IS NOT ON: CLEAN THE HEAT
EXCHANGER AFTER EACH 30 DRYING RUNS OR ONCE A
MONTH.
If the drying process is nished, open the loading door and wait until it cools.
1. Open the cover plate cover as shown.
2. Unlock the heat exchanger.
3. Remove the cover of the heat exchanger as shown in the picture.
4. Clean the front area of the heat exchanger according to the picture.
5. Install the heat exchanger cover according to the picture.
6. Lock the heat exchanger.
7. Close the cover plate according to the picture.
WARNING: THE HEAT EXCHANGER STABILIZERS ARE SHARP. DO NOT TRY TO CLEAN
THEM MANUALLY. THE STABILIZERS CAN DAMAGE YOUR HANDS.
Cleaning the humidity sensor
There are humidity sensors inside the appliance, which determine if the laundry is
dry or not.
To clean the sensors:
1. Open the loading door.
2. If the machine is still hot due to drying, wait for it to cool.
11
2

English
English
20
3. Use a soft cloth soaked in vinegar to wipe the sensor's metal surfaces and dry them.
IMPORTANT NOTE: CLEAN THE METAL SENSOR SURFACES 4 x A YEAR.
IMPORTANT NOTE: Do not use metal tools to clean the metal surfaces of the sensor.
WARNING: Do not use cleaning agents or similar products to clean the sensors due to the risk of re or
explosion.
Cleaning the inner surface of the loading door
IMPORTANT NOTE: DO NOT FORGET TO CLEAN THE INNER SURFACE OF THE LOADING DOOR AFTER EACH
DRYING RUN.
Open the dryer loading door and clean all inside surfaces and seals with a soft, damp cloth.
TECHNICAL SPECIFICATIONS
Brand ECG
Model ETF 80 Heat BlackLine
Height Min: 845 mm / Max: 855 mm*
Width 596 mm
Depth 563 mm
Capacity (max.) 8 kg**
Net weight (with plastic door) 41.5 kg
Net weight (with glass door) 43 kg
Voltage 220–240 V
Power input 1000 W
Fuse / Total current 10 A
* Min. Height: Height with adjustable feet is not available. Max. height: Height with adjustable feet extended
to maximum.
**Weight of dry laundry before washing
IMPORTANT NOTE: Technical specications may be changed without prior notice when the quality of the
dryer will be improved.
Table of contents
Other ECG Dryer manuals
Popular Dryer manuals by other brands

Bosch
Bosch Vision 500 series Operating, care and installation instructions

Maytag
Maytag Bravos MEDB850WB installation instructions

Tricity Bendix
Tricity Bendix BTD 600 Operating & installation instructions

Beko
Beko DA 7011 GX user manual

GE
GE DNCK440EA Dimension Guide

Kenmore
Kenmore 62821 Use Feature manual