ECOHOUZING ECP5015 User manual

User Manual
Model: ECP5015
Rice Cooker
Thank you for purchasing our rice cooker. Please read the User Manual
carefully before use and keep it in a convenient place for future reference.
(Pictures in the text are for reference only,
please refer to the actual product.)

1. Important: Read all instructions carefully before first use.
2. Do not touch hot surfaces. Use the handles or knobs.
3. Use only on a level, dry and heat-resistant surface.
4. To protect against fire, electric shock and injury to persons, do not
immerse cord, plug or the appliance in water or any other liquid.
See instructions for cleaning.
5. Close supervision is necessary when the appliance is used by or
near children.
6. Unplug from outlet when not in use and before cleaning. Allow unit
to cool before putting on or taking off parts and before cleaning the
appliance.
7. Do not operate any appliance with a damaged cord or plug or after
the appliance malfunctions or has been damaged in any manner.
Contact Midea customer service for examination, repair or adjustment.
8. The use of accessory attachments not recommended by Midea
Housewares may result in fire, electrical shock or injury.
9. Do not use outdoors.
10. Do not touch hot surfaces or let the cord hang over the edge of a counter
or table.
11. Do not place on or near a hot gas or electric burner or in a heated
oven.
12. Do not use the appliance for other than its intended use.
13. Extreme caution must be used when moving the appliance containing rice,
hot oil or other liquids.
14. Do not touch, cover or obstruct the steam vent on
the top of the rice cooker as it is extremely hot and may cause scalding.
15. Use only with a 120V AC power outlet.
16. Always unplug from the base of the wall outlet. Never pull on the cord.
17. The rice cooker should be operated on a separate electrical circuit from
other operating appliances. If the electrical circuit is overloaded with other
appliances, the appliance may not operate properly.
18. Always make sure the outside of the inner cooking pot is dry prior to use. If
the inner pot is returned to the cooker when wet, it may damage or cause
the product to malfunction.
IMPORTANT SAFEGUARDS
Basic safety precautions should always be followed when
using electrical appliances, including the following:
2

19. Use extreme caution when opening the lid during or after cooking. Hot
steam will escape and may cause scalding.
20. Rice should not be left in the inner cooking pot with the Keep-Warm
function on for more than 12 hours.
21. To prevent damage or deformation, do not use the inner cooking pot on a
stovetop or burner.
22. To disconnect, turn any control to OFF, then remove the plug from the wall
outlet.
23. CAUTION: To reduce the risk of electrical shock, cook only in the
removable inner cooking pot provided.
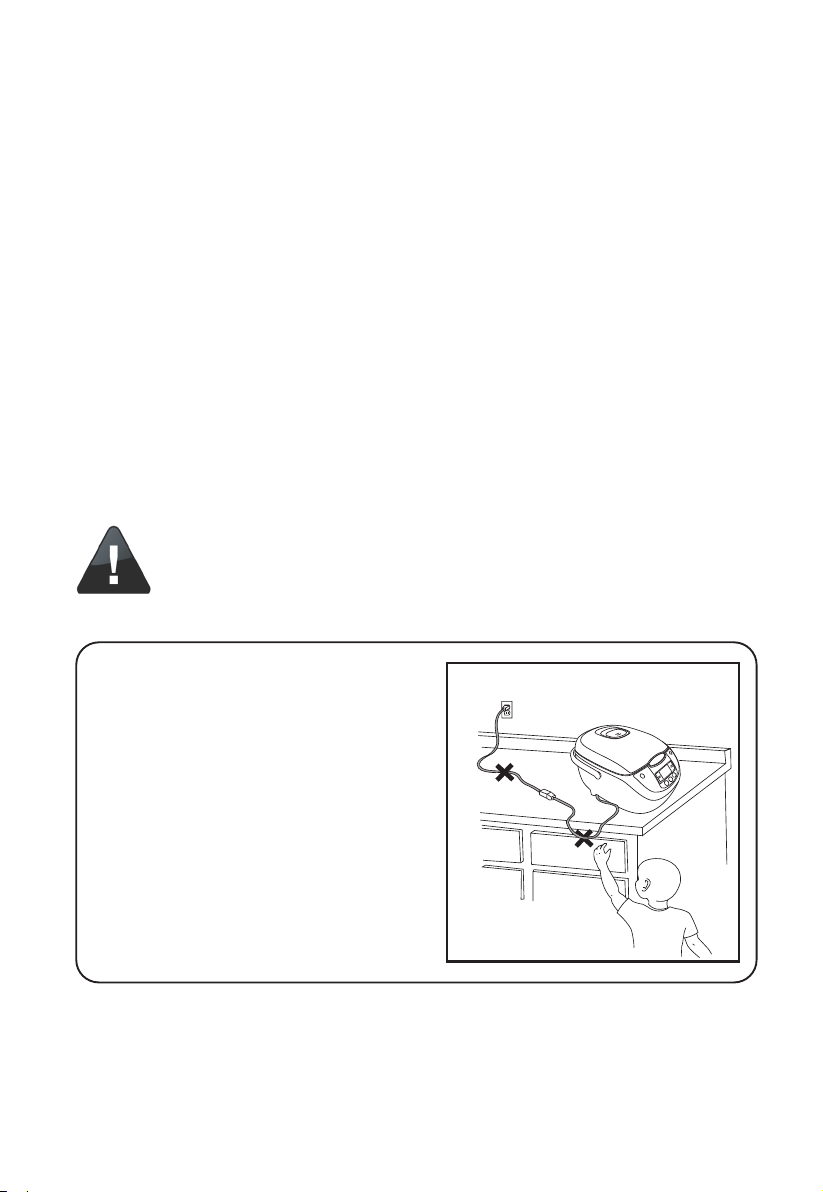
DO NOT DRAPE CORD!
KEEP AWAY
FROM CHILDREN!
IMPORTANT SAFEGUARDS
SAVE THESE INSTRUCTIONS
Short Cord Instructions
1. A short power-supply cord is provided to
reduce the risks resulting from becoming
entangled in or tripping over a longer cord.
2. Longer extension cords are available and
may be used if care is exercised in their use.
3. If a longer extension cord is used:
a.The marked electrical rating of the extension
cord should be at least as great as
the electrical rating of the appliance.
b.The longer cord should be arranged so that
it will not drape over the counter top
or tabletop where it can be pulled by children
or tripped over unintentionally.
3
THIS APPLIANCE IS FOR
HOUSEHOLD USE ONLY.
Polarized Plug
This appliance has a polarized plug (one blade is wider than the other); follow the
instructions below:
To reduce the risk of electric shock, this plug is intended to fit into a polarized
outlet only one way If the plug does not fit fully into the outlet, reverse the plug.
If it still does not fit, contact a qualified electrician. Do not attempt to modify the
plug in any way.
If the supply cord is damaged, it must be replaced by the manufacturer, its service
agent or a similarly qualified person in order to avoid hazard.
4

Product Instructions
Accessories
Scoop Spoon Measuring
cup Steamer
5
Power Cord
Control panel
Handle
Main unit
Uncovering
button
Cover
Usage Instructions
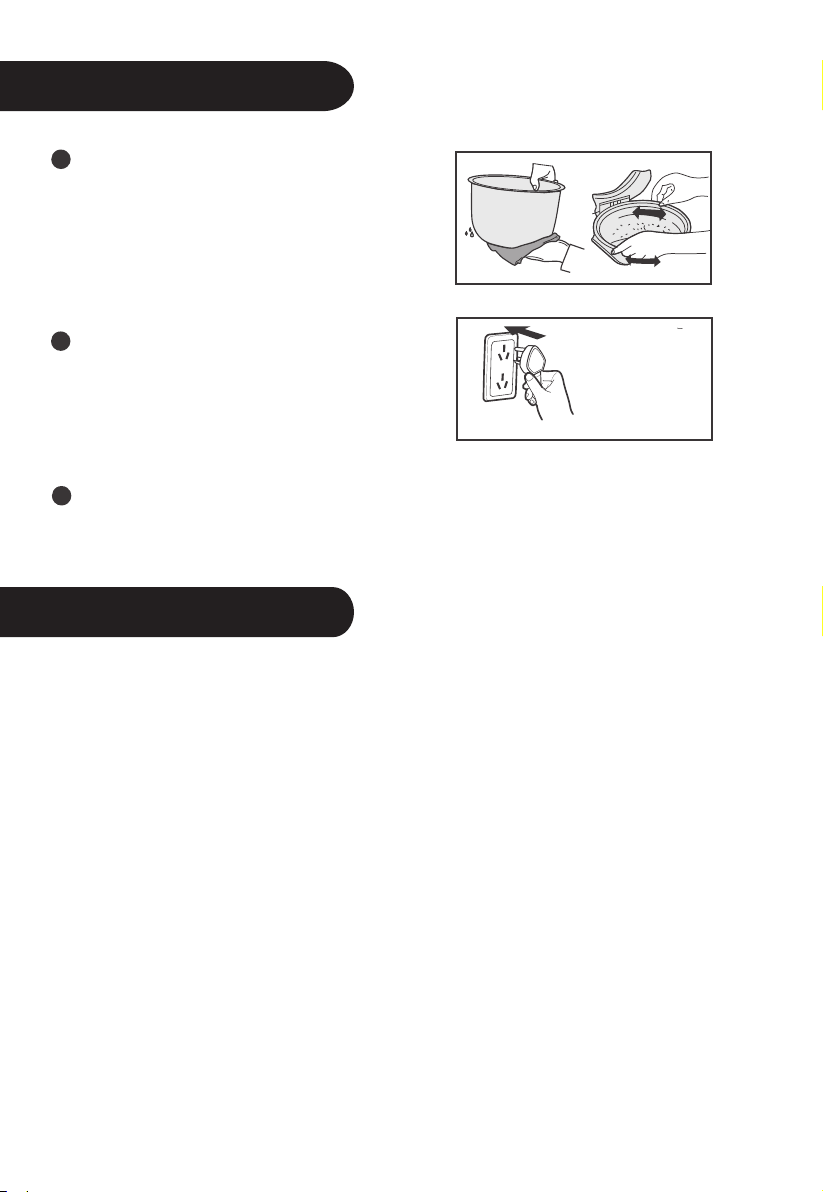
Use of the Functional Buttons
Dry the external surface of the inner
pot with fabric, put it into the cooker,
please turn the inner pot for 2-3 times
to make it perfectly contact the heating
tray; then press the cooker cover till it
makes “Click” sound.
Power socket
Avoid heating the inner pot on other
stoves, otherwise, it may cause distortion
under high temperature; it is not allowed
to substitute the inner pot with other
containers on the heating tray.
Press the function button to select the desired function, then press the
“Start” button to enter into the working state, or press corresponding
function button to directly enter into the working state.
LED
Supply power, press “on / off start” button, the cooker switch on and standby LED
Warm/Cancel button
1. Under the Standby state, press the “Warm/Cancel” button to enter into WARM.
As shown in Drawing
2. Under the Working state: press the “Warm/Cancel” button to exit the work state
and return the Standby state.
3. After cooking, the cooker will automatically enter into the WARM state, during
the WARM process, the time displays from 0-12h, if it exceeds 12h, LED
displays “----”, and the cooker keeps WARM, the suggested WARM time is
less than 5h for avoiding rice color or taste changing.
ON/OFF Start button
Plug in the power, press “on / off start” button, the cooker switch on and standby.
Under the standby state, press "on / off start” button the cooker switch off. On
standby state, choose the functions and press the "on / off start " button to enter
the working process of the function.)
6
displays “----”, “Start” indicator flashes, the electric rice cooker keeps at the Standby
state.

Use of the Functional Buttons
Menu button
Under the Standby state , press the “Menu” button to select the function.
The function is circulated as: Brown Rice - Baby Porridge - Oatmeal - Soup
-Steam - Stew- Slow Cook - Reheat.
Quick Cook button
, press the “Quick Cook” button, “Quick Cook” indicator
press the “Start” button to enter into the “Quick Cook” work program.
White Cook button
, press the “White Cook” button, “White Cook” indicator
press the “Start” button to enter into the “White Cook” work program.
Congee button
Supply power, press the “Congee” button, “Congee” indicator lights on, the LED
flashes and displays “2:00”, and then press the “Start” button to enter into the
“White Cook” work program.
Delay Timer button
Select the reserving function, press the “Delay Timer” button, “Delay
Timer” indicator lights on, after setting the time, press the “Start” button. The set
reserving time is the time to stop reserving.
h and min buttons
Press the “h” or “min” button to adjust the clock.
Select the reserving set state, press the “h” or “min” button to set the time of
stopping reserving.
Press “h” once to increase 1h, press “min” once to increase 10min.
7
Under the Standby state
lights on,
lights on,
Under the Standby state

Usage Instructions
Usage Instructions
8
Quick Rice
1. Under the Standby state, press the “Quick Rice” button, “Quick Rice” indicator lights on.
2. Press the “Start” button to start the “Quick Rice” function, the “Start” and “Quick Rice”
indicators light on, LED displays .
3. Quick Rice function will automatically enter into rice stewing stage when finishing cooking,
and then start countdown of rice cooking.
Note: Water (Mark) is the water level mark on the inner pot.
Function
Quick Rice ECP5015
Specification
Proportion
Rice
(Cup)
2
2 cups
10 cups
About 45min
2
Water
(Mark)
Cooking
Time
Min Rice
Amount Max Rice
Amount
Function Specification
Proportion
Rice
(Cup)
White Rice ECP5015 22 cups 10 cups About 55min
2
Water
(Mark)
Cooking
Time
Min Rice
Amount Max Rice
Amount
White Rice
1. Under the Standby state, press the “White Rice” button, “White Rice” indicator lights on.
2. Press the “Start” button to start the “White Rice” function, the “Start” and “White Rice”
indicators light on, LED displays .
3. White Rice function will automatically enter into rice stewing stage when finishing cooking,
and then start countdown of rice cooking.
Note: Water (Mark) is the water level mark on the inner pot.

Usage Instructions
Usage Instructions
9
Congee
1. Under the Standby state, press the “Congee” button, “Congee” indicator lights on.
2. Press the “Start” button to start the “Congee” function, the “Start” and “Congee” indicators
light on, LED displays 2:00 hour, and then starts countdown.
Note: Water (Mark) is the water level mark on the inner pot.
Brown Rice
1. Under the Standby state, press the “Menu” button and select “Brown Rice” function,
“Brown Rice” indicator lights on.
2. Press the “Start” button to start the “Brown Rice” function, the “Start” and “Brown Rice”
indicators light on, LED displays .
3. Brown Rice function will automatically enter into rice stewing stage when finishing cooking,
and then start countdown of rice cooking.
Note: Water (Mark) is the water level mark on the inner pot.
Function Specification
Proportion
Rice
(Cup)
Congee ECP5015 22 cups 2 cups About 2 hours
2
Water
(Mark)
Cooking
Time
Min Rice
Amount Max Rice
Amount
Function
Brown Rice
Specification
Proportion
Rice
(Cup)
80 min
ECP5015 22 cups 10cups About
2
Water
(Mark)
Cooking
Time
Min Rice
Amount Max Rice
Amount

Usage Instructions
Usage Instructions
10
Baby Porridge
1. Under the Standby state, press the “Menu” button and select “Baby Porridge” function,
the “Baby Porridge” indicator lights on.
2. Press the “Start” button to start the “Baby Porridge” function, the “Start” and “Baby Porridge”
indicators light on, LED displays .
Oatmeal
1. Under the Standby state, press the “Menu” button and select “Oatmeal” function, the
“Oatmeal” indicator lights on.
2. Press the “Start” button to start the “Oatmeal” function, the “Start” and “Oatmeal” indicators
light on, LED displays 40 minutes, and then starts countdown.
Soup
1. Under the Standby state, press the “Menu” button and select “Soup” function, the “Soup” indicator
lights on.
2. Press the “Start” button to start the “Soup” function, the “Start” and “Soup” indicators light on,
LED displays 2:00 hours, and then starts countdown.
Steam
1. Under the Standby state, press the “Menu” button and select “Steam” function, the “Steam”
indicator lights on. LED min flashes 5.
2. Press the “Start” button to start the “Steam” function, the “Start” and “Steam” indicators light
on, LED displays , and then starts countdown. After boiling the water, LED displays the
countdown time.
Stew
1. Under the Standby state, press the “Menu” button and select “Stew” function, the “Stew”
indicator lights on.
2. Press the “Start” button to start the “Stew” function, the “Start” and “Stew” indicators light on,
LED displays 2:00 hours, and then starts countdown.
Slow Cook
1. Under the Standby state, press the “Menu” button and select “Slow Cook” function, the
“Slow Cook” indicator lights on.
2. Press the “Start” button to start the “Slow Cook” function, the “Start” and “Slow Cook” indicators
light on, LED displays 2:00 hours, and then starts countdown.
Reheat
1. Under the Standby state, press the “Menu” button and select “Reheat” function, the “Reheat”
indicator lights on.
2. Press the “Start” button to start the “Reheat” function, the “Start” and “Reheat” indicators light on,
LED displays .

11
Set the cooking time
1. Set the time for cooking Oatmeal, Congee, Soup, Steam, Stew, and Slow Cook.
Time of cooking Oatmeal: default is 40min, adjustable from 20min - 2h. Press “h” to increase
by 1h, press the “min” to increase by 5min.
Time of cooking Congee: default is 2h, adjustable from 1.5h - 4h. Press “h” to increase by 1h,
press the “min” to increase by 10min.
Time of cooking Soup: default is 2h, adjustable from 1.5h - 4h. Press “h” to increase by 1h, press
the “min” to increase by 10min.
Time of cooking Steam: default is 5min, adjustable from 5min – 30min. Press “h” to increase by
1min, press the “min” to decrease by 1min.
Time of cooking Stew: default is 2h, adjustable from 45min - 2h. Press “h” to increase by 1h,
press the “min” to increase by 5min.
Time of cooking Slow Cook: default is 2h, adjustable from 2h - 10h. Press “h” to increase by 1h,
press the “min” to increase by 10min.
2. After setting the cooking time, press the “Start” button to start the work program of
corresponding function.
Set the reserving function
1. Select the reserving function, press the “Delay Timer” button, “Delay Timer” indicator flashes
and the electric rice cooker enters into the reserving set state. Press “h” or “min” button to set the
time of stopping reserving. Press “h” once to increase by 1h, press “min” once to increase by
10min. Hold it to automatically increase the time.
2. Press the “Start” button to start the reserving function work program. LED displays the time of
stopping reserving and starts countdown.
3. The default time of stopping reserving is 2h, adjustable from 2h - 24h.
Note: The suggested reserving time is less than 12h for avoiding color and taste changing.

Cleaning and Maintenance
Cleaning and Maintenance
Wipe the WARM panel with
wet fabric, do not directly
flush it with water.
Remove the rice from the
front part with toothpick or
dishcloth.
Please remove the water
and rice from the surface
and bottom of the inner pot.
Please dry the water on the
heating tray with dishcloth,
clean the burnt rice from the
heating tray with steel wire
or sand paper.
Dry the water storage
tank with dry dishcloth.
12

Method of disassembling and cleaning the cover plate
Cleaning and Maintenance
Disassembling, cleaning and installing the steam valve
Note: It is suggested to clean the steam valve frequently
to ensure smooth steam outlet, please clean it after
cooling for avoiding scald.
Hold the handle of the
steam valve and lift it up. As shown in Drawing, turn
anticlockwise to open it.
Open the cover,
remove the cover plate
Press here
Clean the
cover plate
Install the plate
13
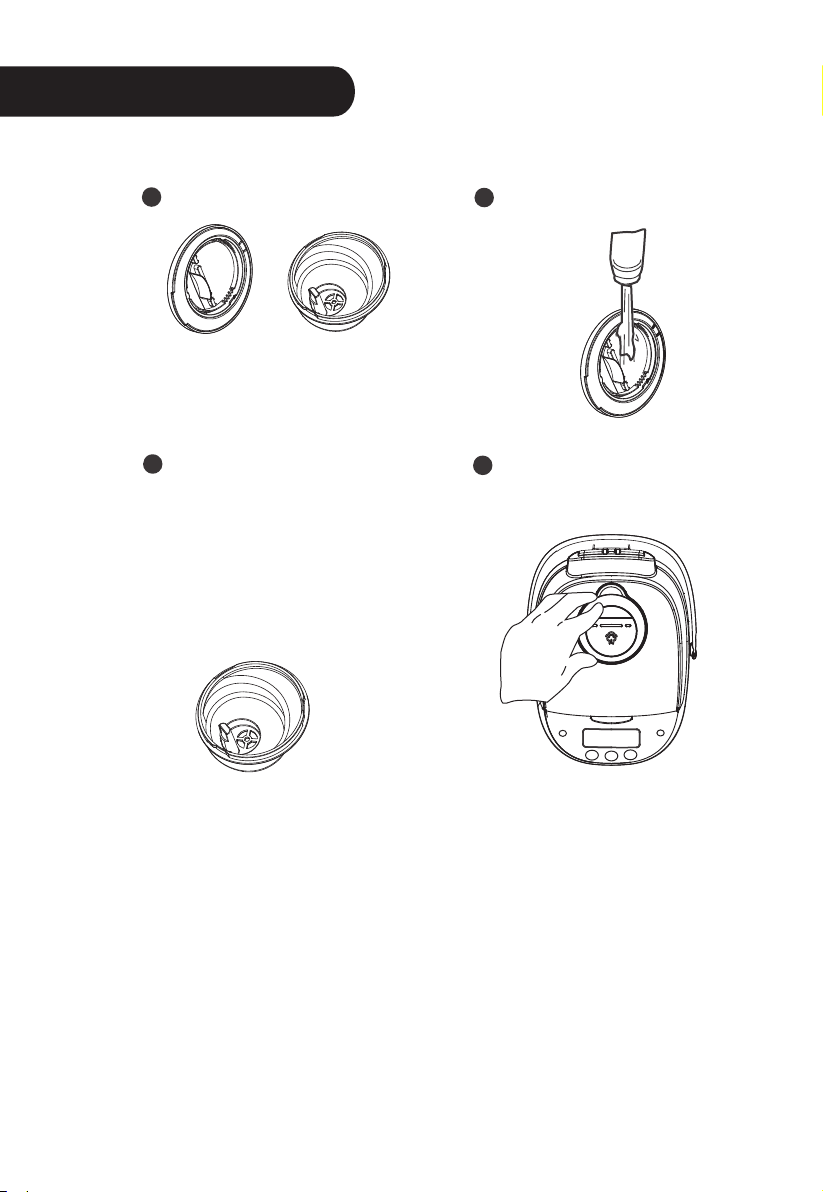
Cleaning and Maintenance
Drawing of opening it. Clean it with water after
opening.
As shown in drawing: turn
clockwise, it means the
steam valve is well installed
when it makes one sound.
Note: aim at the valve
cover and base pointer
before installing.
Press it down to install
the steam valve.
14

Schematic circuit diagram
Temperature
fuse Red
Red
Power
panel
Display
panel
Bottom sensor
Connection
wire
Black
Black
Blue
White
Heating tray
Cover sensor
15
120V~60Hz
Modèle : ECP5015
eGuid d’utilisateur
Les photos dans le texte sont pour référence
seulement, Veuillez se référer au produit réel.
Merci d'avoir acheté notre cuiseur de riz. Veuillez lire attentivement le guide
d’utilisateur avant de l’utiliser, et le conserver dans un endroit commode pour toute
référence future.
Cuiseur de riz

2
MESURES DE SÉCURITÉ IMPORTANTES
Voici des mesures de sécurité fondamentales que
vous devez absolument respecter lorsque vous utili-
sez des appareils électriques :
1. Important : Veuillez lire attentivement toutes les instructions avant la première
utilisation.
2. Ne touchez pas aux surfaces chaudes. Utilisez les poignées ou les boutons.
3. Utilisez l'appareil exclusivement sur une surface plane, sèche et résistante à la
chaleur.
4. Par souci de prévenir les risques de flammes, d'électrocution et de blessures, ne
plongez pas la fiche, le cordon ou l'appareil dans l'eau ni dans un autre liquide.
Respectez les instructions relatives au nettoyage.
5. Veuillez exercer une surveillance étroite lorsque l'appareil est utilisé par ou près
des enfants.
6. Débranchez l'appareil de la prise de courant lorsque vous ne l'utilisez pas et avant
de le nettoyer. Laissez-le refroidir avant de monter ou démonter des pièces et
avant de le nettoyer.
7. N'utilisez pas un appareil si le cordon ou la prise est défectueux ou après une
défectuosité de l'appareil ou lorsqu'il a été endommagé d'une quelconque manière.
Veuillez contacter le service après-vente de Midea pour tout examen, réparation
ou mise au point.
8. L'utilisation de pièces détachées non recommandées par Midea Housewares peut
provoquer des flammes, une décharge électrique ou des blessures.
9. Ne pas l’utilisez à l'extérieur.
10. Ne touchez pas aux surfaces chaudes ou ne laissez pas le cordon pendre du
comptoir ou de la table.
11. Ne placez pas l'appareil sur ou près d'un brûleur chaud ou électrique, ou dans un
four chaud.
12. N'utilisez pas l'appareil pour autre fonction que celle pour laquelle il a été conçu.
13. Soyez extrêmement prudent lors du déplacement de l'appareil quand il contient du
riz, de l'huile ou un liquide chaud.
14. En raison de son extrême chaleur et des risques d'échaudures, évitez de toucher,
couvrir ou obstruer l'évent à vapeur situé sur le couvercle.
15. Utilisez l'appareil exclusivement sous une tension de 120 V CA.
16. Débranchez-le toujours depuis la base de la prise murale. Ne tirez jamais sur le
cordon.
17. Le cuiseur de riz doit fonctionner sur un circuit électrique séparé des autres
appareils électriques. Il est possible qu'il ne fonctionne pas correctement en cas de
surcharge du circuit électrique par d'autres appareils.
18. Avant toute utilisation, assurez-vous toujours que la paroi externe du pot de
cuisson intérieur est sèche. Le replacer dans le cuiseur lorsqu'il est mouillé pourrait
endommager l'appareil ou l'empêcher de fonctionner correctement.
N'ENROULEZ PAS LE CORDON !
TENIR HORS DE
PORTÉE DES
ENFANTS !
SÉCURITÉ IMPORTANTES
Consignes relatives au court
cordon d'alimentation
3
19. Soyez très prudent lors de l'ouverture du couvercle avant et après la cuisson. La
vapeur chaude qui s'échappe pourrait causer des brûlures.
20. Évitez de laisser le riz dans le pot de cuisson en mode « Keep-Warm » (garde-
au-chaud) pendant plus de 12 heures.
21. Pour éviter d'endommager ou de déformer le pot de cuisson intérieur, ne l'utilisez
pas sur une cuisinière ou un brûleur.
22. Pour débrancher l'appareil, réglez la commande sur « OFF » (Arrêt) et retirez la
fiche de la prise murale.
23. AVERTISSEMENT : Pour minimiser les risques d'électrocution, n'utilisez que le
pot de cuisson intérieur démontable fourni.
CONSERVEZ CES MESURES DE
1. Un court cordon d'alimentation est fourni afin
de réduire les risques d'emmêlement ou de
trébuchement avec un cordon plus long.
2. Vous pouvez utiliser des cordons plus longs à
condition d'être prudent.
3. En cas d'utilisation de rallonge :
a. La puissance électrique indiquée sur la
rallonge doit être au moins aussi élevée que
la puissance de l'appareil.
b. La rallonge doit être disposée de manière à
ne pas reposer sur le comptoir ou sur la table
où elle peut être tirée par mégarde par un
enfant.

CET APPAREIL EST DESTINÉ
À L'USAGE MÉNAGER
EXCLUSIVEMENT.
Fiche polarisée
4
L'appareil dispose d'une fiche polarisée (une des broches est plus longue que
l'autre). Veuillez respecter les consignes suivantes :
Pour réduire les risques d'électrocution, la fiche polarisée est conçue pour s'insérer
dans la prise polarisée d'une seule manière. Si la fiche n'épouse pas correctement la
prise, retournez-la. Si le problème persiste, faites recours à un électricien qualifié.
N'essayez en aucune façon de modifier la fiche.
Si le cordon d'alimentation est endommagé, faites la remplacer par le fabricant, ses
prestataires ou une personne semblable qualifiée afin d'éviter tous risques.

Présentation de l'appareil
Accessoires
Spatule à riz Louche Tasse à mesurer
Panier
vapeur
5
Cordon d'alimentation
Panneau de commande
Poignée
Élément principal
Bouton de dégagement
du couvercle
Couvercle
Table of contents
Languages:


