ECOLIFE ECO-Cycle Aquaponics 101 User manual
ECO-CYCLE
AQUAPONICS KIT
INSTRUCTION MANUAL

TABLE OF CONTENTS
AQUAPONICS 101
WHAT’S INCLUDED
ASSEMBLING YOUR KIT
PLANTING YOUR SEEDS
CARING FOR YOUR ECO-CYCLE
FREQUENTLY ASKED QUESTIONS
01
02
05
09
10
12
GETTING STARTED
03

AQUAPONICS 101
Aquaponics is a sustainable method of food production combining
aquaculture (raising aquatic animals) and hydroponics (cultivating plants in
nutrient-rich water).
In this circulating system, fish waste acts as a natural fertilizer for plants, while
plants take up those nutrients and return clean water to the fish.
BENEFITS TO GROWING AQUAPONICALLY:
• 90% reduction in water and land use compared to soil-based growing.
• 97% reduction in water use compared to conventional aquaculture.
• Recirculating design helps to keep waste out of watersheds.
• Yields high-quality organic produce, without the use of harsh chemicals
such as pesticides, herbicides, water conditioners, or added fertilizers.
• Systems are versatile and can be designed to fit in almost any space.
• Easy to maintain!
Thank you for reducing your environmental footprint and protecting natural
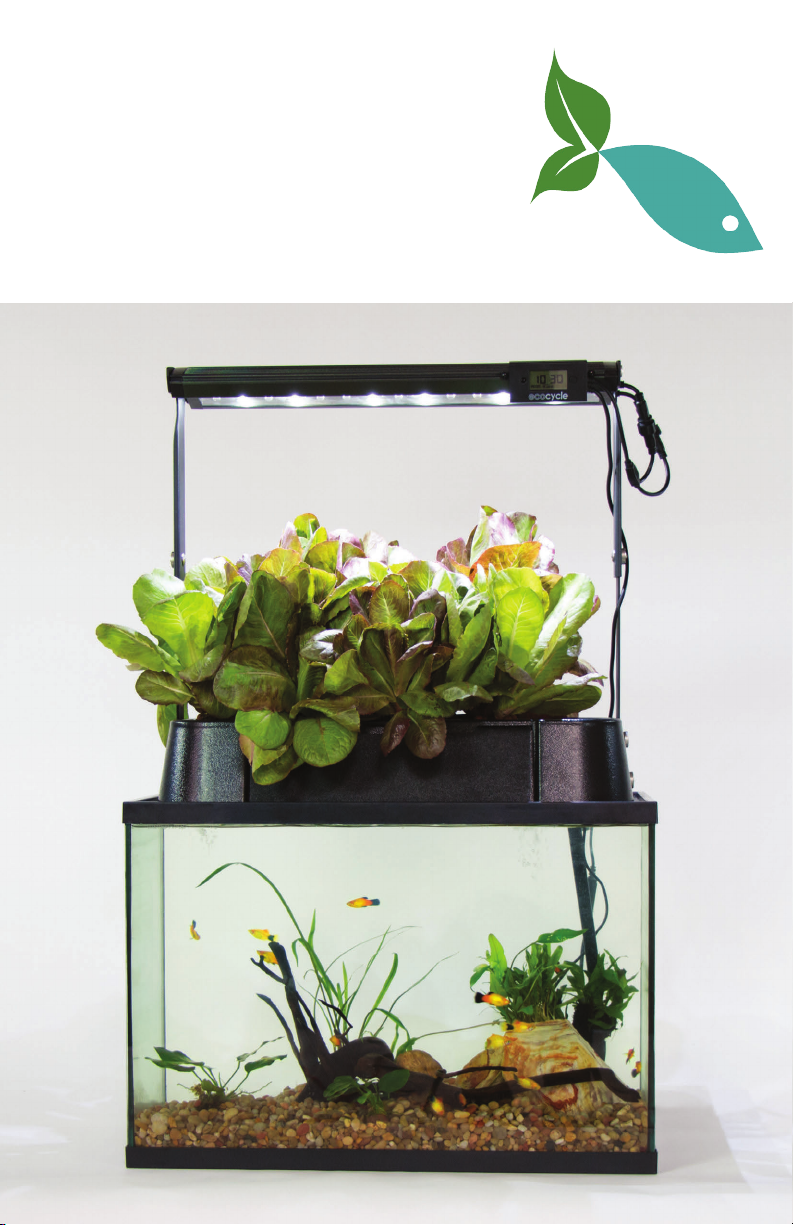
resources by growing aquaponically! Your ECO-Cycle Aquaponics Kit®
converts fish waste into a natural plant fertilizer, while using 90% less land and
water compared to traditional growing methods.
The ECO-Cycle Kit® is an easy, low-maintenance system that turns your
12”x24” fish tank into an organic garden that will produce fresh vegetables
and herbs all year long.
We hope you enjoy your ECO-Cycle® and become inspired to learn more
about the work of ECOLIFE Conservation at www.ecolifeconservation.org.
THANK YOU!
1
WHAT’S INCLUDED:
Your new kit includes everything you need to convert a 12”x24” aquarium into a
blooming indoor garden.
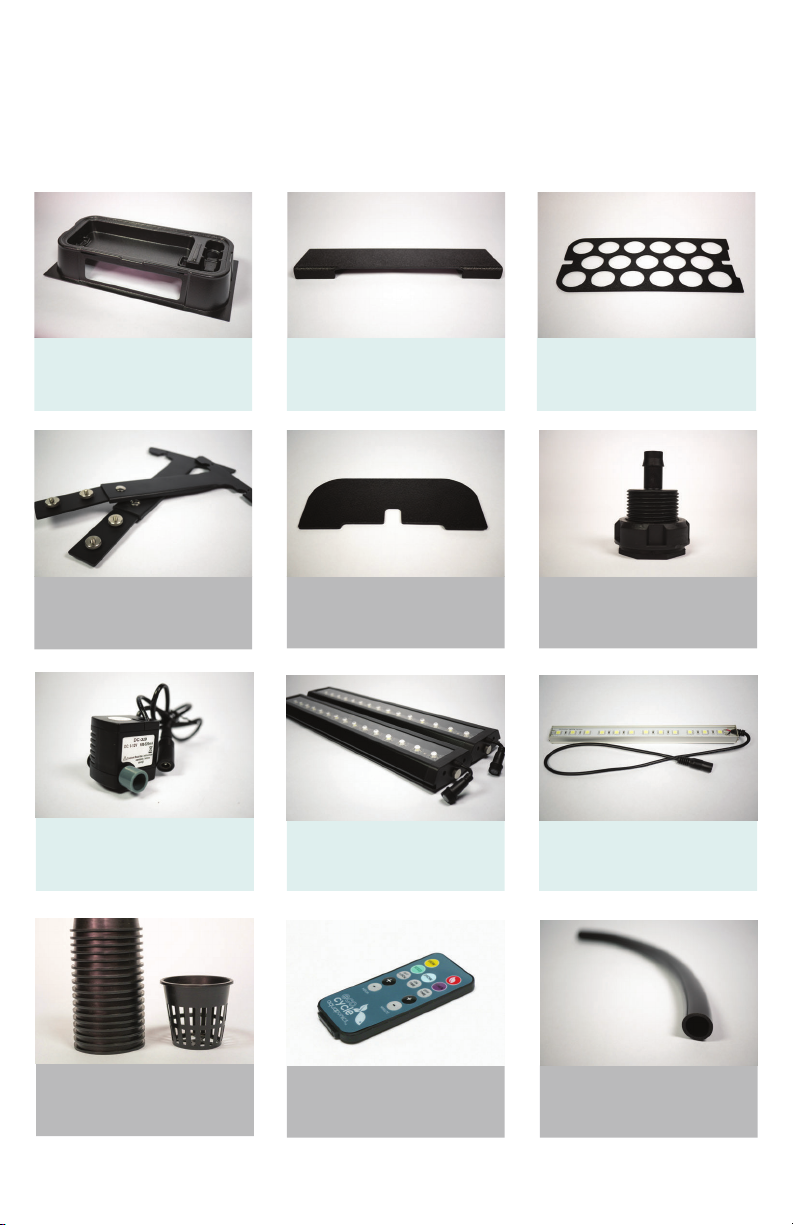
Grow Tray Net Pot Holder
Filter Cover
LED Grow Light
Grow Tray Door
T-Bars ½” Drain Fitting
Water Pump LED Tank Light
Grow Light
Controller
Net Pots 12” Pump Hose
2

GETTING STARTED
2 Pre-Filter SpongesGrow Light Display Bio-Filter Brick
Clay Pebbles
Power Supply Assembly Screws
3
Before getting started, have the following ready:
• 12” x 24” tank
• 2 - 3 fish
• Powdered Vitamin C
• Fish food
• 1 - 2 packets of seeds
• Paper towels
• Phillips screwdriver
• Gravel and decor (Optional)
• Water heater (Optional)
• Siphon (Optional)
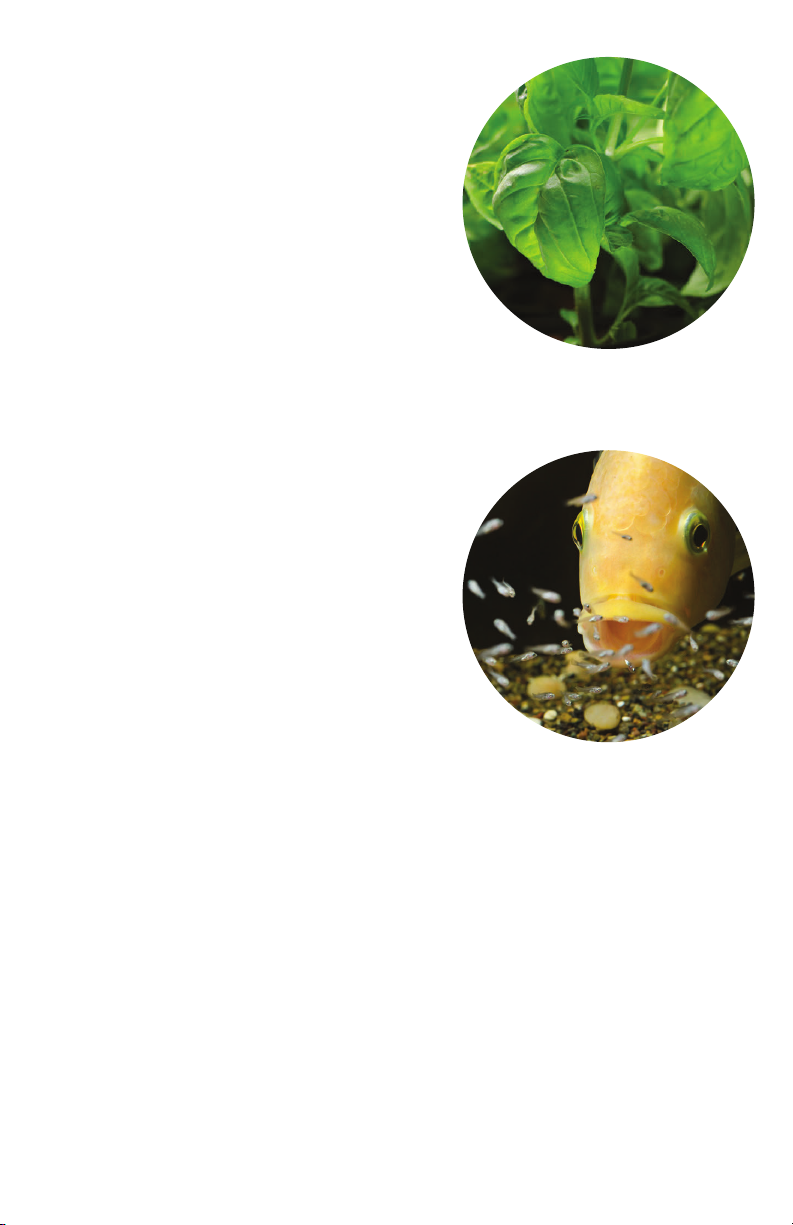
WHAT CAN I GROW?
Leafy greens and herbs grow best because
they thrive in the nitrogen rich fertilizer
produced by fish waste. Customers have
experienced great results with lettuce,
basil, chard, kale, arugula, mint, cabbage,
and a wide variety of leafy greens and
herbs. The kit may also be used to start
seeds for an outdoor vegetable garden,
native plants for landscaping, tropical
house plants, and even trees.
WHAT KIND OF FISH WORK BEST?
The ideal fish for your system are goldfish
and smaller tropical aquarium fish. One inch
of fish per gallon is a common aquarium
stocking recommendation. The actual
number of fish will vary depending on the
type(s) of fish and their species-specific care
requirements.
As with any aquarium, biological filtration is required to keep the system
balanced and safe for fish. Nitrifying bacteria process the fish waste (ammo-
nia), eventually converting it into nitrate (NO3) - which is utilized by the plants.
Bio-filtration is accomplished by moving oxygenated water through a
substrate or media with a high surface area, on which nitrifying bacteria
colonize. The blue bio-filter brick in your ECO-Cycle® provides this surface
area. “Cycling” is the process of building up nitrifying bacteria colonies in the
bio-filter, which can take up to six weeks.
It is important to introduce the fish incrementally, starting with just two or
three. Once the system has "cycled", the tank will be ready to handle a larger
bio-load. From there, fish may be added incrementally in small numbers until
the target number is reached.
• Small Tetras
• Danios
• Rasbora
4
• Goldfish
• Guppies
• Platys
• Swordtails
ADD DECOR AND WATER:
1) Rinse aquarium gravel and decor. Arrange the interior of the aquarium.
2) Fill the tank with water to 95% capacity.
INSTALL AND CONNECT LED TANK LIGHT:
1) Remove the protective tape from the adhesive strips on the bottom of
your LED bar and press against the bottom of the grow tray for 20 seconds.
2) Route the cord through the accessory port on the right side of your grow
tray.
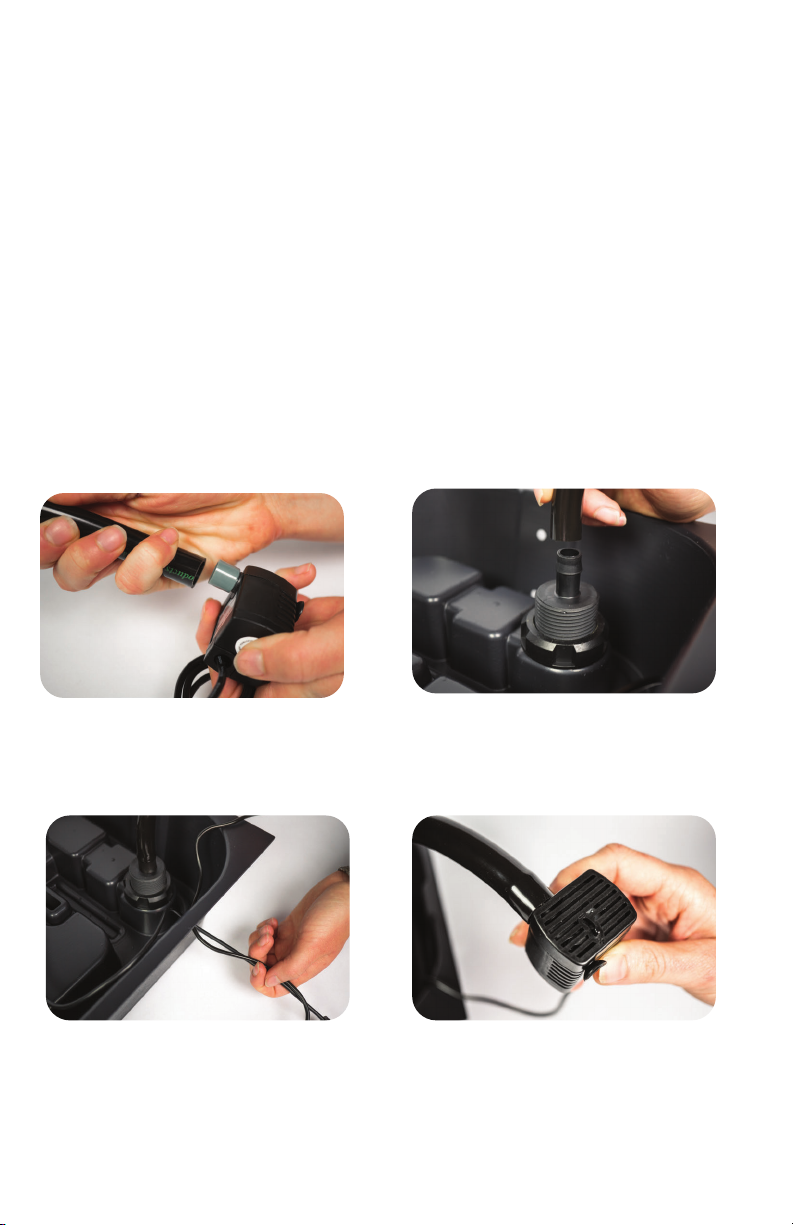
Connect and adjust the water pump:
1) Attach the hose to the water
pump.
3) Feed the pump power cord
through the square accessory
port on the back right side of
the unit.
4) Set flow rate of pump to the
minimum output by sliding the
flow slider towards the nozzle
of the pump. If the flow rate is
too strong it may cause tray to
overflow.
2) Attach the other end of hose
to the drain fitting on the right
side of the grow tray.
ASSEMBLING YOUR KIT:
5

ASSEMBLE THE GROW LIGHT RACK:
1) Place the base of the T-bars against the sides of the grow tray. Align the
holes on the bars with the holes in the grow tray.
2) Reaching inside the grow tray, thread the nuts around the screws to
secure the T-bars in place.
3) Secure the light bars in place by lining up the holes at the top of the T-bars
and fasten with the provided screws.
4) Start grow light height at the lowest setting by unscrewing the locks at the
top of your light stand and adjusting the light bars. It is easiest to make
this adjustment one side at a time.
5) Place the tray on the top of the aquarium, making sure that the tray sits
flush along the entire rim of the tank. Any other accessories, such as an
aquarium heater or airstone, can be installed at this stage.
6) Route all power cords and airlines through the accessory port on
the back of the tray.
PLACE FILTERS IN GROW TRAY:
Place two pre-filter sponges and
bio-filter brick on the right side of the
grow tray. The pre-filter sponge should
be placed in the back and middle
compartments, and the bio-filter brick
should be in the largest rectangular
compartment.
More information about the pre-filter
and bio-filter sponges can be found on
Page 10.
5) As the plants germinate and grow,
raise the light to keep a 2” - 4”
distance from the top of the plants.
This will ensure rapid germination
and full plant growth. If you notice
your plants begin to burn, adjust
accordingly.
6) Connect two cords from grow light
display to grow lights.
6

HOW TO SET CLOCK AND TIMER:
1) Press the button labeled “SET CLOCK” on the controller. Using the hour and
minute buttons set the clock to the current time. Please note the clock
operates in military time (1-24) .
2) Press the button labeled “ON TIME” on the
controller. Using the hour and minute buttons
set the clock to the desired “ON TIME”.
3) Press the button labeled “OFF TIME” on the
controller. Using the hour and minute buttons
set the clock to the desired “OFF TIME”.
HOW TO ASSEMBLE GROW LIGHT DISPLAY:
1) Remove the grow-light controller from packaging. Apply velcro to the side
of the T-Bar and on the back of the remote.
2) Slide the square brackets into the track on the front of your grow light.
3) Using the screws provided and a Phillips screwdriver, fasten the clock
display to the square brackets on the front of your grow light.
7
We recommend
a 16-hour
growth cycle!

OPERATING YOUR GROW LIGHT:
The ECO-Cycle® offers three separate grow settings designed to optimize plant
growth at each stage of development.
Stage 3: Flower
Turn on once vegetative growth is fully
established (after 4-6 weeks).
Stage 2: Grow
If your plant is non-fruit-bearing you can
leave it on this setting for the remainder
of your plants’ life cycle.
Stage 1: Seed
This setting will be used during the first
two weeks following the initial planting
until the first true leaves develop.
SEED
GROW
FLOWER
Your system is designed to germinate seeds and
grow a variety of plants. Leafy greens and herbs can
be grown from seed all the way to harvest.
Plants are grown in reusable expanded clay pebbles,
which are contained in 17 net pots. Net pots allow
the nutrient rich water from the aquarium to flow
through the media to the roots of the plants.
START SEEDS USING THE WICK METHOD:
Seeds may be germinated directly in the system by creating a simple wick of
paper towel to provide moisture to the seeds.
1) Rinse clay pebbles in water to remove dust build-up.
PLANTING YOUR SEEDS
8
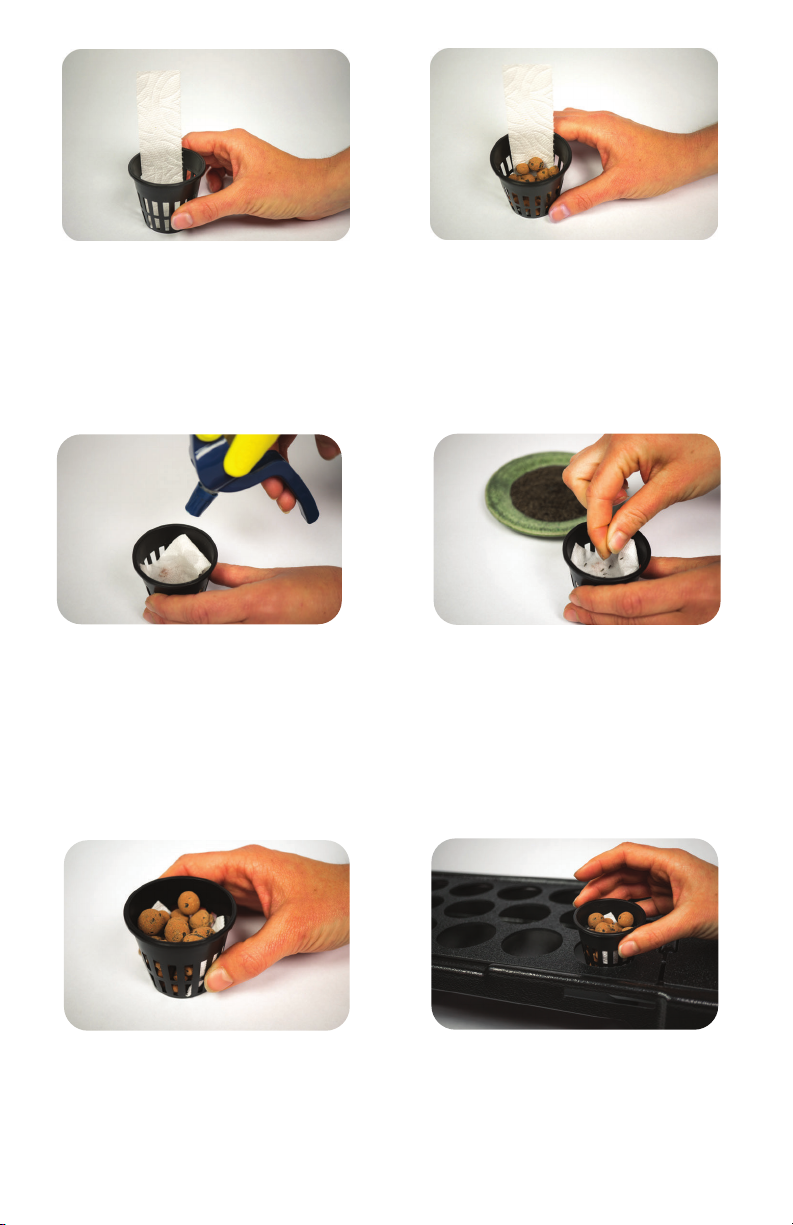
2) Cut a paper towel into strips of
1.5” x 5”. Place one end of the
strip in the bottom of net pot,
with the rest positioned along
the side, forming an L-shape.
3) Add a thin layer of clay pebbles
in the pot on top of the paper
towel, about halfway up the
net pot.
4) Fold the rest of the paper towel
over on top of the clay pebbles.
Using a spray bottle, dampen
the paper towel with a light mist
of water to help the seeds stay
in place.
5) Add seeds to the top of damp
paper towel. The number of
seeds will vary depending on
the type of plant - three to
five seeds works well for most
leafy greens and herbs.
6) Cover seeds with another layer
of clay pebbles, filling the net
pot to the top of the perforated
area.
7) Place the seeded pot into the
system.
9
When all pots are in place, lower the grow-light fixture to its lowest setting at
eight inches above the pots. Adjust grow light setting to ‘seed’ until all plants
have sprouted. The seeds will germinate over the next few days, and in most
cases, the first sprouts will emerge from the clay pebbles in four to seven
days, depending on plant variety. As your plants grow, raise the light to 2” - 4”
over the top of plants. Switch light setting to ‘grow’ once plants have reached
two inches tall and true leaves are established.
CARING FOR YOUR ECO-CYCLE
THE GROW TRAY:
Check the tray regularly to make sure the drain is free of any roots or other
debris that could cause an overflow. Ensure the water flow is properly
adjusted and not overflowing the filter section.
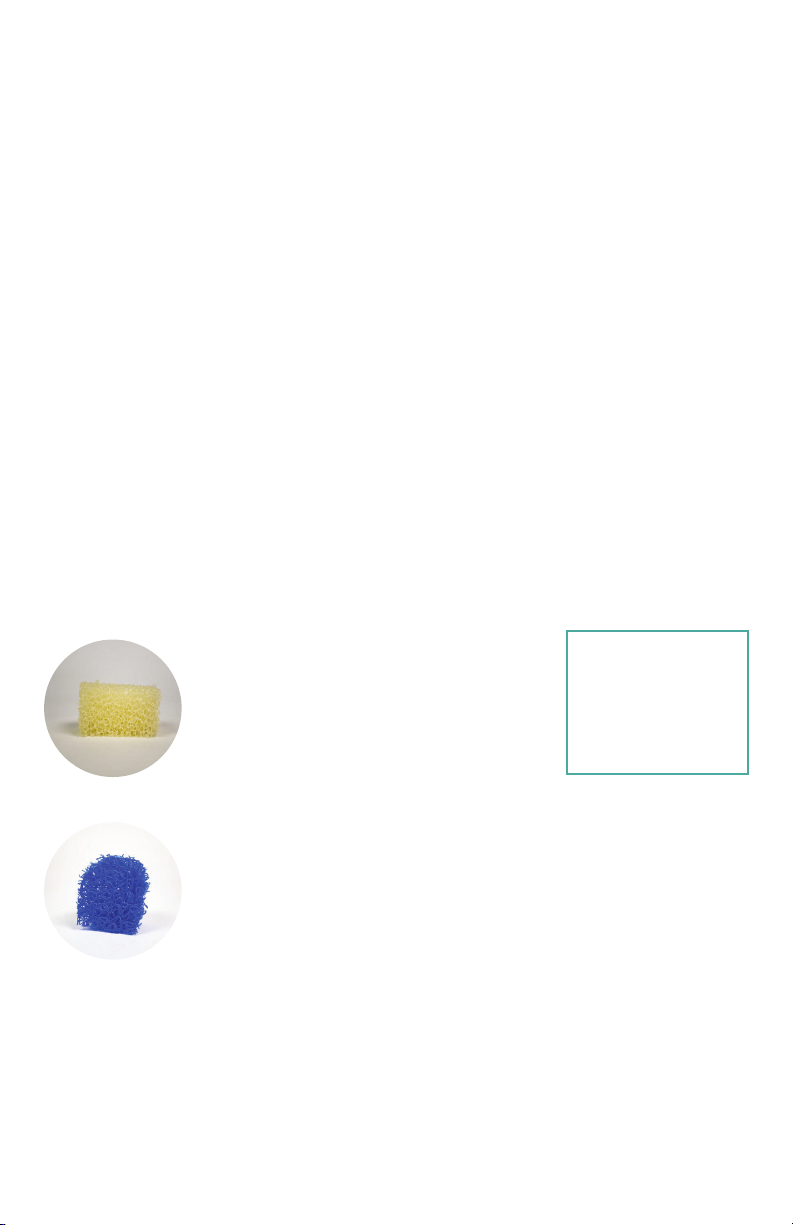
THE FILTER SECTION:
The filter section is on the right end of the grow tray. It is comprised of a
pre-filter sponge (white) and a bio-filter brick (blue). The aquarium water flows
through these integrated filters prior to reaching the plant roots in the grow
tray.
Pre-Filter Sponge (White)
The pre-filter sponge serves to trap
solid waste and should be removed
and rinsed weekly in warm water or
more frequently if necessary. Visually
inspect the sponge regularly for
discoloration and accumulated debris.
VERY
IMPORTANT
to keep your
kit clean!
Bio-Filter Brick (Blue)
The blue bio-filter brick is composed of Matala® media.
This filter provides a high surface area for beneficial
nitrifying bacteria to colonize. This filter should not be
removed or cleaned more than once every six months.
Prefiltration by the white sponge will prevent the majority
of solid waste from reaching the bio-filter.
Should the bio-filter become clogged, it can be removed and rinsed in a cup
of water taken from your ECO-Cycle® or tap water that has been treated to
remove chlorine and chloramine. Rinsing in untreated tap water is
detrimental to the bacteria that live on the filter.
10

FEEDING FISH:
Feed fish according to their specific feeding requirements. Most community fish
will accept high-quality flake, freeze-dried, and frozen foods. Only feed as much
as fish will eat in three to five minutes.
CLEANING YOUR AQUARIUM:
Growing with the ECO-Cycle® Kit helps ensure a balanced aquarium, where
there are little to zero excess nutrients. That means less algae growth and
reduced maintenance requirements in comparison to conventional aquariums.
Biofilm, however, can gradually grow on the glass and solid waste will
accumulate on the gravel. These are best removed using a clean sponge, an
algae pad on a stick , and a gravel vacuum. These pieces of equipment can be
easily maneuvered through the front door of the grow tray. Avoid algae build-up
by choosing a location for your ECO-Cycle® that is not in direct sunlight.
HARVESTING PLANTS:
Plants may be harvested all at once or by clipping a few leaves at a time. In
either case, the plants should remain in place when harvesting, rather than
removing the pots first. This will keep leaves clean from aquarium water. While
your kit will produce safe, organic produce and herbs, always wash plants with
clean water prior to eating.
Many greens will keep growing after being cut, but eventually the root mass will
distort the net pot so it is best to re-seed after every couple of harvests.
ADDING WATER:
Over time the water level will come down due to evaporation and transpiration.
To keep water level consistent, water treated with Vitamin C should be added as
needed.
TESTING WATER QUALITY:
A well functioning system will stay within
the parameters of the chart to the right
once it has gone through it’s initial “cycle” -
up to a 6 week process.
We recommend using the API Freshwater
Master Test Kit to test your water.
11

FREQUENTLY ASKED QUESTIONS
Q: What size tank do you recommend?
A: Any 15-30 gallon aquarium with a 12”x24“ footprint. The standard 20-gallon
tank is widely available with these dimensions. The tray can accommodate
aquariums with top dimensions of between 23.75” - 24.25” x 11.8” - 12.5”/ 60.3
- 61.6 cm x 30 - 31.8 cm). Tank size is also determined by the type of fish you
want to keep in your tank. The general rule of thumb is one inch of fish per
gallon - a little less for goldfish.
Q: What power source do you recommend?
A: The ECO-Cycle® can be plugged into either 110V or 220V power sources,
which is common in most household outlets.
Q: What kind of water should I use in my kit?
A: Rainwater and pH neutral well water are the best choices for filling your kit.
However, many people are limited to municipal tap water. Most municipal
sources add chlorine and chloramine to water for disinfectant purposes. These
compounds make water safe to drink but are toxic to fish and to the nitrifying
bacteria in the bio-filter. There are several water conditioners available through
aquarium shops, but most of these products are not certified for use with fish
and plants intended for human consumption. A safe alternative is powdered
Vitamin C (ascorbic acid). 1/8 teaspoon of Vitamin C will treat 20 gallons of
water, effectively neutralizing the chlorine and chloramine.
Q: What kind of fish food should I use?
A: There are several sources for fish food that contain high quality protein
without artificial coloring. Fish food that contains feather meal has low
nutritional value and can create a dirty tank.
Q: Why is there some water gathered on the lid of my tank?
A: If there is a heater in your tank and the room is cold, condensation is likely
to increase. Lowering the aquarium temperature a few degrees should
alleviate this issue. Another cause of condensation may be the flow rate of your
pump. To reduce moisture build-up on the bottom of the tray, set the pump to
its lowest setting. This reduces splashing from the drain line, and water
draining through the extra overflow holes. Also check to see if the drain fitting
is clear.
12

Q: What is the brownish stuff growing on the glass and decor in my tank?
A: The growth of brown diatomaceous algae and biofilm is a normal phase in a
new aquarium. This will usually die off naturally and is later replaced by much
slower growing green algae. All of these are easily wiped from the glass using
an algae magnet or algae pad. The addition of a small algae-eating fish, such as
a bushy-nose plecostomus, can also help to keep algae growth in check. In any
case, algae growth will be significantly reduced once your plants are well
established in the grow tray.
Q: Why is my tank getting cloudy?
A: Cloudy water is not uncommon in a new system. It is usually caused by a
bacteria bloom due to overfeeding, overcrowding, or adding fish too quickly. It
is important to provide enough food without overfeeding the fish. Most fish
should be fed 2-3 times per day, but only as much as the fish will consume in
three to five minutes. If you have a cloudy tank, do one or two 30% water
changes and reduce the feeding amount.
Q: Can this system be used with turtles or aquatic frogs?
A: Yes. However, due to the salmonella risk associated with reptiles and
amphibians, we do not recommend growing edible plants.
Q: Can I use saltwater?
A: Our ECO-Cycle® is primarily designed for use in freshwater aquariums and
using freshwater fish to grow edible plants. However, it’s possible that caulerpa
or other marine algae could be cultured in the grow tray, if the pots are
removed to open up the space. A marine system of this type would serve
scientific or ornamental purposes only and would not be for food production.
Q: What do I do if a part breaks? Do I have warranty?
A: The grow lights have a one year warrantyfrom your original purchase date.
All other components may be replaced up to six months from the original
purchase date.
Q: My question wasn’t answered! What now?
A: We want you growing! If you experience any issues with your kit, please call
our office for a custom troubleshooting session. We’re happy to help!
The ECO-Cycle Aquaponics Kit® and manual is protected by copyright and may not be copied
without permission from ECOLIFE. 2017 | United States Patent No. US 8,966,816B2
ECOLIFE Conservation is a designated 501c3 nonprofit organization
funded by philanthropic individuals and community support.
13

101 North Broadway
Escondido, California 92025
760.740.1346
www.ecolifeconservation.org
Table of contents
Popular Lawn And Garden Equipment manuals by other brands


HABAU
HABAU 3149 Assembly instructions

Dealzer
Dealzer SecretGarden instructions

BOLDLY GROWING
BOLDLY GROWING BGLPK84 Assembly guide

Shindaiwa
Shindaiwa PowerBroom X7502235300 Owner's/operator's manual

Crosswater Digital
Crosswater Digital Elite Installation and maintenance guide

Pestill
Pestill PTPSMREP1PA quick start guide