Eden ED-7017 User manual

ED-7017
EN | Instruction manual
NL | Gebruiksaanwijzing
FR | Mode d’emploi
DE | Bedienungsanleitung
ES | Manual de usuario
PT | Manual de utilizador
IT | Manuele utente
SV | Bruksanvisning
PL | Instrukcja obsługi
CS | Návod na použití
SK | Návod na použitie
PL | Instrukcj
CS | Návod n
SK | Návod n

PARTS DESCRIPTION / ONDERDELENBESCHRIJVING / DESCRIPTION DES PIÈCES /
TEILEBESCHREIBUNG / DESCRIPCIÓN DE LAS PIEZAS / DESCRIÇÃO DOS
COMPONENTES / DESCRIZIONE DELLE PARTI / BESKRIVNING AV DELAR /
OPIS CZĘŚCI / POPIS SOUČÁSTÍ / POPIS SÚČASTÍ
1
7 5
3
4
6
2

Instruction manual
3
SAFETY
• By ignoring the safety instructions the
manufacturer cannot be held responsible for
the damage.
• If the supply cord is damaged, it must be
replaced by the manufacturer, its service
agent or similarly qualified persons in order
to avoid a hazard.
• Never move the appliance by pulling the
cord and make sure the cord cannot
become entangled.
• The appliance must be placed on a stable,
level surface.
• This appliance is only to be used for
household purposes and only for the
purpose it is made for. In worst case the
food can catch fire. (i.e. do not use more
than one tea spoon of oil, no meat that will
release to much grease or water intended
for boiling foods.
• This appliance shall not be used by children
aged less than 8 years. This appliance can
be used by children aged from 8 years and
above and persons with reduced physical,
sensory or mental capabilities or lack of
experience and knowledge if they have been
given supervision or instruction concerning
use of the appliance in a safe way and
understand the hazards involved. Children
shall not play with the appliance. Keep the
appliance and its cord out of reach of
children aged less than 8 years. Cleaning
and user maintenance shall not be made by
children unless older than 8 and supervised.
• To protect yourself against an electric shock,
do not immerse the cord, plug or appliance
in the water or any other liquid.
• The appliance is to be connected to a
socket-outlet having an earthed contact (for
class I appliances).
• WARNING: If the surface is cracked, switch
off the appliance to avoid the possibility of
an electric shock.
• Keep the appliance and its cord out of reach
of children less than 8 years.
• The temperature of accessible surfaces may
be high when the appliance is operating.
• The appliance is not intended to be operated
by means of an external timer or a separate
remote-control system.
EN

Instruction manual
4
• Surfaces indicated with this logo
are liable to get hot during use.
• In order to prevent disruptions of the airflow
do not put anything on top of the appliance
and make sure there is always 10 centimeter
of free space around the appliance.
• After the baking process the appliance
needs to cooldown, this cooling process will
activate automatically when the timer is
done. Avoid to unplug the appliance from the
net socket before the cooling process is
finished because the remaining hot air can
damage the appliance.
• This appliance is intended to be used in
household and similar applications such as:
• Staff kitchen areas in shops, offices and
other working environments.
• By clients in hotels, motels and other
residential type environments.
• Bed and breakfast type environments.
• Farm houses.
SAVE THESE INSTRUCTIONS
HOUSEHOLD USE ONLY
The universal recycling symbol, logo, or icon is an
internationally recognized symbol used to designate recyclable
materials. The recycling symbol is in the public domain and is not a
trademark.
This product complies with conformity requirements of
the applicable European regulations or directives.
The Green Dot is the registered trademark of Der Grüne
Punkt – Duales System Deutschland GmbH and is protected as a
trademark worldwide. The logo may only be used by customers of
DSD GmbH holding a valid trademark usage contract or by engaged
waste management companies within the Federal Republic of
Germany. This also applies to reproduction of the logo by third parties
in a dictionary, an encyclopaedia or an electronic database containing
a reference manual.
Waste electrical products should not be disposed of with
household waste. Please recycle where facilities exist. Check with
your local Authority or local store for recycling advice.

Instruction manual
5
This symbol is used for marking materials intended to
come into contact with food in the European Union as defined in
regulation (EC) No 1935/2004.
The Eurasian Conformity mark (ЕАС) is a certification mark to
indicate products that conform to all technical regulations of the
Eurasian Customs Union.
The product and packaging materials are recyclable,
subject to extended manufacturer responsibility. Dispose it
separately, following the illustrated packaging symbols, for better
waste treatment. The Triman logo is valid in France only.
Separate collection / Check your local municipal guidelines.
Cleaning and maintenance
• Before cleaning, unplug the appliance and
wait for the appliance to cool down.
• Never immerse the device in water or any
other liquid. The device is not dishwasher
proof.
• Clean the appliance with a damp cloth.
Never use harsh and abrasive cleaners,
scouring pad or steel wool, which damages
the appliance.
• Rinse all other used parts with dish soap
and warm water or in the dishwasher. In the
case of stubborn dirt, we recommend
soaking the accessories in warm water and
washing-up liquid beforehand.
• Allow all parts to dry completely or dry them
with a towel.
PARTS DESCRIPTION
1. Main unit
2. Display
3. Rotating spit fork with locking screw
4. Rotisserie handle
5. Rotating basket
6. Baking rack (3 x)
7. Fat collecting tray
BEFORE THE FIRST USE
• Remove all packaging material.
• Remove any stickers or labels from the appliance.
• Wipe the inside and outside of the appliance with a moist cloth.
• Place the appliance on a stable, horizontal and level surface, do
not place the appliance on non-heat-resistant surfaces.
EN

Instruction manual
6
Note: When the device is turned on for the first time, a slight odour
will occur. This is normal, ensure adequate ventilation. This odour is
only temporary and will disappear soon.
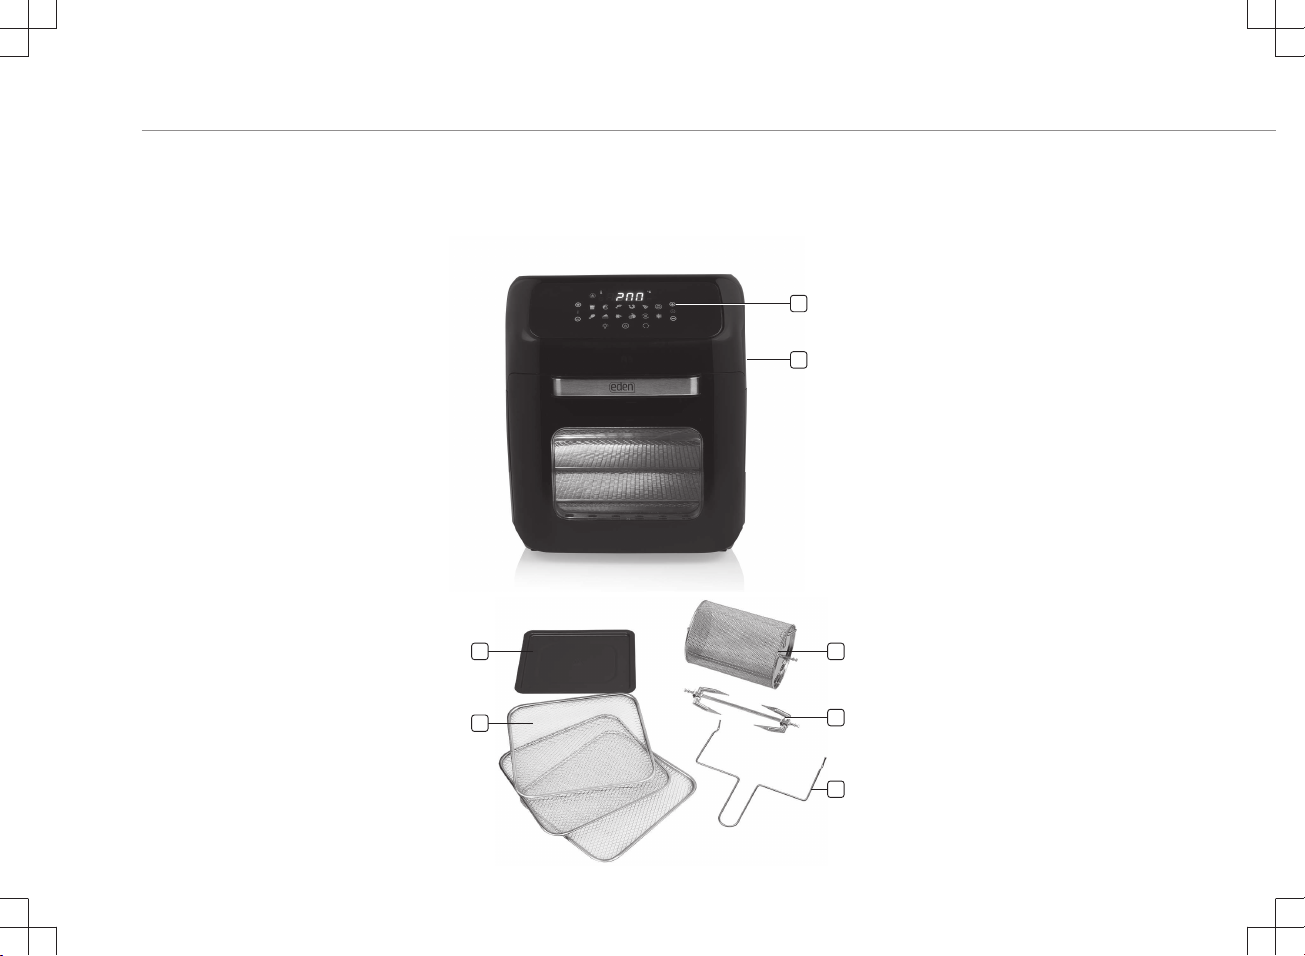
Fat collecting/baking tray
• Always place the fat collecting tray in the lower rails of the
cooking space to collect dripping fat, food residues or crumbs. It
can also be used as a baking tray by placing food on it, place the
baking tray in the middle rails.
Rotating spit fork
• The spit fork shaft contains two notches. The notches mark the
outermost positions of the locking screws. These must not be
attached any further to enable correct operation.
• The rotating spit fork is suitable for grilling large pieces of meat,
but do not place pieces of meat that are too large, the spit fork
must still be able to rotate.
• Slide one of the rotating spit forks onto the shaft and lock it with
the locking screw.
• Now slide the items you want to grill onto the shaft.
• Slide the other rotating spit fork onto the shaft and lock it with the
locking screw.
• Plug the left end of the shaft as far as it will go into the round
holder on the left-hand side of the cooking space.
• Insert the other end of the shaft into the support on the right-hand
side of the cooking space.
• Check if it is placed correctly.
Removal tools
• Use the rotisserie handle to take out the rotating spit fork and the
baking racks from the cooking space.
• Place the end of the rotisserie handle under the shaft.
• First lift up the right side of the shaft and move it forwards until the
left end of the shaft is released from the holder.
• Lift the rotating spit fork gently out of the cooking space and put it
on a heat-resistance surface.
• Use the removal handle to take out the rotating basket from the
cooking space. First lift up the right side of the shaft and move it
forwards until the left end of the shaft is released from the holder.
• Lift the rotating basket gently out of the cooking space and put it
on a heat-resistance surface.
Rotating basket
• The rotating basket can be used to prepare chips or other potato
products, pieces of vegetables, meat and frozen products like
chicken nuggets or squid rings.
• Don’t overfill the basket with ingredients, if it’s to full, the food will
not cook evenly.
• Close the basket and ensure that it is shut correctly so that it can’t
open during use.
• First insert the left side with the L marking ( image 2; number 1) of
the rotating basket into the cooking space. To do this, plug the left
end of the shaft as far as it will go into the round holder on the left
side of the cooking space. Turn the basket until it is fixated into
the axis and cannot move.

Instruction manual
7
• Then hang the right end of the shaft into the support on the right
side of the cooking space. ( image 2; number 2)
• Check if it is placed correctly.
• Always use the removal handle to remove the rotating basket
from the cooking space (see removal tool chapter). The basket
will be very hot.
Baking racks
• The baking racks are slid onto the rails in the cooking space.
• The heating element is located at the top of the cooking space.
• The higher a rack is placed, the more intense the heat is from
above.
• In the upper part, the food is cooked faster and crispy.
• The middle position can be selected to achieve uniform heating
from all sides.
• The bottom rails are suitable for gentle cooking.
• Use gloves to remove the baking racks.
USE
• Put the mains plug in an earthed wall socket.
• Open the door.
• If the fat collecting tray is not to be used as a baking tray, slide it
into the lowest rails of the cooking space.
• Select a suitable accessory for the food to be prepared.
• Process the food and place it on or in the accessory and attach
this accessory in the device.
• Close the door.
• Press the on/off switch. The display will become active.
• Set the temperature and cooking time manually or choose
between one of the 10 programs.
Manual setting:
• Touch the up or down symbol at the temperature setting to set
the desired temperature (lowest 80°C, highest 200°C).
• Touch the up and down symbol at the time setting to set the
desired time(1 minute to 90 minutes).
• Note: To preheat the device touch the preheat symbol. (default is
set on 80°C and 5 minutes)
Program setting:
• Activate the desired program by touching the program symbol,
it’s activated when the symbol starts flashing. The appliance will
start automatically.
• The flame indicator will start flashing and the °C and remaining
time will be shown on display.
• See for pre-setting information the table below:
Program Icon Default
temperature/
time
Quantity Extra information
EN

Instruction manual
8
Aerofryer
fries
200°C/15
minutes
500g When using the
rotating frying
basket, suitable up to
500g fries. When
using the 3 grill
racks, suitable up to
750g. (Shake every 5
minutes). Baking
times may vary
based on amount of
fries, type of fries,
temperature and
brand.
Homema
de fries
Proposed time
120°C/10 min
200°C /20 min
500g/
750g
Add 1/2 a tablespoon
of oil. 120°C When
using the rotating
frying basket,
suitable up to 500g
fries. 200°C When
using the 3 grill
racks, suitable up to
750g. (Shake every 5
minutes)
Roast 175°C/25 min 200g
Bake 160°C/30 min 1 pcs
Pizza 180°C/15 min 1 pcs
Heating
up
Proposed time
115°C/12 min
1 pcs
Shellfish/
Crustace
ans
160°C/12 min 250g
Fish 165°C/15 min 200g
Chicken 185°C/40 min 600g
Rotisserie 190°C/30 min 500g/
30min
Dehydrati
ng
30°C/2H 250g
• The cooking time depends on the thickness of the food. Times
can also vary due to the quantity and consistency of the food. The
time settings are only guidelines and can be adapted to your
taste. Double the time for tough meat. Extend the time by at least
20% for deep-frozen food or choose the defrost option first, touch
the defrost symbol to start. (default 200°C, 20 minutes)
• Make sure that meat and poultry are thoroughly cooked before
serving.
• To change the temperature or cooking time of a selected
program, touch the temperature and time setting buttons, the
same as for manual setting and set a new value.
• A flashing flames indicator light indicates that the device is
operating. If operation is interrupted, the flames indicator stays on
and “OFF” is shown on display.

Instruction manual
9
• If the rotating basket or rotating spit are used, touch the rotating
button to start the rotating function. Touching the button again will
stop the rotating function.
• Switch on the light pushing the light button to check the condition
of the food during use or open the door, the light will switch on
and the operation is interrupted automatically. Operation is
resumed once the door is closed again
• After the cooking time has elapsed, the device switches off
automatically and it will give a beep sound. If the device must be
stopped prematurely, press the on / off switch.
• Open the door and take the cooked items out of the device.
Always use oven gloves and use the removal handle/tool to take
out the accessories.
• After use, remove the mains plug from the wall socket.
• Allow the used accessories and device to cool down and then
clean them.
ENVIRONMENT
This appliance should not be put into the domestic garbage at
the end of its durability, but must be offered at a central point for the
recycling of electric and electronic domestic appliances. This symbol
on the appliance, instruction manual and packaging puts your
attention to this important issue. The materials used in this appliance
can be recycled. By recycling of used domestic appliances you
contribute an important push to the protection of our environment.
Ask your local authorities for information regarding the point of
recollection.
Support
You can find all available information and spare parts at
www.edenappliances.com!
EN

Gebruiksaanwijzing
10
VEILIGHEID
• Als u de veiligheidsinstructies negeert, kan
de fabrikant niet verantwoordelijk worden
gehouden voor de mogelijke schade.
• Als het netsnoer beschadigd is, moet het
worden vervangen door de fabrikant, de
onderhoudsmonteur van de fabrikant of door
personen met een soortgelijke kwalificatie
om gevaar te voorkomen.
• Verplaats het apparaat nooit door aan het
snoer te trekken en zorg dat het snoer niet in
de war kan raken.
• Het apparaat moet op een stabiele, vlakke
ondergrond worden geplaatst.
• Dit apparaat is uitsluitend voor huishoudelijk
gebruik en voor het doel waar het voor
bestemd is. In het ergste geval kan het
voedsel vlam vatten. (Gebruik niet meer dan
één theelepel olie, geen vlees dat te veel vet
vrijgeeft of water dat bedoeld is om voedsel
te koken.)
• Dit apparaat mag niet worden gebruikt door
kinderen jonger dan 8 jaar. Dit apparaat kan
worden gebruikt door kinderen vanaf 8 jaar
en door personen met verminderde
lichamelijke, zintuiglijke of geestelijke
vermogens of gebrek aan de benodigde
ervaring en kennis indien ze onder toezicht
staan of instructies krijgen over hoe het
apparaat op een veilige manier kan worden
gebruikt alsook de gevaren begrijpen die met
het gebruik samenhangen. Kinderen mogen
niet met het apparaat spelen. Houd het
apparaat en het netsnoer buiten bereik van
kinderen jonger dan 8 jaar. Laat reiniging en
onderhoud niet door kinderen uitvoeren,
tenzij ze ouder zijn dan 8 jaar en onder
toezicht staan.
• Dompel het snoer, de stekker of het
apparaat niet onder in water of andere
vloeistoffen om elektrische schokken te
voorkomen.
• Het apparaat moet worden aangesloten op
een geaard stopcontact (voor klasse I-
apparaten).
• WAARSCHUWING: Indien het oppervlak is
gebarsten, schakel dan het apparaat uit om
elektrische schokken te voorkomen.
• Houd het apparaat en het netsnoer buiten
bereik van kinderen jonger dan 8 jaar.
• De temperatuur van de toegankelijke
oppervlakken kan hoog zijn wanneer het
apparaat in gebruik is.

Gebruiksaanwijzing
11
• Het apparaat is niet bedoeld om bediend te
worden met behulp van een externe timer of
een afzonderlijk afstandbedieningssysteem.
• Oppervlakken gemarkeerd met dit
logo kunnen heet worden tijdens gebruik.
• Plaats niets boven op het apparaat en zorg
ervoor dat er altijd 10cm vrije ruimte rondom
het apparaat is om verstoring van de
luchtstroom te voorkomen.
• Na het bakken moet het apparaat afkoelen.
Dit koelproces wordt automatisch
geactiveerd na afloop van de timer.
Verwijder de stekker pas na voltooiing van
het koelproces uit het stopcontact, omdat de
resterende hete lucht het apparaat kan
beschadigen.
• Dit apparaat is bedoeld voor huishoudelijk
en soortgelijk gebruik, zoals:
• Personeelskeukens in winkels, kantoren en
andere werkomgevingen.
• Door gasten in hotels, motels en andere
residentiële omgevingen.
• Bed&Breakfast-type omgevingen.
• Boerderijen.
BEWAAR DEZE INSTRUCTIES
ALLEEN VOOR HUISHOUDELIJK GEBRUIK
Het universele recyclingsymbool, -logo of -pictogram is een
internationaal erkend symbool dat wordt gebruikt om recyclebare
materialen aan te duiden. Het recyclingsymbool behoort tot het
publieke domein en is geen handelsmerk.
Dit product voldoet aan de conformiteitseisen van de
toepasselijke Europese verordeningen of richtlijnen.
The Green Dot is het geregistreerde handelsmerk van Der
Grüne Punkt - Duales System Deutschland GmbH en is een
wereldwijd beschermd handelsmerk. Het logo mag uitsluitend worden
gebruikt door klanten van DSD GmbH die in het bezit zijn van een
geldig handelsmerkgebruikscontract of door aangewezen
afvalverwerkingsbedrijven binnen de Bondsrepubliek Duitsland. Dit
geldt ook voor de reproductie van het logo door derden in een
woordenboek, een encyclopedie of een elektronische databank met
een naslagwerk.
NL

Gebruiksaanwijzing
12
Afgedankte elektrische producten mogen niet samen
met huishoudelijk vuil worden weggegooid. Gelieve te laten recyclen
bij de daartoe aangewezen faciliteiten. Neem contact op met uw
gemeente of plaatselijke winkel voor advies over recycling.
Dit symbool wordt gebruikt voor het markeren van
materialen die bestemd zijn om in aanraking te komen met voedsel in
de Europese Unie, zoals gedefinieerd in verordening (EC) nr.
1935/2004.
Het Euraziatische conformiteitsmerk (ЕАС) is een
certificeringsmerk om producten aan te duiden die voldoen aan alle
technische voorschriften van de Euraziatische douane-unie.
Het product en de verpakkingsmaterialen zijn recyclebaar,
binnen de grenzen van de uitgebreide verantwoordelijkheid van de
fabrikant. Verwijder het gescheiden, volgens de geïllustreerde
verpakkingssymbolen, voor een betere afvalverwerking. Het Triman-
logo is alleen in Frankrijk geldig.
Gescheiden inzameling / Controleer uw
gemeentelijke richtlijnen.
Reiniging en onderhoud
• Haal voor het schoonmaken de stekker uit
het stopcontact en wacht tot het apparaat
afgekoeld is.
• Dompel het toestel nooit onder in water of
een andere vloeistof. Het apparaat is niet
vaatwasmachinebestendig.
• Reinig het apparaat met een vochtige doek.
Gebruik nooit agressieve en schurende
schoonmaakmiddelen, schuursponsjes of
staalwol, die het apparaat beschadigen.
• Spoel alle andere gebruikte onderdelen af
met afwasmiddel en warm water of reinig ze
in de vaatwasser. Bij hardnekkig vuil is het
raadzaam om de accessoires van tevoren te
laten weken in warm water met afwasmiddel.

Gebruiksaanwijzing
13
• Laat alle onderdelen volledig drogen of
droog ze af met een theedoek.
ONDERDELENBESCHRIJVING
1. Hoofdgedeelte
2. Display
3. Draaispit met vergrendelingsschroeven
4. Handgreep van rotisserie
5. Draaimand
6. Bakrooster (3x)
7. Vetopvangplaat
VOORAFGAAND AAN HET EERSTE GEBRUIK
• Verwijder alle verpakkingsmateriaal.
• Verwijder eventuele stickers of etiketten van het apparaat.
• Reinig de binnenkant en de buitenkant van het apparaat met een
vochtige doek.
• Plaats het apparaat op een stabiele, horizontale en vlakke
ondergrond. Plaats het apparaat niet op een niet-hittebestendige
ondergrond.
Opmerking: Wanneer u het apparaat voor het eerst inschakelt, kunt
een lichte geur opmerken. Dit is normaal, zorg voor voldoende
ventilatie. Deze geur is slechts tijdelijk en verdwijnt al snel.
Vetopvang-/bakplaat
• Plaats de vetopvangplaat altijd in de onderste rails van de
ovenruimte. Zo kunt u vet, etensresten of kruimels goed
opvangen. U kunt deze plaat ook gebruiken als bakplaat door er
voedsel op te leggen. Plaats de bakplaat dan in de middelste
rails.
Draaispit met vorken
• De as van het draaispit is voorzien van twee inkepingen. Deze
inkepingen geven de uiterste posities van de
vergrendelingsschroeven aan. Voor een juiste werking mogen de
schroeven niet voorbij deze markeringen worden bevestigd.
• Het draaispit kan worden gebruikt om grote stukken vlees te
grillen. Zorg echter dat de stukken vlees niet te groot zijn: het spit
met de vorken moet nog kunnen draaien.
• Schuif een van de draaispitvorken op de as en zet deze vast met
de vergrendelingsschroef.
• Rijg vervolgens de producten die u wilt grillen aan de as.
• Schuif de andere vork op de as en zet deze vast met de
vergrendelingsschroef.
• Steek het linkeruiteinde van de as zo ver mogelijk in de ronde
houder aan de linkerkant van de ovenruimte.
• Steek het andere uiteinde van de as in de steun aan de
rechterkant van de ovenruimte.
• Controleer of de as correct is aangebracht.
NL

Gebruiksaanwijzing
14
Verwijderinstrumenten
• Gebruik de handgreep van de rotisserie om het draaispit en de
bakroosters uit de ovenruimte te halen.
• Plaats het uiteinde van de handgreep van de rotisserie onder de
as.
• Til eerst de rechterkant van de as omhoog en beweeg deze
voorwaarts, totdat het linkeruiteinde van de as uit de houder
komt.
• Til het draaispit voorzichtig uit de ovenruimte en leg het op een
warmtebestendige ondergrond.
• Gebruik de verwijdergreep om de draaimand uit de ovenruimte te
halen. Til eerst de rechterkant van de as omhoog en beweeg
deze voorwaarts, totdat het linkeruiteinde van de as uit de houder
komt.
• Til de draaimand voorzichtig uit de ovenruimte en plaats deze op
een warmtebestendige ondergrond.
Draaimand
• U kunt de draaimand gebruiken voor de bereiding van friet of
andere aardappelproducten, stukken groente, vlees en
diepvriesproducten zoals kipnuggets of inktvisringen.
• Doe de mand niet te vol, anders wordt het eten niet gelijkmatig
bereid.
• Sluit de mand en controleer of deze goed is gesloten, zodat de
mand tijdens het gebruik niet open kan gaan.
• Steek eerst de linkerkant van de draaimand met de aanduiding 'L'
(afbeelding 2, nummer 1) in de ovenruimte. Hiervoor steekt u het
linkeruiteinde van de as zo ver mogelijk in de ronde houder aan
de linkerkant van de ovenruimte. Draai de mand totdat deze in de
as is vastgezet en niet meer kan bewegen.
• Hang daarna het rechteruiteinde van de as in de steun aan de
rechterkant van de ovenruimte (afbeelding 2, nummer 2).
• Controleer of de as correct is aangebracht.
• Gebruik altijd de verwijdergreep om de draaimand uit de
ovenruimte te halen (raadpleeg het hoofdstuk over het
verwijderinstrument). De mand is erg heet.
Bakroosters
• U schuift de bakroosters in de rails in de ovenruimte.
• Het verwarmingselement bevindt zich boven in de ovenruimte.
• Hoe hoger u een rooster plaatst, hoe intenser de hitte van
bovenaf is.
• In het bovenste deel wordt voedsel daarom sneller en krokant
bereid.
• Kies de middelste stand voor een gelijkmatige verwarming aan
alle kanten.

Gebruiksaanwijzing
15
• De onderste rails zijn geschikt voor een milde bereiding.
• Gebruik ovenhandschoenen om de bakroosters te verwijderen.
GEBRUIK
• Plaats de netstekker in een geaard stopcontact.
• Open de deur.
• Als u de vetopvangplaat niet gebruikt als bakplaat, schuift u deze
in de onderste rails van de ovenruimte.
• Kies een geschikt accessoire voor het voedsel dat u wilt
bereiden.
• Bereid het voedsel voor en plaats het aan of in het accessoire.
Plaats het accessoire daarna in het apparaat.
• Sluit de deur.
• Druk op de aan/uit-schakelaar. Het display wordt ingeschakeld.
• Stel de temperatuur en bereidingstijd handmatig in of kies een
van de tien programma's.
Handmatige instelling:
• Druk op de pijl omhoog/omlaag voor de temperatuurinstelling om
de gewenste temperatuur in te stellen (minimaal 80°C, maximaal
200°C).
• Druk op de pijl omhoog/omlaag voor de tijdinstelling om de
gewenste duur in te stellen (1 tot 90minuten).
• Opmerking: Raak het symbool voor voorverwarmen aan om het
apparaat voor te verwarmen (de standaardinstelling is 80°C en
5minuten).
Programma-instelling:
• Activeer het gewenste programma door op het
programmasymbool te drukken. Het programma is geactiveerd
als het symbool begint te knipperen. Het apparaat wordt
automatisch gestart.
• De vlamindicator begint te knipperen en het aantal graden en de
resterende tijd worden op het display weergegeven.
• Meer informatie over de voorinstellingen vindt u in de
onderstaande tabel:
Program
ma
Pictogr
am
Standaardtem
peratuur/-tijd
Hoeveel
heid
Extra informatie
NL

Gebruiksaanwijzing
16
Aerofryer-
friet
200°C/
15minuten
500g Bij gebruik van het
draaiende
frituurmandje,
geschikt voor 500g
friet. Bij gebruik van
de 3grillroosters,
geschikt voor 750g.
(Elke 5minuten
schudden.) Baktijden
kunnen variëren,
afhankelijk van de
hoeveelheid friet, het
type friet, de
temperatuur en het
merk.
Zelfgema
akte friet
Voorgestelde
tijd
120°C/10min
200°C/20min
500g/
750g
Voeg 1/2 eetlepel olie
toe. 120°C Bij gebruik
van het draaiende
frituurmandje,
geschikt voor 500g
friet. 200°C Bij
gebruik van de
3grillroosters,
geschikt voor 750g.
(Elke 5minuten
schudden)
Braadstu
k
175°C/25min 200g
Gebak 160°C/30min 1stuk
Pizza 180°C/15min 1stuk
Opwarme
n
Voorgestelde
tijd 115°C/
12min
1stuk
Schelp-
en
schaaldie
ren
160°C/12min 250g
Vis 165°C/15min 200g
Kip 185°C/40min 600g
Rotisserie 190°C/30min 500g/
30min
Drogen 30°C/2uur 250g
• De bereidingstijd is afhankelijk van de dikte van het voedsel. De
tijden kunnen ook verschillen afhankelijk van de hoeveelheid en
consistentie van het voedsel. De vermelde tijdsinstellingen zijn
slechts een indicatie en kunnen naar wens worden aangepast.
Verdubbel de tijd voor taaier vlees. Verleng de tijd met minstens
20% voor diepgevroren voedsel of kies eerst de optie voor
ontdooien: raak het symbool voor ontdooien om te starten (de
standaardinstelling is 200°C en 20minuten).
• Zorg dat vlees of gevogelte goed gaar is voordat u het serveert.

Gebruiksaanwijzing
17
• Als u de temperatuur of bereidingstijd van een geselecteerd
programma wilt wijzigen, drukt u op de knoppen voor de
temperatuur- en tijdsinstelling, op dezelfde manier als u dit doet
voor een handmatige instelling. Vervolgens stelt u een nieuwe
waarde in.
• Een knipperende vlamindicator geeft aan dat het apparaat in
bedrijf is. Als de werking is onderbroken, blijft de vlamindicator
branden. Op het display wordt OFF (UIT) weergegeven.
• Als u de draaimand of het draaispit gebruikt, drukt u op de
rotatietoets om de draaifunctie te starten. Als u nogmaals op de
toets drukt, stopt u de draaifunctie.
• Schakel de verlichting in door op de verlichtingstoets te drukken
of open de deur als u tijdens de bereiding het voedsel wilt
controleren. Het licht gaat branden en de werking wordt
automatisch onderbroken. De werking wordt hervat nadat u de
deur weer hebt gesloten.
• Wanneer de bereidingstijd is verstreken, wordt het apparaat
automatisch uitgeschakeld en klinkt er een piepgeluid. Als u het
apparaat voortijdig wilt stoppen, drukt u op de aan/uit-schakelaar.
• Open de deur en haal de bereide producten uit het apparaat.
Draag altijd ovenwanten en gebruik de verwijdergreep/het
verwijderinstrument om de accessoires eruit te halen.
• Verwijder na gebruik de netstekker uit het stopcontact.
• Laat de gebruikte accessoires en het apparaat eerst afkoelen en
reinig ze dan pas.
MILIEU
Dit apparaat mag aan het einde van de levensduur niet bij het
normale huisafval worden gedeponeerd, maar moet bij een speciaal
inzamelpunt voor hergebruik van elektrische en elektronische
apparaten worden aangeboden. Het symbool op het apparaat, in de
gebruiksaanwijzing en op de verpakking attendeert u hierop. De in
het apparaat gebruikte materialen kunnen worden gerecycled. Met
het recyclen van gebruikte huishoudelijke apparaten levert u een
belangrijke bijdrage aan de bescherming van ons milieu. Informeer bij
uw lokale overheid naar het inzamelpunt.
Support
Alle beschikbare informatie en gegevens over reserveonderdelen zijn
te vinden op www.edenappliances.com.
NL

Manuel d'instructions
18
SÉCURITÉ
• Si vous ignorez les consignes de sécurité, le
fabricant ne peut être tenu pour responsable
des dommages.
• Si le cordon d'alimentation est endommagé,
il doit être remplacé par le fabricant, son
réparateur ou des personnes qualifiées afin
d'éviter tout risque.
• Ne déplacez jamais l'appareil en tirant sur le
cordon et veillez à ce que celui-ci ne
s'enroule pas.
• L'appareil doit être posé sur une surface
stable et nivelée.
• Cet appareil est uniquement destiné à des
utilisations domestiques et seulement dans
le but pour lequel il est fabriqué. Dans le pire
des cas, les aliments peuvent prendre feu.
(N'utilisez pas plus d'une cuillère à café
d'huile, aucune viande pouvant diffuser trop
de graisse ou d'eau pour l'ébullition des
aliments.)
• Cet appareil ne doit pas être utilisé par des
enfants de moins de 8 ans. Cet appareil peut
être utilisé par des enfants de 8 ans ou plus
et des personnes présentant un handicap
physique, sensoriel ou mental voire ne
disposant pas des connaissances et de
l'expérience nécessaires en cas de
surveillance ou d'instructions sur l'usage de
cet appareil en toute sécurité et de
compréhension des risques impliqués. Les
enfants ne doivent pas jouer avec l'appareil.
Maintenez l'appareil et son cordon
d'alimentation hors de portée des enfants de
moins de 8 ans. Le nettoyage et la
maintenance utilisateur ne doivent pas être
confiés à des enfants sauf s'ils ont 8 ans ou
plus et sont sous surveillance.
• Afin de vous éviter un choc électrique,
n'immergez pas le cordon, la prise ou
l'appareil dans de l'eau ou autre liquide.
• Branchez l'appareil sur une prise électrique
munie d'une connexion à la terre (pour les
appareils de catégorie I).
• AVERTISSEMENT: Si la surface est
fissurée, arrêtez l'appareil pour éviter tout
risque de choc électrique.
• Maintenez l'appareil et son cordon
d'alimentation hors de portée des enfants de
moins de 8 ans.
• La température des surfaces accessibles
peut devenir élevée quand l'appareil est en
fonction.

Manuel d'instructions
19
• L'appareil n'est pas destiné à fonctionner
avec un dispositif de programmation externe
ou un système de télécommande
indépendant.
• Les surfaces indiquées par ce
logo risquent de devenir chaudes à l'usage.
• Pour éviter les perturbations du flux d'air, ne
placez rien sur l'appareil et assurez-vous de
préserver systématiquement un
dégagement de 10 cm autour de l'appareil.
• Après le processus de cuisson, l'appareil
doit refroidir. Ce processus de
refroidissement s'active automatiquement
une fois la minuterie terminée. Évitez de
débrancher l'appareil du secteur avant la fin
du processus de refroidissement. L'air
chaud résiduel risquerait d'endommager
l'appareil.
• Cet appareil est destiné à une utilisation
domestique et aux applications similaires,
notamment:
• Coin cuisine des commerces, bureaux et
autres environnements de travail.
• Hôtels, motels et autres environnements de
type résidentiel.
• Environnements de type chambre d’hôtes.
• Fermes.
CONSERVEZ CES INSTRUCTIONS
USAGE DOMESTIQUE UNIQUEMENT
Le symbole, le logo ou l'icône universel de recyclage est un
symbole internationalement reconnu utilisé pour désigner les
matériaux recyclables. Le symbole du recyclage relève du domaine
public et n'est pas une marque déposée.
Ce produit est conforme aux exigences de conformité
des règlements ou directives européens en vigueur.
Le Point vert est une marque déposée de Der Grüne Punkt
- Duales System Deutschland GmbH et est une marque déposée
dans le monde entier. Le logo ne peut être utilisé que par des clients
de DSD GmbH titulaires d'une licence valide d'utilisation de la
marque ou par des entreprises engagées dans la gestion des
déchets en République Fédérale Allemande. Cela s'applique
également à la reproduction du logo par des tiers dans un
dictionnaire, une encyclopédie ou une base de données électronique
contenant un manuel de référence.
FR

Manuel d'instructions
20
Les produits électriques usagés ne doivent pas être
jetés avec les ordures ménagères. Veuillez recycler là où les
installations sont disponibles. Vérifiez auprès des autorités locales ou
du magasin le plus proche pour obtenir des conseils sur le recyclage.
Ce symbole est utilisé pour le marquage des matériaux
destinés à entrer en contact avec les aliments dans l'Union
Européenne, tel que défini dans le règlement (CE) n° 1935/2004.
La marque de conformité eurasienne (ЕАС) est une marque de
certification destinée à indiquer les produits conformes à toutes les
réglementations techniques de l'Union douanière eurasienne.
Le produit et les matériaux d'emballage sont recyclables,
sous réserve de la responsabilité étendue du fabricant. Par souci de
bon traitement des déchets, mettez-le au rebut séparément, en
suivant les symboles d'emballage illustrés. Le logo Triman n'est
valable qu'en France.
Collecte séparée / Vérifiez les directives de
votre municipalité locale.
Nettoyage et maintenance
• Avant le nettoyage, débranchez l'appareil et
attendez qu'il refroidisse.
• N'immergez pas l'appareil dans de l'eau ou
dans d'autres liquides. L'appareil ne sont pas
lavables au lave-vaisselle.
• Nettoyez l'appareil à l'aide d'un chiffon
humide. N'utilisez jamais de nettoyant
abrasif ni de tampon à récurer ou de laine
d'acier, ce qui pourrait endommager
l'appareil.
• Rincez toutes les autres pièces utilisées
avec du détergent et de l'eau chaude ou
mettez-les au lave-vaisselle. En cas de
saleté tenace, nous recommandons de faire
tremper les accessoires dans de l'eau tiède
et du liquide vaisselle au préalable.
Table of contents
Languages: