EDF EO Mini Pro User manual
EO Mini Pro User Guide

2
Mini Pro User Guide I April 2019
TABLE OF CONTENTS
1. Introduction 2
2. Charging a vehicle 3
2.1 Starting the Charge 3
2.2 Stopping the Charge 3
3. Configuring the Charging Session Options using the Juicenet APP 4
3.1 Minimum Charge 4
3.2 Time Of Use 4
3.3 Notifications 4
3.4 Settings 4
4. Adding another user to the Charging Station 5
5. GoElectric Portal 6
6. TroubleShooting 7
7. Further Technical Support 7
1. INTRODUCTION
This document details the user instructions for
the EO Mini Pro. It details how to use both the
charging station as well as the key features of
the associated GoElectric App.
Note - It is assumed that:
• The User has the EV GoElectric App
(eMotorWerks) installed on a smart phone
or has access to the GoElectric Dashboard -
https://dashboard.emotorwerks.com/Portal
• The EO Mini Pro has been joined to the
user’s wifi network as per the EO Pro Mini
Installation Manual
3
Mini Pro User Guide I April 2019
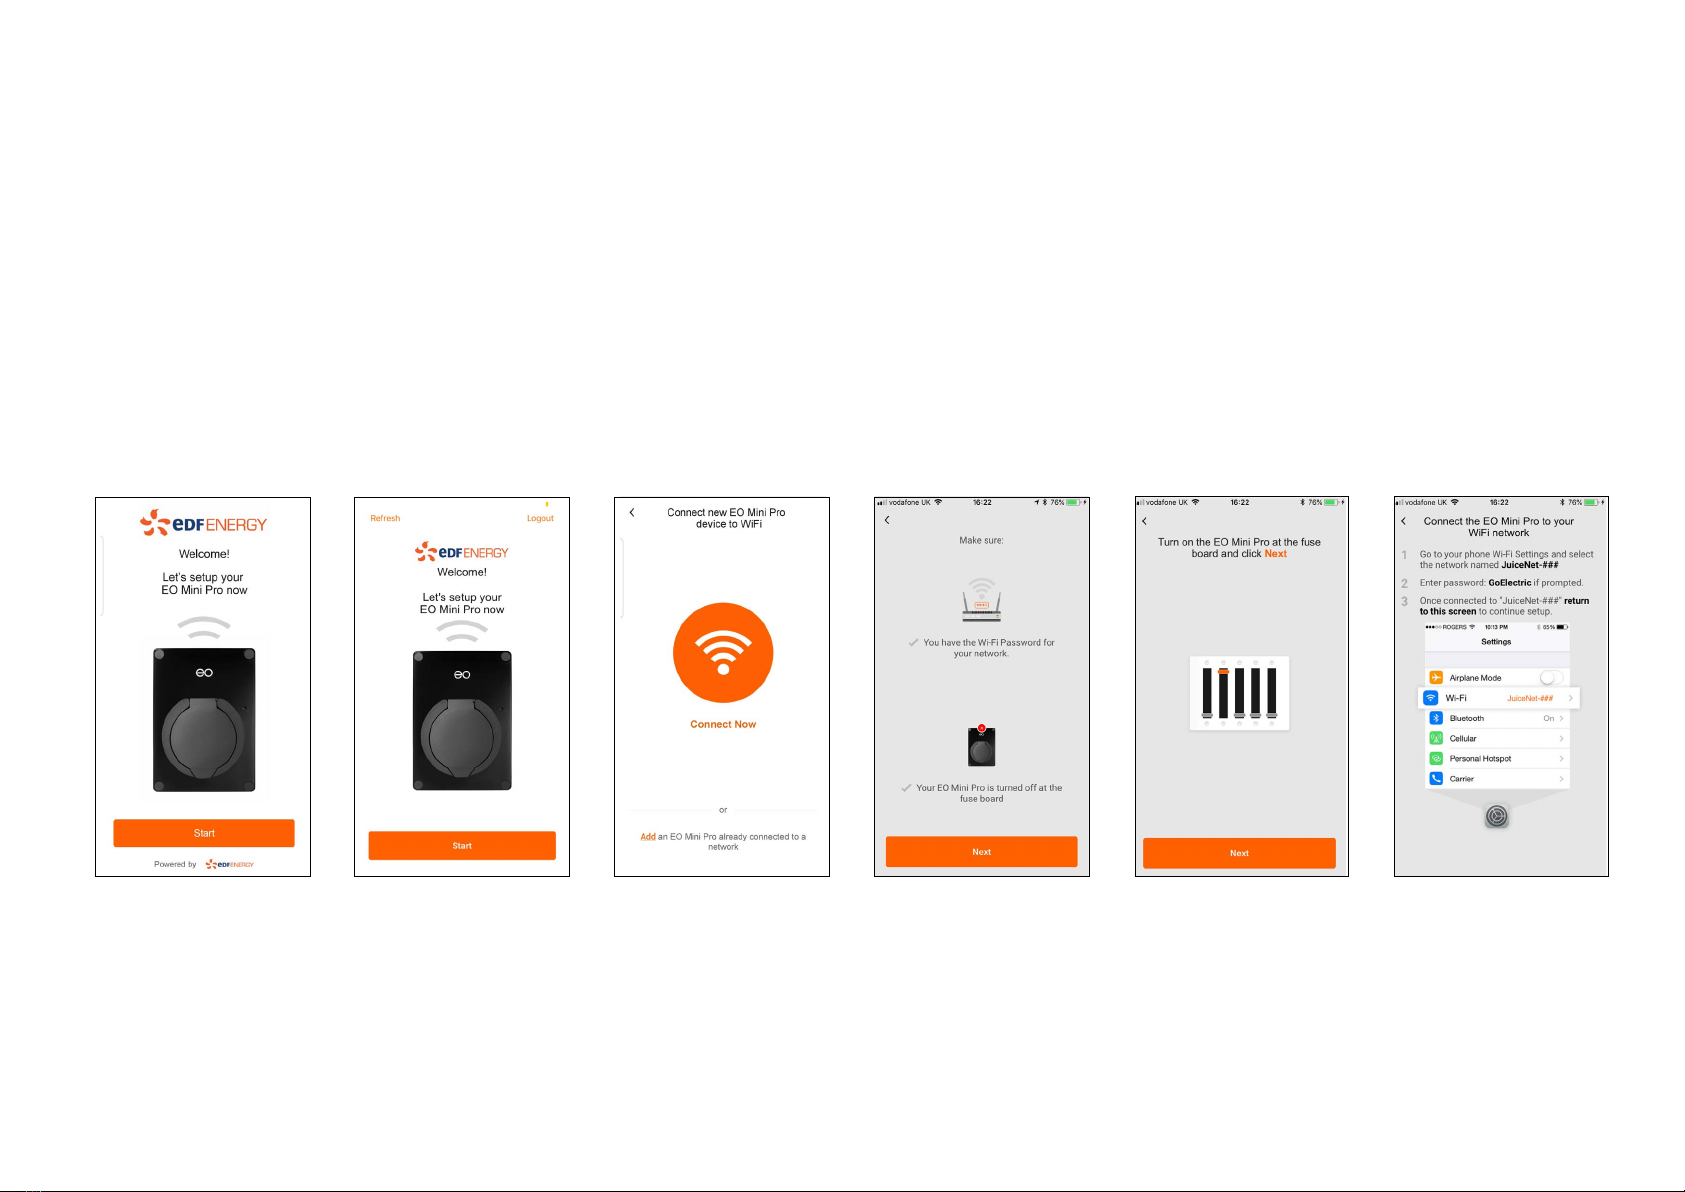
2.1 Connecting the EO Mini Pro to the Internet
1. Install the GoElectric app onto your mobile device.
2. Log into the GoElectric app. If you do not have an account, create one.
3. Select Add JuiceNet Device on Android devices or Start on iOS devices.
5. Have the WiFi network
password ready, then
turn off the circuit
breaker for the EO
Mini Pro. In the app,
select Next.
6. Turn on the circuit
breaker for the EO
Mini Pro. In the
app, select Next.
7. Connect to the
EO Mini Pro’s WiFi
network.
Note: After powering
the EO Mini Pro, steps
7 through 9 must be
completed within
2 minutes.
2. CONNECTING THE EO MINI PRO TO THE INTERNET
The process for connecting the EO Mini Pro can be summarised into the following steps:
1. Download the GoElectric app onto a smart phone
2. Using the app, connect to the wifi hotspot created by the EO Mini Pro
3. Configure the EO Mini Pro to join a wifi network with access to the internet
At this point it is possible to view the status of the EO Mini Pro using either the app or through the dashboard on a personal computer.
Android iOS 4. Select Connect
Now.
EO Mini Pro Installation Guide I April 2019 4
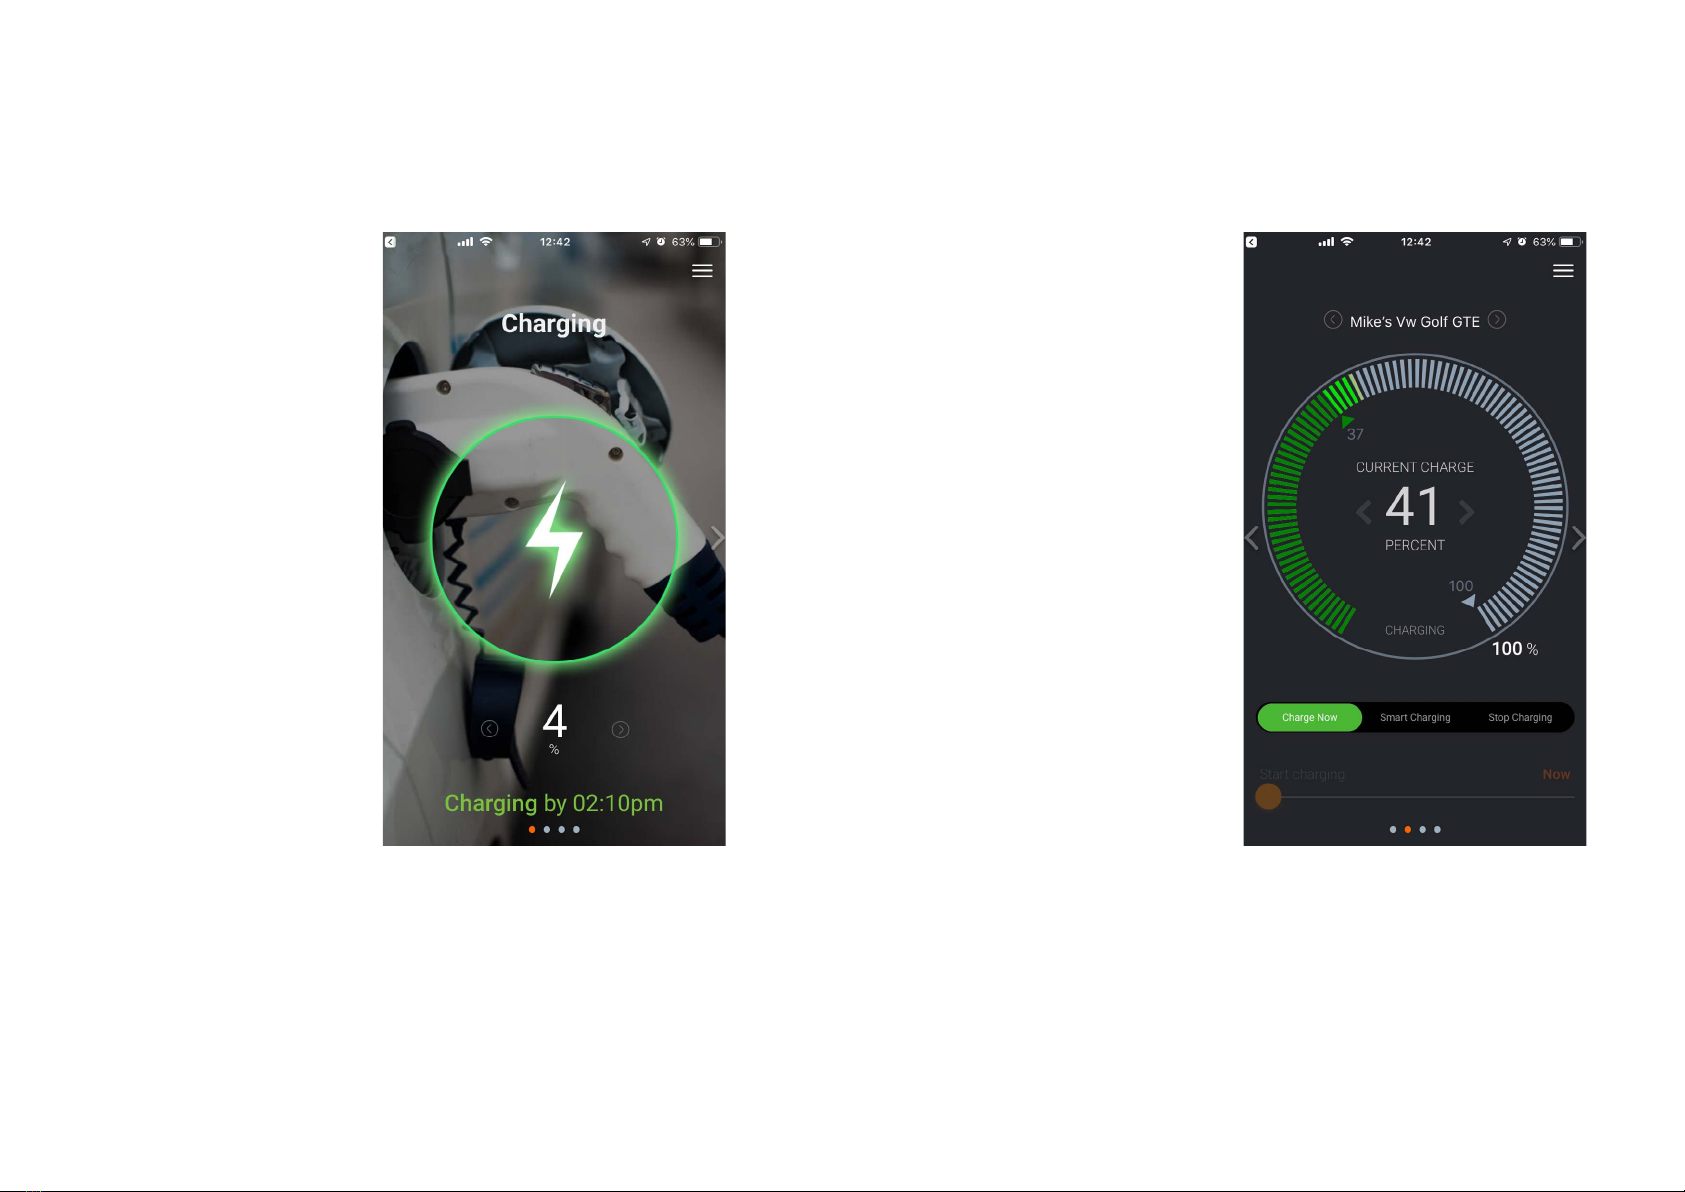
3. CHARGING A VEHICLE
3.1 Starting the Charge
1) Ensure that the EO Mini Pro is powered and that the Status
LED is pulsing blue.
2) Insert the cable into the
vehicle first.
3) Insert the other end of
the cable into the EO
Mini Pro.
4) The vehicle should start
to charge immediately
or will charge at the
scheduled time.
5) Set the charging station
configuration options
using the app or
dashboard –
see figure 1.
When a vehicle is
plugged into the EO Mini
Pro, then the following
summary screen is
available.
Figure 1 - Summary screen on the App
There are various options available:
Current State of Charge
a. This is set by the user when the charging
session has started. It is represented by the
Green inner triangle at 51% in Figure 2.
b. In order to set the current state of charge,
the user must move the green inner
triangle to the current state of charge of
the battery of the EV when the vehicle
is plugged in. This will allow the app to
calculate how much energy and time is
required to charge up the vehicle
Charge Now
a. Press this button to start charging
immediately. This will override any
Smart Charging functionality currently
programmed
Smart Charging
a. The user allows the EO Mini Pro to
determine when to start charging. This
will charge the car according to the
Time Of Use or the minimum charge
functionality.
Stop Charging
a. Press this button to stop the charging
session immediately (this will tell the car
that no power is available).
Minimum Charge
a. The Orange line indicates the minimum level of charge that has been defined
in the settings of the app.
Figure 2 - The charging details
3.2 Stopping the Charge
1) Stop the charging session from the vehicle e.g. unlock the vehicle
2) Remove the cable from the vehicle first
3) Remove the cable from the EO Mini Pro
If the user swipes right then the
Charging Screen is available.
EO Mini Pro Installation Guide I April 2019 5
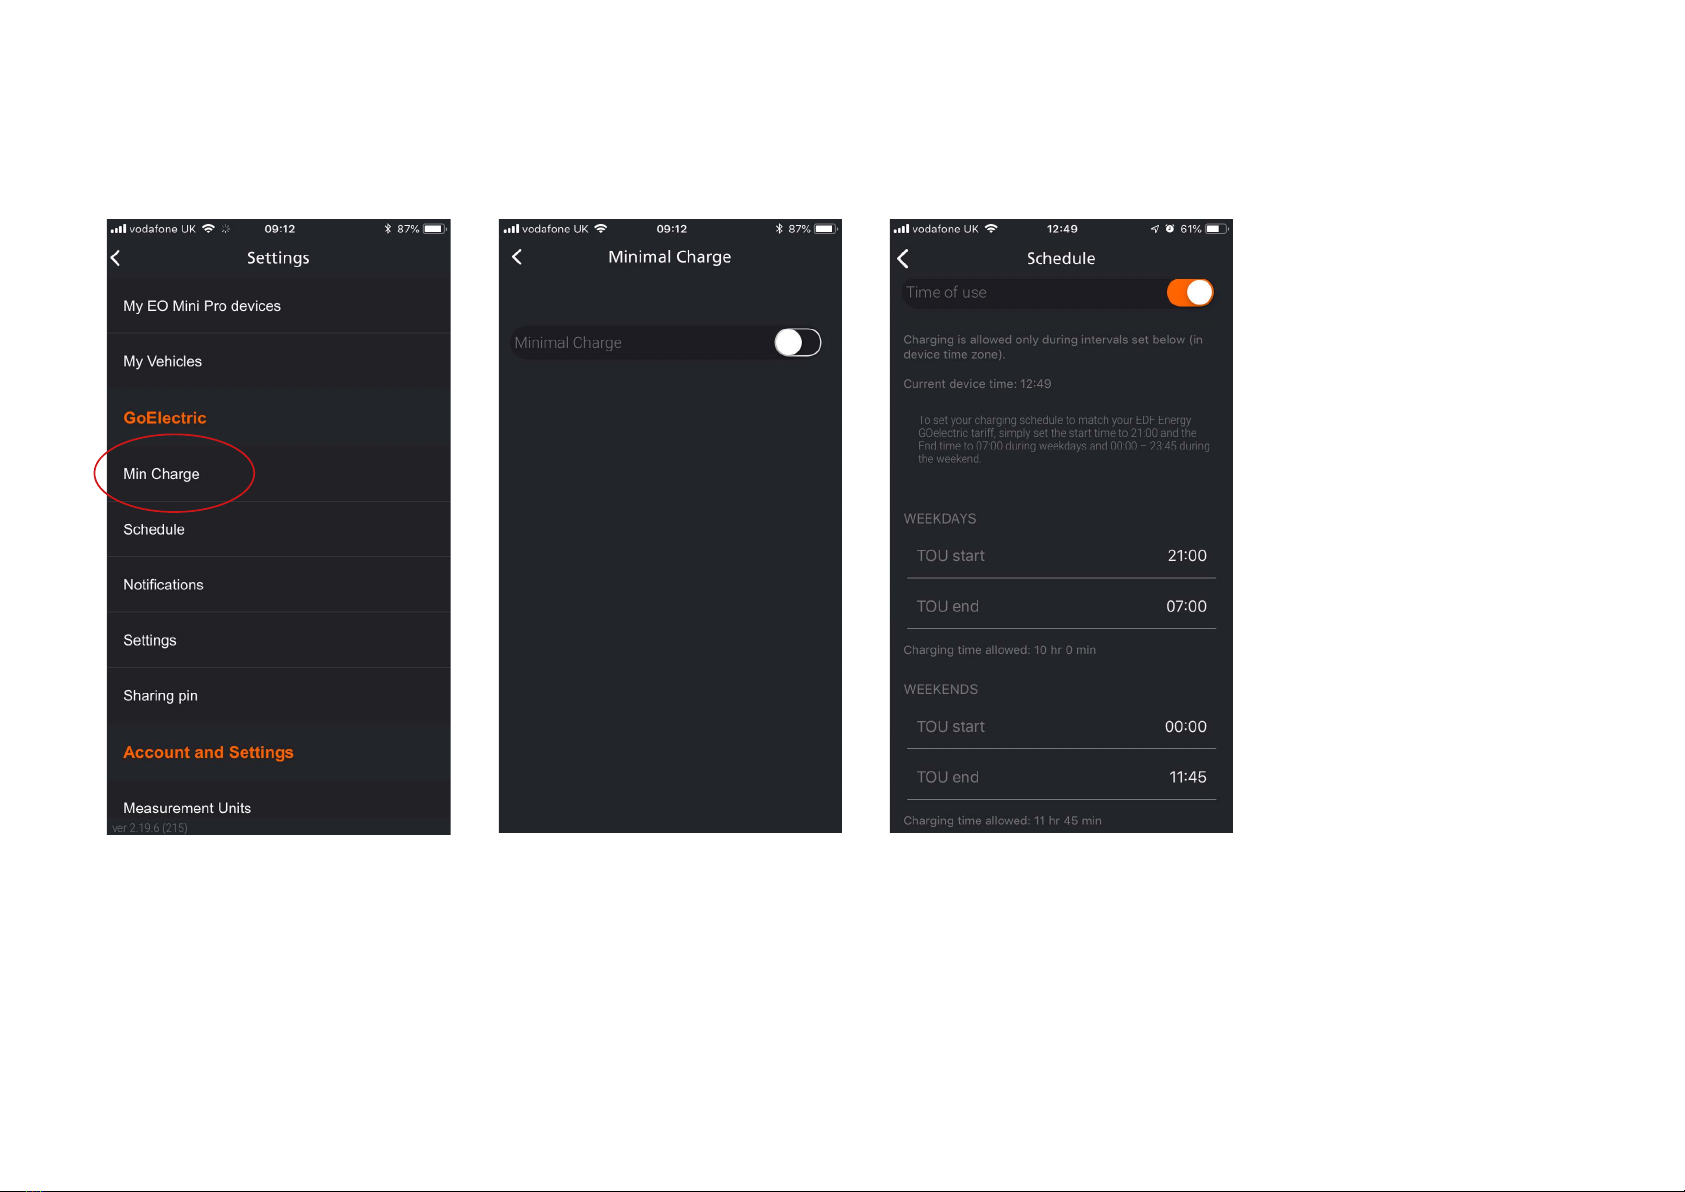
4. CONFIGURING THE CHARGING SESSION OPTIONS USING THE GOELECTRIC APP
There are various options that can be set which can impact the charging session. These are accessible from the three horizontal lines at the top right hand side
of the screen shown in Figure 2.
4.1 Minimum Charge
When a vehicle is plugged in, then the EO Mini Pro will charge the vehicle
until the minimum charge level is reached. For example, if the minimum
charge value is set to 20% and a vehicle with 10% is connected, then the
EO Mini Pro will give 10% charge.
NOTE – this depends on the user defining the vehicle connected and setting
the existing state of charge.
Figure 3 - Settings of the GoElectric App
4.2 Time Of Use
It is possible to configure the EO
Mini Pro so that it will only charge
during certain time periods. This
is possible within the Time of Use
section.
Figure 4 - Time of Use Configuration options
4.3 Notifications
It is possible to enable the
GoElectric app to send notifications
via phone or email
on the following events:
• Charging Start
• Charging Stop
• Charging delayed due to ToU
• Unit is back online
• Unit offline
• Unit is not plugged in by
o The user can set the app to
remind the user if a car hasn’t
been plugged into the EO Mini Pro
by a certain time. This is a handy
tool to prevent the user from
forgetting to charge their car!
4.4 Settings
In the settings menu it is possible
to configure certain parameters
such as
• Device Name
• Maximum charging rate
• Location
• Time zone
From this screen it is also possible
to reset the ownership if the unit
is no longer to be associated with
that user.
EO Mini Pro Installation Guide I April 2019 6
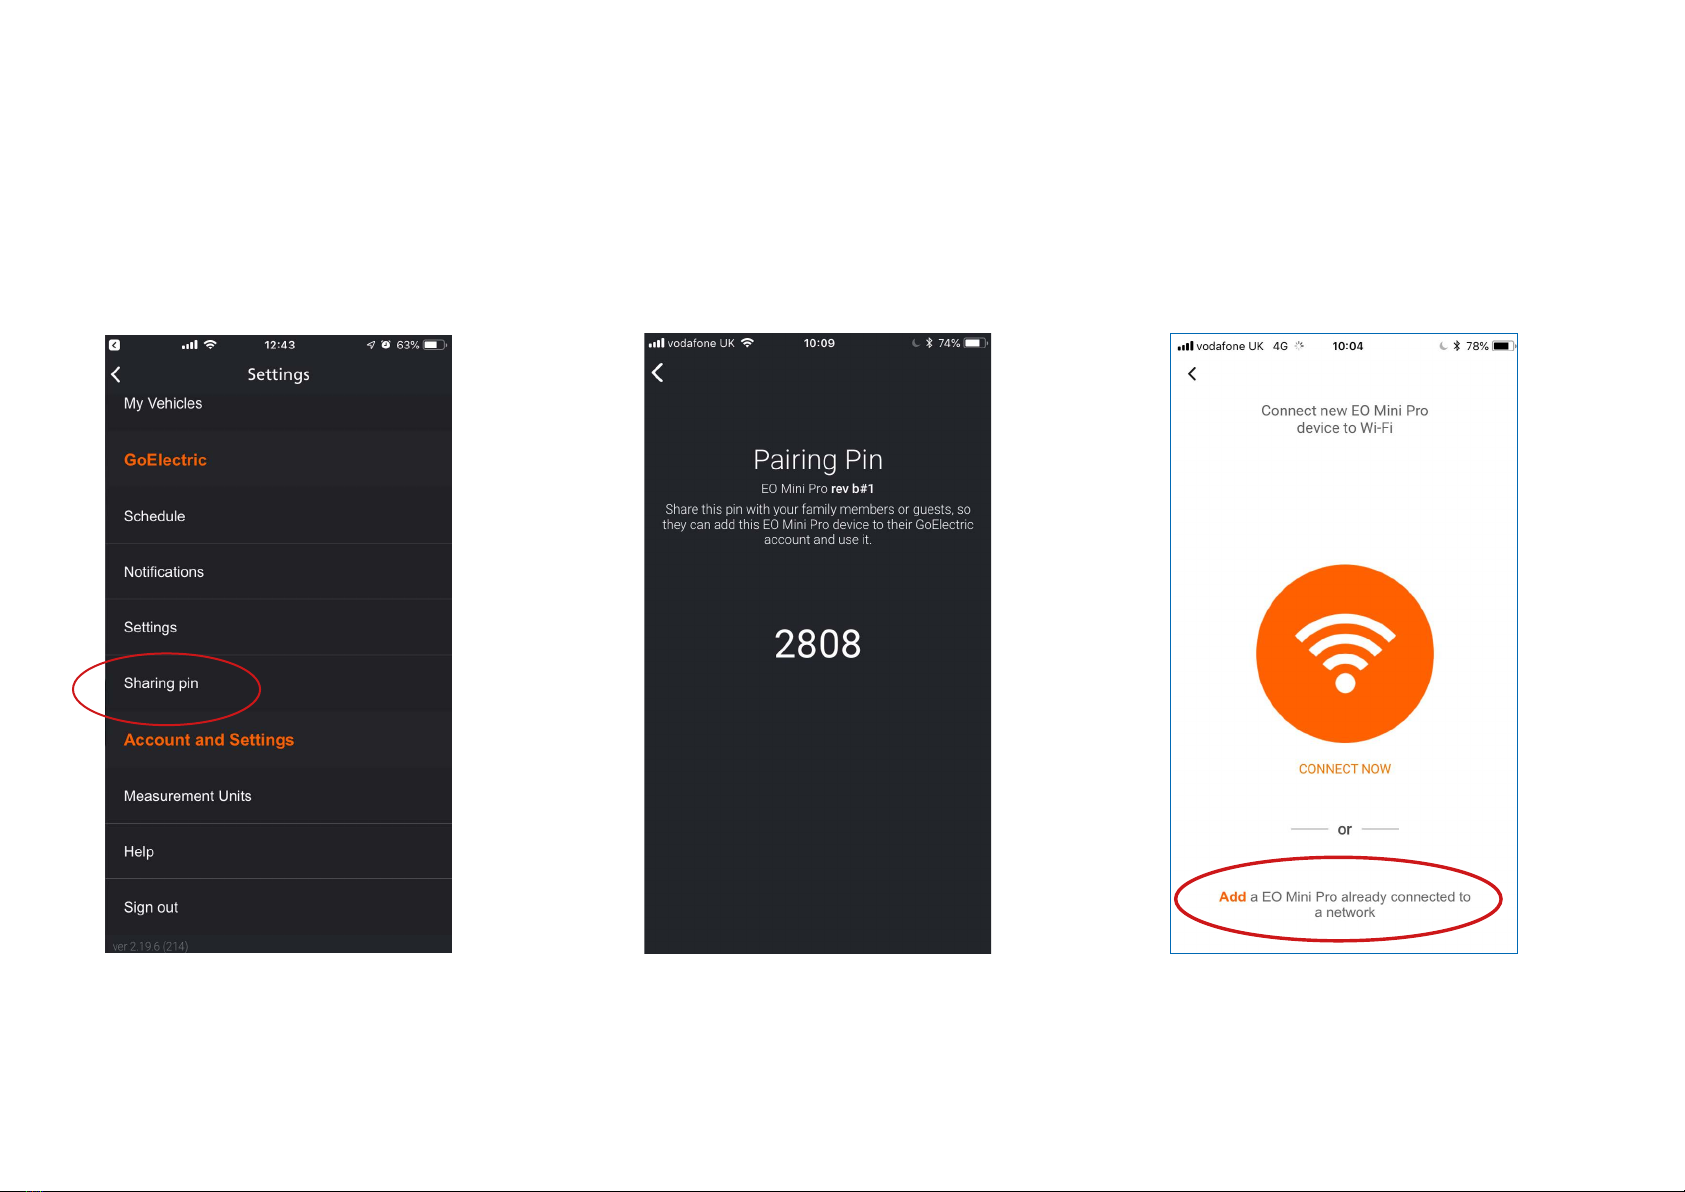
5. ADDING ANOTHER USER TO THE CHARGING STATION
o A sharing Pin Number is displayed
and this needs to be shared with
the secondary user
Figure 5 - Sharing Pin
Secondary User
o Select My GoElectric Devices from
the Settings Page
o Add a New Device
Figure 6 - Sharing Pin Number
It is possible to have multiple users control a single EO Mini Pro. Each user would need to download the EV GoElectric App and then join to the particular
charging station. It is possible for the primary user to share the Station with a secondary user by the sharing functionality:
• Primary User
o Select Sharing Pin from the settings screen
o Add a GoElectric Device already
connected to a network
o Select the device that you wish to
join and then enter the sharing pin
Figure 7 - adding a device to the EV GoElectric
App that is already on the network

EO Mini Pro Installation Guide I April 2019 7
6. TROUBLESHOOTING
What do the colours of the LED on the EO Mini Pro mean?
o The LED is an indicator of the state of the EO Mini Pro. For more details please refer
to the EO Mini and Basic LED Guide which is on the EO Resource Centre
Is the wifi working on the EO Mini Pro?
o Firstly, check in the app to see if the mini is connected
o Secondly on powering up of the EO Mini Pro for the first time, a GoElectric-XXX
wifi hotspot is emitted
The EO Mini Pro is not joining the Wifi when installing a new EO Mini Pro
using the GoElectric APP.
o Turn off the EO Mini Pro
o Turn on the EO Mini Pro
o Wait for the GoElectric-XXX wifi hotspot to be broadcast.
o Join the GoElectric-XXX hotspot
o Using a web browser, go to http://10.10.10.1
o This will then present you with the option to select the preferred wifi to join
The EO Mini Pro keeps dropping out of wifi
o The Signal strength of the wifi could be too weak to maintain a steady connection
o The signal strength can be checked by turning off and on the EO Mini Pro
o Using the app, add a new device and follow the on screen instructions
o Join the GoElectric-XXX wifi when it is emitted
o When the wifi options are presented then check the signal strength of the desired wifi. If it
is low, then consider boosting the home wifi signal strength using a 3rd party wifi extender.
The EO Mini Pro is not rejoining the wifi
o It could be that the EO Mini Pro is trying to join the Phone rather than the home wifi.
o Turn off the EO Mini Pro
o Turn on the EO Mini Pro
o On the phone, wait for the GoElectric-XXX wifi is displayed
o Select “forget this network” on the phone
o Reboot the EO Mini Pro and check that it joins the home wifi
7. FURTHER TECHNICAL SUPPORT
All EO Charging technical documentation is
published in the EO Resource Centre, this is
found at: https://www.eocharging.com/
edfenergy
The EO Support team can be reached at:
• Phone: +44 (0) 330 223 1483
Table of contents
Popular Automobile Accessories manuals by other brands


Whispbar
Whispbar K998W Fitting Instructions for Basic Carrier

Whelen Engineering Company
Whelen Engineering Company 10”Continuum installation guide

Mopar
Mopar 68275910AB instruction manual

AL-KO
AL-KO AKS 1300 operating instructions

Hauler Racks
Hauler Racks C300 instructions

Downeaster
Downeaster DED LP Owner's/operator's manual