EF EFBM 2591 M User manual

Read this manual thoroughly before using and save it for future reference
BUILT-IN MICROWAVE OVEN
EFBM 2591 M
THE BEAUTY OF SIMPLICITY
USER MANUAL

Dear Customer,
Thank you for having purchased and given your preference to our product. This manual provides a
means to make full use of the features of this product. The safety precautions and recommendations are
also featured in this manual. We recommend that you read this manual for best performance and to
extend the life of your appliance.
Please preserve this manual for future use, in the event that doubts arise relating to the operation.
To reduce the risk of fire, electric shock, injury to persons or exposure to excessive microwave
oven energy when using your appliance, follow basic precautions, including the following:
After having unpacked the appliance, check to ensure that it is not damaged. In case of doubt, do not
use it and consult customer service or qualified technician
Please do not allow young children to play with the plastic film and packaging as this may result in
suffocation.
This appliance can be used by children aged from 8 years old and above and persons with reduced
physical, sensory or mental capabilities or lack of experience and knowledge if they have been given
supervision or instruction concerning use of the appliance in a safe way and understand the hazards
involved.
Children should be supervised to ensure they do not play with the appliance.
Cleaning and user maintenance shall not be done by children unless they are adult supervised.
Keep the appliance and its cord out of reach of children less than 8 years old.
Only use utensils that are suitable for use in microwave ovens.
The oven should be cleaned regularly and any food deposits should be removed.
Warning: Liquids and other foods must not be heated in sealed containers since they are liable to explode.
Warning: It is hazardous for anyone other than a competent person to carry out any service or repair
operation that involves the removal of a cover which gives protection against exposure to microwave
energy.
If smoke is emitted, switch off or unplug the appliance and keep the door closed in order to stifle any
flames.
Do not use the oven cavity for storage purposes. Do not store items, such as bread, cookies, etc. inside
the oven.
Install or locate this oven only in accordance with the installation instructions provided.
This appliance is intended to be used in household and similar applications such as:
ostaff kitchen areas in shops, offices and other working environments;
oclients in hotels, motels and other residential type environments;
ofarm houses;
obed and breakfast type environments.
If the supply cord is damaged, it must be replaced by the manufacturer, its service agent or similarly
qualified persons in order to avoid a hazard.
Do not store or use this appliance outdoors.
Do not use this oven near water, in a wet basement or near a swimming pool.
The temperature of accessible surfaces may be high when the appliance is operating. The surfaces are
liable to get hot during use. Keep cord away from heated surface, and do not cover any vents on the oven.
Do not let cord hang over edge of table or counter.
The contents of feeding bottles and baby food jars shall be stirred or shaken and the temperature
checked before consumption, in order to avoid burns.
The appliance is not intended for use by persons (including children) with reduced physical, sensory or
mental capabilities, or lack of experience and knowledge, unless they have been given supervision or
instruction concerning use of the appliance by a person responsible for their safety.
Children should be supervised to ensure that they do not play with the appliance.
SAFETY GUIDELINES

The appliances are not intended to be operated by means of an external timer or separate remote-control
system.
WARNING: The appliance and its accessible parts become hot during use. Care should be taken to avoid
touching heating elements. Children less than 8 years of age shall be kept away unless continuously
supervised.
Surface of a storage drawer can get hot.
The appliance shall not be cleaned with a steam cleaner.
Care should be taken not to displace the turntable when removing containers from the appliance.
The appliance must not be installed behind a decorative door in order to avoid overheating.
Failure to maintain the oven in a clean condition could lead to deterioration of the surface that could
adversely affect the life of the appliance and possibly result in a hazardous situation.
PRECAUTIONS TO AVOID POSSIBLE EXPOSURE TO EXCESSIVE MICROWAVE ENERGY
Do not attempt to operate this oven with door open since this can result in harmful exposure to microwave
energy. It is important not to break or tamper with the safety interlocks.
Do not place any object between the oven front face and the door or allow soil or cleaner residue to
accumulate on sealing surfaces.
The oven door must be closed properly. Do not operate the oven if :
oDoor seals is damaged
oDoor hinges are loose or broken
oDoor is warped
oHoles or crack is found on the oven
WARNING: The oven must not be operated if the above issues occur as this will result in microwave
leakage and cause hazard to user. The repair and service must be carried out by authorized and
qualify technician.
PRECAUTIONS TO AVOID POSSIBLE RISK OF FIRE INSIDE THE CAVITY
Do not overcook food.
Eggs in their shell and whole hard-boiled eggs should not be heated in microwave ovens since they may
explode, even after microwave heating has ended.
Remove wire twist-ties and metal handles from paper or plastic containers/bags before placing them in
the oven.
When heating food in plastic or paper containers, keep an eye on the oven due to the possibility of
ignition.
The microwave oven is intended for heating food and beverages. Drying of food or clothing and heating of
warming pads, slippers, sponges, damp cloth and similar may lead to risk of injury, ignition or fire.
Metallic containers for food and beverages are not allowed during microwave cooking.
Microwave heating of beverages can result in delayed eruptive boiling, therefore care must be taken
when handling the container.
Do not heat oil or fat. Do not leave the food unattended when cooking with oils as this can cause fire
hazard.
If smoke or ignition is observed in the cavity during operation, keep the oven door closed. Switch off the
power and unplug the oven immediately.
Personal Injury Hazard It is hazardous for anyone other than a competent person to carry out any
service or repair operation that involves the removal of a cover which gives protection against exposure to
microwave energy.

PRECAUTIONS TO REDUCE RISK OF INJURY TO PERSONS DURING INSTALLATION
ELECTRIC SHOCK HAZARD
WARNING:
Touching some of the internal components can cause serious personal injury or death. Do not disassemble
this appliance.
Improper use of the grounding can result in electric shock.
Do not plug into an outlet until appliance is properly installed and grounded.
This appliance must be grounded. In the event of an electrical short circuit, grounding reduces the risk
of electric shock by providing an escape wire for the electric current.
This appliance is equipped with a cord having a grounding wire with a grounding plug. The plug must
be plugged into an outlet that is properly installed and grounded.
Consult a qualified electrician or serviceman if the grounding instructions are not completely understood
or if doubt exists as to whether the appliance is properly grounded.
If it is necessary to use an extension cord, use only a 3-wire extension cord.
A short power-supply cord is provided to reduce the risks resulting from becoming entangled in or
tripping over.
If a long cord set or extension cord is used:
The marked electrical rating of the cord set or extension cord should be at least as great as the
electrical rating of the appliance.
The extension cord must be a grounding-type 3-wire cord.
The long cord should be arranged so that it will not drape over the counter top or tabletop where it
can be pulled on by children or tripped over unintentionally
Suitable Utensil for Microwave Oven
To cook or defrost or heat up food in the microwave oven, the microwave energy must be able to pass
through the cooking utensils to reach the food.
Below is the general guide for selecting a suitable utensil:
Utensil
Microwave
Grill
Combination
Glassware
Heat-resistant glass only
Heat-resistant glass only
Heat-resistant glass only
Ceramic ware
Heat-resistant glass only
Heat-resistant glass only
Heat-resistant glass only
Plastic
Microwave-safe only
No
No
Kitchen Paper
Yes
No
No
Metal Tray/Rack
No
Yes
No
Aluminum Foil
No
Yes
No
Model:
EFBM 2591 M
Rated Voltage:
230V~ 50Hz
Rated Input Power(Microwave):
1450W
Rated Output Power(Microwave):
900 W
Rated Input Power(Grill):
1000W
Oven Capacity:
25L
Turntable Diameter:
Ø 315mm
External Dimensions:
W594 X D403 X H382 mm
Net Weight:
Approx. 17.6 kg
PRODUCT SPECIFICATIONS
Your oven comes with the following accessories:
1) Glass Tray x 1
2) Grill Rack x 1
3) Turntable Ring x 1
4) User Manual x 1
5) Rubber Sucker x 1 (for door opening when there is no electric power)
6) Screws x 2
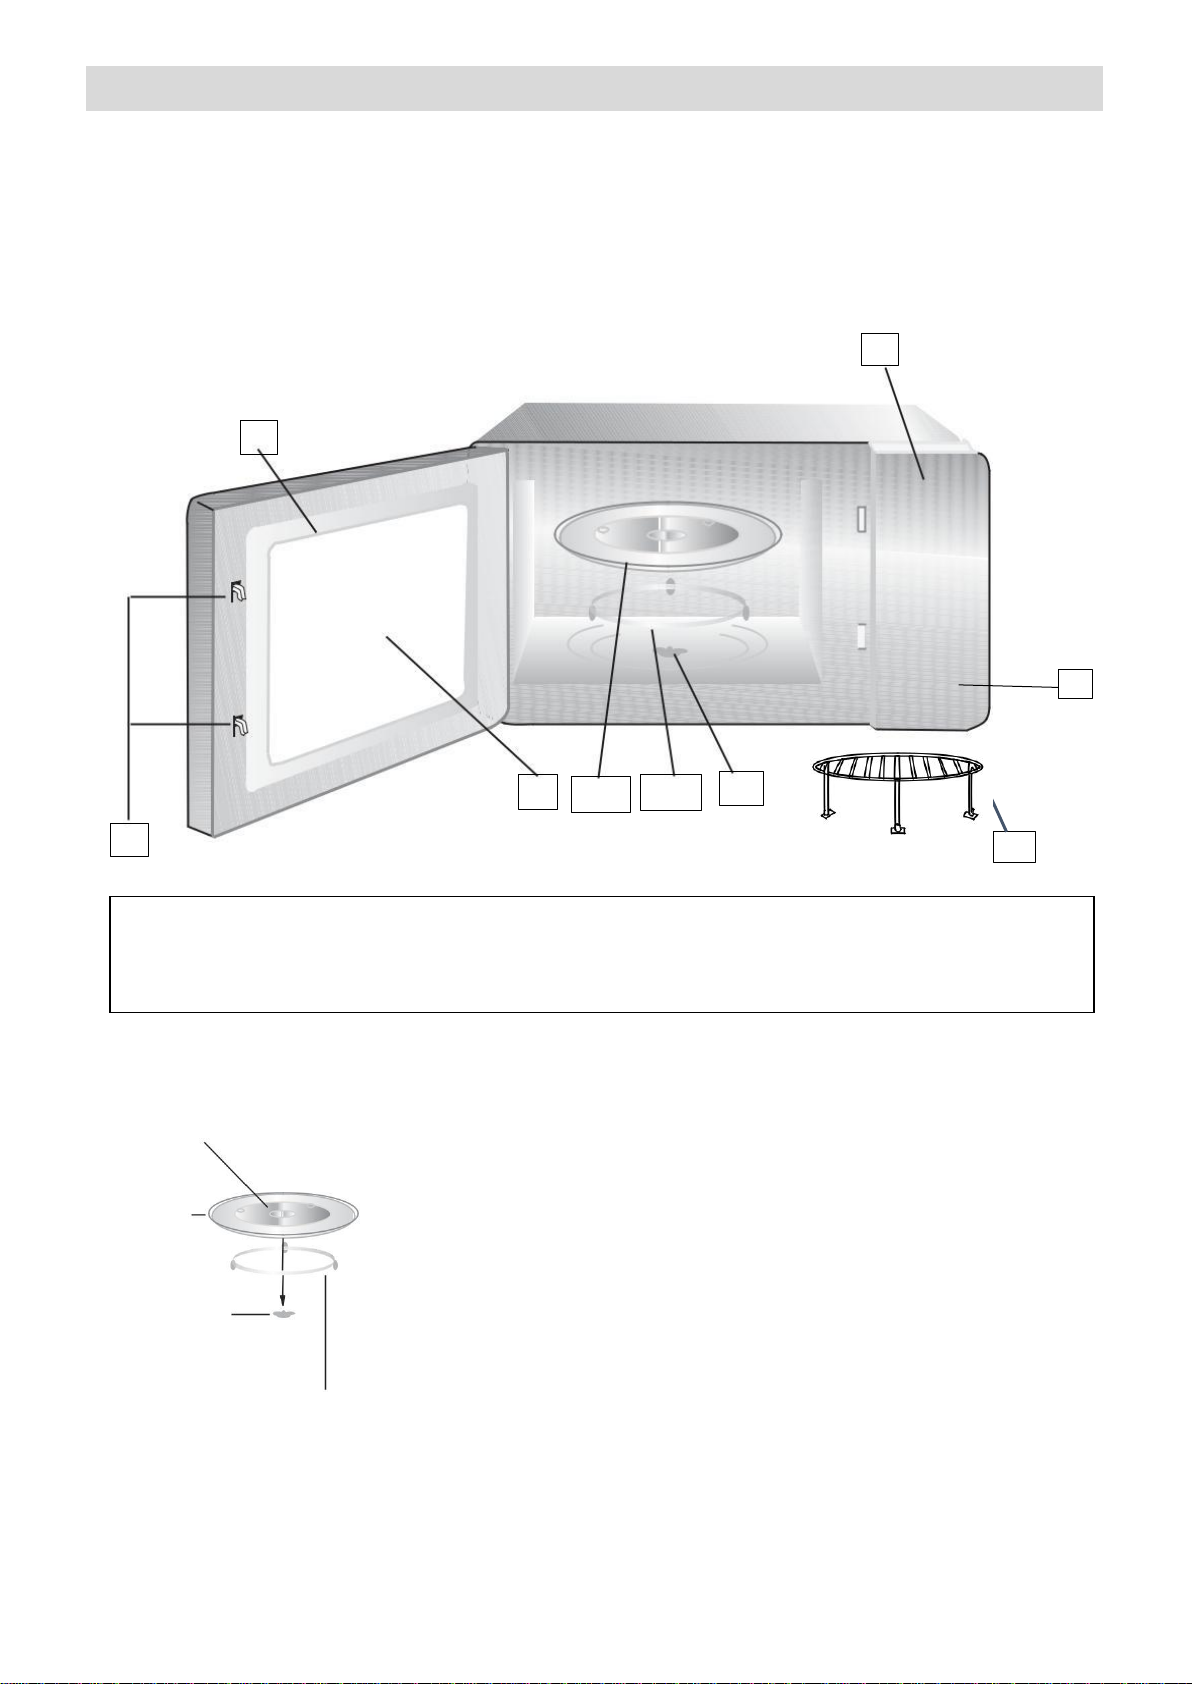
Turntable Installation
A) Control Panel E) Oven Window
B) Turntable Shaft F) Door Assembly
C) Turntable Ring G) Safety Interlock
D) Glass Tray H) Auto Door Button
2
PRODUCT DESCRIPTIONS
Glass Tray
Turntable Shaft
Turntable Ring
Grill Rack (Only be used in grill function
and be placed on the glass tray)
Hub (underside)
Place the turntable ring at the bottom of the cavity and place the glass tray
on it. Ensure that the glass tray is well secured.
a. Never place the glass tray upside down.
b. Do not turn the glass tray manually as this could damage the drive
motor.
c. Both glass tray and turntable ring assembly must always be used
during cooking.
d. All food and containers of food are always placed on the glass tray
for cooking
e. If glass tray or turntable ring assembly cracks or breaks, contact
authorized service center
H
3/C
1/D
B
E
G
A
F

FIRST USE
oEnsure that all the packaging material is removed from the oven before use.
oClean the oven cavity and the supplied accessories thoroughly.
oWarning: Do not operate the oven if any of the issues below occur:
oDoor seals is damaged
oDoor hinges are loose or broken
oDoor is warped
oHoles or crack is found on the oven
Note: When first use the grill function, it may produce slight burning smell. The smell will be dissipated after a while.
This is normal and will not impose any risk. Please operate the grill without any food for at least 20 minutes when
use for the first time.
OPERATION
This microwave oven uses modern electronic control to adjust cooking parameters to meet your needs better.
When turn on the power, the oven will display "WELCOME", buzzer will ring once. If there is no operation within 1
minute, the oven will enter into standby mode and "0:00" will display.
Setting the Clock
oPress " Kitchen Timer/Clock " icon twice, the screen will display "00:00" and the hour figures will flash
oPress “ -” or “ + ” to set the present hour (0-23). The hour is displayed in 24 Hour mode.
oPress the " Kitchen Timer/Clock " or " Start/+30Sec./Confirm" to confirm the hour.
oMinutes figures will flash. Press “ -” or “ + ” to set the present minutes (0-59)
oPress the " Kitchen Timer/Clock " or " Start/+30Sec./Confirm" again to confirm the minutes setting. The
clock setting is completed and the current time will show (the 2 points “:” between hours and minutes will blink).
CONTROL PANEL
1) Display Screen
2) Microwave
3) Grill / Combi
4) Defrost by Weight
5) Defrost by Time
6) Kitchen Timer/Clock
7) Auto Menu/Power/Weight/Timer Adjustment
8) Stop/Clear –Child Lock “3’”
9) Start/+30sec/Confirm
10) Auto Door Opening
OPERATION OF THE OVEN
2
3
4
5
6
7
8
10
9
1

Microwave Cooking Mode
You may select the desired power level and cooking time for microwave cooking.
oPress “Microwave” icon once, the screen will display maximum power level (100%) “P100”.
oPress “Microwave” icon repeatedly to select the desired microwave power level. There are 5 power levels –
P100, P80, P50, P30 and P10.
Microwave Power
High (100%)
Med. High (80%)
Med. (50%)
Med. Low (30%)
Low (10%)
Display
P100
P80
P50
P30
P10
oPress “ -” or “ + ” to set the cooking time (from 5 sec to max. 95 min). The cooking time is incremented
Between 0 to 1 min in steps 05 seconds
Between 1 to 5 min in steps 10 seconds
Between 5 to 10 min in steps 30 seconds
Between 10 to 30 min in steps 01 minute
Between 30 to 95 min in steps 05 minutes
oPress the "Start/+30Sec./Confirm" to start cooking.
oWhen cooking ends, there will be acoustic signal (beep 5 times) and the screen will show “End”.
Note:
oPress the “Microwave” icon to check on the power level during cooking
oPress “Stop/Clear” icon to stop cooking during operation. Press "Start/+30Sec./Confirm" to resume cooking
oDuring cooking, press "Start/+30Sec./Confirm” to add the cooking time. Each press is 30 seconds increment.
Grill or Combi (Microwave + Grill)
oPress “Grill/Combi” icon once, the screen will display “G” (for grilling).
oPress “Grill/Combi” icon repeatedly to select the desired cooking mode. There are 3 modes –“G”, “C-1” and
“C-2”.
Program
Display
Microwave Power
Grill Power
Suitable Dish
Grill
G
0%
100%
Thin slices of meat,
sausage, kebabs, au
gratin dish
Combi 1
C-1
55%
45%
Pudding, omelets, baked
potato
Combi 2
C-2
36%
64%
Fish, potato, au gratin
dish
oPress “ -” or “ + ” to set the cooking time (from 5 sec to max. 95 min).
oPress the "Start/+30Sec./Confirm" to start cooking.
oWhen cooking ends, there will be acoustic signal (beep 5 times) and the screen will show “End”.
Note:
oPress the “Grill/Combi” icon to check on the power level during cooking
oPress “Stop/Clear” icon to stop cooking during operation. Press "Start/+30Sec./Confirm" to resume cooking
oDuring cooking, press "Start/+30Sec./Confirm” to add the cooking time. Each press is 30 seconds increment.
oDo not preheat the grill for Combi mode.
Quick Program
This oven offers smart functions for quick programming:
Quick Start
oIn standby mode, press the "Start/+30Sec./Confirm” icon will immediately start the cooking with 100% power
level for 30 seconds. Each press on the same key increases the cooking time by 30 seconds. The maximum
cooking time is 95 minutes.
oIn standby mode, press the “ -” icon to set the cooking time. Press the "Start/+30Sec./Confirm” icon to start
cooking with 100% power level.

Increasing Cooking Time
During cooking process, press "Start/+30Sec./Confirm” icon to increase the cooking time. Each press is 30
seconds increment. The maximum cooking time is 95 minutes.
Note: The above quick program is not applicable for Auto Menu and Weight Defrost.
Weight Defrost
oPress "Weight Defrost " icon once, the screen will display "100” (100g).
oPress “ -” or “ + ” to select the food weight. The weight can be programmed between 100g –2000g.
oPress the "Start/+30Sec./Confirm" to start cooking.
oWhen cooking ends, there will be acoustic signal (beep 5 times) and the screen will show “End”.
Note:
During defrosting, the oven pauses and produces reminder alert. In order to have a better effect of defrosting, you should turn
the food over, and then press" Start/+30Sec./Confirm" to continue cooking.
Time Defrost
oPress "Time Defrost " icon once, the screen will display "00:00”.
oPress “ -” or “ + ” to choose the desired defrost time (from 5 sec to max. 95 min).
oPress the "Start/+30Sec./Confirm" to start cooking.
oWhen cooking ends, there will be acoustic signal (beep 5 times) and the screen will show “End”.
Multi-Stage Cooking Mode
This oven can be programmed up to 2 stages of cooking using combinations of Microwave mode, Grill Mode or
Combi Mode.
Example: if you want to defrost the food for 5 minutes, then cook with 80% microwave power for 7 minutes.
The steps are as following:
oPress the “Time Defrost” icon.
oSet the defrost time to 5 minutes by pressing the “ -” or “ + ”.
oPress the “Microwave” icon till the microwave power is set to “P80” (80% power)
oSet the cooking time to 7 minutes by pressing the “ -” or “ + ”.
oPress the "Start/+30Sec./Confirm" to start cooking.
oWhen cooking ends, there will be acoustic signal (beep 5 times) and the screen will show “End”.
Note:
This cooking mode is not applicable for Weight Defrost, Auto Menu and Quick Program.
There will be beep signal sounds after the first cooking stage is completed and before entering to the 2nd stage.
Kitchen Timer
Kitchen timer operates independently. It can be set from 5 sec to maximum 95 min.
oPress "Kitchen Timer/Clock " icon once, the screen will display "KT 00:00”.
oPress “ -” or “ + ” to set the desired time (from 5sec to max. 95min)
oPress the "Start/+30Sec./Confirm" to start the timer countdown.
oWhen cooking ends, there will be acoustic signal (beep 5 times) and the screen will show “End”.

Auto Menu
This oven offers 8 preset cooking programs. These programs are weight dependent and the cooking duration is
automatically calculated once the weight is set.
To access to this auto menu, follow the steps as below:
oIn standby mode, Press “ + ”to select the desired menu (menu chart as below).
oPress the "Start/+30Sec./Confirm" to confirm the menu
oPress “ -” or “ + ” to choose the food weight
oPress the "Start/+30Sec./Confirm" to start cooking.
oWhen cooking ends, there will be acoustic signal (beep 5 times) and the screen will show “End”.
Menu Chart
Child Lock
The oven allows locking the control panel to avoid unauthorized use. All buttons are disabled when child lock is
activated.
To activate the child lock, press and hold the “Stop/Clear” icon for approximately 3 seconds. An acoustic signal
and the lock symbol is displayed.
To cancel the child lock function, press and hold the “Stop/Clear” icon again for approximately 3 seconds. An
acoustic signal and the lock symbol goes off.
Stop/Clear
The cooking programs can be paused at any time by pressing the “Stop/Clear” icon. Press the
“Start/+30Sec./Confirm" to continue cooking.
To reset the cooking programs, press the “Stop/Clear” icon.
Menu
Weight
Cooking Mode
Pizza
200 g
C-2
400 g
Meat
250 g
P100 (100%)
350 g
450 g
Vegetable
200 g
P100 (100%)
300 g
400 g
Pasta
50 g (with 450g cold water)
P80 (80%)
100 g (with 800g cold water)
Potato
200 g
P100 (100%)
400 g
600 g
Fish
250 g
P80 (80%)
350 g
450 g
Beverage
1 cup (around 120ml)
P100 (100%)
2 cups (around 240ml)
3 cups (around 360ml)
Popcorn
50 g
P100 (100%)
100 g

Oven Door Opening
Press " " button, the oven door will open. To close the door, push the door firmly.
During cooking process, the program will be disrupted if the door is opened. Close the door firmly and press the
“Start/+30Sec./Confirm" to continue cooking or press the “Stop/Clear” icon to reset the cooking programs.
The door opening is powered by electric. Should there be any disruption on electricity, the door can be opened
manually using the rubber suction (provided). Paste the rubber suction near to the door opening and pull to force
open the door.
It is recommended to clean the oven regularly and to remove any food deposit inside or outside the oven.
Warning:
Disconnect the power supply before carrying out any cleaning and maintenance.
Ensure that the oven has cooled down to a safe temperature before carrying out any cleaning
oThe oven interior can be cleaned using a damp cloth. Mild detergent can be used.
oDo not use abrasive cleaning products as they may stain or deteriorate the oven interior or door surface
oDo no use steam cleaners
oTo remove stubborn deposit or to remove smell, boil a cup of water with some lemon juice or vinegar for 3-5
minutes, then clean the cavity wall with damp cloth.
oThe door should be kept clean at all times and ensure that there is no damage sign.
oAvoid water or small particles to penetrate into the small vent holes in the cavity.
oKeep the control panel dry. Wipe dry with soft and damp cloth. Avoid using excessive water
oThe turntable shaft and glass tray can be removed for cleaning. Wash with soapy water and dry thoroughly
before putting them back to the oven.
oAlways keep the turntable shaft clean so that the turntable can turn smoothly.
oWash and dry the grill rack after each use. Wash with soapy water and soak with hot soapy water to remove
stubborn grease.
CARE AND MAINTENANCE

IMPORTANT:
This appliance is only intended for domestic use.
This oven is intended for built-in use only. It is not intended for counter-top use or for use inside a cupboard.
The oven must be installed in compliance with regulations in force in your country and in observation of the
manufacturer’s instructions.
Operation of the oven may cause interference to your radio, TV and similar equipment. Place the oven far from
these equipment.
The oven can be installed in a 60cm wide wall-mounted cupboard and the cabinet must be made of heat-
resistant material.
The oven is fitted with a plug and must only be connected to a properly installed earthed socket
The mains voltage must correspond to the voltage specified on the rating plate.
The socket must be installed and connecting cable must only be replaced by a qualified electrician.
The power supply and socket must be easily accessible after installation. If the plug is no longer accessible
following the installation, an all-pole disconnecting device must be present on the installation side with a
contact gap of at least 3mm.
Adapters, multi-way strips and extension leads must not be used. Overloading can result in a risk of fire.
This oven shall only be serviced by authorized personnel.
Incorrect installation, for which the manufacturer or distributor accepts no responsibility, may cause personal
injury or damage.
Before Installation
Remove all packing materials and accessories supplied
Check that the oven is free from damage (e.g. deformed seal or door, broken door hinge)
If there is any damage, do no install the oven and contact the authorized service center immediately.
Electrical Connection
The appliance is fitted with a power cable + 13Amp plug and must only be connected to a properly installed
earthed socket. Only a qualified electrician who takes the appropriate regulations into account may install the
socket or replace the connecting cable. If the plug is no longer accessible after installation, an all -pole isolating
switch must be present on the installation side with a contact gap of at least 3mm. Contact protection must be
ensured by the installation.
Note:
Electrical safety must be provided by a correct built-in. During installation and maintenance, the oven must be
unplugged from electrical grid.
Fitting the Oven to the Cabinet
oEnsure that the air vents are not obstructed or blocked. If ventilation is blocked, the oven may over heat and
cause the oven malfunction.
oThe installation cabinet must not have a back panel behind the appliance.
oVentilation slots and intakes must not be covered.
INSTALLATION
The oven is supplied with 2 screws
for installation purpose

oThe cabinet column unit must have the following cut-out dimension
To ensure adequate ventilation, a minimum gap of 45mm is required from back of the oven to the cabinet wall.
oDo not crush the power supply cord.
oFit the oven to the column unit and fix it with the 2 screws provided. The fixing points are located at the top of
oven (see Fig below). Ensure the oven is stable and align with the cabinet. Please keep a minimum distance of
3mm between the oven and other appliances adjacent to it.
oConnect the oven to electrical socket.
Min. 3mm
If there is minor faults or problems with the oven, please check the following points before calling for service
appointment.
Trouble
Possible Action
Oven does not work
Check if the main power is switched on and the plug is
properly fixed
Check if the door is closed properly
Check if circuit breaker is in working order
Check if the “Start/+30Sec./Confirm” icon is pressed
Glass door shows condensation
Steam and water droplets may form during cooking. This is not
an issue and does not affect the safety of the oven. Wipe the
condensation off.
Turntable does not rotate correctly
Check that the shaft is correctly positioned.
Clean the shaft and the contact area between the glass tray
and turntable support.
Food is not properly cooked, heated or defrost
Check if the power level is set correctly
Check if the programs is interrupted and paused
The oven interferes with TV or radio
Radio and TV reception may be interfered when the oven is in
operation. It is similar to the interference of small electrical
appliances like mixer and vacuum cleaner. This is not an issue
If the problem persists despite observing the above checking, please contact the authorized customer service
center.
When consulting the customer service center, please ensure that you have the model number, date of purchase
and repair issue ready.
ENVIRONMENT-FRIENDLY DIPOSAL
You can help protect the environment!
Please remember to respect the local regulations:
Hand in the non-working electrical equipment to an
appropriate waste disposal centre.
TROUBLESHOOTING

The manufacturer and agent decline all responsibilities in the event of
damage caused by improper, incorrect or illogical use of the appliance.
Contact after sales service center when in doubt of the condition of the
appliance.
For after sales service [Singapore], please contact
Casa (S) Pte Ltd
15 Kian Teck Crescent, Singapore 628884
Telephone: +65 6268 0077
Fax: +65 6898 0510
Table of contents
Other EF Microwave Oven manuals


