EF MW 28.2G User manual

For original parts & reliable service:
Built-in
Microwave Oven
MW 28.2G
INSTRUCTIONS MANUAL

Table of Contents
From the manufacturer 03
Specifications 03
Read this first 04
Important Safety Information 05
Installation Instructions 06, 07
Cook Safely 09,10
Description of Parts 11
Display Panel 12,13
Control Panel : MW 28.2G 14,15, 16 & 17
Cleaning & Maintenance 18
Troubleshooting 19
Page 2
TROUBLESHOOTING
PROBLEM POSSIBLE CAUSE REMEDY
Appliance does not work Plug not inserted Plug in the appliance
Power failure Check if kitchen lights are
working
Child safety lock on Unlock child safety function
Door not closed properly Ensure that door is closed
properly
Food takes a long time to Microwave setting too low Use a higher setting
cook A larger than usual portion Cooking time is naturally longer
forlargerportions
Food was colder than usual Stir or turn the food during
cooking
Scraping sound Foreign body lodged under Remove accessories and clean
the glass turntable turntable drive area
The interior does not Blown bulb Request technical service. Bulb
lightup cannotbereplacedbyuser.
Page 19

Page 18
CLEANING & MAINTENANCE
CAUTION !
1. Always turn off the power & unplug the microwave before com-
mencement of cleaning or maintenance.
2. Do not use a high pressure or steam cleaning machine.
3. The stainless steel surface can be irreparably damaged by strong or
abrasive cleaning agents, scratching sponges or metal polish.
4. Failure to wipe up spillage will damage base.
EXTERIOR
It is usually sufficient to clean the stainless steel exterior with a damp
cloth, a mild detergent can be added to remove grease. Follow by wiping
with a dry cloth to remove water stains.
INTERIOR
It is usually sufficient to clean the interior with a damp cloth, a mild de-
tergent can be added to remove grease but must be rinsed thoroughly by
wiping repeatedly with a clean damp cloth.
To remove any unpleasant smells, pour a few drops of lemon juice in a
glass of water. Place a spoon inside and microwave at full power for 2
minutes. Then wipe any moisture from the interior with a cloth
TURNTABLE
Remove the glass turntable and roller ring from the interior and wash
with a mild detergent.
Ensure that water does not leak into the turntable drive!
Wipe dry all the parts and carefully replace according to the sequence as
detailed on page 11.
From the Manufacturer
This appliance and it’s packaging are produced by processes that minimize
waste and respect the environment.
Please help us to continue the protection of the environment by disposing
of the packaging in a correct manner.
Safety :
Please do not allow young children to play with the plastic bag packaging.
Before disposing of any old appliances, be sure to cut off the power chord
so that others will not be endangered by a defective electric appliance.
Specifications
Power Consumption : 220-240V ~ 50Hz
1400W (Microwave)
220-240V,950W (Heater)
Output : 900W
Microwave Frequency : 2450Mhz
External Dimensions : 326x525x460mm
Cavity Dimensions : 219x350x355mm
Net Weight : Approx. 19 kg
Page 3

Read this First !
Do not connect the appliance if there are obvious signs of transportation
damage.
Read this user manual thoroughly before attempting to use this appliance.
Please follow closely the Installation Instructions detailed in pages 6, 7 & 8
for installation.
Check that the power supply requirement is correct before plugging in.
This appliance must be installed in accordance to all safety regulation rele-
vant to your country or territory.
The electrical connection of this appliance must be earthed. If unsure, check
with a qualified electrician.
Green & yellow = EARTH
Blue = NEUTRAL
Brown = LIVE
Multiple plugs and extension cables must not be used. Overload is danger-
ous and may cause a fire.
Page 4
Page 17
AUTO DEFROST
The oven allows the defrosting of meat, poultry, and seafood. The time and the de-
frosting power are adjusted automatically once the weight is programmed. The range
weight of frozen foods varies between 100gr and 2700gr.
FOR EXAMPLE: Suppose you want to defrost 600g of shrimp.
Place the shrimp to be defrosted into the oven.
Press AUTO DEFROST button once.
Turn TIME/WEIGHT dial to choose a weight 600g.
Press START button.
QUICK START
This feature allows you to start the oven quickly.
Press the START button a number of times to set the cooking time, the oven starts
work at full power level immediately.
For example, to set the oven to cook for 2 minutes using this feature:.
Press START button 4 times, the oven starts working immediately at full microwave
power.
CHILD LOCK
Use to prevent unsupervised operation of the oven by little children. The CHILD
LOCK indicator will show up on display screen, and the oven can not be operated
while the CHILD LOCK is set.
To set the CHILD LOCK: Press and hold the STOP button for 3 seconds, a beep
sounds and LOCK indicator lights.
To cancel the CHILD LOCK: Press and hold the STOP button for 3 seconds until lock
indicator on display goes off.
SPECIAL FEATURE
AUTO REMINDER
After a cooking or defrosting program has completed, the oven will automatically con-
tinue to sound beeps every two minutes until the oven door is opened or the STOP
button is pressed.
PRESS START/QUICK START BUTTON TIME
Once 0:30
Twice 1:00
Thrice 1:30
… …

Page 16
For food or the following cooking mode, it is not necessary to program the dura-
tion and the cooking power. It is sufficient to indicate the type of food that you
wish to cook as well as the weight of this food. In order to do this, press the
AUTO COOK button a number of times to select a category of food/cooking
mode. Then turn the TIME/WEIGHT dial to indicate weight of food to be cooked.
The oven begins cooking once the START button is engaged.
You may need to turn food over at the middle of cooking time to obtain uniform
cooking.
For example, to cook 400g of fish.
Press the AUTO COOK button 6 times.
Turn TIME/WEIGHT dial to indicate a weight of 400g.
Press START button.
Auto Cook Code
*Add boiling water before cooking.
The result of auto cooking depends on factors such as the shape and size of
food, your personal preference as to the doneness of certain foods and even
how well you happen to place food in the oven. If you find the result at any rate
not quite satisfactory, please adjust the cooking time a little bit accordingly.
AUTO COOK
No Food/cooking
mode
Turn TIME/WEIGHT dial to indicate weight of food
1 Coffee/Milk(unit)
Check the display for setting the weight of food (or number of
servings):
As you turn the time/weight dial, a number of preset weight
parameters or number of servings comes up on screen one by
one, choose the one that is equal to the weight of food you have
placed into the oven.
2 Rice (g)
3 Spaghetti (g)*
4 Potato (g)
5 Auto reheat (g)
6 Fish (g)
7 Popcorn (g)
8 Pizza (g)
Important Safety Information
Any repairs to this appliance must be done by a qualified technician.
Do not attempt to open up the chassis, there are no user replaceable parts
inside. There is serious risk of exposure to microwave energy or high
voltage by opening the chassis.
Children and infirm people should only be allowed to use this appliance if
they have been properly instructed and supervised by an adult.
The appliance should only be operated with the turntable installed.
The appliance must be operated with food inside. It should not be oper-
ated when empty. There is a risk of overload.
If you see smoke inside the appliance, do not open the door. Immediately
pull the plug out.
Keep the appliance away from excessive moisture, it must only be used
indoors.
The door must always close properly. If there are signs of damage to the
door, hinges or seals, stop using the appliance and request for repairs.
Ensure that the power supply chord is not kinked and is free from any
heat source or sharp objects.
This appliance is designed for domestic use and for the preparation of
food only.
Page 5

Installation Instructions
Installation of this built-in microwave requires special procedures so please
study the instructions carefully before proceeding.
The cabinet to be used may or may not have a rear wall behind the appli-
ance.
Always keep the ventilation points unobstructed.
Page 6
360m
600m
Min 500mm
560—564mm
400-500mm
>2000mm
(continued)
With the oven ready for input, touch the CLOCK button once or twice to set the digi-
tal clock in 12 or 24 hours cycle.
FOR EXAMPLE: Suppose you want to set the oven clock time to 8:30.
Press CLOCK button once or twice
Turn TIME/WEIGHT to indicate the hour digit 8.
Press CLOCK button.
Turn TIME/WEIGHT dial to indicate the minute digits until the screen shows 8: 30.
Press CLOCK to confirm the setting.
To check clock time during cooking, press the CLOCK button once, the time will be
displayed for 5 seconds.
To cook with microwave power alone, press the POWER button a number of times
to select a cooking power level, and then use the TIME/WEIGHT dial to set a de-
sired cooking time. The longest cooking time is 60 minutes.
Select power level by pressing the POWER button:
For example, suppose you want to cook for 1 minute at 60% of microwave power.
Press POWER button 3 times.
Turn TIME/WEIGHT to 1:00.
Press START button.
SETTING DIGITAL CLOCK
MICROWAVE COOKING
PRESS POWER BUTTON COOKING
POWER
Once 100%
Twice 80%
3 times 60%
4 times 40%
5 times 20%
Page 15

Page 14
CONTROL PANEL : MW 28.2G
MENU ACTION SCREEN
Cooking time, power, action indicators,
and clock time are displayed.
POWER
Touch this button a number of times to
set microwave cooking power level.
AUTO COOK
Press for instant settings to cook popular
food,
AUTO DEFROST
Touch to defrost food by weight.
CLOCK
Use to set the digital clock
TIME/WEIGHT
Turn the dial to enter the oven clock time
or input cooking time.
Rotate to specify food weight or number
of servings
START
Touch to start a cooking program.
Simply touch it a number of times to state
cooking time and the oven starts immedi-
ately at full power.
STOP
Press to cancel setting or reset the oven
before setting a cooking program.
Press once to temporarily stop cooking,
or twice to cancel cooking altogether.
It is also used for setting child lock
(continued)
Step 1:
Mounting the collets (4 pieces) at the front edge in cabinet as illustrated as
below pictures.
533mm
Collets
533mm
Collets
Page 7
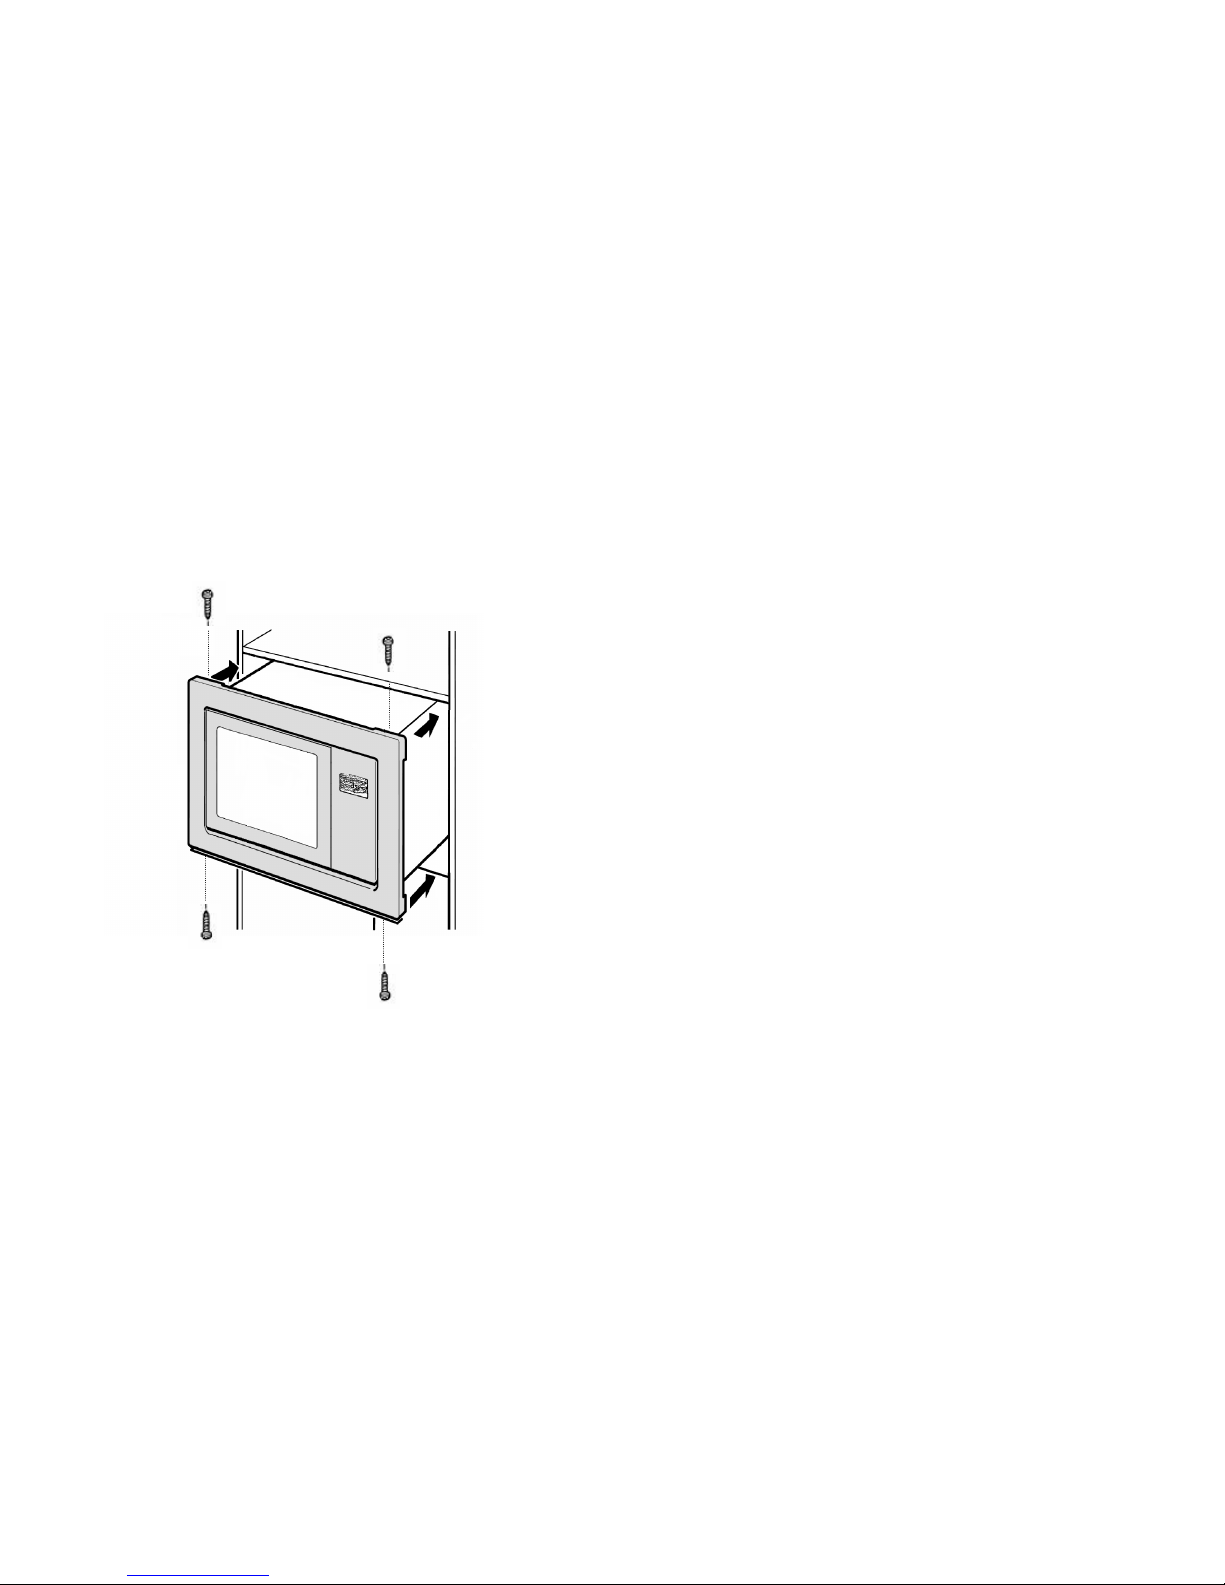
(continued)
Step 2:
Insert the built-in microwave oven into the cabinet and tights 4 screws as
illustrated.
Completed !
Page 8
(continued)
High Power Cooking
Lighted : Microwave power of 100% or 80% selected or cooking in progress
Low Power Cooking
Lighted : Microwave power of 60%, 40% or 20% selected or cooking in pro-
gress
Enter Weight
Lighted : Display panel is indicating weight entry in grams
% of Power
Lighted : Display Panel is indicating microwave power entry as a percentage
of maximum power.
Child Lock
Lighted : Child lock safety feature activated
Clock
Lighted : Display panel is indicating time
Grill
Blinking : Grill cooking setting in progress
Lighted : Grill cooking in progress
Start Prompt
Blinking : Reminder that pressing the START button is needed to commence
cooking
Defrost
Blinking : Defrost at ambient temperature setting in progress
Lighted : Defrosting in progress
Page 13

DISPLAY PANEL
The display panel is standard for all models:
Auto Cook
Blinking : Auto menu program setting in progress
Lighted : Auto menu cooking in progress
Menu & Digital Prompt
Indicates program setting number, time, weight or power setting depending on func-
tion currently in use
Auto Defrost
Blinking : Auto defrost setting in progress
Lighted : Auto defrosting in progress
Microwave
Blinking : Microwave setting in progress
Lighted : Microwave cooking in progress
Combination 1 / 2
Blinking : Combination cooking setting in progress
Lighted : Combination cooking in progress
Page 12
Cook Safely
When heating up liquids, always place a teaspoon inside the container
to prevent delayed-boiling. Delay-boiling can cause a sudden &
abrupt splatter of boiling liquids resulting in serious scald injury.
When heating baby food in a bottle, always do so without the lid on.
Carefully stir the food then check the temperature before feeding
your baby.
When heating up alcoholic drinks, extra caution is advised to avoid
over heating that may cause an explosion.
Never heat up a large quantity of cooking oil with a microwave. Oils
vapours may ignite.
Never cook eggs in their shells as this will cause the eggs to crack or
explode. The same applies to shellfish and crustaceans.
Use ovens gloves to remove items from the microwave to prevent
scalding.
To cook foodstuffs with hard crusts like sausages, apples, tomatoes,
chestnuts or potatoes, always prick the skin to allow hot steam to re-
lease so that the skin will not burst abruptly.
Page 9

Page 10
(continued)
Never heat up food or liquids in tightly sealed containers.
When the microwave is used for drying herbs, bread etc, close monitor-
ing is needed to ensure that there will be no over drying causing the
foodstuffs to burn up.
Do not use re-cycled packaging material in the microwave oven as there
is a possibility of small metal fragments that will cause sparks.
Never store foreign objects in the cavity when the microwave is not in
use.
Use containers that are designed for microwave ovens. To test if the
container is suitable, do the following:
1. Place the empty & dry container in the microwave.
2. Operate at high power for 60 seconds.
A container that feels hot should not be suitable for microwave cooking.
Cookware that can be used with Microwave :
COOKWARE MICROWAVE
Heat resistant glass Yes
Non heat resistant glass No
Heat resistant ceramic Yes
Microwave safe plastic Yes
Kitchen paper Yes
Metal tray No
Metal rack No
Aluminum foil No
Description of Parts
Page 11
Microwave Light Globes must be replaced by a qualified person and
is not included in the warranty cover.
Table of contents
Other EF Microwave Oven manuals


