effegibi Bluluce Nova Large User manual

manuale di montaggio
assembly manual
manuel de montage
Montageanleitung
Bluluce
Nova
Bluluce Nova 2
Nova Large
Nova Medium
Nova Small
Certfied
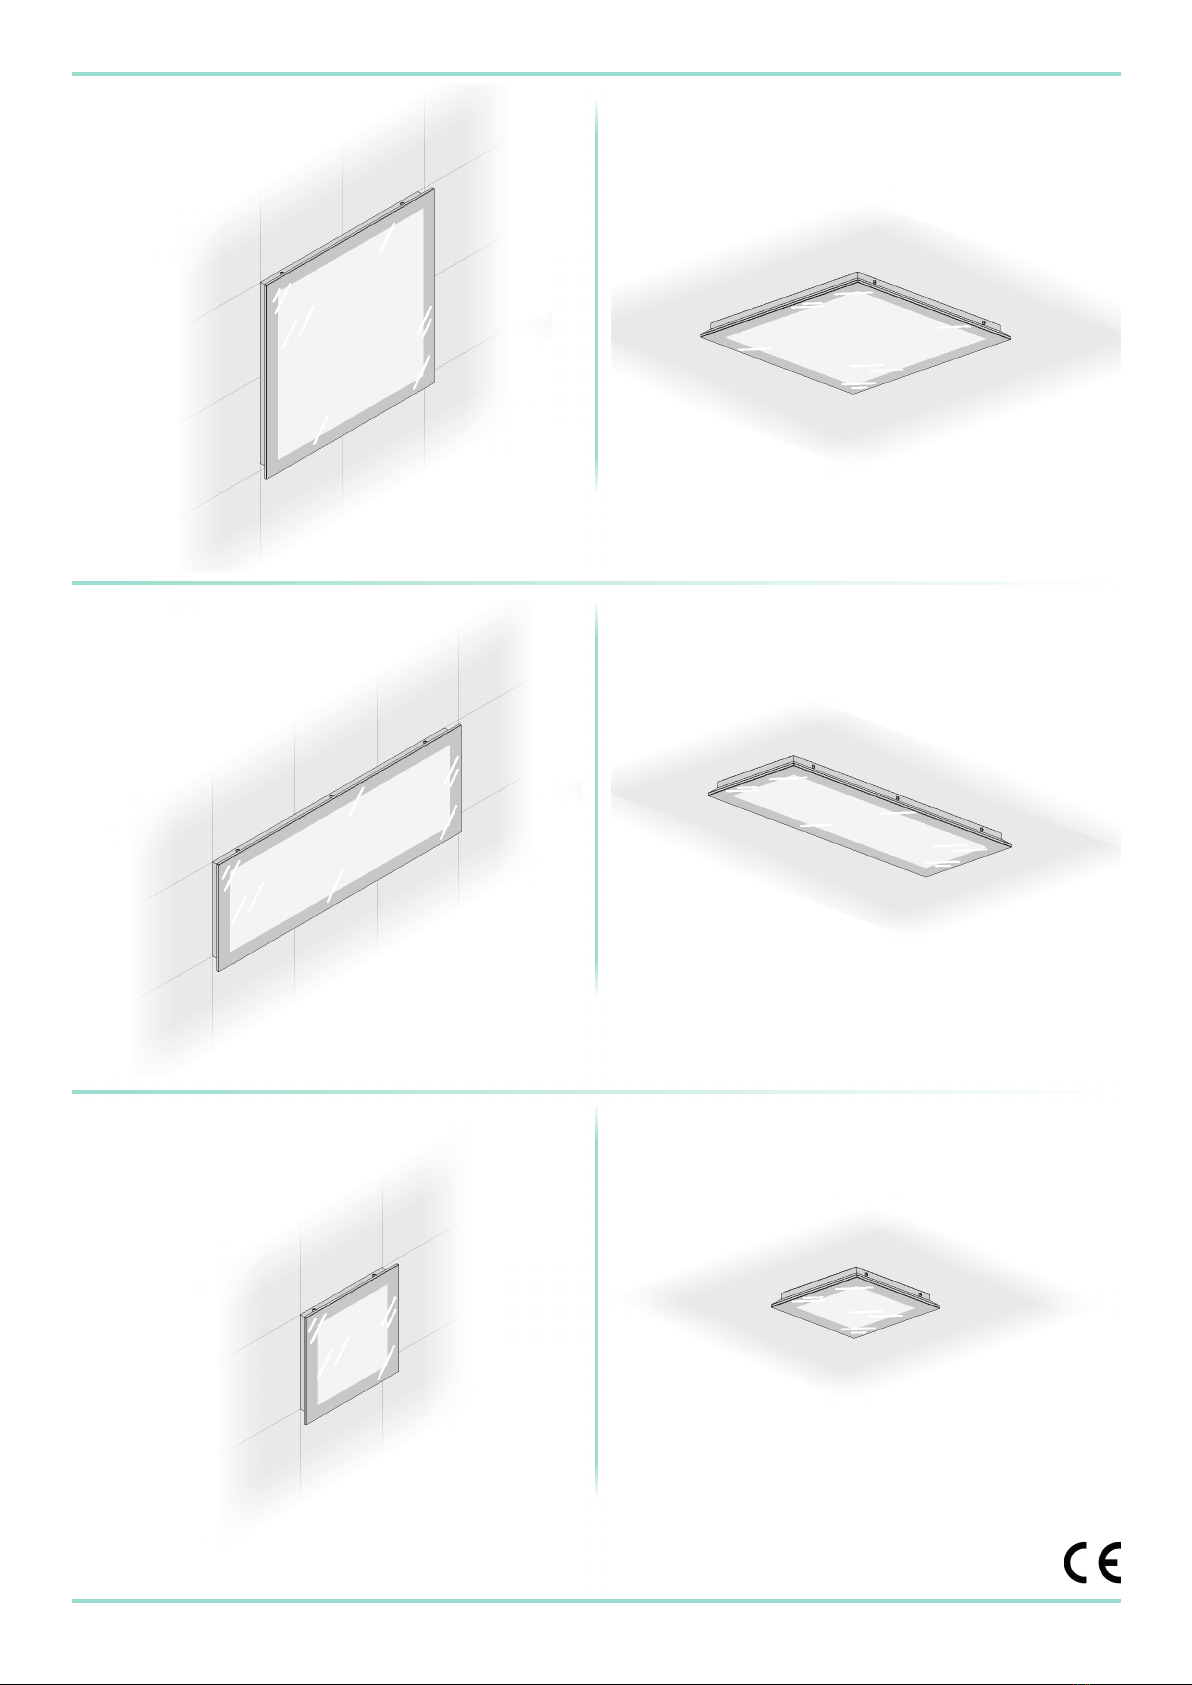
cm 44,8 x 44,8 x 3,3
20W 200-240V 50/60Hz
cm 64,8 x 24,8 x 3,3
26W 200-240V 50/60Hz
cm 24,8 x 24,8 x 3,3
10W 200-240V 50/60Hz

Bluluce Nova
3
CARATTERISTICHE
• Plafoniera design Ultra-Piatto
• Alto rendimento e lunga durata
• Alimentatore incorporato
• Installazione su parete o sotto
• Struttura in alluminio laccato bianco
• Vetro extrachiaro temperato serigrafato 6 mm
• Protezione agli spruzzi d’acqua IPX4
• Classe isolamento: II
• Luce bianca (calda) 3000K
• Accensione ON/OFF + regolazione con pulsante
• Pulsante 1P NC 10A 250V non fornito
• Gestione mediante Sistemi di Controllo
• Integrazione con i sistemi Eegibi
NOVA BLULUCE è stata costruita
conformemente ai requisiti di sicurezza
prescritti dalle seguenti direttive:
› CEE 2006/95/CE – sicurezza elettrica generale
› CEE 89/336 più 93/68 CEE (EMC) –
compatibilità elettromagnetica;
prescritti dalla direttiva CEI 64-8 (IEC60364)
› 2011/65/UE Direttiva Europea Rohs.
IT
EN FEATURES
• Ultra-at light tting
• High performance and long life
• Power supply included
• Wall or ceiling mounted
• White-painted aluminium frame
• Extra-clear screen-printed 6mm toughened glass
• IPX4 protection against water splashes
• Insulation class: II
• White light (warm) 3000K
• ON/OFF + dimmer button
• 1P NC 10A 250V button not supplied
• Managed by control systems
• Integrated with Eegibi systems
NOVA BLULUCE was manufactured in
compliance with the safety requirements
established by the following directives:
› 2006/95/CE general electric safety
› 89/336/EC & 93/68/EC (EMC) electromagnetic
compatibility;
established by the CEI 64-8 (IEC 60364)
standard
› 2011/65/UE European Directive Rohs.
FR CARACTÉRISTIQUES
• Plafonnier design ultraplat
• Rendement élevé et longue durée
• Boîtier d’alimentation intégré
• Installation au mur ou au plafond
• Structure en aluminium verni blanc
• Verre extra-clair trempé sérigraphié 6mm
• Protection contre les éclaboussures d’eau IPX4
• Classe d’isolation: II
• Lumière blanche (chaude) 3000 K
• Allumage ON/OFF + réglage par bouton
• Bouton 1P NC 10A 250V pas fourni
• Gestion par Systèmes de commande
• Intégration avec les systèmes Eegibi
NOVA BLULUCE a été construit suivant les
normes de sécurité gurant dans les directives
suivantes :
› CEE 2006/95/CE – sécurité électrique générale
› CEE 89/336 plus 93/68 CEE (EMC) –
compatibilité électromagnétique ;
prescrits par la loi CEI 64-8 (IEC60364)
› 2011/65/UE Directive européenne Rohs.
DE EIGENSCHAFTEN
• Leuchte im ultraachen Design
• Hohe Leistung und lange Lebensdauer
• Eingebautes Netzgerät
• Wand- oder Deckenmontage
• Struktur aus Aluminium, weiß lackiert
• Extrahelles gehärtetes Glas mit Siebdruck, 6mm
• Spritzwasserschutz IPX4
• Isolationsklasse: II
• Weißlicht (warm) 3000K
• EIN/AUS + Regelung über Taster
• Taster 1P NC 10A 250V, nicht enthalten
• Steuerung mittels Kontrollsystem
• In die Eegibi-Systeme integrierbar
NOVA BLULUCE ist gemäß den
Sicherheitsvorschriften der folgenden
Richtlinien konstruiert:
› CEE 2006/95/CE – allgemeine elektrische
Sicherheit
› CEE 89/336 und 93/68 CEE (EMC) –
elektromagnetische Verträglichkeit ;
vorgeschrieben von der Richtlinie CEI 64-8 (IEC
60364)
› 2011/65/UE EU-Richtlinie Rohs.
Bluluce Nova 4
321
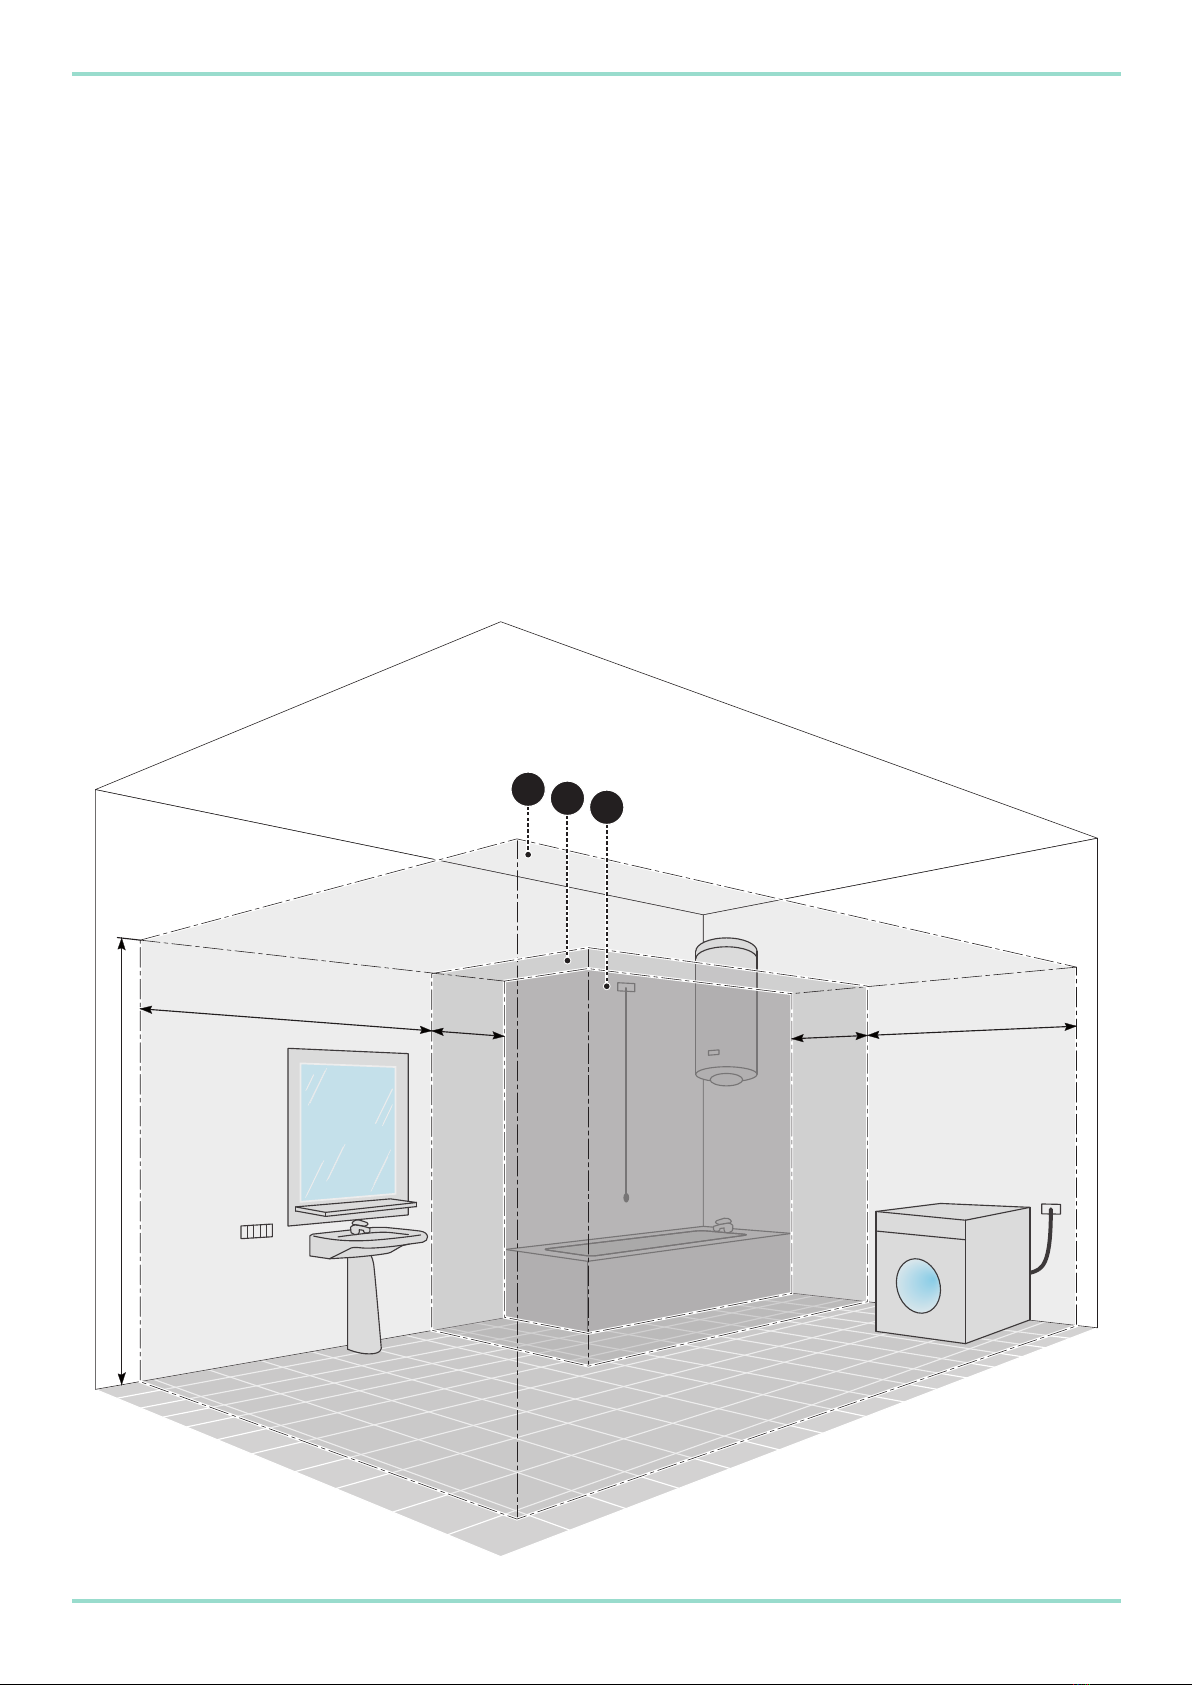
2,40
2,40
0,60
0,60
2,25
ZONE DI INSTALLAZIONE:
Installazione in zona 2 o 3, secondo la IEC60364-1.
CEI 64-8 Prescizioni particolari per Ambiente Bagno:
IT
INSTALLATION AREAS
To be installed in area 2 or 3, according to IEC60364-1.
CEI 64-8 Special instructions for bathroom environments:
EN
ZONES D’INSTALLATION :
Installation dans la zone 2 ou 3 conformément à la norme CEI 60364-1.
CEI 64-8 Prescriptions particulières pour la salle de bains :
FR
MONTAGEBEREICH:
Montage im Bereich 2 oder 3, gemäß IEC60364-1.
CEI 64-8 Besondere Vorschriften für das Badezimmer:
DE

Bluluce Nova
5
IT
IT IT
ATTREZZATURA NECESSARIA PER L’INSTALLAZIONE
INSTALLAZIONE A PARETE INSTALLAZIONE A SOFFITTO
EN
EN EN
TOOLS REQUIRED FOR INSTALLATION
WALL INSTALLATION CEILING INSTALLATION
FR
FR FR
OUTILLAGE NÉCESSAIRE POUR L’INSTALLATION
INSTALLATION AU MUR INSTALLATION AU PLAFOND
DE
DE DE
FÜR DIE MONTAGE BENÖTIGTES WERKZEUG
WANDMONTAGE DECKENMONTAGE
Bluluce Nova 6
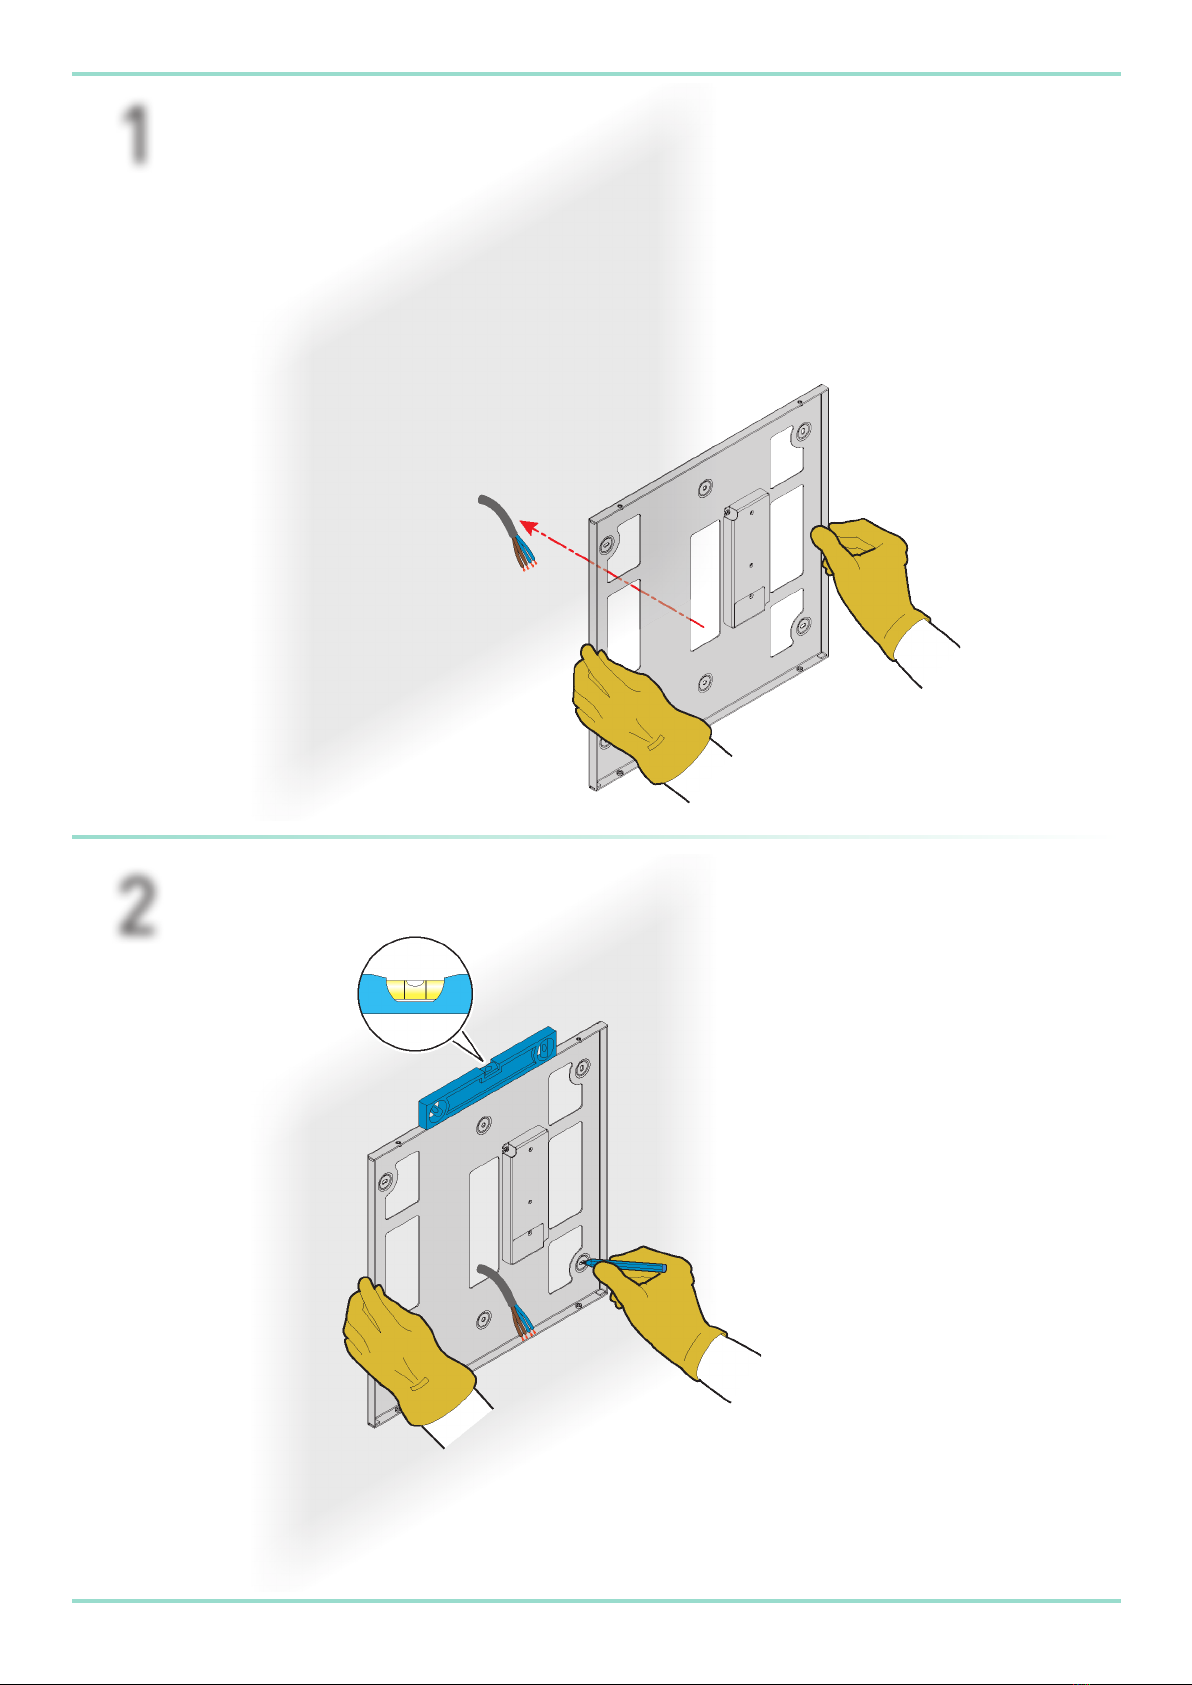
1
2

Bluluce Nova
7
Non incluso
Not included
Pas inclus
Nicht enthalten
13
4

Bluluce Nova 8
Non incluso
Not included
Pas inclus
Nicht enthalten
5
6
Bluluce Nova
9
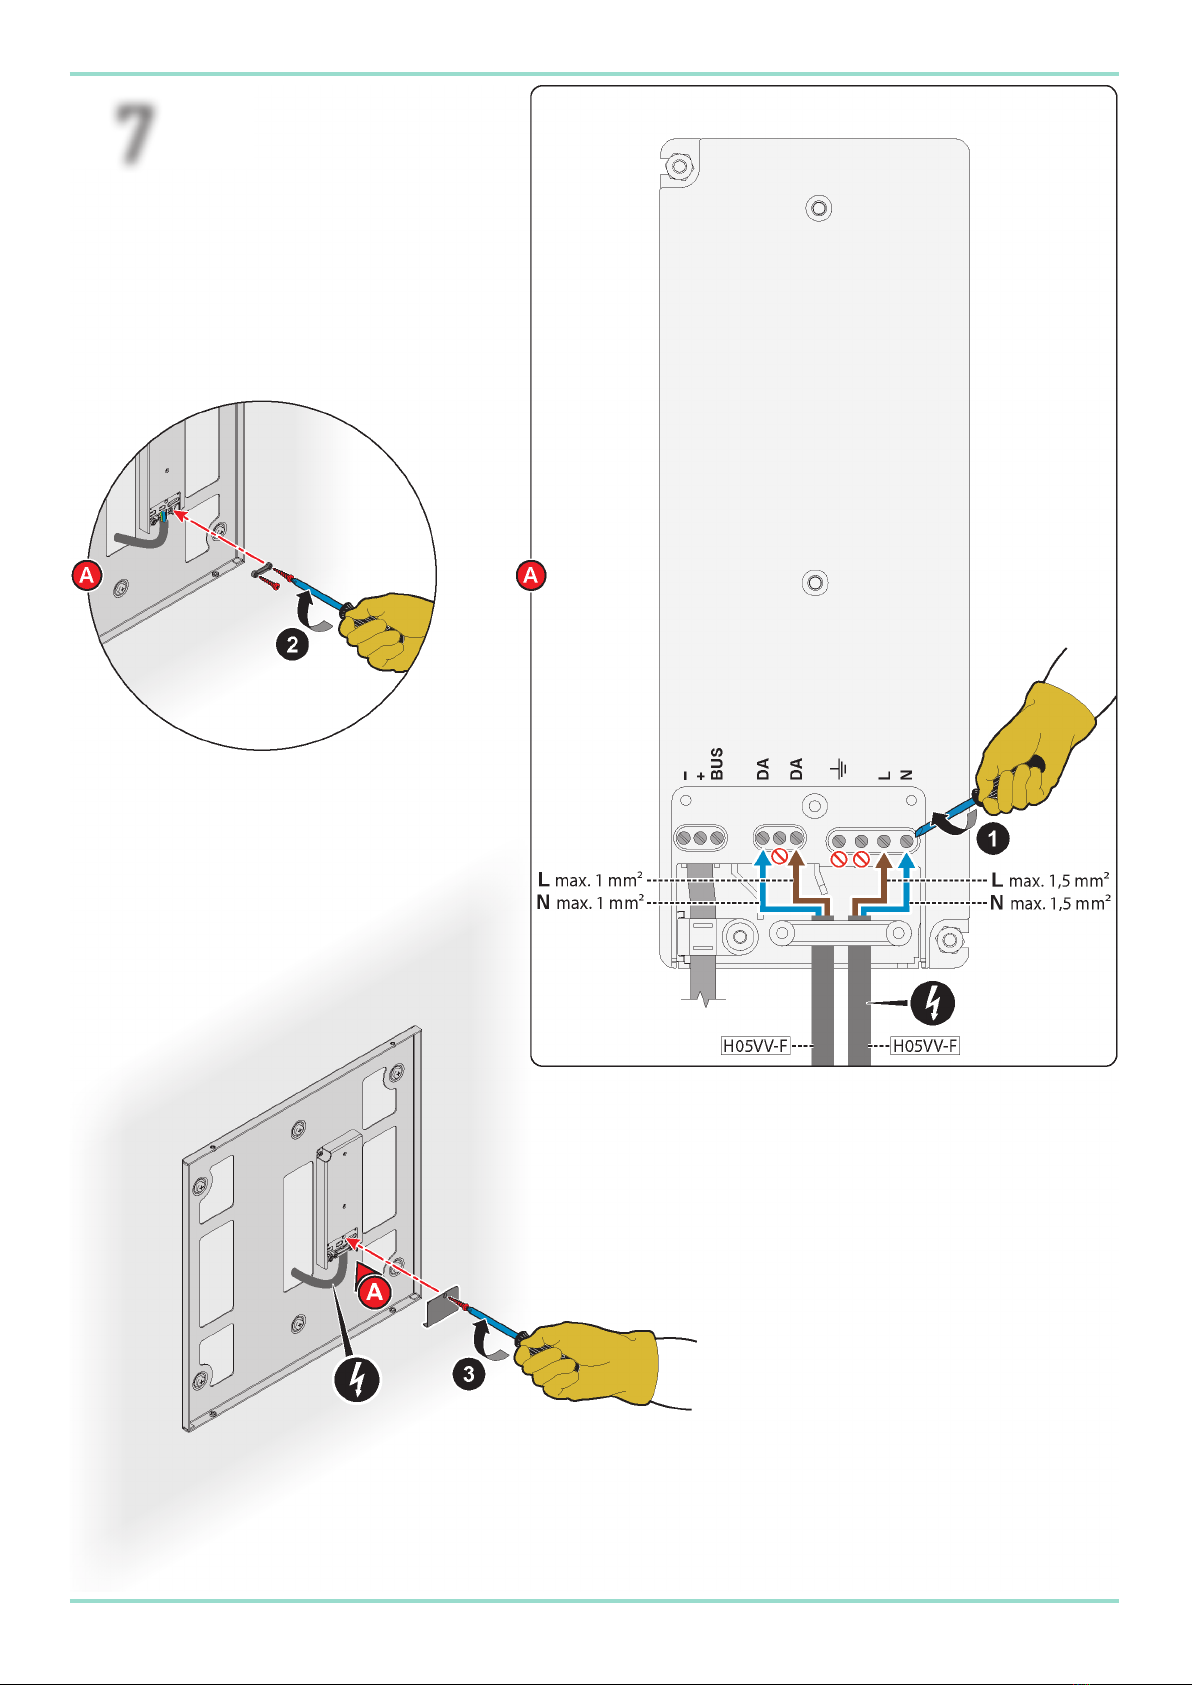
7

Bluluce Nova 10
IT
IT
Cablaggio con pulsante diretto per lampada singola
Cablaggio con pulsante diretto per lampade multiple
EN
EN
Cabling with direct control button for single light
Cabling with direct control button for multiple lights
FR
FR
Câblage avec bouton direct pour lampe simple
Câblage avec bouton direct pour lampes multiples
DE
DE
Verdrahtung für Einzelleuchte, mit Direkttaster
Verdrahtung für multiple Leuchten, mit Direkttaster

Bluluce Nova
11
IT Cablaggio con sistema di controllo DALI
EN Cabling with DALI control system
FR Câblage avec système de commande DALI
DE Verdrahtung mit dem DALI-Kontrollsystem
8

Bluluce Nova 12
FUNZIONAMENTO
Accensione
Premere e rilasciare velocemente il pulsante.
Spegnimento
Premere e rilasciare velocemente il pulsante.
Regolazione intensità luminosa
• Aumento intensità luminosa: a lampada accesa premere il pulsante no al raggiungimento del livello di
intensità luminosa desiderato.
• Riduzione intensità luminosa: a lampada accesa premere il pulsante no al raggiungimento del livello
massimo di intensità luminosa (fase di aumento luminosità) dopodiché rilasciare il pulsante e premerlo
nuovamente no a raggiungimento del livello di luminosità desiderato (fase di riduzione luminosità).
IT
EN HOW TO OPERATE
Switch on
Press and release the button quickly.
Switch o
Press and release the button quickly.
Adjust the light intensity
• To increase the brightness: with the light on, press the button until the desired brightness is reached.
• To reduce the brightness: with the light on, press the button until the brightest setting is reached
(increase brightness phase), then release the button and press it again until the desired brightness is
reached (reduce brightness phase).
FR FONCTIONNEMENT
Allumage
Appuyer, puis relâcher rapidement le bouton.
Extinction
Appuyer, puis relâcher rapidement le bouton.
Réglage de l’intensité lumineuse
• Augmentation de l’intensité lumineuse : avec la lampe allumée, appuyer sur le bouton jusqu’à atteindre
le niveau d’intensité lumineuse souhaité.
• Réduction de l’intensité lumineuse : avec la lampe allumée, appuyer sur le bouton jusqu’à atteindre le
niveau maximum d’intensité lumineuse (phase d’augmentation de la luminosité), puis relâcher le bouton
et l’appuyer à nouveau jusqu’à atteindre le niveau de luminosité souhaité (phase de réduction de la
luminosité).
DE FUNKTIONSWEISE
Ein
Den Taster drücken und sofort wieder loslassen.
Aus
Den Taster drücken und sofort wieder loslassen.
Leuchtintensitätsregelung
• Leuchtintensität erhöhen: Bei eingeschalteter Leuchte den Taster solange drücken, bis die gewünschte
Leuchtintensität erreicht ist.
• Leuchtintensität senken: Bei eingeschalteter Leuchte den Taster solange drücken, bis die stärkste
Leuchtintensität erreicht ist (Leuchtintensitätserhöhung), dann den Taster loslassen und nochmals solange
drücken bis die gewünschte Leuchtintensität erreicht ist (Leuchtintensitätssenkung).

Bluluce Nova
13
PRESCRIZIONI ELETTRICHE
L’installazione deve essere eseguita solo da personale qualicato in conformità con tutte le disposizioni
contenute in questo manuale e in conformità alla norma CEI 64-8 (iec 364-1).
Rispettare la connessione descritta negli schemi elettrici.
E’ fatto obbligo di installare sempre sulla linea di alimentazione, a monte dell’apparecchiatura, un dispositivo
che consenta la disconnessione completa nelle condizioni della categoria di sovratensione III.
Esempio: un interruttore onnipolare ( d > 3 mm + dierenziale + fusibile ).
L’apparecchio deve essere collegato in modo permanente alla rete ssa attraverso un dispositivo di
protezione dierenziale (RCD) che abbia una corrente dierenziale di funzionamento nominale che non
superi i 30 mA.
La connessione elettrica, la posizione dell’interruttore generale con dierenziale, dell’interruttore di
comando, e del trasformatore devono essere nel rispetto della norma 64-8.
Osservare sempre e comunque tutte le avvertenze di pericolo e le norme di sicurezza emanate dagli enti
preposti in ogni nazione.
IT
EN ELECTRICAL INSTALLATION
Only to be installed by a qualied person following all the instructions in this manual and in compliance with
the standard CEI 64-8 (IEC 364-1).
Make the connection as described in the circuit diagrams.
It is essential to install, on the same power line and upstream of the equipment, a device that makes
possible complete disconnection in category III overload conditions.
E.g. an omnipolar circuit-breaker (d > 3mm + dierential + fuse).
The equipment must be permanently connected to the xed mains by means of an RCD dierential
protection device with a nominal dierential operating current not exceeding 30mA.
The electrical connection, position of the main switch with dierential, the control switch and the
transformer must all be compliant with the standard 64-8.
Always follow all the safety instructions and hazard warnings issued by the authorities of individual
countries.
FR PRESCRIPTIONS ÉLECTRIQUES
L’installation doit être eectuée uniquement par du personnel qualié conformément à toutes les
dispositions contenues dans le présent manuel et conformément à la norme italienne CEI 64-8 (CEI 364-1).
Il convient de respecter le raccordement décrit dans les schémas électriques.
Il est obligatoire de toujours installer sur la ligne d’alimentation, en amont de l’appareillage, un dispositif
permettant de couper complètement l’alimentation dans les conditions de la catégorie de surtension III.
Par exemple : un interrupteur omnipolaire (d>3mm+diérentiel+fusible).
L’appareil doit être branché en permanence au réseau xe par le biais d’un dispositif de protection
diérentielle (DDR), dont le courant diérentiel nominal de fonctionnement ne dépasse pas 30mA.
Le branchement électrique, la position de l’interrupteur général avec diérentiel, de l’interrupteur de
commande et du transformateur doivent être conformes à la norme italienneCEI 64-8.
Il convient de toujours se conformer aux indications de danger et aux normes de sécurité xées par les
organismes compétents dans chaque pays.
DE ELEKTRISCHE VORSCHRIFTEN
Die Montage darf nur von qualiziertem Fachpersonal in Übereinstimmung mit allen Anweisungen dieser
Anleitung und in Übereinstimmung mit der Norm CEI 64-8 (IEC 364-1) ausgeführt werden.
Halten Sie sich an die Schaltpläne.
An der Stromversorgungsleitung muss stromaufwärts des Geräts eine Vorrichtung installiert werden, welche
unter den Bedingungen der Überspannungskategorie III die gänzliche Trennung gewährleistet.
Beispiel: ein allpoliger Trennschalter (d > 3 mm + Dierentialvorrichtung + Sicherung).
Das Gerät muss permanent über eine Fehlerstrom-Schutzeinrichtung (RCD) mit einem
Bemessungsfehlerstrom bis max. 30mA an das Stromnetz angeschlossen sein.
Der elektrische Anschluss und die Position des Hauptschalters mit Fehlerstrom-Einrichtung, des
Steuerschalters und des Trafos müssen die Norm CEI 64-8 erfüllen.
Beachten Sie stets alle Gefahrenhinweise und die im jeweiligen Land erlassenen Sicherheitsvorschriften.


Via Gallo, 769
47522 Borello di Cesena (FC)
Italy
tel. +39 0547 372881
fax +39 0547 372924
www.effegibi.it
e-mail: info@effegibi.it MACH000029 REV. 01
This manual suits for next models
2
Table of contents
Other effegibi Indoor Furnishing manuals

Popular Indoor Furnishing manuals by other brands


Furniture of America
Furniture of America CM-DK6385 Assembly instructions

Okamura
Okamura Legender Instructions for use

Coaster
Coaster June 315927QF Assembly instructions

John Lewis
John Lewis Franklin 862 39202 manual

BluDot
BluDot Right Round Table manual

Furniture of America
Furniture of America Manvel CM7867D Assembly instructions