EFFEKTIV TRIUMPHATOR 2000X User manual

TRIUMPHATOR 2000X
Coverstitch Machine
EN USER MANUAL ES MANUAL DE USUARIO
FR MANUEL DE L’UTILISATEUR
TR KULLANIM KILAVUZU
IT MANUALE D’USO
DE BENUTZERHANDBUCH

CONTENIDOCONTENTS
EN
1. ACQUAINTANCE WITH THE MACHINE .......6
1.1 Name of Parts .........................................................6
1.2 Standard Accessories ...........................................7
2. GETTING READY TO SEW............................7
2.1 Connecting the Machine to Power Supply ........7
2.2 Controlling Sewing Speed .....................................8
2.3 Raising or Lowering the Presser Foot.................9
2.4 Attaching the Presser Foot................................. 10
2.5 Presser Foot Pressure Adjustment................... 11
2.6 Adjustment of Stitch Length .............................. 11
2.7 Changing the Needles ......................................... 12
2.8 Adjustment of Differential Dial .......................... 12
2.9 Needle Threader ................................................... 13
2.10 Setting the Telescopic Thread Guide ............... 13
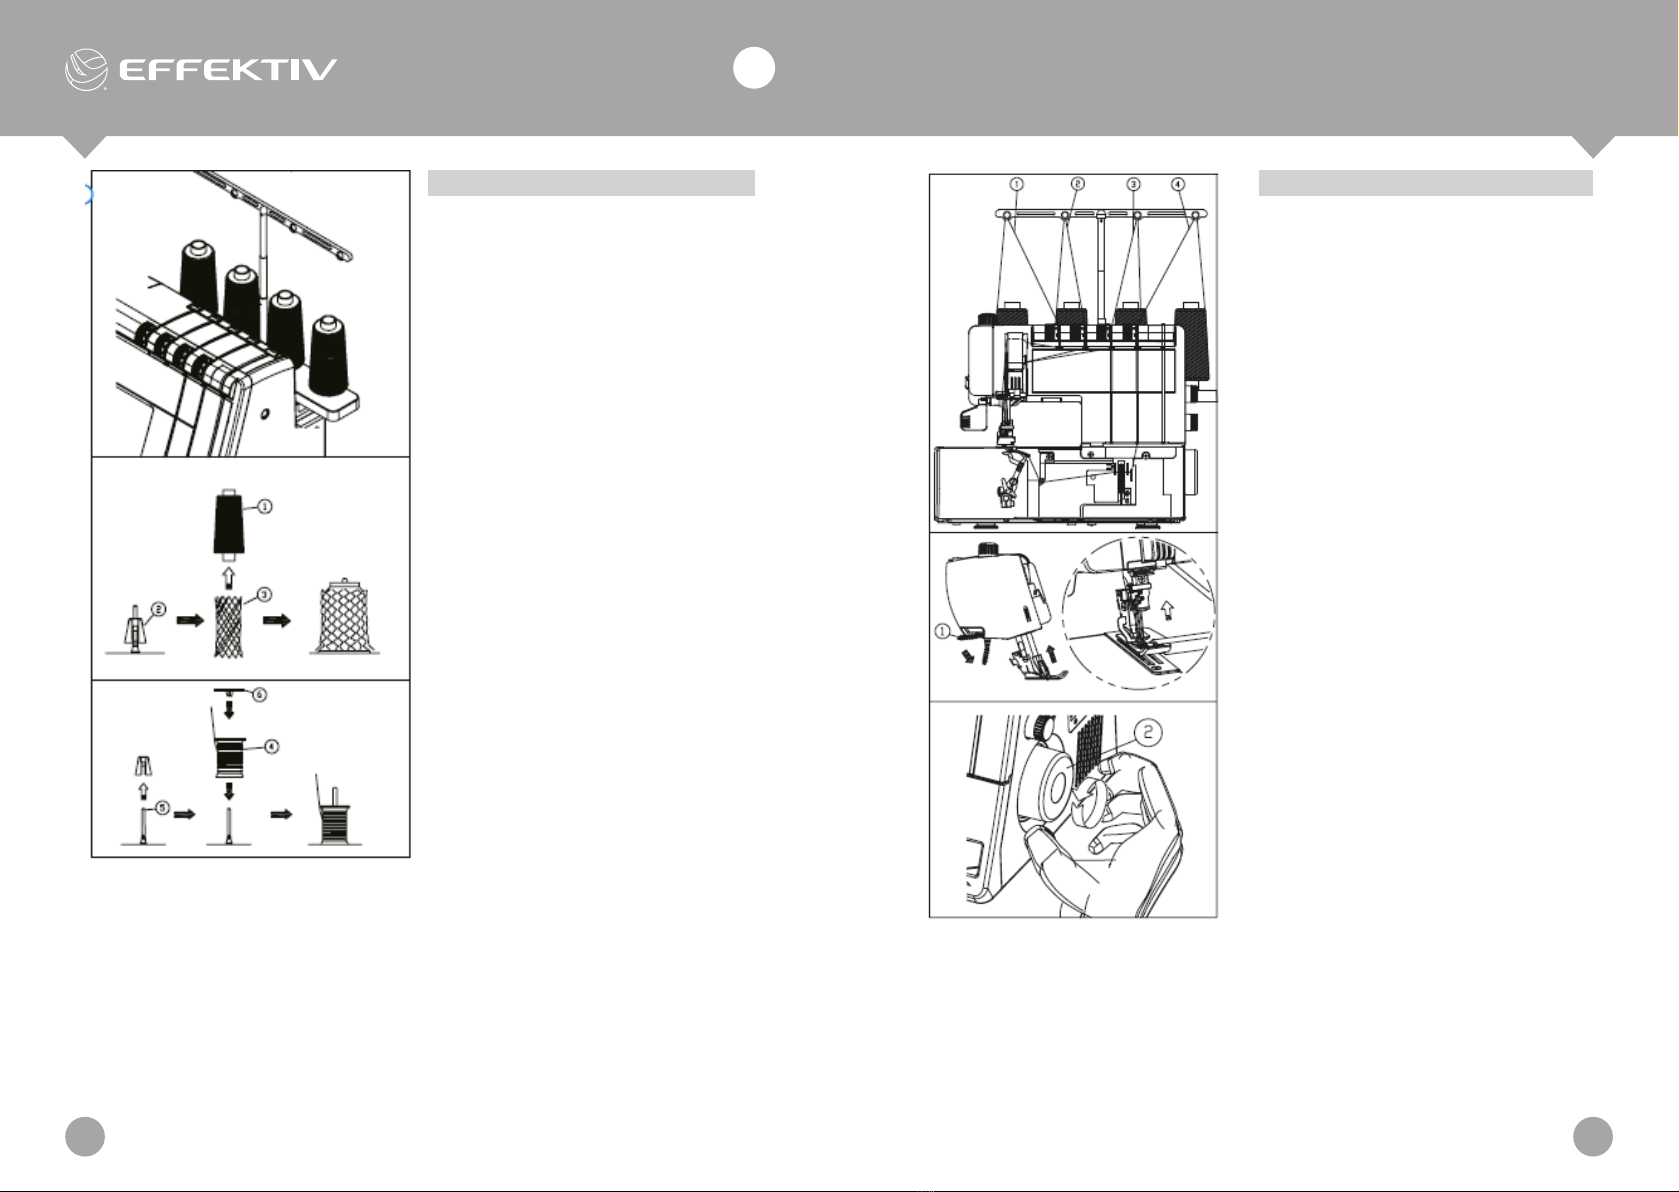
2.11 Setting the Spool Cones...................................... 14
2.12 Threading the Machine ....................................... 15
2.13 Threading the Needles: ....................................... 16
2.14 How to Use the Threader.................................... 18
2.15 Threading the Looper .......................................... 19
3. STITCH TYPES ..........................................20
3.1 Triple Cover Stitch ................................................ 20
3.2 Cover Stitch ........................................................... 23
3.3 Upper Thread Tension Balance ........................ 24
3.4 Chain Stitch ........................................................... 26
4. FINISHING THE SEAM ...............................28
4.1 Beginning of the Seam........................................ 28
4.2 End of the Seam ................................................... 28
4.3 Knotting the Threads........................................... 29
4.4 Removing the Fabric in the Middle of the
Stitching ................................................................. 29
4.5 Hemming with the Cover Stitch ........................ 30
4.6 Triple Cover Stitch Applications ........................ 30
5. MAINTENANCE OF THE MACHINE............31
ES
1. INFORMACION DE LA MÁQUINA ........................35
1.1 Nombre de las piezas.......................................................35
1.2 Accesorios estándar ........................................................36
2. PREPARACIÓN PARA LA COSTURA ...................36
2.1 Conexión de alimentación...............................................36
2.2 Control de velocidad de costura ....................................37
2.3 Levantar y bajar el prensatelas de presión...................38
2.4 Cómo instalar un prensatelas de sujeción ..................39
2.5 Cambio en la presión del prensatelas sobre la tela ...40
2.6 Cambiar la longitud de la puntada ................................40
2.7 Cambio de aguja ..............................................................41
2.8 Cambio diferencial Alimentación de tela .....................41
2.9 Enhebrador ........................................................................42
2.10 Instalación de la guía de hilo ..........................................42
2.11 Instalación de carretes ....................................................43
2.12 Enhebrado de hilos en la maquina.................................44
2.13 Enhebrado de agujas........................................................45
2.14 Cómo usar el enhebrador................................................47
2.15 Enhebrado del prensatelas..............................................48
3. VARIEDADES DE COSTURAS ..............................49
3.1 Triple costura .....................................................................49
3.2 Puntada de cobertura: .....................................................52
3.3 Equilibrio de tensión del filamento superior ................53
3.4 Cadeneta ............................................................................55
4. FINALIZACIÓN DE LA COSTURA ........................57
4.1 Inicio de la costura ...........................................................57
4.2 Fin de la costura ...............................................................57
4.3 Enhebrado...........................................................................58
4.4 Quitar tela en medio de la costura.................................58
4.5 Terminación el borde con una puntada de cobertura59
4.6 Aplicación de costura triple ............................................59
5. CUIDADO DE LA MÁQUINA..................................60
CONTENU
FR
1. DECOUVERTE DE LA MACHINE:..................... 64
1.1 Nom des parties .......................................................... 64
1.2 Accessoires standarts ...............................................65
2. PREPARATION AVANT DE COUDRE ............... 65
2.1 Allumage de la machine............................................. 65
2.2 Contrôle de la vitesse de couture............................. 66
2.3 Réglage de la pression du pied presseur................ 67
2.4 Comment installer le pied presseur......................... 68
2.5 Changement de la pression du pied sur le tissu ... 69
2.6 Modification de la longueur du point....................... 69
2.7 Changement d’aiguilles.............................................. 70
2.8 Modification de l’alimentation différentielle........... 70
2.9 L'enfile-aiguille ..............................................................71
2.10 Installation du guide-fil télescopique.......................71
2.11 Installation des bobines.............................................72
2.12 Enfilage de la machine ............................................... 73
2.13 Enfilage des aiguilles .................................................. 74
2.14 Comment utiliser l'enfile-aiguille .............................. 76
2.15 Enfilage du boucleur................................................... 77
3. VARIÉTÉS DE COUTURES............................... 78
3.1 Point de recouvrement triple.....................................78
3.2 Point de recouvrement............................................... 81
3.3 Équilibre de la tension du fil supérieur .................... 82
3.4 Point de chaînette ....................................................... 84
4. ACHEVEMENT DE LA COUTURE..................... 86
4.1 Début de la couture.....................................................86
4.2 Fin de la couture..........................................................86
4.3 Nouage des fils............................................................87
4.4 Retrait du tissu au milieu de la ligne........................ 87
4.5 Finition de la bordure avec un point de
recouvrement...............................................................88
4.6 Usage d’un point de recouvrement triple................ 88
5. ENTRETIEN DE LA MACHINE ......................... 89
INHALT
DE
1. HERANFÜHRUNG AN DIE MASCHINE...... 93
1.1 Bezeichnung der Teile .........................................93
1.2 Standard-Zubehör ................................................94
2. VORBEREITUNG AUFS NÄHEN.................94
2.1 Stromanschluss....................................................94
2.2 Steuerung der Nähgeschwindigkeit..................95
2.3 Anheben und Absenken des Druckfußes ........96
2.4 So stellen Sie den Druckfuß ein.........................97
2.5 Ändern des Fußdrucks auf den Stoff................98
2.6 Ändern der Stichlänge.........................................98
2.7 Nadelwechsel........................................................99
2.8 Ändern des differentiellen Stoffvorschubs......99
2.9 Nadeleinfädler.................................................... 100
2.10 Einbau der teleskopischen Fadenführung.... 100
2.11 Einbau der Spulen ............................................. 101
2.12 Einfädeln der Maschine Vorsicht:................... 102
2.13 Einfädeln der Nadel........................................... 103
2.14 So verwenden Sie den Nadeleinfädler........... 105
2.15 Beschicken des Greifers .................................. 106
3. ARTEN VON NÄHTEN ............................. 107
3.1 Dreifach-Überdecknaht .................................... 107
3.2 Überdecknaht:.................................................... 110
3.3 Oberfadenspannung ausgleichen.................. 111
3.4 Kettenstich.......................................................... 113
4. BEENDIGUNG DER NAHT........................ 115
4.1 Anfang der Naht ................................................ 115
4.2 Ende der Naht .................................................... 115
4.3 Führen Sie die ................................................... 116
4.4 Entfernen des Stoffes in der Mitte der Naht 116
4.5 Bearbeitung der Kante mit einer Überdecknaht:
.............................................................................. 117
4.6 Anwendung der Dreifach-Überdecknaht....... 117
5. WARTUNG DER MASCHINE.................... 118
TRIUMPHATOR 2000X
32

BASIC SAFETY PRECAUTIONS
Please read this manual before using the machine.
Do not use the machine at an ambient temperature higher than 45°C or lower
than 5°C, in humid rooms or outdoors, otherwise the machine may not work
properly. To avoid condensation on electronic devices, it is not recommended
to turn on the machine immediately after it has been moved from outdoors to
indoors. It is necessary to wait until the machine reaches room temperature.
Do not use the device in unstable electrical network or in places where there
is a strong electric or magnetic field, otherwise the machine will malfunction.
It is necessary to install the machine on a flat stable surface, taking into
account the required distance from fixed objects.
Do not drop the machine as this may result in injury or damage to the machine.
OPERATING THE MACHINE
Be careful when operating the machine; protect your hands from getting into
the working area of moving parts, especially in close proximity of needles.
To avoid electric shock or short circuit, make sure that all cables are in good
condition and not damaged (cuts, burns, etc.), not in contact with damp or
corrosive environments. The power cable must have good contact with the
mains. When disconnecting the power cable from the mains, do not pull on
the cable.
SAVE THESE INSTRUCTIONS
This machine is intended for domestic use only.
This device is not intended for use by persons (including children) with
reduced physical or mental capabilities, or lack of knowledge and skills,
unless they are supervised or trained by a person responsible for their safety.
Supervise children and prevent them from playing with this device.
If the operating conditions and storage rules of the machine are observed,
the service life will be at least 8 years.
CONTENUTI
IT
1. CONOSCENZA DELLA MACCHINA..................122
1.1 Denominazione delle parti..........................................122
1.2 Accesori standard........................................................ 123
2. PREPARAZIONE ALLA CUCITURA................... 123
2.1 Allacciamento elettrico ............................................... 123
2.2 Controllo velocita’ cucitura .........................................124
2.3 Salita e discesa del piedino ....................................... 125
2.4 Come si monta il piedino ............................................ 126
2.5 Variazione della pressione del piedino sul tessuto 127
2.6 Variazione della lunghezza del punto....................... 127
2.7 Sostituzione degli aghi ................................................128
2.8 Variazione del trasporto differenziale del tessuto . 128
2.9 Infila ago.........................................................................129
2.10 Posizionamento del guidafili telescopico................ 129
2.11 Posizionamento dei rocchetti.................................... 130
2.12 Infilatura della macchina.............................................131
2.13 Infilatura degli aghi....................................................... 132
2.14 Come usare l’infila ago................................................ 134
2.15 Infilatura del crochet.................................................... 135
3. TIPOLOGIE DEI PUNTI.....................................136
3.1 Punto di copertura a tre fili......................................... 136
3.2 Рunto di copertura:....................................................... 139
3.3 Livello di tensione del filo superiore.......................... 140
3.4 Punto catenella.............................................................142
4. TERMINE DEL PUNTO......................................144
4.1 Inizio del punto.............................................................. 144
4.2 Termine del punto........................................................ 144
4.3 Allacciatura dei fili ........................................................145
4.4 Come togliere il tessuto in mezzo all’impuntitura.. 145
4.5 Orlatura con il punto di copertura:.............................146
4.6 Uso del punto di copertuta a tre fili........................... 146
5. MANUTENZIONE DELLA MACCHINA.............. 147
İÇİNDEKİLER
TR
1. MAKİNE İLE TANIŞMA ........................... 151
1.1 Parça Adları ........................................................ 151
1.2 Standart Aksesuarlar........................................ 152
2. DİKİŞ ÖNCESİ HAZIRLIK ........................ 152
2.1 Güç bağlantısı .................................................... 152
2.2 Dikiş hızı kontrolü .............................................. 153
2.3 Baskı ayağının kaldırılması ve çıkarılması .... 154
2.4 Baskı ayağı nasıl takılır ..................................... 155
2.5 Baskı Ayağı Basıncını Değiştirme................... 156
2.6 Dikiş uzunluğu.................................................... 156
2.7 İğne değişimi...................................................... 157
2.8 Diferansiyel beslemenin değiştirilmesi.......... 157
2.9 İplik geçirici......................................................... 158
2.10 Teleskopik iplik sehpasının takılması ........... 158
2.11 Makaraların takılması ....................................... 159
2.12 Makineye iplik geçirme..................................... 160
2.13 İplik iğneleri......................................................... 161
2.14 İplik geçirici nasıl kullanılır ............................... 163
2.15 Lüpere iplik geçirme.......................................... 164
3. DİKİŞ ÇEŞİTLERİ..................................... 165
3.1 Üçlü kapak dikişi................................................ 165
3.2 Kapak dikişi:........................................................ 168
3.3 Üst iplik tansiyon dengesi................................ 169
3.4 Zincir dikiş........................................................... 171
4. DİKİŞ TAMAMLAMA ...............................173
4.1 Dikişin başında................................................... 173
4.2 Dikişin sonu ........................................................ 173
4.3 İplerin bağlanması............................................. 174
4.4 Dikişin ortasında kumaşın çıkarılması........... 174
4.5 Kenarı bir kapak dikişiyle tamamlamak: ....... 175
4.6 Üçlü kapak dikişi uygulaması.......................... 175
5. MAKİNE BAKIMI ..................................... 176
TRIUMPHATOR 2000X
54

ACQUAINTANCE WITH THE MACHINE
Name of Parts
1. Differential Dial
2. Length Dial
3. Balance Wheel
4. Thread Reel Stand
5. Spool Cushion
6. Telescopic Thread Guide
7. Three-Extension Rod
8. Looper Thread Tension Dial
9. Right Needle Thread Tension Dial
10. Center Needle Thread Tension Dial
11. Left Needle Thread Tension Dial
12. Pressure Adjusting Dial
13. Cs Looper
14. Power Switch
15. Looper Cover
16. Presser Holder
17. Presser Foot
18. Blade
19. Cloth Cover
20. Needle Plate
21. Presser Bar Connection Rod
22. Left Needle#14
23. Center Needle#14
24. Right Needle#14
Standard Accessories
1. Screw driver
2. Cleaning brush
3. Hexagonal wrench
4. Tweezers
5. Nets x 4
6. Set of needles
7. Needle threader
8. Spool holder caps x4
9. Oil feeder
10. Accessory box
GETTING READY TO SEW
Connecting the Machine to Power Supply
1. Turn off the power switch, and connect
the machine plug to the machine
socket.
2. Connect the power supply plug to your
power supply.
3. Turn the power switch.
TRIUMPHATOR 2000X
76
EN
USER MANUAL

Controlling Sewing Speed
Sewing speed can be varied by the
foot control.
The harder you press on the control,
the faster the machine runs. Step on
the foot control with the presser foot
lifter up, and practice controlling the
speed.
For Your Safety:
• While the machine is in operation, always keep your eyes on the sewing
area, and do not touch any moving parts such as the loopers, balance
wheel or needles.
• Always disconnect the machine from the power supply:-when leaving the
machine unattended.-when attaching or removing parts.-when threading
or cleaning the machine.
• Do not place anything on the foot control, except when the machine is
in use.
Operating instruction:
• The symbol "O" of a switch indicates the "off" position of a switch.
How to Turn the Balance Wheel
Always turn the balance wheel
toward you (counterclockwise).
Balance wheel
Opening and Closing looper
cover
To open: (A) While pushing with the
thumb to the right as far as it will go,
pull the loooper cover toward you.
NOTE: When the looper cover is
opened, the motor will switched off
immediately although the power
switch is at position”1”.
To close: (B) Lift the looper cover and push it against the machine. The looper
cover snaps into its position automatically.
Looper cover
Raising or Lowering the Presser
Foot
By raising or lowering the presser
foot lifter, the presser foot goes
down or up.
The presser foot should always be
lowered when sewing, except when
you are threading the machine or
testing it without threading.
NOTE: Raising the presser foot lever
loosens the thread tension.
When the presser foot is lifted, the
motor stops automatically even
though the power button is at
position “I”.
Presser Bar Connection Rod
TRIUMPHATOR 2000X
98
EN
USER MANUAL

1. Turn off the power switch and
unplug the machine.
2. Turn the balance wheel toward
you to raise the needle.
Raise the presser foot.
3. Press the lever located on the
back of the foot holder. The
presser foot will drop off.
Balance Wheel
Lever
Presser Holder
Attaching the Presser Foot
1. Turn off the power switch and
unplug the machine.
2. Place the presser foot so that
the pin on the foot lies just
under the groove of the presser
holder.
3. Lower the presser holder to
lock the foot into place.
4. Raise the presser bar
connection rod to check that
the presser foot is secure.
Presser Holder
Groove
Pin
Presser Foot Pressure Adjustment
The preset presser foot pressure on
the machine is suitable for medium
fabrics. For most fabrics, the presser
foot pressure does not need to be
altered. If you intend to work with
lighter or heavier fabrics, however,
it may be necessary to reset the
pressure. In this case, you can choose
from six position; make your selection
with the presser foot pressure lever.
The standard setting is "N".
Presser Foot Pressure Lever
Adjustment of Stitch Length
To adjust the stitch length, turn the dial.
The larger the number, the longer the
stitch.
For regular sewing, set the stitch length
at 3 - 3.5.
1. Stitch length dial
2. Setting mark
3. To lengthen
4. To shorten
TRIUMPHATOR 2000X
1110
EN
USER MANUAL

Adjustment of Differential Dial
The differential dial can be altered
by turning the dial.
The number on the dial indicates the
ratio between the main and the sub
feed motion.
• Set the dial at 1.0 for regular
sewing.
• Set the dial at a lower number
when sewing fine fabrics that
tend to pucker.
• Set the dial at a higher number
when sewing stretch fabrics
such as knits, jersey and tricot.
Differential dial
Setting mark
To shrink
To stretch
Changing the Needles
Turn the Balance wheel toward you to
raise the needle to its highest position.
Balance wheel
Then loosen the needle clamp screw for
the needle you are going to remove.
Needle clamp screw Hexagonal
wrench
Insert a new needle into the needle clamp
with the at side to the back and push it
up against the stopper, then tighten the
needle clamp screw.
Flat side
WARNING:
Turn the power switch off and unplug
the machine before changing needles.
Needle Threader
To attach the needle easily, use the
end of the needle threader to hold the
needle.
Insert a needle into the needle threader/
holder with the at side facing back as
shown.
Hold the stem and insert the needle into
the needle clamp and push it up as far
as it will go.
Tighten the needle clamp screw rmly
while supporting the holder in place.
Pull the holder own to remove it.
Needle threader / holder
NOTES: Use needles EL X 705 CF. Do not use any needle which is bent or
blunt.
Setting the Telescopic Thread
Guide
Pull the telescopic thread guide up
as far as it will go. Turn the it so that
the thread guides are right above the
spool pins.
Telescopic thread guide
Three-extension rod
Spool stand base
Stoppers
NOTE: Make sure the two stoppers on
the thread guide post, as shown, are
set in at the correct position.
TRIUMPHATOR 2000X
1312
EN
USER MANUAL

Setting the Spool Cones
Place the spool cones on the spool
cushion. Thread the machine in the
following order: If the thread slips
down from a spool cone during
threading and/or sewing, put a net
over the spool cone as illustrated to
prevent jamming.
Spool Cone
Spool cushion
Net
When using small spools, remove the
spool holders from the spool pins.
Small spool of thread
Spool pin
Place the spool with its slit side up, and put the spool holder cap on top of it.
Spool Holder Cap
Threading the Machine
WARNING:
Turn the power switch off and unplug
the machine before threading the
machine. Thread the machine in the
following order:
Left needle thread
Center needle thread
Right needle thread
Looper thread
Raise the presser foot lifter.
Presser foot lifter
NOTE: When threading the machine a
ways raise the presser foot.
Turn the balance wheel toward you
to bring the needles to their highest
position.
Balance wheel
TRIUMPHATOR 2000X
1514
EN
USER MANUAL

Threading the Needles:
Thread each needle in the
following order:
1. Pull out the thread through
the holes of the telescopic
thread guide from the left
side from back to front.
2. Pass the thread through
the holes on the left side of
the thread guide plate as
illustrated.
Thread Guide Plate
3. Holding the thread on both
sides, insert it between the
tension discs and tighten it
a little. (Raise the presser
foot lever so that the thread
can easily pass between the
tension discs)tension discs)
Tension disks
1. Pass the thread through the
thread guide plate A from the
right.
Thread guide plate A
2. Draw the thread to the left and
pass it through the thread guide
plate B. Draw the thread down
and slip it behind the upper take-
up lever
Thread guide plate B
Upper take-up lever
3. Pull the thread down and pass it
behind the thread guide plate C.
Thread guide plate C.
4. Thread each needle as follows:
Left Needle: Pass the thread behind
the upper take-up lever plate from the
Bring the thread between the rst and
second tooth on the left side.
Center needle: Pass the thread behind
the thread guide plate on the right
side. Bring the thread between the two
inner teeth.
Right needle: Pass the thread behind
the thread guide plate on the right
side. Bring the thread between the rst
and second teeth on the right side.
Thread guide plate
Needle bar guide
TRIUMPHATOR 2000X
1716
EN
USER MANUAL

How to Use the Threader
1. Take a needle threader. The triangular
mark on the handle should face up.
Insert the thread into the slit of the Y
shaped notch.
Triangle mark
Y-shaped notch
2. Place the V shaped notch over the
needle just above the needle eye.
3. Slide the threader down along the
needle while pushing it against the
needle, until the threader pin enters
into the needle eye
V-shaped notch
Threader pin
4. Push the threader and the thread
will go through the needle eye
5. Remove the threader from the
needle. Use the hook to grab the
loop. Pull the ends of the threads
back.
Hook
Threading the Looper
Thread the looper in the following order:
1. Pass the thread through the
telescopic rod thread guide from
the right side from back to front as
shown in the illustration.
Telescopic thread guide
2. Pass the thread through thread
guide on the right and let the thread
pass the tension disc of the tension
adjustment dial.
Thread guide
3. Holding the thread on both sides,
insert it between the tension discs
and tighten it a little. (Raise the
presser foot lever so that the thread
can easily pass between the tension
discs)
Tension disc
4. Pass the thread down through the
looper thread guide (A) on the right
side. Pass it through the looper
thread guide (A) while holding the
thread against the thread guide
plate.
TRIUMPHATOR 2000X
1918
EN
USER MANUAL

Thread guide plate A
5. Continue threading according to
steps (5)-(9).
6. Pull the looper release handle. The
looper will tilt to the right for easy
access when threading.
(B) Looper release handle
7. Insert the thread into the eye of the
looper thread guide, and then into
the eye of the looper itself. Pull the
ends of the threads 10 cm back.
NOTE:
You may use a pair of tweezers.
STITCH TYPES
Triple Cover Stitch
The triple cover stitch is sewn with all three needles. This stitch forms three
parallel rows of the straight stitch on the right side, ideal for hemming,
attaching elastics, decorative stitches etc.
Left needle
Center needle
Right needle
NOTE: The machine is installed with the
EL X 705 CF needles.
Balancing the thread tension
1. Set the tension dials as follows:
Left needle thread tension dial: 4
Center needle thread tension
dial: 4
Right needle thread tension dial:
4
Looper thread tension dial: 4
2. Check the tension balance by test
stitching on the same fabric and
threads as actual garment.
Adjust the tension as necessary.
Type of Fabric Needle
Size Type of
Thread
Light to
medium
weight
Fine
knits
Fine
jersey
80/12
or
90/14
#60-90
Spun
Heavy
Weight Jersey
Fleece 90/14 #60
Spun
TRIUMPHATOR 2000X
2120
EN
USER MANUAL

Balanced tension:
The rows of stitches on the right side
of the fabric are straight and even. The
looper thread forms the dual rows of
squares with diagonals.
Wrong side of the fabric
Looper thread
Left needle thread
Center needle thread
Right needle thread
(A) If the needle thread tension is too
loose:
• The stitches on the right side are
irregular and loose
• There is a gap between head and
tail of the looper thread crossing
points.
Tighten the needle thread tension,
and/or loosen the looper thread
tension to correct it.
(B) If the needle thread tension is too
tight:
• The fabric puckers.
Loosen the needle thread tension, and
/ or tighten the looper thread tension
to correct it.
Cover Stitch
This stitch is sewn with two needles
and forms two parallel rows of straight
stitches on the right side, widely used on
cuffs and stretch welts of T-shirts etc.
There are three types of cover stitch:
• Narrow-right (3 mm wide)
• Narrow-left (3 mm wide)
• Wide (6 mm wide).
1. Narrow-right (3 mm wide)
Remove the left needle. Thread the looper,
right and center needles.
NOTE:
Tighten the needle clamp screw on the
side that is Not being used to prevent
losing the screw.
Center needle Right
needle
2. Narrow-left (3 mm wide)
Remove the left needle. Thread the looper,
left and center needles.
NOTE::
Tighten the needle clamp screw on the
side that is not being used to prevent
losing the screw.
Left needle Center needle
3. Wide (6 mm wide)
Remove the center needle. Thread the
looper, right and left needles.
TRIUMPHATOR 2000X
2322
EN
USER MANUAL

NOTE:
Tighten the needle clamp screw on the side that is not being used to prevent
losing the screw.
Left needle Right needle
Upper Thread Tension Bal-
ance
1.Set the tension dials as
follows:
For narrow-right (3 mm wide):
A. Center needle thread tension
dial: 4
B. Right needle thread tension
dial: 4
C. Looper thread tension dial: 4
For narrow-left (3 mm wide):
A. Left needle thread tension
dial: 4
B. Centre needle thread tension
dial: 4
C. Looper thread tension dial: 4
For Wide (6 mm wide):
A. Left needle thread tension
dial: 4
B. Right needle thread tension
dial: 4
C. Looper thread tension dial: 4
2. Check the tension balance by test
stitching on the same fabric and
threads as actual garment.
Adjust the tension as necessary.
Balanced tension:
The rows of stitches on the right side
of the fabric are straight and even. The
looper thread forms a row of square with
diagonals.Reverse side of the fabric
Looper thread
Left needle thread
Right needle thread
(A) If the needle thread tension is too loose:
• The stitches on the right side are irregular and loose.
• A gap is formed between the upper and lower weave points of the looper
thread.
Tighten the needle thread tension, and/or loosen the looper thread tension
to correct it.
(B) If the needle thread tension is too tight:
• The fabric puckers. Loosen the needle thread tension, and/or tighten the
looper thread tension to correct it.
TRIUMPHATOR 2000X
2524
EN
USER MANUAL

Chain Stitch
This stitch is sewn with a single
needle and forms a chain of
looper thread on the wrong side
of the fabric.
This is a durable and exible
stitch used for seaming knit
fabrics, attaching elastics,
attaching bias tapes etc.
Thread one of the three needles
and looper. Remove the needles
not to be used.
NOTE:
Tighten the needle clamp
screws on the sides that are
not being used to prevent
losing the screws.
Balancing the thread tension
1. Set the tension dials as
follows:
Needle thread tension dial: 4
Looper thread tension dial: 4
NOTE:
Adjust the tension dial for the
needle being used
2. Check the tension balance by test
stitching on the same fabric and
threads as actual garment. Fine-
tune the tension as necessary.
Balanced tension
The straight stitch on the right side of the
fabric is straight and even. The looper
thread forms a chain.
Reverse side of the fabric
Looper thread
Needle thread
A: If the needle thread tension is too
loose:
a. The stitch on the right side is irregular
and loose.
b. The needle thread forms loops on the
wrong side of the fabric.
Tighten the needle thread tension, and/
or loosen the looper thread tension to
correct it.
B: If the needle thread tension is too
tight:
a: The fabric puckers.
Loosen the needle thread tension, and/
or tighten the looper thread tension to
correct it.
TRIUMPHATOR 2000X
2726
EN
USER MANUAL

FINISHING THE SEAM
To achieve the best results, use a piece
of scrap fabric at the beginning and end
of the seam.
Beginning of the Seam
A. Raise the presser foot and insert a piece
of scrap fabric under the foot. Lower the
foot and turn the balance wheel several
times toward you.
Step on the foot controller and start
sewing slowly.
Balance wheel
B. Stop sewing at the end of the scrap
fabric.Insert the main fabric after the
scrap as shown, then start sewing on the
main fabric.
Scrap fabric
Main fabric
End of the Seam
C. Stop sewing at the end of the main
fabric. Insert another piece of scrap fabric
after the main fabric as shown, then sew
through the scrap.
Another scrap fabric
D. Cut the connecting threads between the
main fabric and scrap fabric.
Connecting threads
Knotting the Threads
Draw the needle threads to the wrong side
of the fabric by using a pair of tweezers
and knot them together.
Removing the Fabric in the Middle of
the Stitching
1. Raise the needles to their highest
position by turning the balance wheel
toward you.
Balance wheel
2. Raise the presser foot with the
presser foot lifter.
Presser foot lifter.
3. Pull the needle threads before the
needle eyes. This prevents the
threads from being caught when
removing the fabric.
4. Pull the fabric to the rear.
5. Remove the fabric and cut threads
with the thread cutter.
Thread cutter
TRIUMPHATOR 2000X
2928
EN
USER MANUAL

Hemming with the Cover Stitch
1. Fold up the edge of the fabric to the
wrong side and press.
2. Drawa line with a tailor’s chalk on the
right side of the fabric to mark the
fabric edge.
3. Place the fabric so the left needle
drops just to the left side of the marked
line. Lower the presser foot.
4. Sew carefully along the marked line.
5. After finishing sewing. Raise the
presser foot and remove the fabric to
the rear.
6. Draw the needle threads to the wrong
side of the fabric and knot them
together.
Marked line
Left needle
Right needle
Right side of the fabric
Triple Cover Stitch Applications
1. Hemming the sleeves
Sleeve
2. Attaching laces and tapes
Tap or lace
Right side of the fabric
Reverse side of the fabric
MAINTENANCE OF THE MACHINE
3. Attaching elastics
Right side of the fabric
Elastic
Reverse side of the fabric
4. Decorative stitch
Right side of the fabric
Reverse side of the fabric
Cleaning the Feed Dogs and Looper
Area
WARNING:
Turn the power switch off and unplug
the machine before cleaning.
NOTE:
Do not dismantle the machine in any
way other than as explained in this
section.
1. Remove the presser foot and
needles.
2. Remove the set screw and needle
plate.
3. Clean the feed dogs with a
cleaning brush.
Needle plate
Set screw
Cleaning brush
TRIUMPHATOR 2000X
3130
EN
USER MANUAL

4. Open the looper cover and clean
the looper and surrounding area
with the cleaning brush.
5. Replace the needle plate, needles
and presser foot.
Close the looper cover.
Problem Cause Reference
Needle Thread breaks The machine is not threaded correctly See pages 15-20
The thread tension is too tight See pages 20, 24-27
The needle is bent or blunt See page 12-13
The needle is not set correctly See page 12-13
A wrong needle is used See page 12-13
Needle bends or breaks The needle is bent or blunt See page 12-13
The needle is not set correctly See page 12-13
The needle clamp screw is loose See page 12-13
The fabric is forcedly pulled Do not pull the fabric
Skipped stitches The needle is not set correctly See page 12-13
The needle is bent or blunt See page 12-13
The tension is out of balance See pages 16, 19, 20
The machine is not threaded correctly See pages 15-20
Seam puckering The tension is out of balance See pages 20, 24-27
Machine does not operate The machine is not connected to the
power supply
See page 7
The foot control is not plugged in
firmly
See page 7
TRIUMPHATOR 2000X
3332
EN
USER MANUAL

PRECAUCIONES
Antes de usar la máquina, lea esta guía.
No utilice la máquina a una temperatura ambiente superior a 45 °C o inferior
a 5 °C, en habitaciones con alta humedad o al aire libre, de lo contrario la
máquina puede funcionar incorrectamente. Para evitar la condensación
en los dispositivos electrónicos, no se recomienda encender la máquina
inmediatamente después del frío. Deje que se caliente a temperatura
ambiente (instale en el calor). No se recomienda utilizar la máquina en caso
de funcionamiento inestable de la red eléctrica o en lugares donde hay un
fuerte campo eléctrico o magnético, de lo contrario la máquina no funcionará
correctamente. Es necesario instalar la máquina en una superficie plana y
estable, teniendo en cuenta que la máquina tenga una distancia suficiente
de los objetos estacionarios y no entre en contacto con ellos.
No deje caer del automóvil, puede provocar lesiones o daños en la máquina.
ANTES DE USAR LA MAQUINA
Tenga cuidado al trabajar en la máquina, proteja sus manos de entrar en
la zona de operación de las partes móviles de la máquina, especialmente
en el campo de trabajo de las agujas. Para evitar descargas eléctricas o
cortocircuitos: todos los cables deben estar en buenas condiciones y libres
de daños (cortes, quemaduras, etc.), no estar en contacto con un ambiente
húmedo o agresivo. El cable de alimentación debe tener un buen contacto con
la red eléctrica. Al desconectar el cable de alimentación de la red eléctrica,
no tire del cable.
GUARDE ESTAS INSTRUCCIONES
Esta máquina está destinada solo para uso doméstico. Este dispositivo no está
destinado a ser utilizado por personas (incluidos niños) con discapacidades
físicas, sensoriales o mentales o que carezcan de conocimientos y habilidades
suficientes, excepto cuando esté supervisado o vigilado por personas
responsables de la seguridad. Sujeto a las condiciones de operación y las
reglas de almacenamiento de la máquina de coser, la vida útil es de 8 años.
INFORMACION DE LA MÁQUINA
Nombre de las piezas
1. Perilla de control alimentación
diferencial de la tela
2. Regulador de ajuste de longitud de
puntada
3. Rueda de mano
4. Bastidor de bobinas
5. Soporte de bobina
6. Guía de hilo
7. Polo de guía de hilo
8. Regulador de tensión de hilo en
aguja izquierda
9. Regulador de tensión de hilo de
aguja derecha
10. Control de tensión de hilo en
enlazador superior
11. Control de tensión de hilo en
enlazador inferior.
12. Tornillo de regulación del
prensatelas
13. Prensatelas
14. Interruptor de encendido
15. Cubierta
16. Soporte de sujeción para
prensatelas
17. Prensatelas de sujeción
18. Cortador
19. Panel cerrado
20. Placa de la aguja
TRIUMPHATOR 2000X
3534
MANUAL DE USUARIO
ES

Accesorios estándar
Destornillador
Brocha
Llave hexagonal
Pinzas
Cuadrícula
Juego de agujas
Enhebrador
Disco de carrete
Aceitera
Caja de accesorios
PREPARACIÓN PARA LA COSTURA
Conexión de alimentación
1. Apague la alimentación e inserte en el
enchufe el conector de la máquina.
2. Enchufe a la toma de corriente.
3. Encienda la alimentación.
21. Palanca de elevación de pie de sujeción
22. Aguja izquierda (Nº 90/14)23.
23. Aguja central (Nº 90/14) 24.
24. Aguja derecha (No90/14)
Control de velocidad de costura
La velocidad de costura está regulada
por el pedal. Cuanto más lo presione,
más rápido funcionará la máquina.
Levante el pedal de sujeción y
presiónelo
Apriételo y practique trabajando a
diferentes velocidades.
Para su seguridad:
• Mientras trabaja, siempre mire el área de costura. No toque las partes
móviles de la maquina, a saber: accionamiento de hilo, prensatelases,
rueda manual, aguja, cuchillas.
• Siempre apague la alimentación si:
- deja la maquina desatendida
- cambia o agrega cualquier pieza, si llena el hilo o limpia la máquina
• No ponga nada en el prensatelas, especialmente mientras la máquina
está funcionando.
Instrucciones de uso: El "0" en el interruptor indica la posición "OFF".
Rotación de la rueda manual: Siempre gire la rueda manual de inercia
sobre usted mismo (en sentido contrario a las manecillas del reloj).
La rueda de mano
TRIUMPHATOR 2000X
3736
MANUAL DE USUARIO
ES

Cómo abrir y cerrar la cubierta del
prensatelas
Para abrir: (A)
Empujando la tapa con el dedo
hacia la derecha, baje la cubierta de
la bisagra sobre usted mismo.
⚠ Nota: Al abrir la tapa del
prensatelas, el motor se apaga
automáticamente, aunque el botón
de encendido esté encendido en la posición "I" para cerrar: (B).
Levante la tapa de la bisagra y empuje hacia la máquina. La tapa se
sujetará en su lugar automáticamente.
Cubierta del prensatelas
Levantar y bajar el prensatelas de presión
El prensatelas de sujeción se eleva
y baja mediante la palanca de
elevación de prensatelas.
Cuando se trabaja, el prensatelas
siempre debe estar abajo, excepto
cuando está suspendida la
maquina o sin llenar los hilos.
Nota: Al levantar la palanca
del prensatelas de presión la
tensión de los hilos se debilita.
Cuando se eleva la carga
aerodinámica, el motor se detiene
automáticamente, aunque el botón
de encendido esté encendido en la
posición "I".
1. Palanca del prensatelas de
presión
2. Apague la alimentación y
desenchufe la máquina.
3. Gire la rueda manual de inercia
sobre usted mismo y levante la
aguja. Levante el prensatelas
de presión. Presione la palanca
detrás del soporte de sujeción
del prensatelas. El prensatelas
rebotará.
Rueda manual
Palanca
Soporte del prensatelas
Cómo instalar un prensatelas de
sujeción
1. Apague la alimentación y
desenchufe la máquina.
2. Coloque el prensatelas de
presión de modo que la varilla
esté directamente debajo del
enganchador del soporte.
3. Baje el soporte del prensatelas y
ajústelo.
4. Levante la palanca del
prensatelas de presión y
compruebe que el prensatelas
esté bien sujeto
Soporte del prensatelas
enganchador
Varilla
TRIUMPHATOR 2000X
3938
MANUAL DE USUARIO
ES
Table of contents
Languages:
Other EFFEKTIV Sewing Machine manuals