EFFEKTIV TRIUMPHATOR 2500X User manual

EN USER MANUAL ES MANUAL DE USUARIO
FR MANUEL DE L’UTILISATEUR DE BENUTZERHANDBUCH
IT MANUALE D’USO
Coverlocker
TRIUMPHATOR 2500X

RU
2
1. Principal Parts ............................................................................ 7
2. Accessories ................................................................................. 9
3. Preparing To Sew .................................................................... 10
4. Тelescopic Thread Guide / Cone Holders / Thread Net /
Spool Сар ................................................................................... 11
5. Needle Position / Presser Foot Lifting Lever ................. 13
6. Changing АNeedle ................................................................ 14
7. Connecting The Machine To The Power Source ......... 15
8. Starting Sewing ....................................................................... 16
9. Adjusting Presser Foot Pressure ....................................... 17
10. Threading The Thread Guides ........................................... 17
11. Threading The Upper Overedge Looper ......................... 18
12. Threading The Lower Overedge Looper ......................... 20
13. Double Chainstitch And Cover Stitch Looper ................. 21
14. Threading The Needles ........................................................ 23
15. Needle Threader ..................................................................... 26
16. Threading Schemes For All Types Of Programs .......... 27
17. Thread Cutter ............................................................................ 30
18. Disengaging The Upper Knife .............................................. 31
19. Swiveling Stitch Width Finger ............................................. 32
20. Right (Upper) Looper Converter ......................................... 33
21. Disengaging The Upper Looper .......................................... 34
22. Adjusting The Stitch Length/ Differential Feed ............ 35
23. Removing The Knife Guard .................................................. 36
24. Adjusting The Seam Width .................................................. 37
25. Attaching The Presser Foot Holder .................................. 38
26. Replacing The Upper Knife ................................................... 39
27. Саrе Of The Machine ............................................................ 40
28. Cover Stitches, Seam Stitches, Overlock Stitches, Setting
Examples .................................................................................... 42
ES CONTENTS
EN ES CONTENIDO
ES
1. Nombres De Las Piezas..........................................................53
2. Accesorios Incluidos................................................................55
3. Preparación Para Coser .........................................................56
4. Guiahilos Telescópico / Soportes De Conos / Portabobi-
nas..................................................................................................57
5. Levantar El Prensatelas Y Las Agujas ................................59
6. Reemplazo De La Aguja..........................................................60
7. Conexión Eléctrica ....................................................................61
8. Empezar A Coser.......................................................................62
9. Ajuste De La Presión Del Prensatelas ................................63
10. Enhebrar Las Guías Del Hilo..................................................64
11. Enhebrado De La Lanzadera Derecha (Superior)...........65
12. Enhebrado De La Lanzadera Izquierda (Inferior)............66
13. Enhebrar El Bucleador De Costura Koverlock (Puntadas
De Costura Y Recubrimiento)................................................67
14. Enhebrado De Agujas...............................................................69
15. Enhebrador De Agujas Manual.............................................72
16. Diagrama De Enhebrado General Para Todo Tipo De Pro-
gramas..........................................................................................73
17. Cortador De Hilo Incorporado...............................................76
18. Desconectar La Cuchilla Superior .......................................77
19. Deshabilitar El Esparcidor.......................................................78
20. Convertidor De Bucleador Derecho (Superior)................79
21. Deshabilitar El Bucleador Derecho (Superior)..................80
22. Ajuste De La Longitud De La Puntada Y El Avance Difer-
encial..............................................................................................81
23. Reemplazo Del Inserto Superior De La Tapa De La Lanza-
dera ................................................................................................82
24. Ajuste Del Ancho De Corte De La Tela...............................83
25. Instalación De La Valla ............................................................84
26. Reemplazo De La Cuchilla Superior....................................85
27. Cuidado De La Maquina..........................................................86
28. Cosido, Costura Y Puntadas De Koverlock, Ejemplos De
Ajustes ..........................................................................................88

RU
TRIUMPHATOR 2500X
3
ES CONTENU
FR
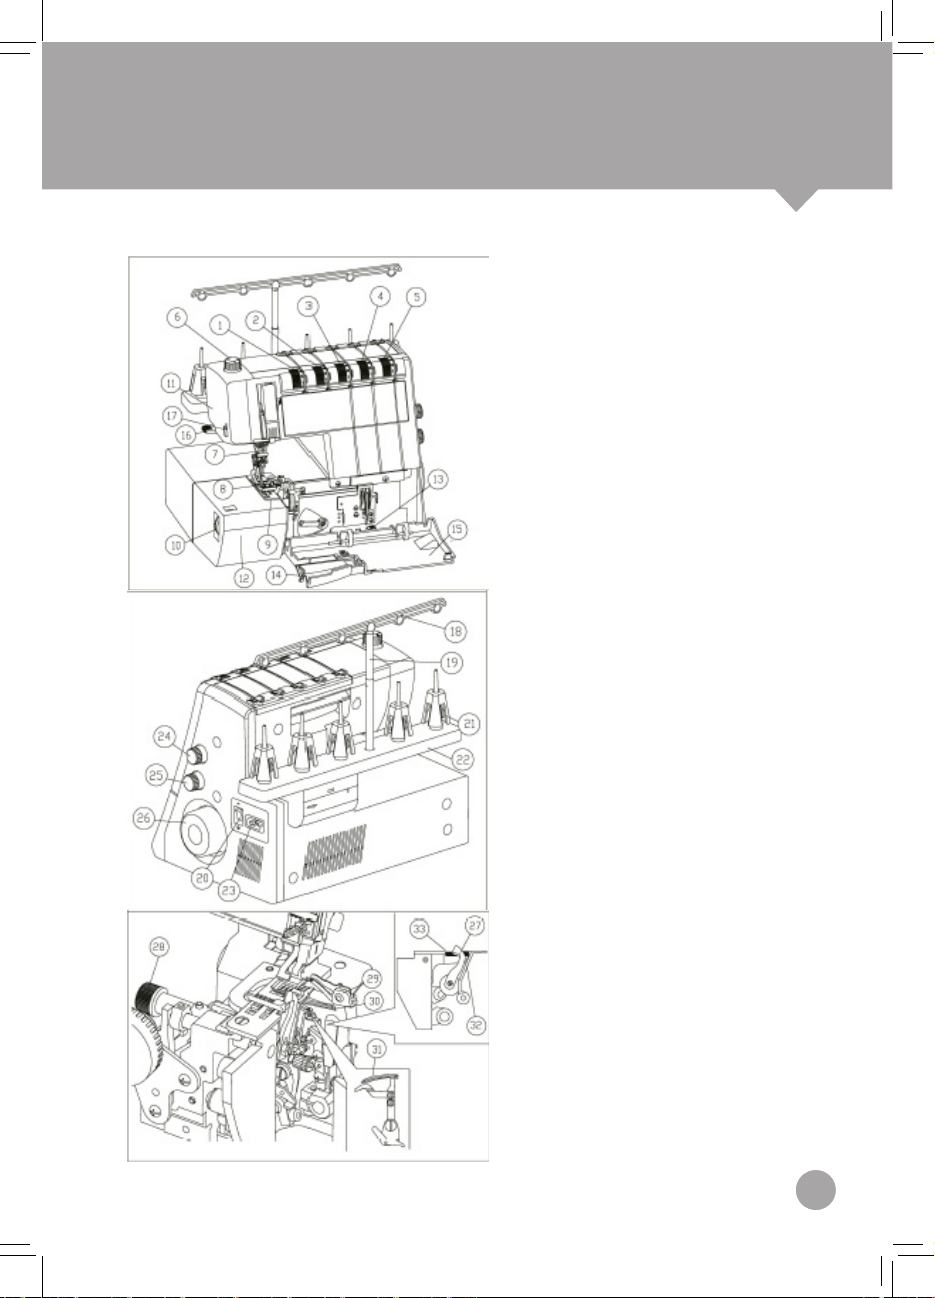
1. Découvrez Votre Machine ......................................................99
2. Accessoires Inclus .................................................................101
3. Initiation À La Couture ..........................................................102
4. Guide-Fil Télescopique / Porte-Bobine / Butée De Bobine
.......................................................................................................103
5. Relevage Du Pied-De-Biche Et Des Aiguilles..................105
6. Remplacement De L’Aiguille.................................................106
7. Branchement De L’Alimentation ........................................107
8. Commencer À Coudre...........................................................108
9. Réglage De La Pression Du Pied De Biche .....................109
10. Enlage Des Guide-Fils ........................................................109
11. Enlage Du Boucleur Droit (Supérieur) ............................110
12. Enlage Du Boucleur Gauche (Inférieur) .........................112
13. Enlage Du Boucleur De Couture Pour La Boucle De Ta-
pis (Points De Recouvrement Et De Couture)................113
14. Enlage De L’Aiguille...............................................................115
15. Enle-Aiguille Manuel ............................................................118
16. Schéma Général De Threading Pour Tous Les Types De
Programmes.............................................................................119
17. Coupe-Fil Intégré ....................................................................122
18. Déconnecter Le Couteau Supérieur .................................123
19. Désactiver Boucle Doigt .......................................................124
20. Convertisseur Boucleur Droit (Supérieur) ......................125
21. Désactiver Du Boucleur Droit (Supérieur)........................126
22. Réglage De La Longueur De Point Et De L’Avance Dif-
férentielle....................................................................................127
23. Remplacement De L’Insert Supérieur ..............................128
24. Réglage De La Largeur De Coupe Du Tissu ...................129
25. Fixation De La Règle ..............................................................130
26. Remplacement Du Couteau Supérieur ...........................131
27. Entretien De La Machine ......................................................132
28. Couture, Couture Et Points De Tapis, Exemples De
Réglages.....................................................................................134
ES INHALT
DE
1. Lernen Sie Ihre .........................................................................145
2. Inklusive Zubehör ...................................................................147
3. Vorbereitung Für Das Nähen ..............................................148
4. Teleskopfadenführung / Spulenhalter / Garnrollenhalter
.......................................................................................................149
5. Nähfuß Und Nadellift..............................................................151
6. Austausch Von Nadeln..........................................................152
7. Anschließen Der Stromversorgung ..................................153
8. Starten Sie Zu Nähen.............................................................154
9. Einstellen Des Nähfußdrucks .............................................155
10. Einfädeln Der Fadenführungen ..........................................155
11. Einfädeln Des Rechten (Oberen) Greifers........................156
12. Einfädeln Des Linken (Unteren) Greifers .........................158
13. Nahtgreifer Für Carpetlock Einfädeln (Cover- Und Ab-
steppstiche)...............................................................................159
14. Nadeleinfädeln..........................................................................161
15. Manueller Nadeleinfädler .....................................................164
16. Allgemeines Threading-Schema Für Alle Arten Von Pro-
grammen....................................................................................165
17. Eingebauter Fadenabschneider..........................................168
18. Trennen Des Obermessers .................................................169
19. Abkoppeln Des Streuers .......................................................170
20. Rechter (Oberer) Knopochkonverter...............................171
21. Deaktivieren Des Rechten (Oberen) Greifers..................172
22. Einstellen Der Stichlänge Und Des Differentialtransports
.......................................................................................................173
23. Ersetzen Des Oberen Einsatzes Der Greiferabdeckung
.......................................................................................................174
24. Einstellen Der Schnittbreite Des Stoffes..........................175
25. Anbringen Des Lineals ..........................................................176
26. Ersetzen Des Obermessers ................................................177
27. Pege Des Geräts ..................................................................178
28. Nähen, Nähen Und Teppichstich, Beispiele Für Einstellun-
gen................................................................................................180

RU
4
1. Conoscere La Macchina ......................................................191
2. Accessori....................................................................................193
3. Preparazione Al Cucito .........................................................194
4. Asta Guidalo Telescopica / Porta Spole / Fermi A Disco
Per Spolette...............................................................................195
5. Salita Del Piedino E Degli Aghi ..........................................197
6. Sostituzione Degli Aghi ........................................................198
7. Allacciamento Elettrico .........................................................199
8. Inizio Del Cucito ..................................................................... 200
9. Regolazione Di Pressione Del Piedino............................. 201
10. Inlatura Delle Guide Dei Fili .............................................. 201
11. Inlatura Del Crochet Destro (Superiore) ..................... 202
12. Inlatura Del Crochet Sinistro (Inferiore) ........................ 204
13. Inlatura Del Crochet Della Catenella (Per Il Punto Di Co-
pertura Ed Il Punto Catenella)............................................. 205
14. Inlatura Degli Aghi ............................................................... 207
15. Inlatore Dell’Ago Manuale...................................................210
16. Shema Generale Di Inlatura Per Tutti I Tipi Di Program-
mi..................................................................................................211
17. Tagliali Incorporato .............................................................214
18. Disattivazione Del Coltello Superiore ..............................215
19. Disattivazione Dell’Allargatore.............................................216
20. Convertitore Del Crochet Destro (Superiore).................217
21. Disattivazione Del Crochet Destro (Superiore)..............218
22. Regolazione Della Lunghezza Del Punto E Del Trasporto
Differenziale Della Stoffa .....................................................219
23. Sostituzione Dell’Inserto Superiore Del Coperchio Dei
Crochet ...................................................................................... 220
24. Regolazione Della Larghezza Di Taglio Della Stoffa... 221
25. Montaggio Del Righello Guida ......................................... 222
26. Sostituzione Del Coltello Superiore ................................. 223
27. Manutenzione Della Macchina ......................................... 224
28. Punti Di Copertura, Punti Catenella E Punti Overlock, Es-
empi Di Regolazioni............................................................... 226
ES CONTENUTI
IT

RU
TRIUMPHATOR 2500X
5
USER MANUAL
BASIC SAFETY PRECAUTIONS
Please read this manual before using the machine.
Do not use the machine at an ambient temperature higher than 45°C or lower
than 5°C, in humid rooms or outdoors, otherwise the machine may not work
properly. To avoid condensation on electronic devices, it is not recommended
to turn on the machine immediately after it has been moved from outdoors to
indoors. It is necessary to wait until the machine reaches room temperature.
Do not use the device in unstable electrical network or in places where there
is a strong electric or magnetic field, otherwise the machine will malfunction.
It is necessary to install the machine on a flat stable surface, taking into
account the required distance from fixed objects.
Do not drop the machine as this may result in injury or damage to the machine.
OPERATING THE MACHINE
Be careful when operating the machine; protect your hands from getting into
the working area of moving parts, especially in close proximity of needles.
To avoid electric shock or short circuit, make sure that all cables are in good
condition and not damaged (cuts, burns, etc.), not in contact with damp or
corrosive environments. The power cable must have good contact with the
mains. When disconnecting the power cable from the mains, do not pull on
the cable.

RU
6
EN
SAVE THESE INSTRUCTIONS
This machine is intended for domestic use only.
This device is not intended for use by persons (including children) with
reduced physical or mental capabilities, or lack of knowledge and skills,
unless they are supervised or trained by a person responsible for their safety.
Supervise children and prevent them from playing with this device.
If the operating conditions and storage rules of the machine are observed,
the service life will be at least 8 years.

RU
TRIUMPHATOR 2500X
7
USER MANUAL
PRINCIPAL PARTS
1 . Upper needle-thread tension
2. Upper needle-thread tension
3. Thread tension/ upper looper
thread
4. Thread tension/ lower looper
thread
5. Thread tension/ two-thread
chainstitch looper/ cover
stitch looper
6. Adjusting knob for presser
foot pressure
7. Needle holder
8. Standard presser foot
9. Needle plate
10. Adjusting knob for seam
width
11. Lamp cover
12. Swivel plate
13. Looper disengaging lever
14. Blade guard (for Overedge/
Overlock)
15. Looper cover
16. Presser foot lever
17. Thread chain cutter

RU
8
EN
18. Thread guides19. Telescoping thread guide
20. Electrical power master switch
21. Саnе thread adapter
22. Thread spool stand
23. Machine socket, foot control
24. Stitch length adjustment knob
25.Differential feed adjustment knob
26.Handwheel
27. Моvаblе upper knife
28.Knob for lowering the upper knife
29.Upper overedge looper
30.Lower overedge looper
31.Double chainstitch and cover stitch looper
32.Swiveling stitch width finger
33.Fixed lower knife

RU
TRIUMPHATOR 2500X
9
USER MANUAL
ACCESSORIES
1. Oil bottle
2. Edge/Quitting guide
3. Screwdriver
4. Hex Wrench
5. Tweezers
6. Cleaning brush
7. Waste bin
8. Thread nets (5pcs).
9. Pack of needle
10. Needle threader
11. Upper blade
12. Wrench
13. Spool cap (5 pcs.)
14. Sewing table (for Coverstitch/Chainstitch)
15. Blade guard
16. Accessory box

RU
10
EN
PREPARING TO SEW
Looper Cover
Push the looper cover fully
to the right and then swivel it
down.
Waste Bin
lnsert the upper latch of the
waste bin into the upper slot
of the looper cover. Apply
pressure to the lower part of
the bin until the lower latches
fick into place in the lower
slots of the looper cover.
То remove the waste bin,
repeat this procedure in the
reverse order.

RU
TRIUMPHATOR 2500X
11
USER MANUAL
ТELESCOPIC THREAD GUIDE / CONE HOLDERS /
THREAD NET / SPOOL САР
Telescopic Thread Guide
Pull the telescopic thread guide upwards to its highest position.
То ensure optimum thread feed, turn the telescopic parts slowly until you
hear the locking balls fick into place.
Foam Pads/ Cone Holders
lf you are using large cones (5,000 -10,000 mm), the foam pads and the
cone holders will bе helpful to you.
With synthetic threads, the foam pads catch threads that have slipped
down and help to advance the thread flawlessly.
Cone holders serve to ensure that large cones are well positioned.

RU
12
EN
Thread Net / Spool сар
Synthetic threads generally unwind too quickly from the thread spool.
Thread nets have been included to allow easy use of these threads. Pull the
thread net (located in the accessory Ьох) over the spool from below. Place
the spool оn the spool holder catching the bottom of the thread net with the
spool pin.
When using small spools, remove the spool holders from the spool pins.
Place the spool with its slit side up, and put the spool сар оn top of it.
1) Spool pin
2) Cone holder
3) Spool сар

RU
TRIUMPHATOR 2500X
13
USER MANUAL
NEEDLE POSITION / PRESSER FOOT LIFTING LEVER
The offers а choice of 5
needle positions. You саn sew
with as many as 3 needles
simultaneously. The needle
positions are L 1 , L2, LЗ, R1
and R2. А retaining screw is
provided above each needle.
lf the needles are inserted at
L2 and LЗ, the left needle is
slightly lower than the right. lf
the needles are inserted at L 1
and LЗ, the left needle is also
lower than the right.
lf the needles are inserted at L
1 , L2 and LЗ, the left needle is
at the lowest point.
The presser foot саn bе up or
down position Ьу using the
presser foot lifting lever.
NOTE:
Presser foot should bе lowered when sewing.
NOTE:
lf the needles are inserted at
R1 and R2, the left needle is
slightly higher than the right.

RU
14
EN
CHANGING А NEEDLE
Тоremove:Lower the presser foot
and raise the needle(s) to its/their
highest position. Take the needle
changing tool out of the accessory
Ьох and push it up over the needle
as far as it will go. Loosen (but do
not remove) the needle’ s retaining
screw with the allen key and pull
the needle out from below.
Tоinsert:lnsert the needle in hole
А of the needle changing tool so
that the flat side В of the needle
is opposite face of the tool. lnsert
the needle as far as it will go into
the needle holder (you may have
to push а little harder Ьу hand)
and tighten the retaining screw.
Remove the needle changing tool.
Needle
System Needle
Size Туре ot
Fabrics
EL х 705 11-14
(75-90)
Light to
medium
weight fabrics
such as silk,
cottons, shirts,
blouse fabrics,
stretchy
fabrics, denim
& etc.
Turnoffatthepowerswitch

RU
TRIUMPHATOR 2500X
15
USER MANUAL
CONNECTING THE MACHINE TO THE POWER SOURCE
Before connecting the power supply, make sure that the voltage and
frequency shown оn the machine is conforming with your electrical power.
Place machine оn а stable surface.
1. Connect the power line cord to the machine Ьу inserting the 3 pin plug
into the power cord socket.
2. Connect the power line plug to the electric outlet.
3. Turn оn the power switch.
4. The sewing lamp will light up when the switch is turned оn.
То disconnect, turn the power switch to the off position, then remove plug
from outlet..

RU
16
EN
Warning!
Consult а qualified electrician if in double as how to connect the
machine to the power source. Unplug the power cord when the
machine is not in use.
Unplug power cord when machine is not in use.
The foot control must Ье used with the appliance Ьу УС-482 (110-
120V area) / УС-483-5 (220-240V area).
STARTING SEWING
With the sewing machine turned off, insert the foot control plug into its
connector оn the sewing machine.
Turn оn the sewing machine, and then slowly depress the foot control to
start sewing.
Release the foot control to stop the sewing machine.

RU
TRIUMPHATOR 2500X
17
USER MANUAL
ADJUSTING PRESSER FOOT PRESSURE
The preset presser foot pressure оn the machine is suitable for medium
fabrics. For most fabrics, the presser foot pressure does not need to Ье
altered. lf you intend to work with lighter or heavier fabrics, however, it may
Ье necessary to reset the pressure. ln this case, you саn choose from six
positions; make your selection with the presser foot pressure adjustment
knob. The standard setting is «N» .
NOTE:
Lower the presser foot before turning the presser foot pressure adjustment
knob. This makes the knob easier to turn.
THREADING THE THREAD GUIDES
Place the spools оn the spool
pins. For notes оn the spool net,
the thread run-off disc, the foam
pads and the соnе holders. Thread
the threads from the back to the
front through the thread guides as
indicated Ьу the codes.

RU
18
EN
After threading the thread guide bar,
slip the thread into the first guide оn
the machine.
То do this, pull the thread down
with both hands until it slips under
the thread guide. Pass the thread
between the tension discs and pull
it down so that it is between the
tension discs.
NOTE:
Thread in а sequence of 1 to 5.
THREADING THE UPPER OVEREDGE LOOPER
Upper looper (green)
Turn the hand wheel towards
you until the upper looper
reaches its highest position.
Thread the threads in order
from 1 to 9. Some of the thread
guides are marked with а green
dot.
A : Upper looper

RU
TRIUMPHATOR 2500X
19
USER MANUAL
Thread the thread in thread
guides 1 to 7. Pass the thread
over the top of guide 8 from
above and pull it down and to
the left until it slips into the
guide.
From the front, pass the
thread through the еуе 9 of the
upper looper. Pull about 10cm
(5 inches) of thread through
the hook and place it facing to
the left under the presser foot.

RU
20
EN
THREADING THE LOWER OVEREDGE LOOPER
Threading Lower Looper (pink)
Turn the hand wheel towards
you until the lower looper is as
far to the right as possible.
А: Lower Looper
Thread the thread in order from
1 to 9. Some of the thread
guides are marked with а pink
dot.
Push lever (а) down and hook
the thread оn the guide (Ь).
Pass the thread from front to
back through the hole (с) оn far
right end of the looper. Draw the
thread back to the left under the
presser foot, leaving а 10cm (4
inches) tail.
Table of contents
Languages:
Other EFFEKTIV Sewing Machine manuals