Eich BC 212 BASS COMBO User manual

BC 212 Bass Combo
MANUAL
Congratulations! You are now the proud owner of an
EICH BC212 Bass Combo. This manual will help you get
to learn all the useful and exciting features of one of the
best combo amplifiers in the world. The new BC212 is
equipped with our latest design of ceramic bass spea-
kers, a 2 x 12” model with a power rating of 500 watts.
The latest generation of our TE12D-8 ceramic loudspea-
kers boasts a plethora of innovative details which make
our cabinets and combo amps so unique. The demanding
requests of our professional users and the close relation-
ship between our in-house Research and Development
team and our experienced suppliers form the keys to
our superior technology. Thanks to the latest measuring
and analysis systems our loudspeakers meet the highest
technical specifications and take up a leading place in
professional loudspeaker manufacturing. We put extra
effort in our loudspeakers reaching maximum power
rating while at the same time strongly reducing power
compression and distortion. As a result our speakers
don’t fade away or sound weak and broken up at high
output levels, rather they maintain their dynamic respon-
se and keep delivering a considerable increase in sound
pressure level. The BC212 also feature the CT1 middle-
high 4” cone speaker. Working in a sealed enclosure it
impresses with a low roll-off frequency and a very flat
frequency response, thus delivering a smooth top end far
beyond 10 kHz at astounding sound pressure levels. All
combo amps sport an additional Speakon combo output
for operating an external speaker cabinet.
IMPORTANT SAFETY INSTRUCTIONS
The apparatus shall not be exposed to dripping or splashing and that
no objects with liquids, such as vases, shall be placed on the appara-
tus. The MAINS plug is used as the disconnect device, the disconnect
device shall remain readily operable.
Warning: the user shall not place this apparatus in the area during
the operation so that the mains switch can be easily accessible.
1. Read these instructions before operating this apparatus.
2. Keep these instructions for future reference.
3. Heed all warnings to ensure safe operation.
4. Follow all instructions provided in this document.
5. Do not use this apparatus near water or in locations where con-
densation may occur.
6. Clean only with dry cloth. Do not use aerosol or liquid cleaners.
Unplug this apparatus before cleaning.
7. Do not block any of the ventilation openings. Install in accordance
with the manufacturer’s instructions.
8. Do not install near any heat sources such as radiators, heat
registers, stoves, or other apparatus (including amplifiers) that
produce heat.
9. Do not defeat the safety purpose of the polarized or grounding-
type plug. A polarized plug has two blades with one wider than
the other. A grounding type plug has two blades and a third
grounding prong. The wide blade or the third prong is provided
for your safety. If the provided plug does not into your outlet,
consult an electrician for replacement of the obsolete outlet.
10. Protect the power cord from being walked on or pinched particu-
larly at plug, convenience receptacles, and the point where they
exit from the apparatus.
11. Only use attachments/accessories specified by the manufactu-
rer.
12. Use only with a cart, stand, tripod, bracket, or table specified
by the manufacturer, or sold with the apparatus. When a cart is
used, use caution when moving the cart/apparatus combination
to avoid injury from tipover.
13. When a cart is used, use caution when moving the cart/appara-
tus combination to avoid injury from tipover.
14. Unplug this apparatus during lighting storms or when unused for
long periods of time.
15. Refer all servicing to qualified service personnel. Servicing is re-
quired when the apparatus has been damaged in any way, such
as power-supply cord or plug is damaged, liquid has been spilled
or objects have fallen into the apparatus, the apparatus has been
exposed to rain or moisture, does not operate normally, or has
been dropped.
CAUTION: Use of controls or adjustments or performance of proce-
dures other than those may result in hazardous radiation exposure.
WARNING: To reduce the risk of FIRE or electric shock, do
not expose this apparatus to rain or moisture.
CAUTION: RISK OF ELECTRIC SHOCK DO NOT OPEN
CAUTION: TO REDUCE THE RISK OF ELECTRIC SHOCK, DO NOT
REMOVE COVER (OR BACK) NO USER SERVICEABLE PARTS INSIDE
REFER SERVICING TO QUALIFIED PERSONNEL
The lightning flash with arrowhead symbol, within an
equilateral triangle, is intended to alert the user to the
presence of uninsulated “dangerous voltage” within
the product’ s enclosure that may be of suficient mag-
nitude to constitute a risk of electric shock to persons.
The exclamation point within an equilateral triangle is
intended to alert the user to the presence of important
operating and maintenance (servicing) instructions in
the literature accompanying the appliance.
!
>> BC 212 BASS COMBO
CE Declaration of Conformity
BC 212
We declare under our sole responsibility that this product is
in conformity with the following standards or standardization
documents in attention of operation conditions and installation
arrangements according to operating manual:
EN 61000-3-2, EN 61000-3-3, EN 55013, EN 55020, EN 55022,
EN 60065 according to the provisions of the regulations
89/336/EWG and 73/23/EWG.

Power
0 10 0 10 0 10 0 10 0 100 10 RichDry
Gain Taste Lo LoMid HiMid Hi Master
DI
Input Clip
Mute Post
Gnd Lift
500 Watts
1 INPUT
Plug in your shielded instrument cable into this jack. We
advise you to always turn down the volume control on
your instrument before plugging it into this jack.
2 CLIP
The red »CLIP« LED helps you adjust the input sensitivity
of the BC212 preamp so that the signal from your instru-
ment best matches the preamp’s internal operating level.
Turn up the »GAIN« control (#3) while you hit the strings
of your bass hard until the »CLIP« LED starts flashing.
Now back up the »GAIN« (#3) control a bit until the LED
goes off. The flashing »CLIP« LED tells you that the input
stage of the preamp is clipping somewhere and that you
should either turn down the »GAIN« control (#3). Keep in
mind that excessive use of the »LO« control (#5) will raise
the internal level and thus make the »CLIP« LED come on
much earlier.
3 GAIN
This control adjusts the basic signal level in the preamp
and thus determines it’s sensitivity and overall dynamic
characteristics. In order to best adjust your instrument’s
signal level to the internal operating level of BC212
watch the »CLIP« LED (#2). Set the »GAIN« such that the
»CLIP« LED (#2) just doesn’t come up.
Do not leave the volume control on your instrument
set too low, otherwise noise picked up along the
cable will become more prominent and thus lower
the signal-to noise ratio of the amp.
4 TASTE
This unique feature adds to the superiority of the BC212
tonal qualities. Leave the control in the centre position
if you seek a more “natural” sound. When turned to the
right (clockwise) towards »RICH« the sound gets incre-
asingly fatter with lots of low-end punch, ending in a
warm, vintage-like tone. When turned to the left (coun-
ter clockwise) towards »DRY« this control adds urgent
attack and midrange growl.
The »TASTE« control allows you to quickly and
effectively soften those instruments which sound
a little harsh and scathing. At the same time bass
guitars with a muddy, booming neck pickup gain
definition by turning the »TASTE« control towards
the »DRY« position.
5 LO
This is the primary low frequency control. It allows for
cutting or boosting the frequency range around 30 Hz
by 15 dB each. This frequency range represents the bot-
tom end and massive yet distinguished punch in a bass
guitar. Start from the 12 o’clock position and dial in the
sound you like.
6 LO MID
The »LoMID« control is centred at 250 Hz and offers a cut
or boost of 12 dB. The slope of this control is not as steep
as the one of the »LO« control (#5). This frequency range,
when turned up, determines the body of the bass guitar
signal and lets the bass kick out in a mix. Turn it counter
clockwise to reduce unwanted room resonance.
7 HI MID
The »HiMID« control is centred at 800 Hz and offers a
cut or boost of 12 dB, again with a more gentle slope
just like the »LO MID« control (#6). Due to the broader
ranges which are covered by these controls the sound
never gets booming or honky when you turn them all
the way up. Turning up the »HI MID« control gives you
a great fretless sound. On the other hand, when you cut
the »HI MID« range you end up with a funky slap sound
of extremely high quality.
8 HI
The »HI« control is centred at 8 kHz and offers a cut or
boost of 15 dB. Turn it up for a biting, crystal clear rock
or funk bass. Turn it counter clockwise to reduce hiss or
generally dampen the sound for a muted reggae feel.
9 MASTER
This is the overall volume control of the BC212 and works
on internal power amp. It determines the level at the “IN-
TERNAL and External SPEAKER OUTPUTS” (#17) and the
“LINE OUT” jack on the back panel (#20). Furthermore
you can control the level of the audio source connected
to the Aux In jack to blend it with your bass signal.
10 MUTE
The »MUTE« switch should be depressed when you po-
wer up or down your BC212 the switch illuminates when
the function is engaged. In this mode no audio signal
54
>> FRONT PANEL
1 4 9 10 11 1212a 133 5 6 7 82

will be processed and heard at any output except the
»TUNER« jack (#21). That way you don’t have to turn
down the volume for silent tuning or when changing
instruments, thus you do without the nasty cling which
you usually hear when you unplug the jack. The »MUTE«
switch also interrupts the signal path at the balanced »DI
OUT« (#12), no matter which position the switch »POST«
(#11) and »GND/LIFT« (#12a) is in (that way your silent
tuning or changing instruments won’t be heard in the PA,
either). Disengage the »MUTE« function and start to rum-
ble – now there is signal at all outputs again.
11 POST
With this switch the transformer balanced »DI OUT« (#12)
can be selected to be a »PRE« or »POST« preamp signal. In
the »PRE« position (switch is not depressed) the »DI OUT«
signal is tapped directly after the input stage including
the »GAIN« control (#3). In the »POST« position (switch
illuminates when the function is engaged) the »DI OUT«
signal is taken after it has been processed by the comple-
te preamp, i.e. including the »GAIN« control (#3), the tone
control section (#5 through #8), and the »EFFECTS LOOP«
(#19). It is not affected by the »MASTER« control (#9).
12 DI
The BC212 supplies a transformer balanced line output
signal for connecting to a house mixing board, recording
console or external amplifier(s) with balanced inputs.
Connect a shielded 3-core microphone cable with XLR
plugs to this male XLR output. The need for an additional
active DI box, which can be pretty expensive, is obsolete.
Due to the advanced circuit design using only the best
components available the high sound quality of the »DI
OUT« makes it the amp of choice in any recording stu-
dio (you can use the BC212 pre amp on its own without
driving the Internal speakers #17). The DI signal can be
tapped either before or after the preamp, as determined
by the switch »POST« (#11).
12a GND/LIFT
There is no need to be afraid of nasty ground loops any-
more. In case you will get a ground loop, please switch
the »GROUND LIFT« (#12a) into the »LIFT« position.
13 Power
At the risk of stating the obvious, this switch is used to
turn the BC212 on and off. Before you turn on the amp do
make sure that the »MUTE« switch (#10) is depressed.
Provided the included power cord is plugged into the
»POWER SOCKET« on the back panel (#14) and into an
appropriate wall socket, the »POWER SWITCH« (#13) on
the front panel will illuminate when the switch is turned
on, no matter what positions other switches are in. The
amp is OFF when the »POWER SWITCH« is depressed –
the »POWER SWITCH« will no longer illuminate.
Before you plug in do make sure that the voltage is
correct (see #15)!
76
Power
0 10 0 10 0 10 0 10 0 100 10 RichDry
Gain Taste Lo LoMid HiMid Hi Master
DI
Input Clip
Mute Post
Gnd Lift
500 Watts
>> FRONT PANEL
1 4 9 10 11 1212a 133 5 6 7 82

14 POWER INPUT
Connect the supplied AC power cord to the power re-
ceptacle. Make sure the IEC plug is firmly inserted in the
socket. The other end of the cable should be connected
to any standard grounded AC outlet or into a power strip
of proper voltage. Before you plug in do make sure that
the voltage is correct (see #15)! Just in case you lose
the cord provided, the jack accepts a standard 3-prong
IEC cord like those found on most professional gear and
computers – you can get one at any electronics, music or
computer store.
Never (!) remove or otherwise attempt to defeat
the ground pin of the power cord in order to get rid
of a hum induced by a ground loop.
14a POWER FUSE
The BC212 is fused for your and its own protection. If
you suspect a blown fuse, disconnect the cord, pull out
the »FUSE DRAWER« (#14a, located just below the cord
receptacle) and replace the fuse with another suitable
fuse. There should be a spare fuse in the fuse drawer..
When you’re in a country with a standard of 115 volts set
the »VOLTAGE SELECTOR« (#15) accordingly. If two fuses
blow in a row, something is very wrong. Do not open the
unit. Refer service to qualified service personnel.
15 VOLTAGE SELECTOR
The BC212 features a »VOLTAGE SELECTOR« allowing
you to use your amplifier anywhere in the world just by
the flick of a switch. The unit is set to 230 V when we
ship to a country in Europe. Should you wish to use your
BC212 in the USA set the »VOLTAGE SELECTOR« to “115
V”.
ATTENTION: Don’t forget to set it back to “230 V”
when you return home! EICH cannot be made res-
ponsible for damages to the unit caused by impro-
per voltage selection. Therefore it is a good idea
to always check the »VOLTAGE SELECTOR« before
powering up the unit.
16 EXTERNAL SPEAKER OUT
BC212 sports one Neutrik Speakon®Combo NLJ2 MD-V
external speaker output.
Just make sure that the minimum load of the ex-
ternal speaker is no less than 8 ohms. Whatever
your setup is, always make sure that the speaker
cables are as long as necessary but as short as
possible, using heavy gauge cable (we recommen-
dat least 2 x 2.5 mm2). Do stick to speaker cables
with Speakon®connectors only, either NL2FX (two
pin connector) or NL4FX (four pin connector). No
matter which plug you use the “hot” wire must be
connected to pin “1+” and the “cold” wire to pin
“1-“.
This Speakon®Combo socket is also able to hand-
le a 1/4“ jack. High quality EICH speaker cables
can be obtained as an option.
17 INTERNAL SPEAKER ON/OFF
The internal speaker on/off switch allows a silent re-
hearsal with headphones. It is also possible to use an ex-
ternal cabinet and thereby turn off the internal speaker.
In this case, the connected speaker has an impedance
of at least 4 ohms. If the internal speakers of the BC212
switches on, the impedance of the connected cabinet
must be at least 8 ohms.
18 AUX IN
This 3.5mm stereo Aux In jack provides the possibility to
connect your mp3 player, your iphone or other external
audio sources. You can control its‘ level with the „MAS-
TER“ volume (#9) to blend it with your bass signal. Please
use the included 3.5mm stereo cable to connect the au-
dio source of your choice.
18a PHONE OUT
This 3.5 mm stereo jack lets you connect your headpho-
nes. With the „MASTER“ volume (#9) you can control
both the level of your instrument and the level of the
audio source connected to the Aux In jack. It is possible
to use your BC212 without a cabinet, so you can just play
in any situation!
19 EFFECTS LOOP
RETURN/LINE IN, SEND
These two 1/4” jacks are the serial patch points for ex-
ternal signal processing effects.
19a RETURN/LINE IN
Connect the output of the (last) external device to the
“RETURN” jack. Always use high quality shielded instru-
ment cables for connecting to and from external devices.
Keep the cables as short as possible. If you notice crack-
ling distortion when using external effects, either the
batteries of the stomp box have run out, or the send level
of the amplifier is too high for the processor’s input sta-
ge. In this case you better connect the device between
bass guitar and amplifier.
The “RETURN / LINE IN” jack (#19a) can also be used
to connect various external audio sources to the BC212
such as an MP3 player, or in order to just use the power
amp of the BC212. The “MASTER” control (#9) determi-
nes the final output level. As the “RETURN / LINE IN”
jack (#19a) is placed after the tone controls (#5 through
#8).
19b Send
Connect the “SEND” jack to the input of the (first) exter-
nal device.
98
>> BACK PANEL
USE ONLY WITH A 250V FUSE
N
E
U
T
R
I
K
EFFECTS LOOP
LINE IN
SEND RETURN
LINE OUT TUNER
MIN. LOAD 8 OHMS
EXTERNAL
SPEAKER OUT
Made in Germany
HIGH VOLTAGE! CAUTION: TO PREVENT
THE RISK OF FIRE AND SHOCK HAZARD
DO NOT EXPOSE THIS APPLIANCE TO
MOISTURE OR RAIN. DO NOT OPEN CASE.
NO USER SERVICEABLE PARTS INSIDE.
REFER SERVICING TO QUALIFIED SERVICE
PERSONNEL.
VOLTAGE
SELECTOR
230
REHEARSAL
AUX IN
INTERNAL
SPEAKER
ON/OFF
15
14 14a14a 18
16 17 18a 19b 19a 20 21
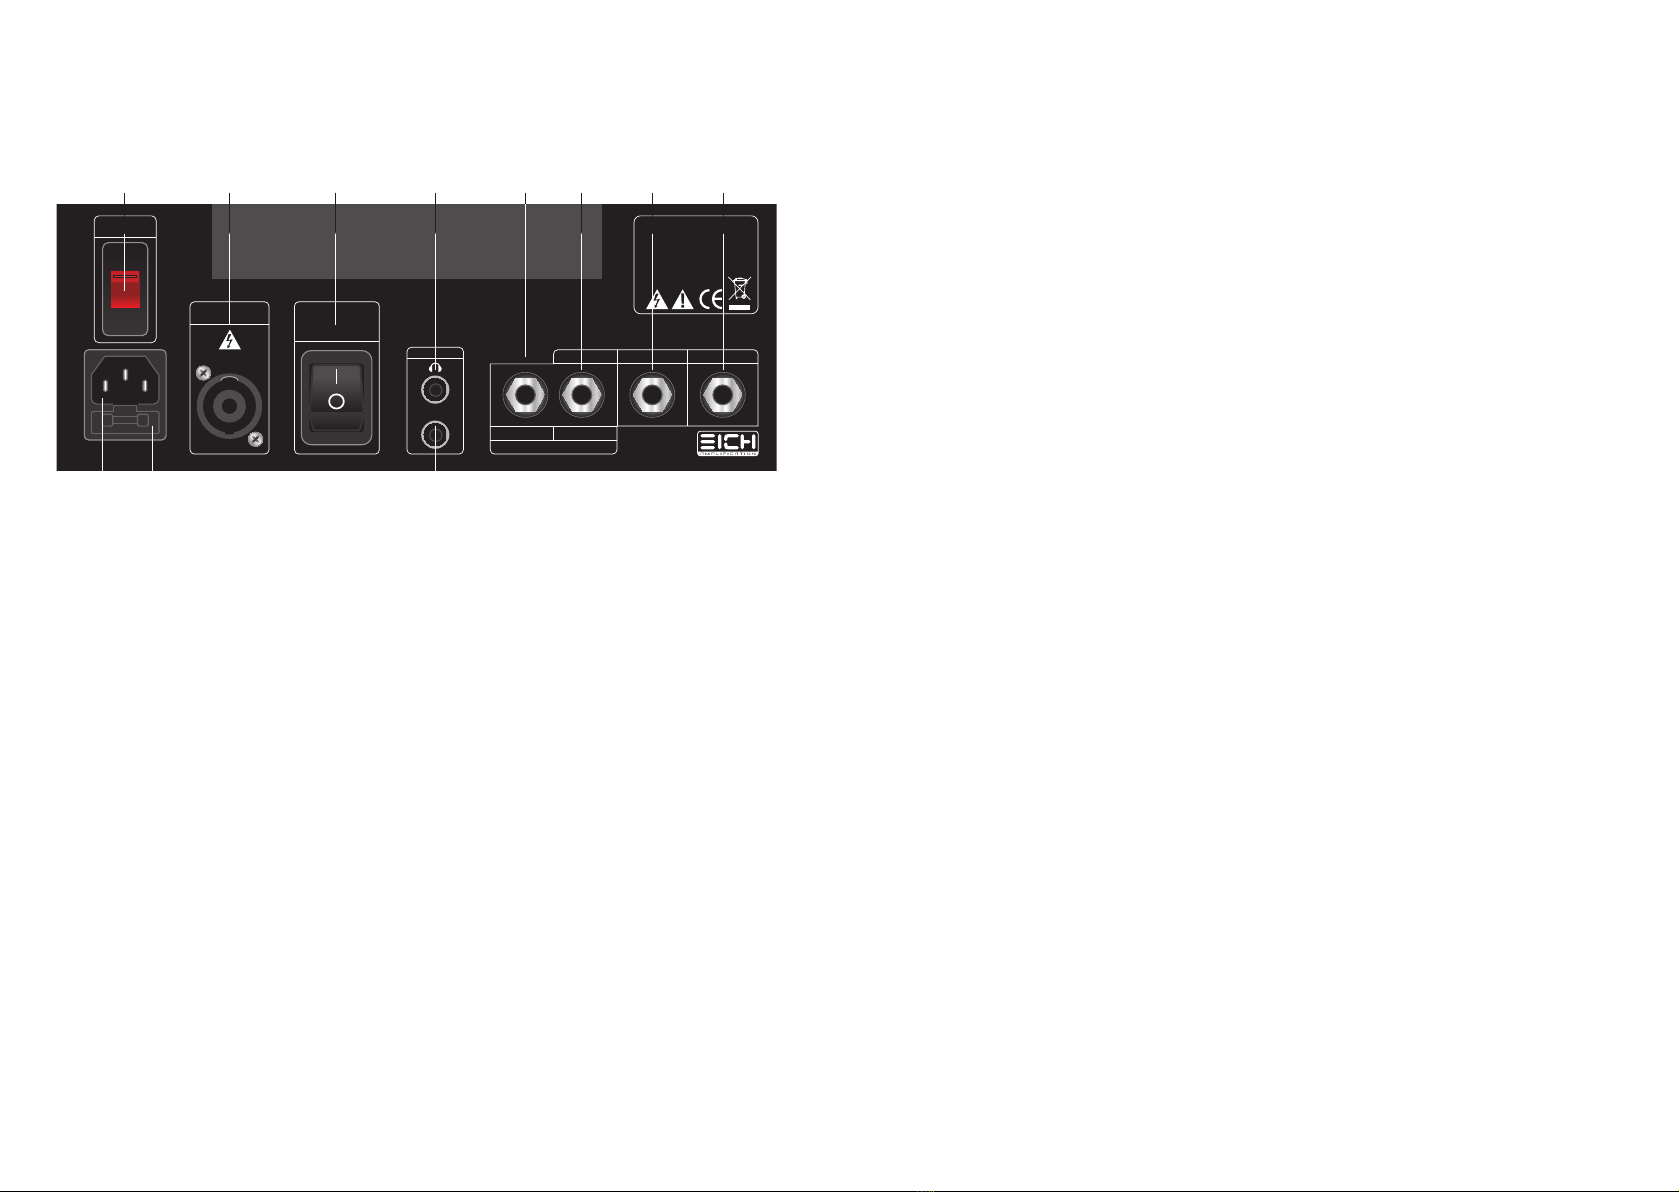
20 LINE OUT
This jack provides a line level signal for connection to
a separate power amp, PA mixing console or recording
equipment. The volume of the signal is controlled by the
“MASTER” control (#9). Note that the output is muted
when the “MUTE” function (#10) is engaged.
21 TUNER
This jack is provided for connection to an electronic tuner
and is always “live” even when the BC212 is in “MUTE”
mode (#10). This allows for silent tuning as well as pro-
viding a monitor feed which stays hot even when the
house mix is muted.
1110
>> BACK PANEL
USE ONLY WITH A 250V FUSE
N
E
U
T
R
I
K
EFFECTS LOOP
LINE IN
SEND RETURN
LINE OUT TUNER
MIN. LOAD 8 OHMS
EXTERNAL
SPEAKER OUT
Made in Germany
HIGH VOLTAGE! CAUTION: TO PREVENT
THE RISK OF FIRE AND SHOCK HAZARD
DO NOT EXPOSE THIS APPLIANCE TO
MOISTURE OR RAIN. DO NOT OPEN CASE.
NO USER SERVICEABLE PARTS INSIDE.
REFER SERVICING TO QUALIFIED SERVICE
PERSONNEL.
VOLTAGE
SELECTOR
230
REHEARSAL
AUX IN
INTERNAL
SPEAKER
ON/OFF
15
14 14a14a 18
16 17 18a 19b 19a 20 21
TECHNICAL SPECIFICATIONS:
Preamp: solid state preamp with gain, taste, lo, lomid,
himid, hi, master controls, transformer balanced DI out,
switchable mute, pre/post, ground lift, serial effects loop,
tuner out, line out, line in, aux in, phone out.
Input impedance: 1 meg ohms
Sensivity: -26 dB max
EFFFECTS LOOP impedance
EFFECT SEND: 600 Ohm
EFFECT RETURN/LINE IN: 10 kOhm
Nominal input level: 0 dBu
LINE OUT impedance: 600 Ohm
Nominal output LINE OUT: +6 db
Impedance balanced DI out: 600 Ohm
Nominal output level Dl out: +6 dBu
Tone control section:
LO: 30Hz/+-15dB
LO MID: 250Hz/+-12dB
HI MID: 800Hz/+-12dB
HI: 8k/+-15dB
Output Power: 500 watts
Power Amp: Class D
External Speaker min. imp: 8 ohms
Power Consumption: 500 w
Fuse 230V/115V/AC: 5 A/ slow blow
Power Req: switchable 115/230 V
Configuration: 2 x 12”
Speaker: 2 x TE12D-8
HF-Driver: 4” Cone-HF- Driver CT1
Freq. response: 40 -19.000 Hz.
Dimensions (W x H x D): 44 cm x 75 cm x 41 cm / 17.4" x 29.6" x 16.2"
Weight: 23,5 kg / 51.8 lbs
Option: Cover

www.eich-amps.com
Table of contents
Other Eich Amplifier manuals


