EINBREW 30L User manual

EINBREW.COM
EINBREW 30L USER INSTRUCTIONS
V1.0.8 521 © ACKSEN LTD 2019
1

EINBREW.COM
EINBREW 30L USER INSTRUCTIONS
V1.0.8 521 © ACKSEN LTD 2019
2
INTRODUCTION
Congratulations on your investment in an EINBREW automatic all-grain brewing system! This will help
you brew better and more consistent beer by automating and controlling the brewing process, ensuring
that you have accuracy and repeatability every time –leaving you to worry about the important things
whilst we take care of the drudgery!
EINBREW allows you to store and brew multi-stage all-grain recipes, maximising the efficiency of
extraction of sugars from your grain using its central upwards forced infusion. As you can pump during
boil you can also get the best out of your hops –and reduce the chance of scorching!
Our integrated cooling system and pump out method allows to you transfer your wort into a fermenter
with a minimum of fuss, and more importantly, less chance of infection.
These user instructions will help you get the best out of your EINBREW system and allow you to use it
safely, and we recommend you read through them fully before starting your brew day!

EINBREW.COM
EINBREW 30L USER INSTRUCTIONS
V1.0.8 521 © ACKSEN LTD 2019
3
CONTENTS
Introduction ....................................................................................................................................................2
Contents..........................................................................................................................................................3
Safety Information ..........................................................................................................................................4
Technical Specifications..................................................................................................................................5
Components and Accessories.........................................................................................................................6
Getting Started ...............................................................................................................................................7
Cleaning ..........................................................................................................................................................8
Before using EINBREW for the first time ....................................................................................................8
Cleaning EINBREW after your brew day .....................................................................................................8
Configuring EINBREW ...................................................................................................................................10
Handheld Controller .................................................................................................................................10
Main Menu................................................................................................................................................10
Start Brewing Menu..................................................................................................................................11
Settings Menu...........................................................................................................................................12
Rinse Menu ...............................................................................................................................................13
Pump Out Menu .......................................................................................................................................14
Recipes Menu ...........................................................................................................................................15
Brewing Wort................................................................................................................................................18
Preparing for Brewing...............................................................................................................................18
Mashing ....................................................................................................................................................20
Grain Removal...........................................................................................................................................21
Boiling Wort ..............................................................................................................................................22
Cooling Wort.............................................................................................................................................23
Brew Complete and Pumping Out ............................................................................................................24
Cleaning ....................................................................................................................................................25
Troubleshooting............................................................................................................................................26
Volumes and Masses (weights) ....................................................................................................................29
Warranty.......................................................................................................................................................29
Maintenance.................................................................................................................................................29
Returning EINBREW for repair ......................................................................................................................30
WEEE Regulations .........................................................................................................................................30

EINBREW.COM
EINBREW 30L USER INSTRUCTIONS
V1.0.8 521 © ACKSEN LTD 2019
4
SAFETY INFORMATION
•Please inspect your EINBREW system and accessories for damage when you receive it. If there is
any damage, please do not use the system and contact your supplier or Support for assistance.
•Do not operate the system if the power lead shows any signs of damage or wear.
•When manually cleaning your EINBREW system, please ensure that it is fully disconnected from
the mains supply beforehand. We recommend removing the plug from the socket to ensure
disconnection. Also ensure that you do not allow liquid to come in contact with the control
systems located underneath the main EINBREW vessel, and ensure the vessel is dry before
reconnecting the electricity supply.
•The EINBREW 30L MUST be used with a RCD/GFCI/RCBO device. Ensure that you test it prior
to every use.
•Ensure that the supplied power lead is fully unwound during use. If using any extension leads,
ensure that they are fully unwound and have a >10A current capacity when unwound.
•EINBREW is not meant to be directly utilised by children or vulnerable adults, or around pets.
Please ensure that the device is only used with adequate supervision to ensure safety.
•EINBREW will become extremely hot during use (temperatures up to and exceeding 100°C).
Please ensure that you take great care around the system, lid and accessories when it is in use.
Please wear gloves/protection equipment when working on or around EINBREW.
•As condensation may form on the lid during use, please ensure you angle the lid over the system
to allow any hot liquid to run off.
•EINBREW must be installed on a stable, level surface. Do not use on rough or uneven surfaces.
•Do not move the EINBREW system during use. Ensure that it is empty and fully cooled before
moving. The handles on the side of the vessel will become hot during use.
•When removing the internal vessel during the mashing process, it will be very hot and contain
hot wort and grains. Please exercise care when removing.
•EINBREW does not contain any user serviceable parts, and should not be disassembled or repairs
attempted. Please contact your supplier or Support for any assistance required.
•Please be careful when pumping out liquid from EINBREW, especially if you have opted not to
cool wort beforehand. Ensure that you do not disconnect any pipes during pump out.
•EINBREW features boil dry protection which will switch off the heating element if the water level
is too low. To reset this, please wait for the system to cool down, then press the reset button
underneath the main vessel.
•Use Hop bags or a hop basket to insert hops; this minimises the possibility of blockages in the
main filter.
•DO NOT USE THIS PRODUCT AS AN ISOLATION DEVICE, TO ISOLATE PUMPS, ELEMENTS OR ANY
EQUIPMENT.
EINBREW.COM
EINBREW 30L USER INSTRUCTIONS
V1.0.8 521 © ACKSEN LTD 2019
5
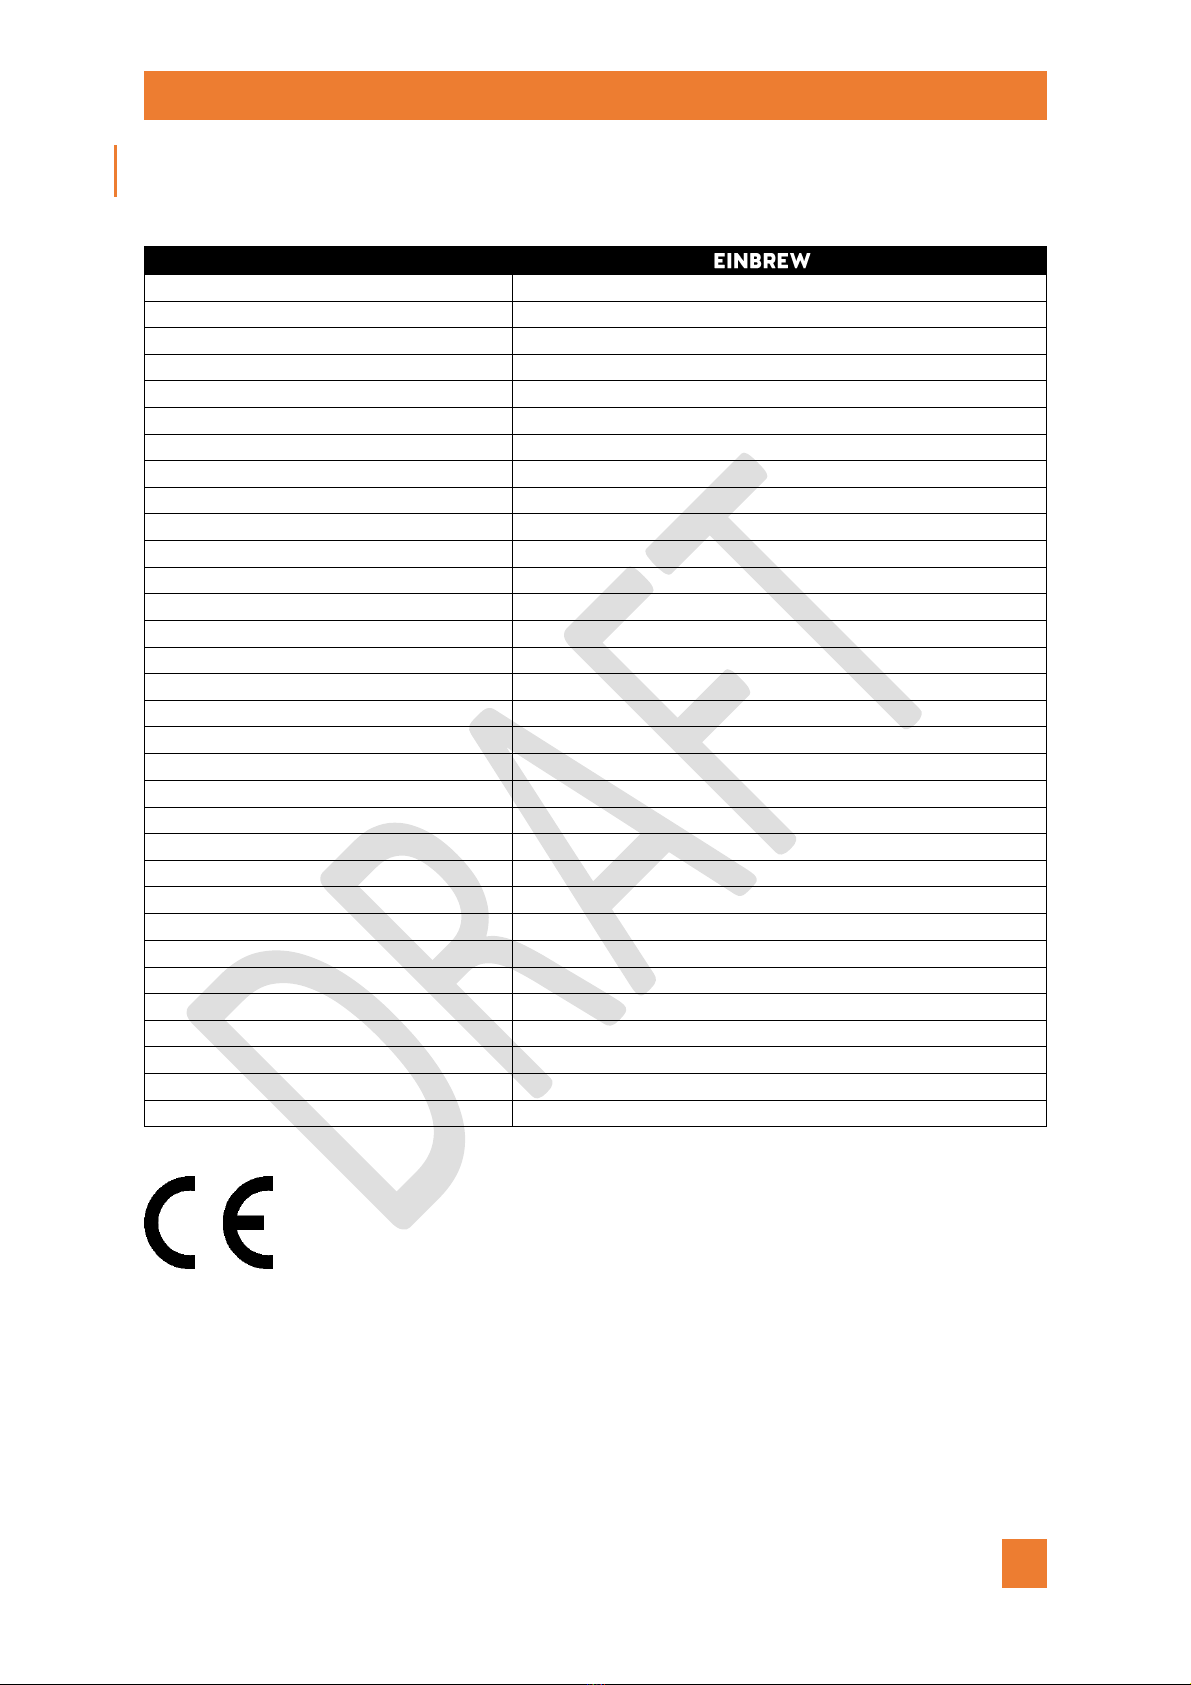
TECHNICAL SPECIFICATIONS
Feature
30L
Product Dimensions
Diameter 550mm, Height 780mm
Power Supply Input
220Vac/230Vac, 50Hz, 10A
Fuses
Two (live and neutral) 15A, 32x5mm quick blow.
Control Precision
0.3C
Temperature Measurement Accuracy
0.3C
Heating Element
2100W, 9.5A @ 230Vac
Main Vessel Capacity
Max. ~45L
Inner Vessel Capacity (Grain)
Max. capacity is 18L, about 9kg.
Pump
3m Head, 16W
Product Weight (empty)
18kg
Product Weight (packaged)
~25kg, 600mm x 600mm x 800mm
Control Unit Enclosure
Sealed to IP65 standard
Handheld Enclosure
Sealed to IP54 standard
Maximum Wort Volume
40L/45L (10.5 US gal)
Max Grain Bill
Max. capacity is 18L, about 10kg.
Minimum Water Volume
10L, 26L, refer to Volume and Masses Section.
Circulate when boiling
YES
Wort Pumped out
YES
Tap
No (not needed, wort pumped out)
Audible / visible stage alarms
YES
Audible / visible cooling alarm
YES
Programmable Recipes
YES, 10 recipes with 9 programmable mash steps each
Microprocessor Control
YES
Hop Insertions Alarms
YES, 9 programmable insertion alarms
Controller position
Flexible, handheld.
Hop filtering
YES
Integral cooler
YES
Automatic Cleaning Cycle
YES
Ergonomic Design
YES
Limited Lifetime Warranty
YES
Product Compliance
CE and LVD Compliant
Country of Manufacture
Northern Ireland

EINBREW.COM
EINBREW 30L USER INSTRUCTIONS
V1.0.8 521 © ACKSEN LTD 2019
6
COMPONENTS AND ACCESSORIES
Your EINBREW system will come shipped with the following components. When you unpack please
ensure you check everything is there, and if any parts are missing please contact your supplier or Support
immediately.
1) 1 x EINBREW stainless steel main heating vessel and control system with 2m power lead.
2) 1 x Stainless steel inner grain vessel.
3) 1 x Handheld controller.
4) 1 x Pump-out pipe.
5) 1 x Measuring paddle.
6) 1 x Circulation (bazooka) filter.
7) 1 x Grain vessel filter lid.
8) 1 x Outer vessel lid.
9) 1 x User Instructions (detailed).
10) 1 x Quick Start Guide & Safety Guide.
EINBREW.COM
EINBREW 30L USER INSTRUCTIONS
V1.0.8 521 © ACKSEN LTD 2019
7
GETTING STARTED
We know you’re eager to get on with making some beer, so the first thing to do is get your EINBREW
system setup!
Once you’ve checked you’ve got everything, place your EINBREW on a flat and level surface near a power
outlet. Take care not to damage the attached power lead.
EINBREW 30L should be connected to an electric outlet suitable for the total electrical load. The supply
MUST be protected by an RCD/GFCI/RCBO device, for your safety –please test the RCD/GFCI/RCBO
device before each use, using the built-in test function.
IF YOU DO NOT UNDERSTAND THE ABOVE STATEMENT, PLEASE CONSULT A LOCAL EXPERT.
Attach the plug for the Handheld controller wired lead to the round socket on the side of the main vessel.
If you intend to use the built-in cooling function that EINBREW provides, please insert your cold water
feed and waste water feed to the marked quick-release connectors on the rear of the vessel, it does not
matter which is flow and which is exhaust. Please do not turn on the water feed until required, and
especially ensure that it is disconnected before you attempt to connect.
If you’re setting EINBREW up for the first time, please ensure that rinse and clean the unit before use,
follow the instructions in the Cleaning section.

EINBREW.COM
EINBREW 30L USER INSTRUCTIONS
V1.0.8 521 © ACKSEN LTD 2019
8
CLEANING
Thanks to our automatic cleaning cycle, cleaning EINBREW is a breeze! Please ensure that you disconnect
the system from the electrical mains supply before carrying out any manual cleaning steps, however.
Before using EINBREW for the first time
Insert the inner grain vessel UPSIDEDOWN in the main vessel and set the inner filter lid on top. Ensure
that you remove any obvious debris from inside the system, and then pour approx. 15L of water inside
the main vessel, let the levels equalise in both the inner and outer (main) vessels. Place the lid on top of
the system.
Once you’ve finished adding water, please connect EINBREW to the electrical mains supply. You will see
the screen on the handheld controller display become active. Choose the Rinse option on the main menu
and follow the on-screen instructions –this will heat and circulate water around the EINBREW system to
clean it.
When the programme has completed, please allow the system to cool for some time so that it’s safe to
work with. The Brew Temperature indicated on the display reflects the internal water temperature.
Once this has completed, slowly remove the inner vessel. Place this to one side, e.g. inside a bucket to
ensure any liquid is captured.
Use the Pump Out menu option to remove all the liquid from EINBREW into a bucket or other vessel.
Once the liquid level gets too low for the pump, please stop the pump, and disconnect the controller and
the EINBREW from the mains, you can then lift the EINBREW by the rear cable recess and tip out any
remaining water.
Your EINBREW is now ready to make wort!
Cleaning EINBREW after your brew day
Remove all grain from the inner grain vessel and dispose of it. Please be careful as the grain may still be
hot or contain traces of hot liquid. The Bazooka filter can be unscrewed horizontally and then removed
for cleaning. Once disconnected from the mains electricity supply, the main vessel can be rinsed and the
liquid pumped out in manual mode and/or tipped out.
Remove the hops from the bottom of the main vessel. There may still be hot liquid so please take care.
Insert the inner grain vessel UPSIDEDOWN in the main vessel and set the inner filter lid on top. Ensure
that you remove any obvious debris from inside the system, and then pour between 12L and 15L of water
inside the main vessel, place the outer lid on top of the system.
Connect the EINBREW to the electrical mains supply. You will see the screen on the handheld controller
display become active. Choose the Rinse option on the main menu and follow the on-screen instructions
–this will heat and circulate water around the EINBREW system to clean it. Once you commence the
cleaning cycle, make sure to observe that the water level does not fall below the top of the heating

EINBREW.COM
EINBREW 30L USER INSTRUCTIONS
V1.0.8 521 © ACKSEN LTD 2019
9
element, if it does insert more water to ensure it stays above the element. Place the outer lid on the
EINBREW and let it complete its cleaning cycle.
When the programme has completed, please allow the system to cool for some time so that it’s safe to
work with. The Brew Temperature indicated on the display reflects the internal water temperature.
Once this has completed, slowly remove the inner vessel, allowing the hot water to drain out. Place this
to one side, e.g. inside a bucket to ensure any liquid is captured.
Use the Pump Out menu option to remove all the liquid from EINBREW into a bucket or other vessel.
Once the liquid level gets too low for the pump, please stop the pump, and disconnect the controller and
the EINBREW from the mains, you can then lift the EINBREW by the rear cable recess and tip out any
remaining water.
Please be careful carrying this out if the liquid temperature is still hot.
Take care if you are ever running the system with the inner vessel in place, but with no grain! When in
this state, the system needs 26 litres of water. As the pump will fill the inner vessel and this will lower
the liquid level around the element, if the element becomes exposed to air, it can fuse and fail. The
system is designed to take account of grain volumes. TO BE SAFE, assume that each 1kg of grain has a
volume of 1.2 litre.
With the inner grain vessel removed the system needs only around 10L to cover the element.

EINBREW.COM
EINBREW 30L USER INSTRUCTIONS
V1.0.8 521 © ACKSEN LTD 2019
10
CONFIGURING EINBREW
Handheld Controller
The Handheld Controller features a 4x20 character OLED display to keep you updated on how your brew
is going, along with a full menu system to let you configure your recipes and system settings.
When EINBREW is not in use, the display will indicate that it is in Standby mode, along with the present
Date and Time. The “signal” icon at the top-right of the display indicates that the Handheld controller is
connected to the EINBREW system successfully. The temperature of the main vessel is indicated at the
bottom as the Wort temperature.
The ▲▼◄► and OK buttons are used to navigate through the menu system and choose/alter settings.
Main Menu
To access the menu system, press the OK button when the system is in Standby mode. The menu will be
displayed and you can navigate using the ▲or ▼buttons. Press OK to activate the selected top menu
item, denoted by a > symbol to the left-hand side of the display. The title of the present menu is always
displayed at the top of the screen.
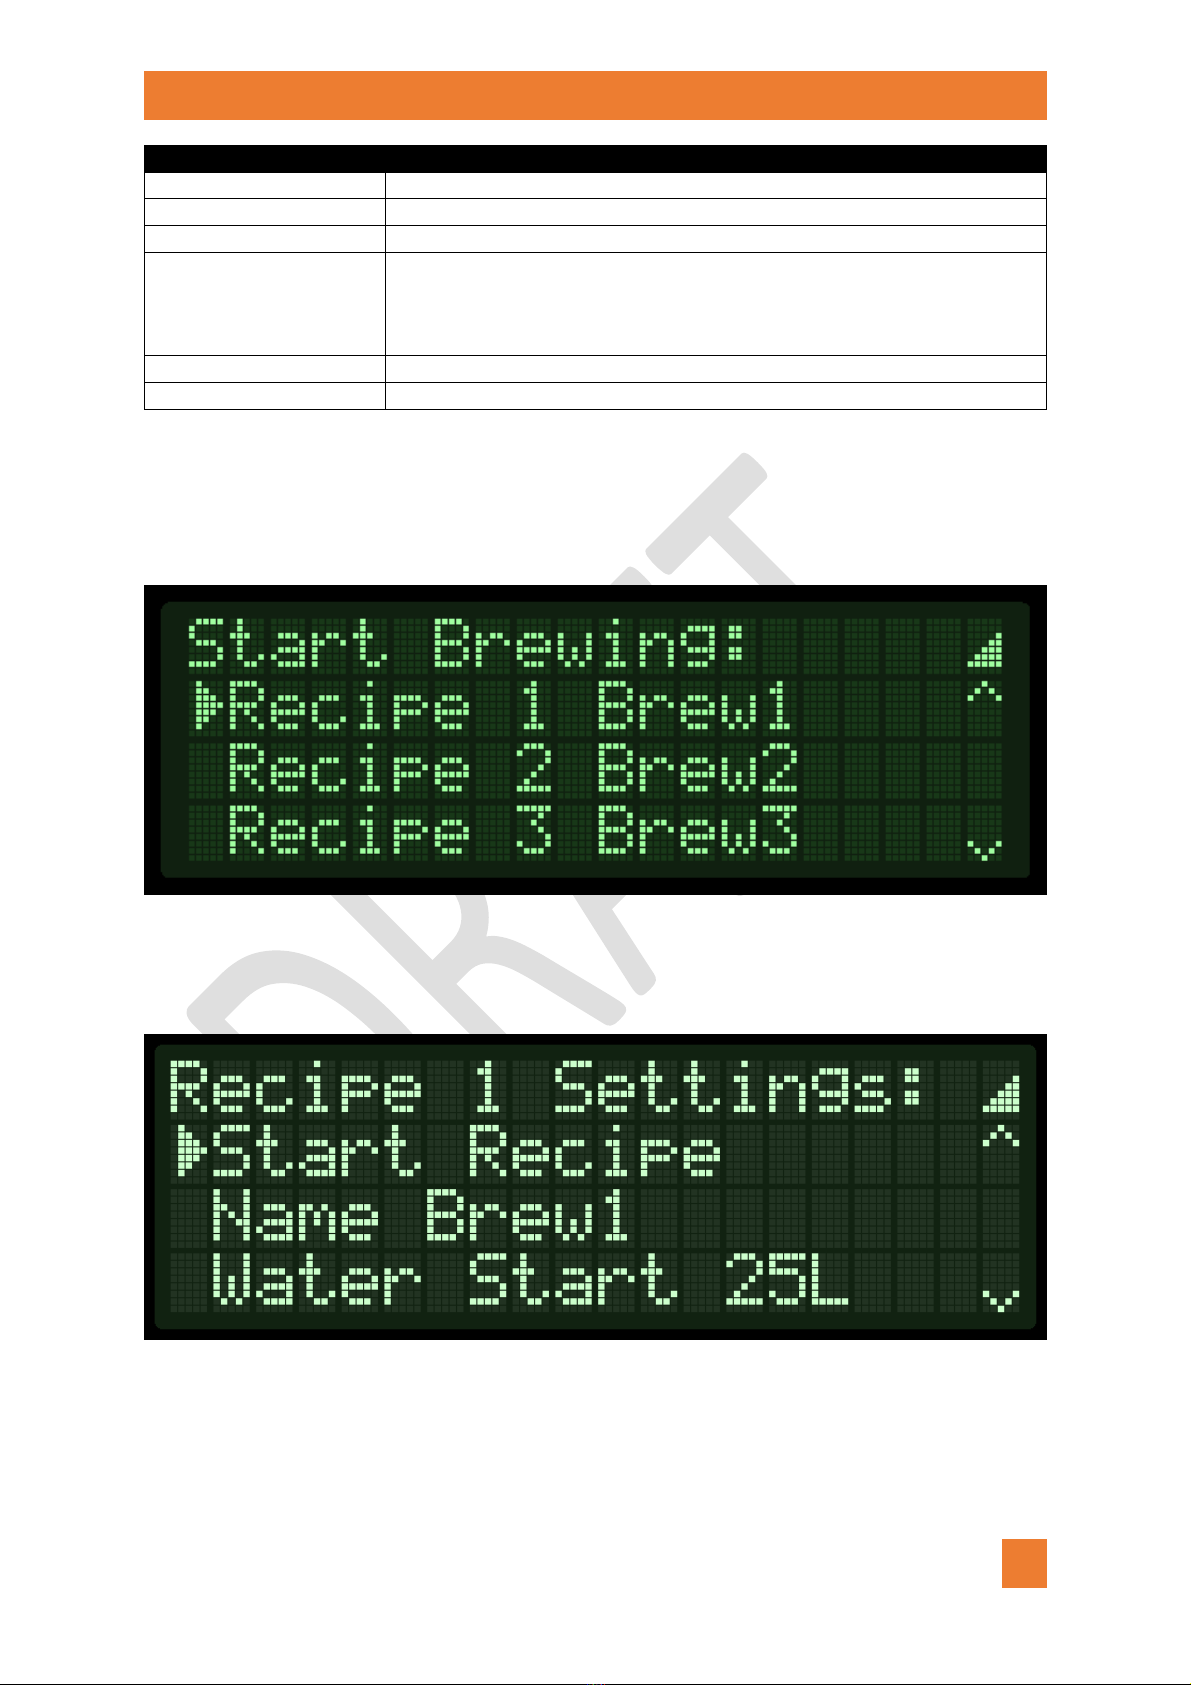
Menu Option
Explanation
Start Brewing
Begin brewing Wort with a recipe of your choice.
EINBREW.COM
EINBREW 30L USER INSTRUCTIONS
V1.0.8 521 © ACKSEN LTD 2019
11
Menu Option
Explanation
Settings
Alter system settings.
Rinse
Begin the Rinse/Cleaning cycle.
Pump Out
Remove liquid from the system using the Pump Out accessory.
Manual
Operate the system in manual mode, specifying the Temperature and the
pump operation. Heater On will activate the heater at 100% regardless of
temperature, Heater Auto will automatically control to the set
temperature.
Recipes
Define and execute Recipes.
Exit…
Close the Menu.
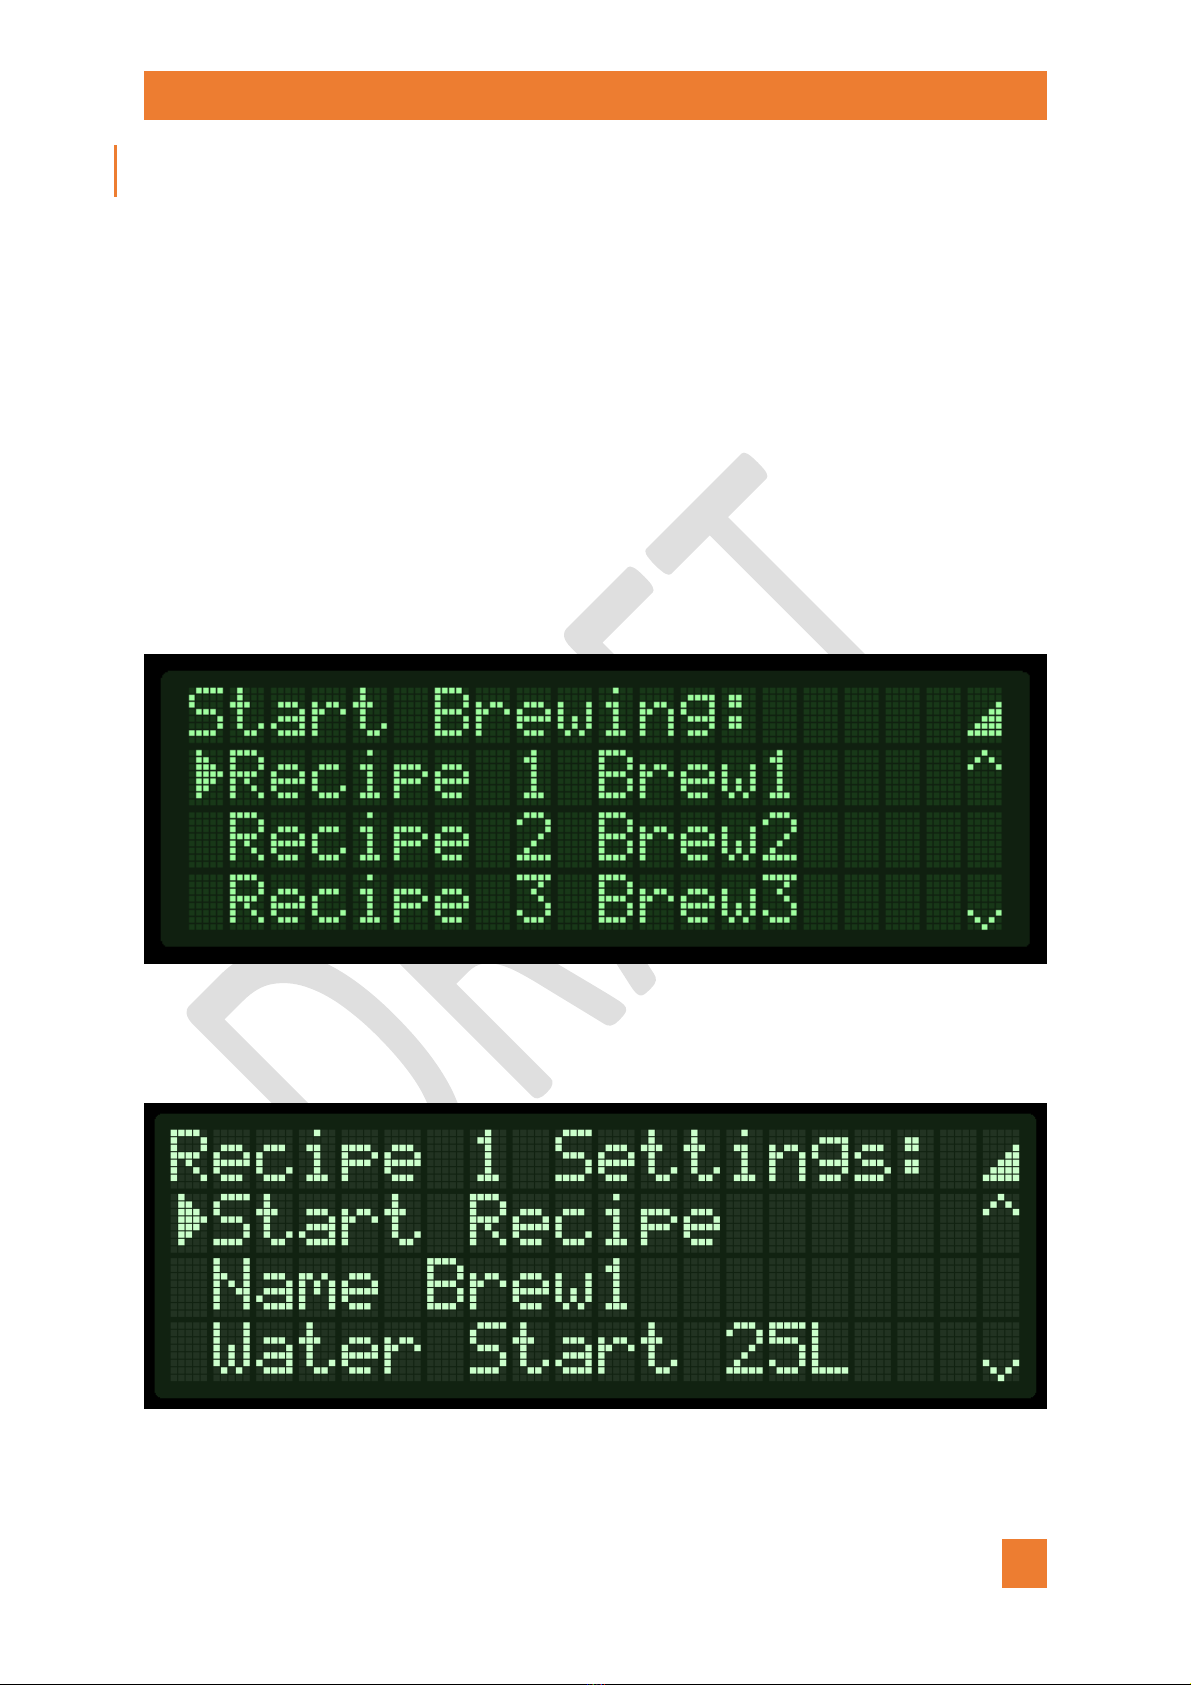
Start Brewing Menu
This allows you to select a pre-defined recipe and begin the brewing process. To abort the process, select
the Back option to return to the Main Menu.
Once you’ve selected a Recipe, you can review (and change) its settings. Select a Recipe parameter using
the ▲▼buttons, then use the ◄► buttons to alter the value. See the Recipe Menu section for more
details. To abort the process, select the Back option to return to the Main Menu.
Once you’ve selected Start Recipe, the brewing cycle will begin. Please follow the on-screen prompts to
go through the brewing process. See the Brewing Wort section for more information.
EINBREW.COM
EINBREW 30L USER INSTRUCTIONS
V1.0.8 521 © ACKSEN LTD 2019
12
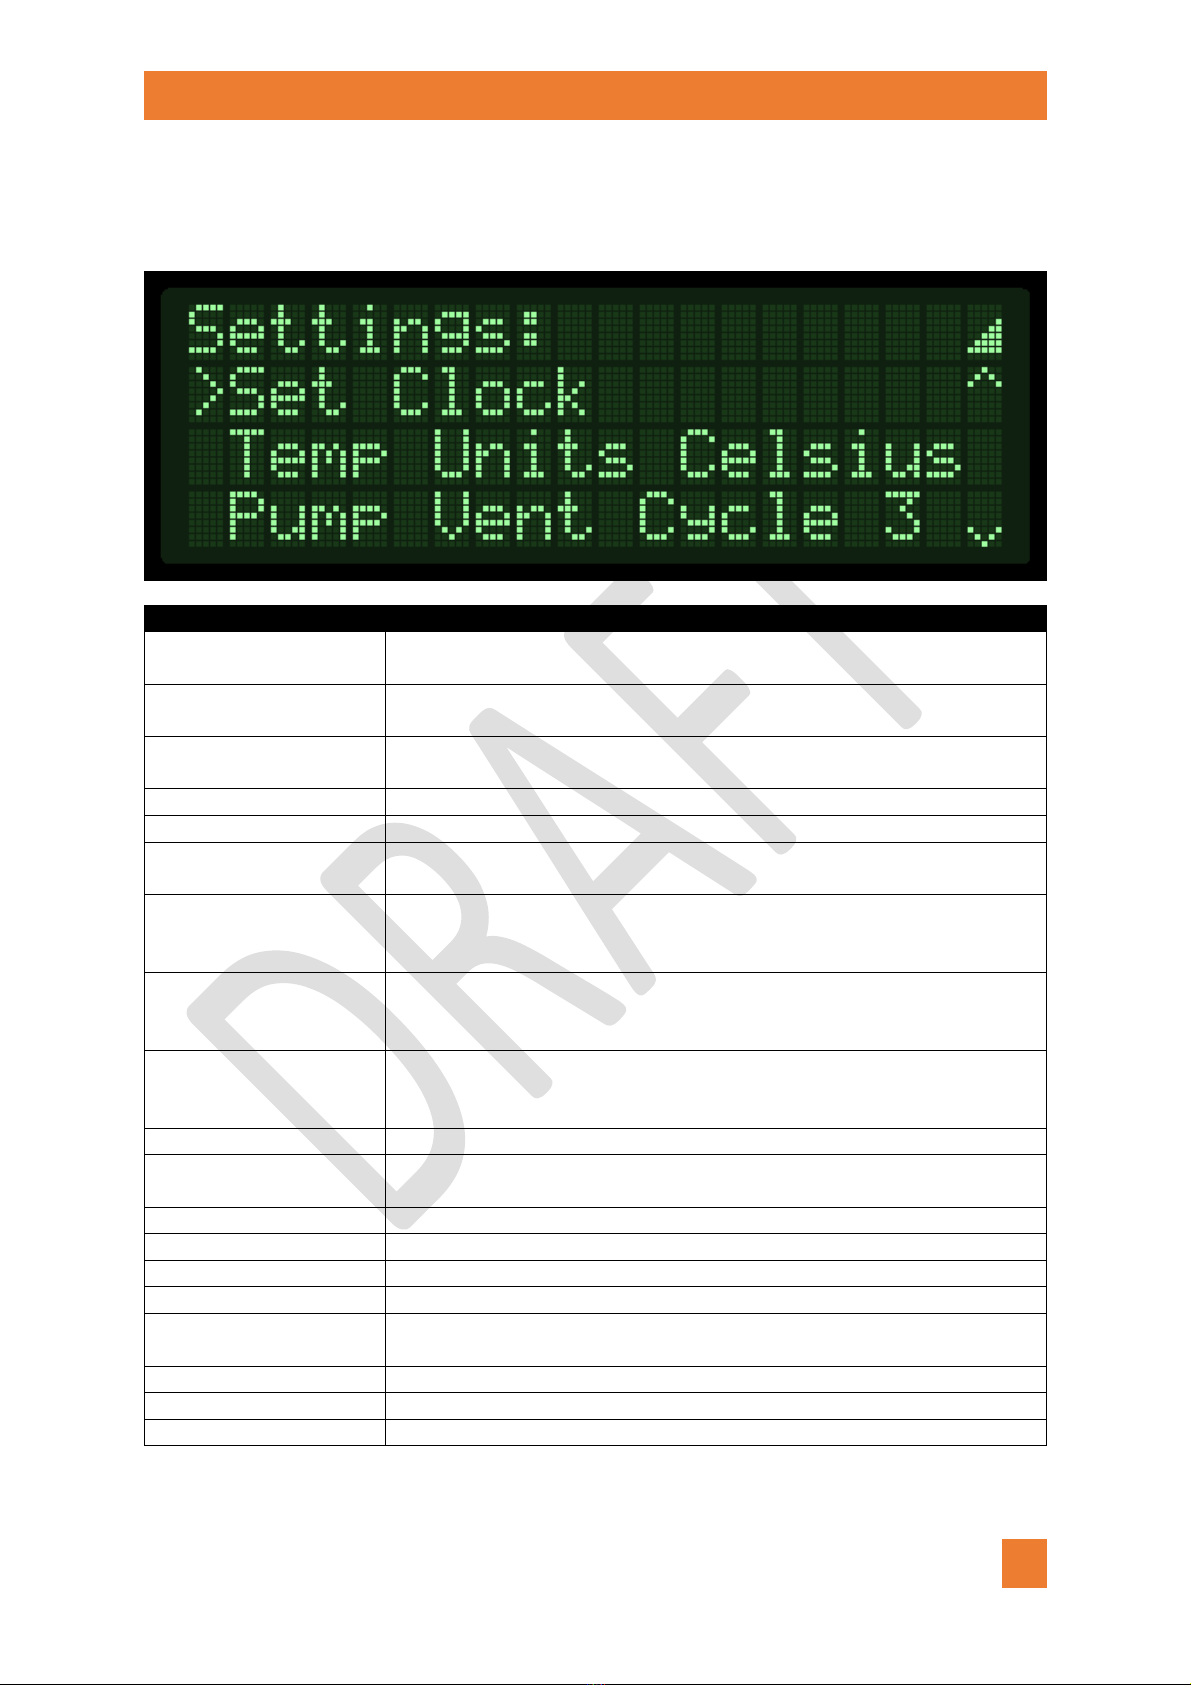
Settings Menu
The Settings Menu allows you to configure how the EINBREW performs, and adjust various parameters
relating to the Brewing Cycle.
Menu Option
Explanation
Set Clock
Allow the System Clock to be set. The present Date and Time can be
defined.
Temp Units
Toggle the Temperature Units between Celsius and Fahrenheit. All
displayed values and settings will be converted accordingly after switching.
Pump Vent Cycle
Set the number of Pump Ventilation Cycles that are carried out when the
Pump is activated, to prevent trapped air.
Pump Vent ON
Set the length of the Pump Ventilation ON Cycle in seconds.
Pump Vent off
Set the length of the Pump Ventilation off Cycle in seconds.
Set MaxPumpTemp
Enable/Disable Maximum Temperature for the Pump. When enabled, the
pump will be deactivated if the temperature exceeds the defined value.
Max Pump Temp
Temperature value which when exceeded the Pump will be deactivated,
when Maximum Pump Temperature is active. This can be used to disable
the pump to avoid cavitation effects at boil, for example.
Set MaxHeatTemp
Enable/Disable Maximum Temperature for the Heater. When enabled,
the heater will be deactivated if the temperature exceeds the defined
value.
Max Heat Temp
Temperature value which when exceeded the Heater will be deactivated,
when Maximum Heater Temperature is active. This is primarily to react in
case of Boil Dry situations.
Enable G Rest
Choose to enable/disable Grain Rests.
G Rest Period
Set the interval used between Grain Rests when mashing. Grain Rests help
prevent compaction of the grain in the inner vessel.
G Rest Length
Set the length of time for each Grain Rest.
Rinse Temp
Set the Temperature that the Rinse cycle will heat water to.
Rinse Length
Select the Length of the Rinse Cycle.
Rinse Pump
Select if the Pump is activated during the Rinse Cycle.
Diagnostics
Access the Diagnostics menu to help diagnose issues with EINBREW -
Please only utilise these options if directed to by Support.
Reset Settings
After confirmation, reset all settings to Factory Defaults.
Save & Exit
Close the Menu and Save all settings.
Exit…
Close the Menu without saving settings.

EINBREW.COM
EINBREW 30L USER INSTRUCTIONS
V1.0.8 521 © ACKSEN LTD 2019
13
Rinse Menu
The Rinse menu allows to you activate a cleaning cycle after you’ve finished with EINBREW. This makes
cleaning and maintaining your system easier.
When you select this option, you’ll be asked to confirm if you’ve added water. Please insert the inner
vessel, add 30L of water and replace the lid before continuing. Select the Abort option to exit without
rinsing.
EINBREW will automatically begin a Pump Ventilation cycle to ensure that the water is brought through
the system properly with no trapped air. No user intervention is required.
The water will automatically be preheated to the defined Rinse temperature, then a timer will begin for
the cycle. The Preheating screen displays the time the system has been preheating for, along with the
current liquid temperature and Set temperature.

EINBREW.COM
EINBREW 30L USER INSTRUCTIONS
V1.0.8 521 © ACKSEN LTD 2019
14
When the cycle has completed the Handheld Controller will sound an alarm to alert you. Once the
system has cooled the Pump Out section can be used to remove the water.
If you would like to abort the Rinse cycle in progress, press the OK button to view the runtime menu.
Continue will resume the rinsing cycle, Pump Vent will trigger a Pump Ventilation, and Abort will exit the
Rinse cycle and return to Standby.
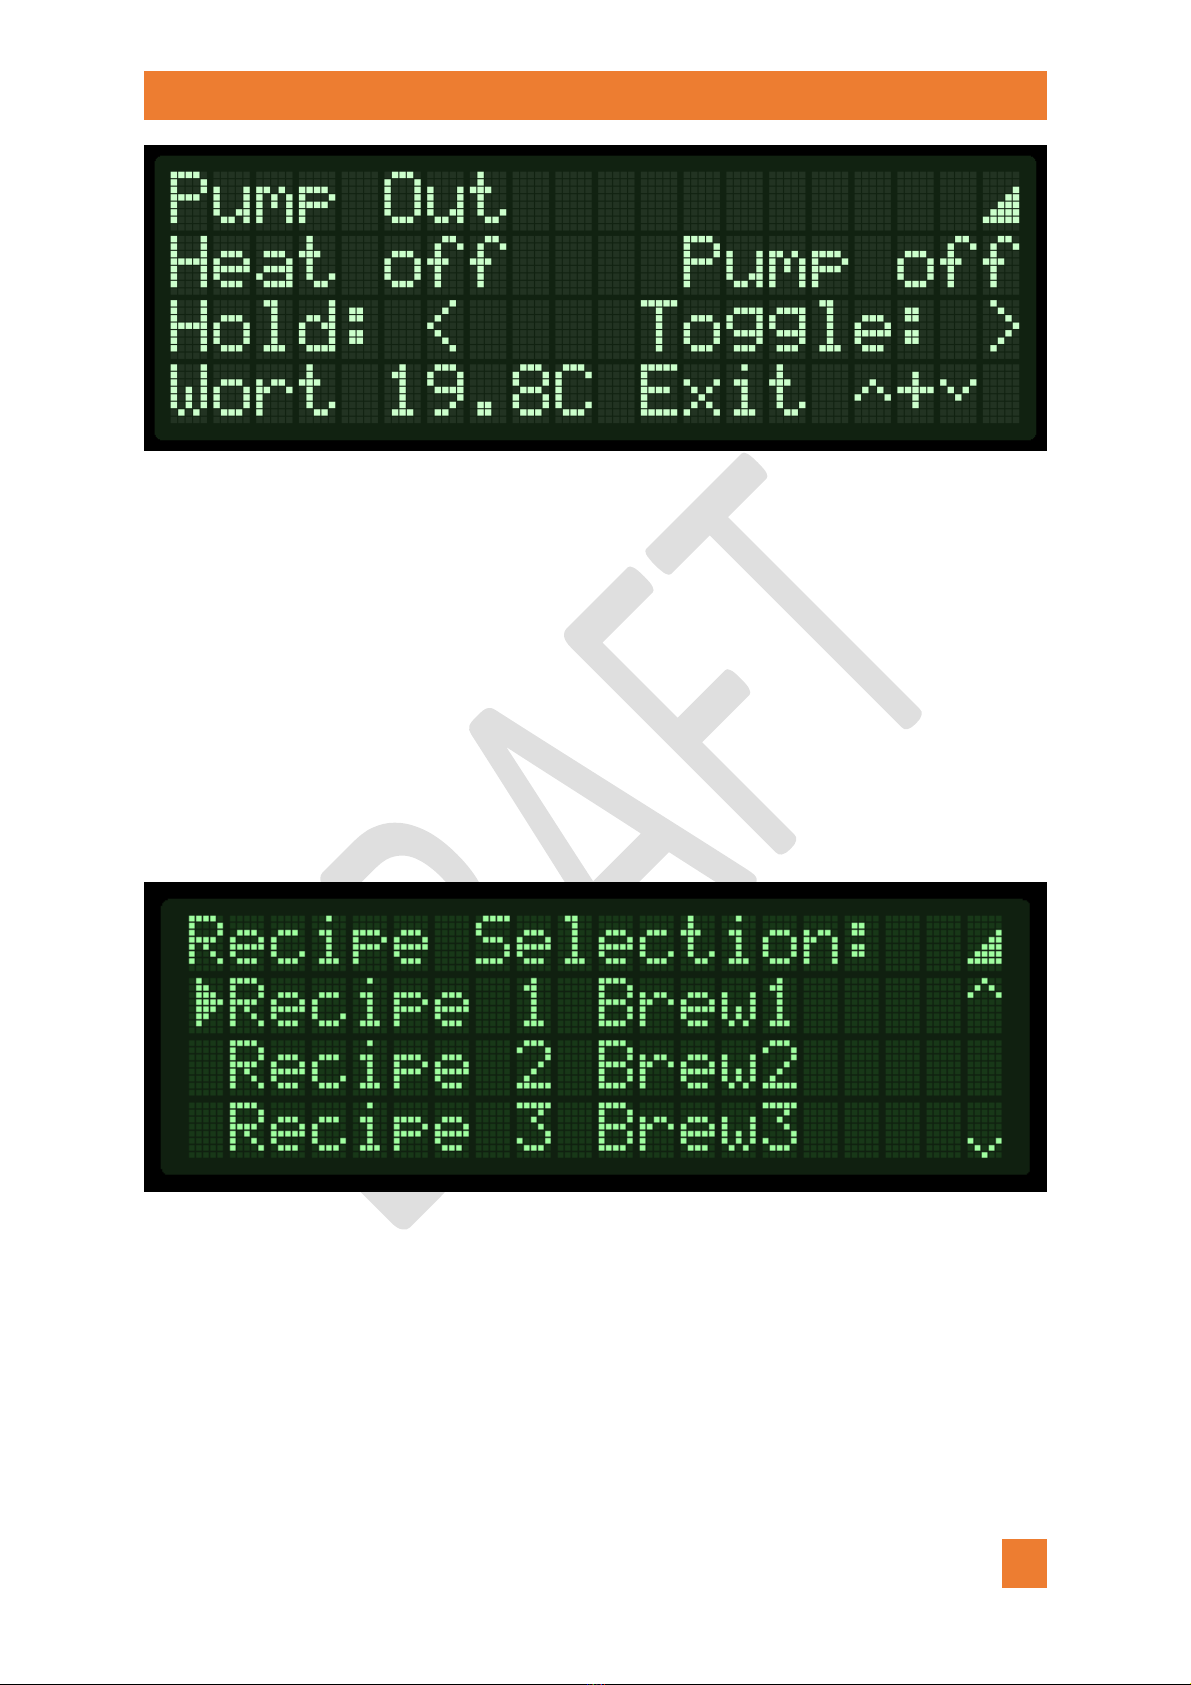
Pump Out Menu
The Pump Out option allows you to remove water from the EINBREW system, either after brewing or
when cleaning. To use, remove the inner vessel and fit the Pump Out Pipe over the pump central outlet
at the bottom-middle of the main vessel. Ensure that it is fitted vertically.
Once you’ve done that you’re ready to pump out! Please note that whilst our pump is fitted with run-dry
protection to prevent it getting damaged when no water is in the system, it is advisable to not run the
system without water.
EINBREW.COM
EINBREW 30L USER INSTRUCTIONS
V1.0.8 521 © ACKSEN LTD 2019
15
To activate the pump, press and hold the ◄button. As a safety feature, the pump will only activate
when the button is held. If you need to activate the pump for a longer period, you can toggle it on and
off with the ►button. Once you’ve finished pumping out, press the ▲and ▼buttons together to exit
the Pump Out mode and return to Standby.
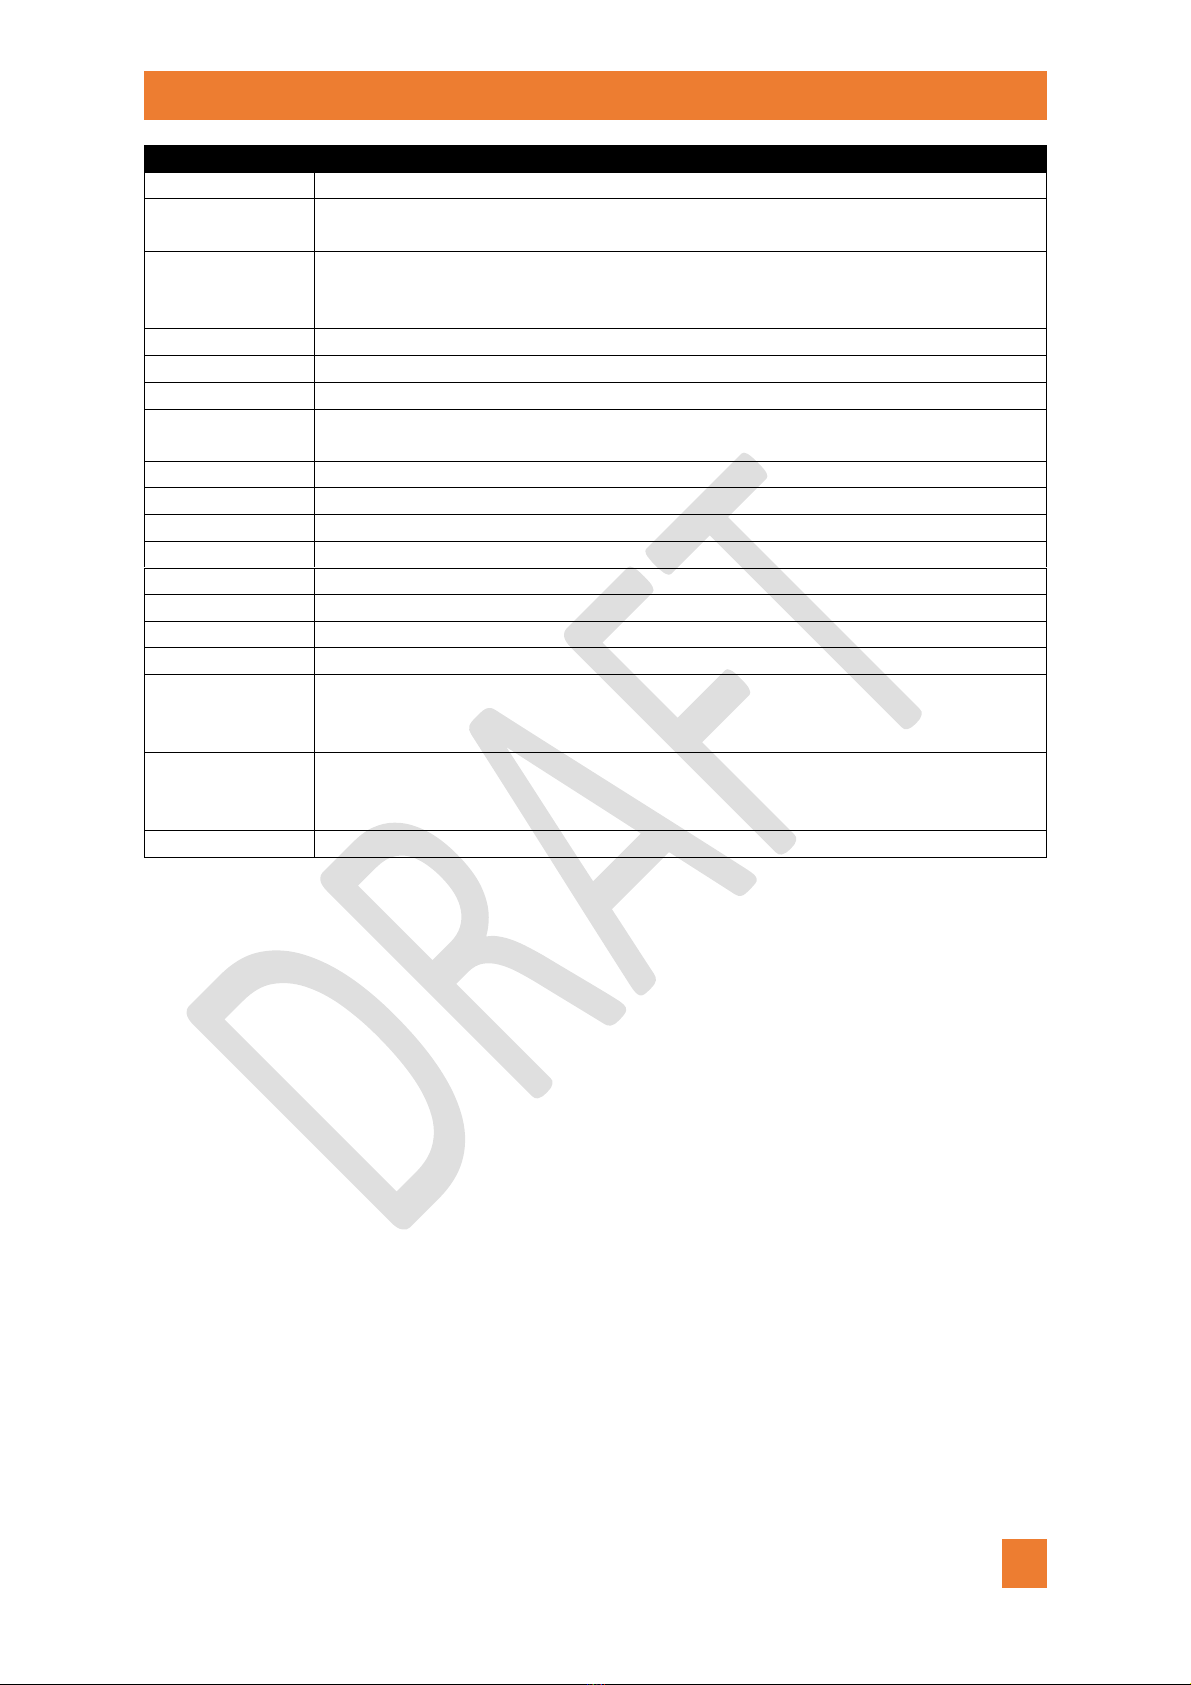
Recipes Menu
EINBREW will let you pre-define 10 of your favourite recipes to make brewing quick and easy! You can
change the recipes settings just before you begin in the Start Brewing menu, or use the Recipes Menu to
get everything setup before your brewday.
To begin select the Recipe you would like to edit.
Once you’ve selected a Recipe, you can review (and change) its settings. Select a Recipe parameter using
the ▲▼buttons, then use the ◄► buttons to alter the value. To abort the process, select the Back
option to return to the Main Menu.

EINBREW.COM
EINBREW 30L USER INSTRUCTIONS
V1.0.8 521 © ACKSEN LTD 2019
16
Each Recipe has several settings you can adjust. You can define up to 9 mashing stages - if you would like
to skip/bypass a stage, you can set its Time to off (0 minutes!) and it’ll be ignored when brewing.
Please note that whilst you can define a set length for each stage, this time doesn’t include any time
spent preheating, i.e. moving from a lower temperature to a higher temperature. The timer for each
stage will only start when the system reaches the Set Temperature you have defined.
Menu Option
Explanation
Start Recipe
Begin Brewing with the present recipe. Provides same action as selecting this
option from the Start Brewing menu.
Name
Text Name for the Recipe. Use the ▲and ▼buttons to change the current
character and OK to confirm.
Water Start
The amount of water to put in at the start of the recipe.
Water Topup
The volume you should top-up or SPARGE to at Mash Out, before the boil stage.
Mash In Temp
Temperature for the Mash In stage.
Mash S1 Temp
Temperature for Mash Stage 1.
Mash S1 Time
Length of Mash Stage 1. This does not include preheating time to reach target
Temperature.
Mash S2 Temp
Temperature for Mash Stage 2.
Mash S2 Time
Length of Mash Stage 2. This does not include preheating time to reach target
Temperature.
Mash S3 Temp
Temperature for Mash Stage 3.
Mash S3 Time
Length of Mash Stage 3. This does not include preheating time to reach target
Temperature.
Mash S4 Temp
Temperature for Mash Stage 4.
Mash S4 Time
Length of Mash Stage 4. This does not include preheating time to reach target
Temperature.
Mash S5 Temp
Temperature for Mash Stage 5.
Mash S5 Time
Length of Mash Stage 5. This does not include preheating time to reach target
Temperature.
Mash S6 Temp
Temperature for Mash Stage 6.
Mash S6 Time
Length of Mash Stage 6. This does not include preheating time to reach target
Temperature.
Mash S7 Temp
Temperature for Mash Stage 7.
Mash S7 Time
Length of Mash Stage 7. This does not include preheating time to reach target
Temperature.
Mash S8 Temp
Temperature for Mash Stage 8.
Mash S8 Time
Length of Mash Stage 8. This does not include preheating time to reach target
Temperature.
EINBREW.COM
EINBREW 30L USER INSTRUCTIONS
V1.0.8 521 © ACKSEN LTD 2019
17
Menu Option
Explanation
Mash S9 Temp
Temperature for Mash Stage 9.
Mash S9 Time
Length of Mash Stage 9. This does not include preheating time to reach target
Temperature.
Drainback Time
At the end of the Mash Stages, the system will pause for a defined period of time
and turn the pump off to allow the wort to withdraw from the grain/inner vessel.
This will make it easier to lift.
Boil Temp
Temperature for the Boil Stage.
Boil Time
Length of Boil Stage.
Boil Pump
Set the Pump Mode during Boil Stage.
Hop 1 Time
Time for Hop Insertion 1 in the Boil Stage. Times are relative to the start of the
Boil Stage. If you do not wish to use a Hop Insertion, set the Time to 0.
Hop 2 Time
Time for Hop Insertion 2 in the Boil Stage.
Hop 3 Time
Time for Hop Insertion 3 in the Boil Stage.
Hop 4 Time
Time for Hop Insertion 4 in the Boil Stage.
Hop 5 Time
Time for Hop Insertion 5 in the Boil Stage.
Hop 6 Time
Time for Hop Insertion 6 in the Boil Stage.
Hop 7 Time
Time for Hop Insertion 7 in the Boil Stage.
Hop 8 Time
Time for Hop Insertion 8 in the Boil Stage.
Hop 9 Time
Time for Hop Insertion 9 in the Boil Stage.
Cooling
Enable optional cooling at the end of the Brewing Cycle. This will allow you to use
the EINBREW integrated cooler in conjunction with a cold water feed to reduce the
temperature of your wort to safe levels for fermentation before pumping out.
Cooling Temp
Define the Temperature to cool to. Be careful not to set this too low, as very low
temperatures are only achievable if your cold water temperature is low enough –
typically you should go no lower than room temperature.
Back
Return to the Recipes Menu.
The information for each Recipe is saved in the Handheld’s memory and will be remembered for future
usage.
EINBREW.COM
EINBREW 30L USER INSTRUCTIONS
V1.0.8 521 © ACKSEN LTD 2019
18
BREWING WORT
Preparing for Brewing
Before brewing, please ensure that you have followed the steps in the Cleaning section –this will help
prevent infection. Also make sure that the inner vessel has been removed from EINBREW. It is also
important to note that the system will preheat faster and use less energy if you keep the lid on as much
as possible during the brewing process.
Before starting any recipe, you insert the correct volume of water.
To access the menu system, press the OK button when the system is in Standby mode. The menu will be
displayed and you can navigate to the Start Brewing option with the ▲or ▼buttons.
This allows you to select a pre-defined recipe and begin the brewing process. To abort the process, select
the Back option to return to the Main Menu.
Once you’ve selected a Recipe, you can review (and change) its settings. Select a Recipe parameter using
the ▲▼buttons, then use the ◄► buttons to alter the value. See the Recipe Menu section for more
details. To abort the process, select the Back option to return to the Main Menu.
Once you’ve selected Start Recipe, the brewing cycle will begin. Please follow the on-screen prompts as
you go through the brewing process.
EINBREW.COM
EINBREW 30L USER INSTRUCTIONS
V1.0.8 521 © ACKSEN LTD 2019
19
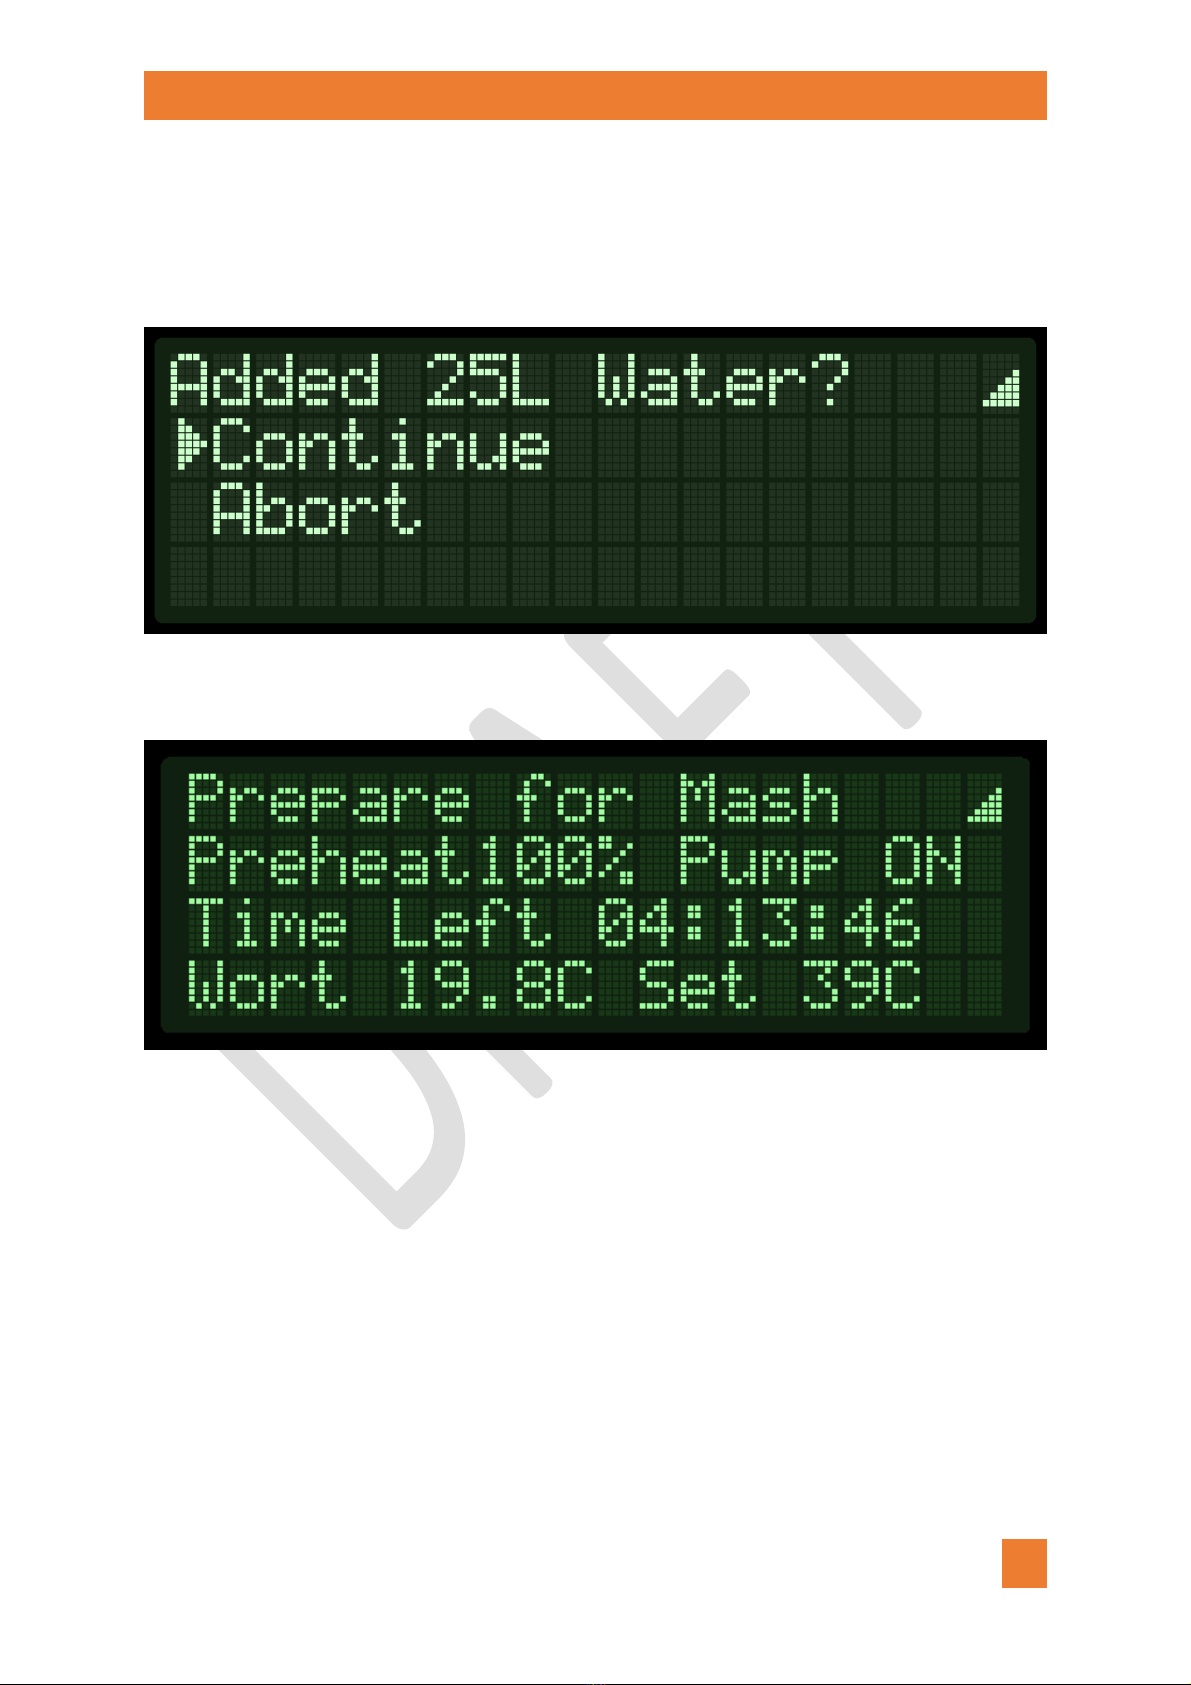
The first thing to do is to add the water specified in your recipe –this will be displayed on-screen for
reference. Please ensure that you always insert a minimum amount of 10 litres of water when beginning
Mash In –this will ensure that the heating element is always covered. Additional water will be required
later when the grain basket is added. Once you’ve done that, select the Continue option to begin heating
the water for mash-in.
The Handheld will tell you that it’s starting to heat the water. You’ll also notice that at the very start, the
system will ventilate the Pump to ensure that there’s no trapped air.
Whilst the water is preheating, the Handheld will display the heating status, the pump status and the
current Wort temperature versus the Set (desired) temperature. The 3rd line of the display will also
display on rotation the estimated total brew time left (Time Left), and the current stage runtime versus
the estimated total time at present heating rate (e.g. 00:04:15/00:18:04). All times are in Hours, Minutes
and Seconds (hh:mm:ss).
EINBREW uses proportional heating, so it’ll apply less heat energy the closer you get to your Set
Temperature. This reduces overshoot and minimises energy usage.
If you need to abort at any time during the brewing process, you can press the Select button to display
the runtime menu. The options available may differ slightly depending on what stage you’re at.

EINBREW.COM
EINBREW 30L USER INSTRUCTIONS
V1.0.8 521 © ACKSEN LTD 2019
20
Menu Option
Explanation
Continue
Continue following the recipe.
Grain Rest
Immediately trigger a Grain Rest. This will turn off the Pump, but the
heating will remain on (if necessary). Only available during Mash Stages.
End Stage
End the present stage immediately. Effectively used to skip a stage.
Exit…
Exit the brewing process –you will be asked for confirmation.
Mashing
At the end of the Preparation stage, an alarm will sound and you can add the inner vessel to EINBREW.
You may find it easier to leave adding the grain until the inner vessel has been added and is beginning to
fill up with water –allowing you to stir it in gradually and avoid creation of water channels.
When inserting the vessel and stirring in the grain, you can also optionally press and hold the ◄button
to pump in water. As a safety feature, the pump will only activate when the button is held. Ensure that
you do not allow the water level to flow over the top of the inner vessel and let grain enter the system –
you want to minimise this to ensure the wort is free of debris when mashing.
Once you’ve finished adding your grain, add the mesh lid and lock it in place on the top of the inner
vessel, then press the ▲and ▼buttons together to continue.
EINBREW will now begin heating to meet the temperature for the first mash stage. It’s worth noting that
because you’ve added a lot of colder grain, the temperature of the wort will drop at first – this will
Table of contents
Popular Brewing System manuals by other brands


Hamilton Beach
Hamilton Beach The Scoop manual

Blichmann Engineering
Blichmann Engineering 3.5 BBL Hybrid Brewhouse Assembly operation maintenance

Curtis
Curtis CGC troubleshooting guide

Grainfather
Grainfather G70 quick start guide

Brew Monk
Brew Monk 017.070.30 instruction manual

Bloomfield
Bloomfield Koffee-King 8541 owner's manual
