EIOEIR HC-21N User manual

Stick vacuum cleaner
User manual
Read this instruction carefully before use.

1
IMPORTANT WARNINGS
PLEASE READ THE SAFETY INSTRUCTIONS CAREFULLY BEFORE USE
AND KEEP FOR FUTURE REFERENCE.
Safety instructions:
·Do not use near stairs or on the balconies. This machine does not have a no
avoidance sensors.
·This unit can be used by children from 8 years old and people with physical,
sensory or mental skills or lack of experience and knowledge provided they
have been placed under supervision or have received instructions for using
the machine safely and that they understand the dangers. Children should
not play with the appliance. The cleaning and maintenance by the user
should not be made by children without supervision.
·This device is intended for domestic use only.
·This unit is suitable for low to medium felt back carpets. It is not suitable for
uneven floors or mixed carpets.
·Remove side brush at the under-carpet cleaning to protect the side brush.
·If the adapter's power cord is damaged, the adapter must be discarded.
·Recharge / battery / s only with the charger supplied by the manufacturer.
Use the device with the battery (s) specifically created(s) for this purpose.
The use of any (s) other (s) battery (s) could cause an explosion or fire.
·Please use an adapter to use this product only.
·Do not use on wet or greasy dust.
·Before use, keep fragile items (glass, light, etc.) and otherobjects that could
entangle the brushes(long hair, plastic bags, rope, wire, etc.).
·Do not sit on the machine and do not put heavy things on it.
·WARNING: Make sure the unit can function freely in the
room (it is not blocked by an obstacle, it cannot fall over) and that there is no
obstacle on which the device may tip and create a risk of danger (such as
lighted candles or a vase filled with water).
·Regularly clean the machine.
·Empty the dust container.
·Load the machine without using it for three months.
·Recharge only in the situation of a low power alarm or when the power is
turned off. Use it after fully charged.
·The battery must be removed from the apparatus prior to its disposal; the
device must be disconnected from the mains when removing the battery;
·Do not dispose of batteries with household waste. Eliminate them in
accordance with local regulations.
·Recharge the battery / the robot only with the adapter provided with the
device.
·The cable of this adapter external flexible cannot be replaced; in case of
damage to the cord, it is necessary to put the adapter discarded and
replaced by an adapter of the same model.

2
·The appliance must be disconnected from the supply mains when removing
the battery.
·This appliance contains battery that are non- replaceable.
·
Do not expose the battery pack or appliance to fire or excessive temperature.
Exposure to fire or temperature above 130℃may cause explosion.
·WARNING: For the purposes of recharging the battery, only use the
detachable supply unit provided with this appliance.
Detachable supply unit
·WARNING: Risk of entrapment hazard. Keep loose clothing, hair, finger, etc.
away from the motorized brushes and nozzles.
·WARNING: the plug must be removed from the socket-outlet before cleaning
or maintaining the appliance.
IMPORTANT
It is forbidden to replace the power cable by yourself if damage.
If the device is dropped, please ask a qualified person to check it before using
it again. Internal damage could cause accidents. For any kind of problems or
repairs, please contact the customer service of the local distributor,
manufacturer or a qualified person to avoid danger.
Disposal and environmental responsibility
In order to be environmentally friendly, we encourage you to have your
device correctly. You can contact your local authorities or recycling
centers for more information.

3
DESCRIPTION OF THE DEVICE
1.Ergonomic handle.
2.Outlet filter cover.
3.Dust tank release button.
4.Dust tank.
5.Bin lid release button.
6.Metal tube release button.
7.Metal tube.
8.Motorized floor brush
release button.
9.Electro brush with
multi-surfaces.
10.On/Off switch.
11.Detachable battery pack.
12.Indicator lights.
13.Adjust power level (7levels).
14.Auto mode switch.
15.Adapter.
16.Hair scraper.
17.Mini motorized brush.
18.Crevice tool.
19.2 in 1 brush tool.
20.Wall mount.

4
INSTRUCTIONS TO INSTALLATION
·Metal Tube
①Insert the metal tube to the main body until a click sound is heard.
②Press the metal tube release button and remove the tube.
·Tube telescopic
①Press the button on telescopic tube, slide to get an ideal length.
·Floor Brush Installation
①Insert the motorized brush on the end of the tube until a click is heard.
②Press the motorized floor brush release button to remove the motorized
floor brush.
·Battery Installation
①Install the battery into the bottom of the main body until it clicks.
②Press the battery release button and pull it out.
5
BEFORE FIRST USE
Unpacking the appliance and disposing of the emballagic elements
Remove all packing material around the appliance and the
protective elements inside the appliancecompartments.
·Carton board and sheets of paper are recyclable. They must be thrown in the
collection bins provided for this purpose.
·Materials bearing the symbol
are recyclable:
>PE <= polyethylene; > PS <= polystyrene; > PP <= polypropylene
This means that they can be recycled by depositing them into appropriate
collection containers.
·Other packaging elements (adhesive, fasteners, etc.) must be disposed of
with household waste.
PRODUCT OPERATION
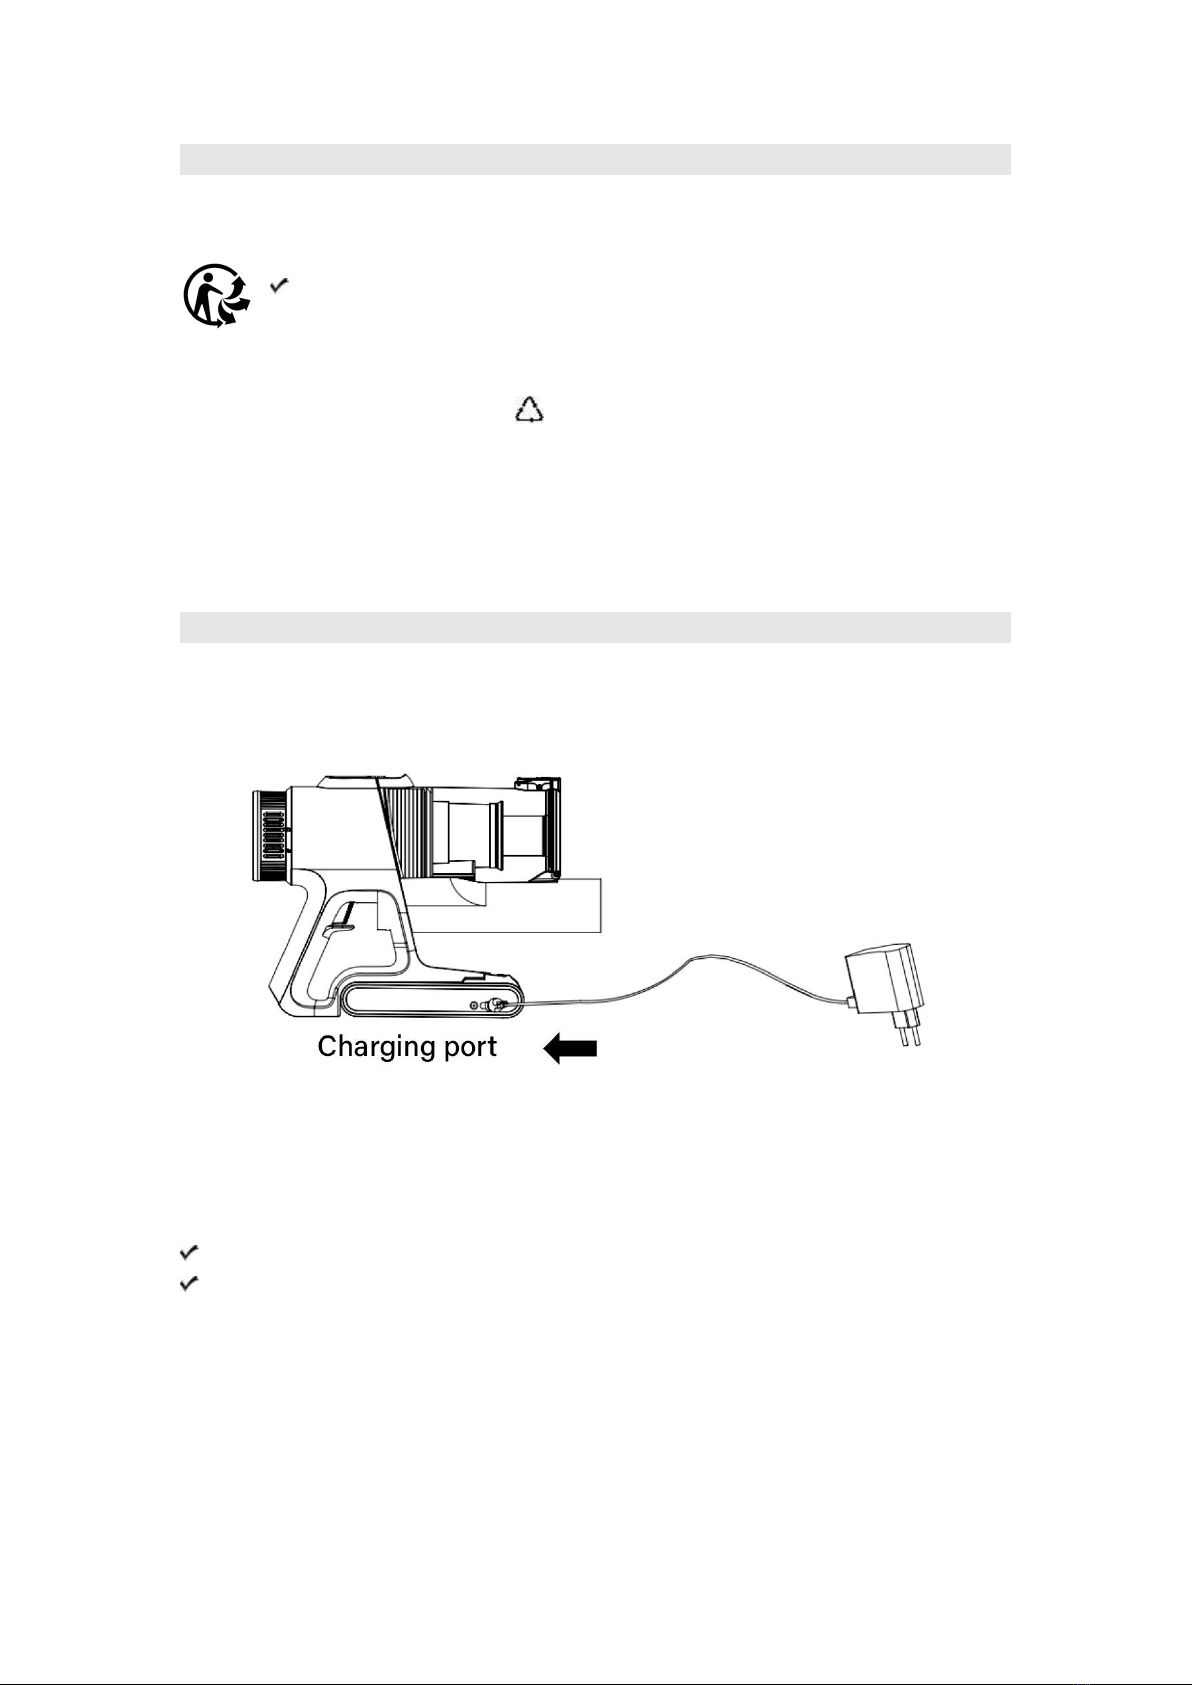
Charging
Plug adapter into charging port and then plug the other side of the adapter into
the power outlet.
Note:
Charge the battery before the first use.
It is better to charge the battery fully in the first 3 times.
Do not charge the battery for extended periods, as this may damage the
battery.
6
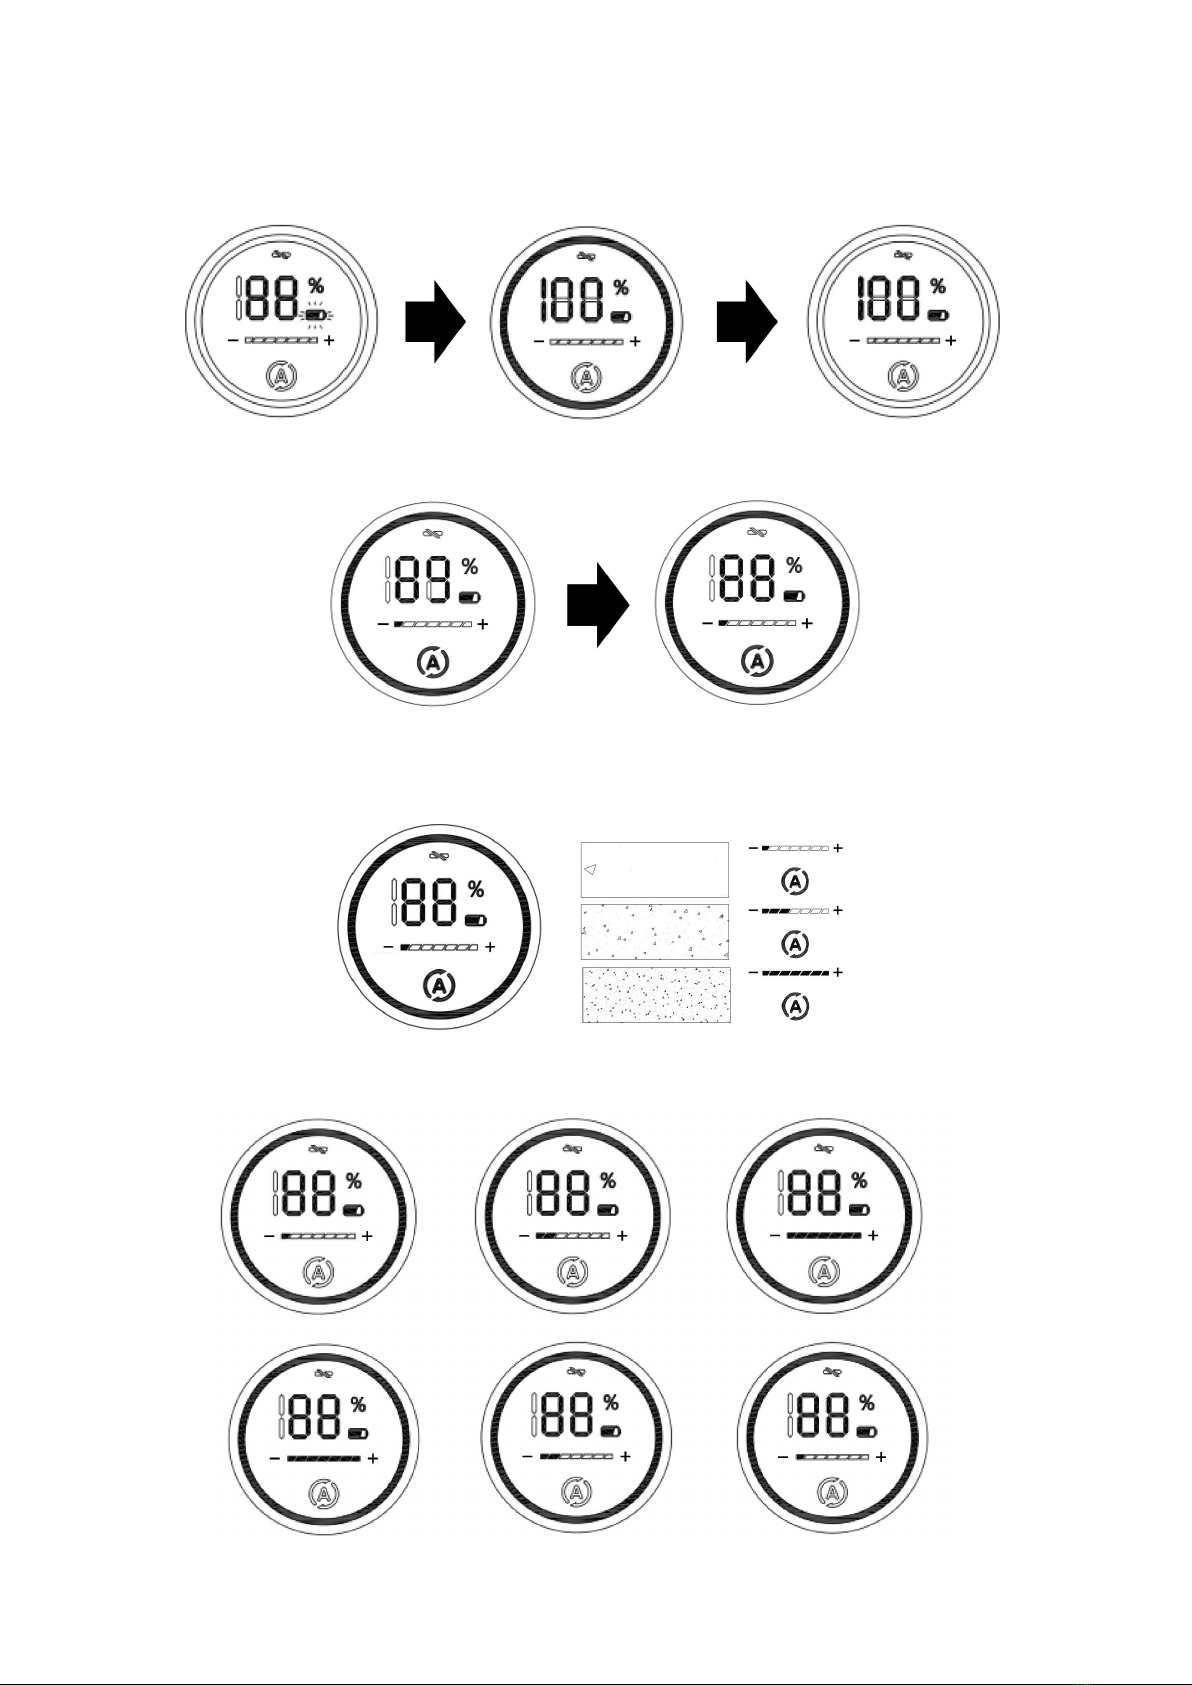
Indicator Lights (All green color)
(A) During charging, the battery icon flickers, and power data goes up.
(B) During discharging or running.
Power data goes down, pls recharge the unit once to 0%.
(C) Mode change
Default Auto mode when turn on the machine, icon “A” lighting while icon “-”
and “+” off. Power adjusted by itself as per dust volume.
Press icon “A” then change to manual mode. Icon “A” off while icon “-” and “+”
lighting. Total 7 speed, adjust by yourself.

7
INSTRUCTIONS TO USE
Cleaning Accessories
·Motorized floor brush: Suitable for rugs and hard floors.
·Long crevice tool: for cleaning the trash in the corners, gaps, baseboard
edges, and other hard-to-reach places.
·2 in 1 brush tool: Use the brush to clean upholstered surfaces, keyboards,
lamps, curtain, blinds, vents, etc. Perfect for cleaning hair and dust inserted
on the fabric. Use the crevice portion to do the ordinary cleaning task. To
switch between brush and crevice portion, press the button on the accessory
and slide brush up or down.
·Mini motorized brush: Suitable for bed and sofa.
Start to Work
1. Select the appropriate accessory to use according to different cleaning task.
2. Press the ON/OFF switch, the machine will start to work. Press it again to
stop.
3. Press the speed control button to adjust 7 suction power levels.
8
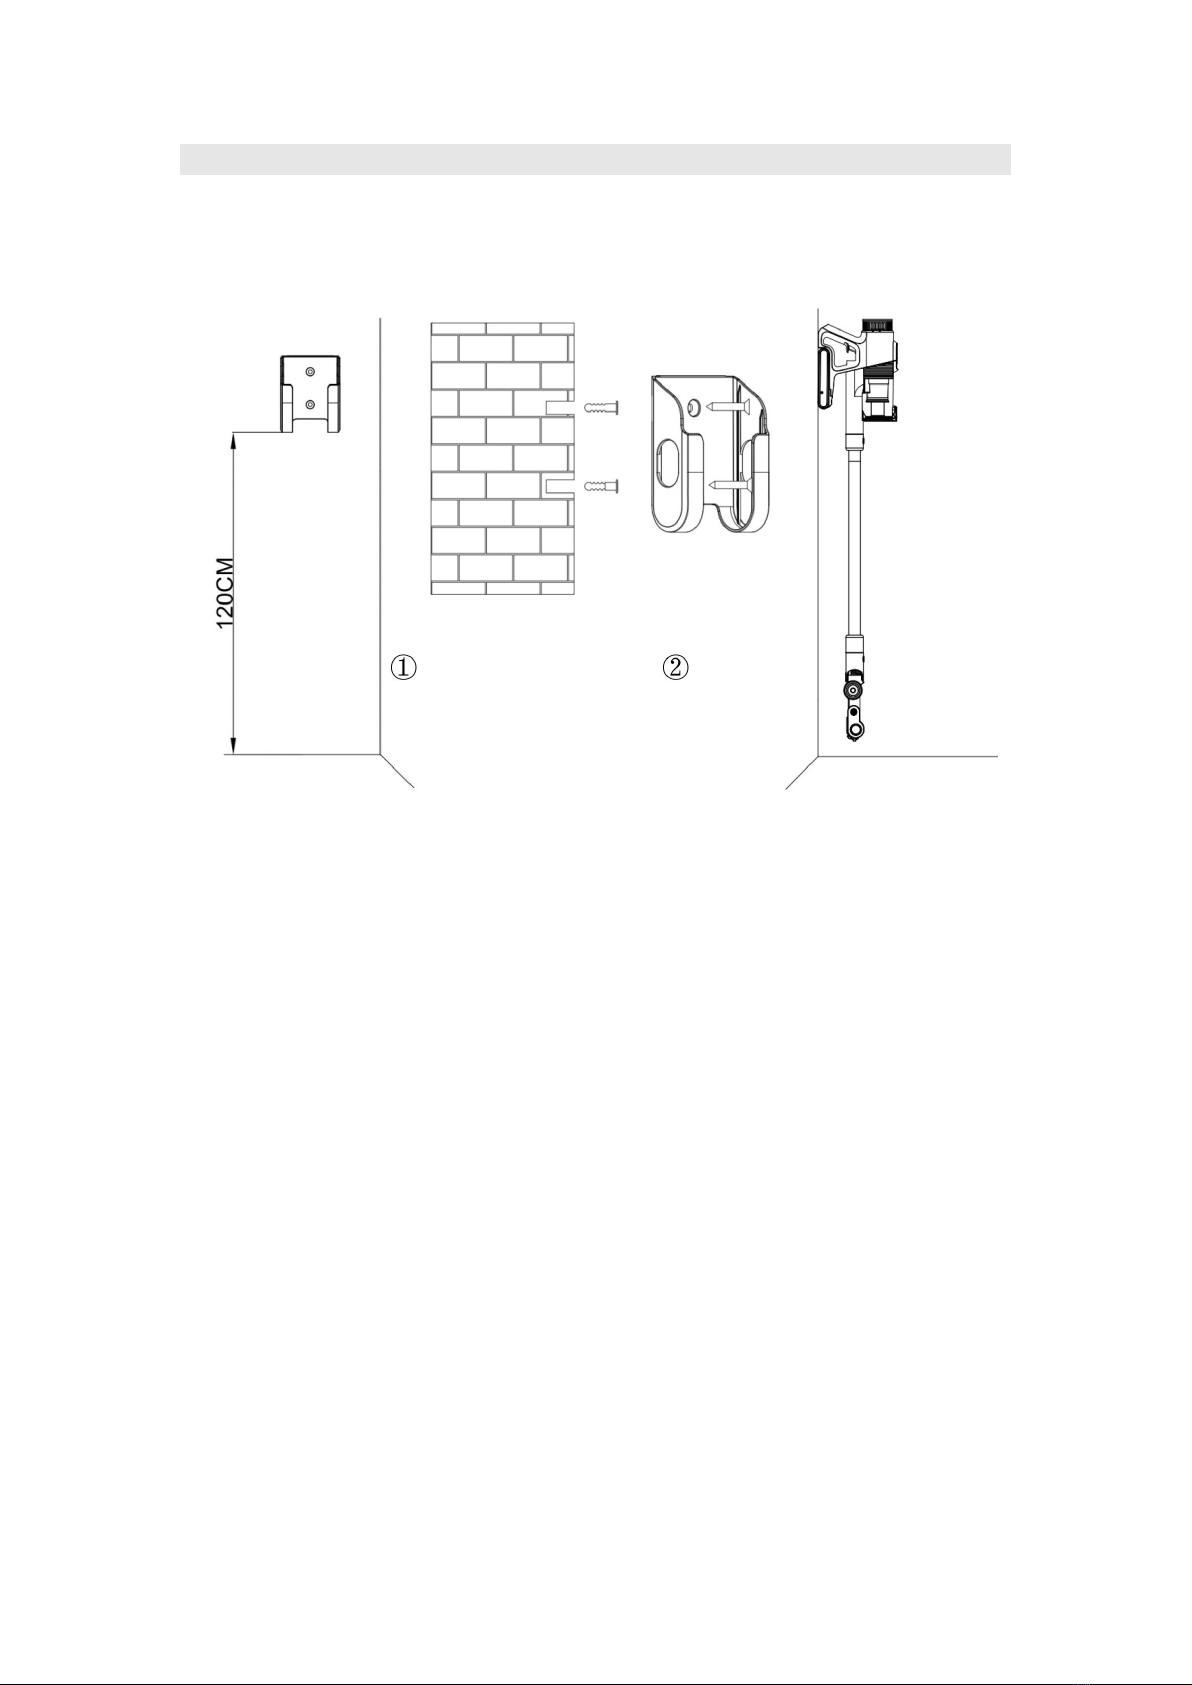
Wall mount installation:
①Keep the bottom line of wall mount at least 120cm to the floor.
②Screw fixing then hang on the unit in the wall mount holder.

9
CLEANING AND MAINTENANCE
Dust Container and Pre- motor Filters Cleaning
Note: Clean the dust container and filters monthly to maintain the
performance.
1. Press the dust bin release button to open the dust tank cover, then empty
the trash.
2. Hold back the dust tank release button and then release the bin from main
body.
3. Hold the dust tank, remove inlet HEPA filter and then lift out the filter mask.
Twist anticlockwise and pulling out the inner separator.
LOCK
)
UNLOCK
)
10
4. Wash all components under running cold water.
5. Completely dry the filter before reassembling.
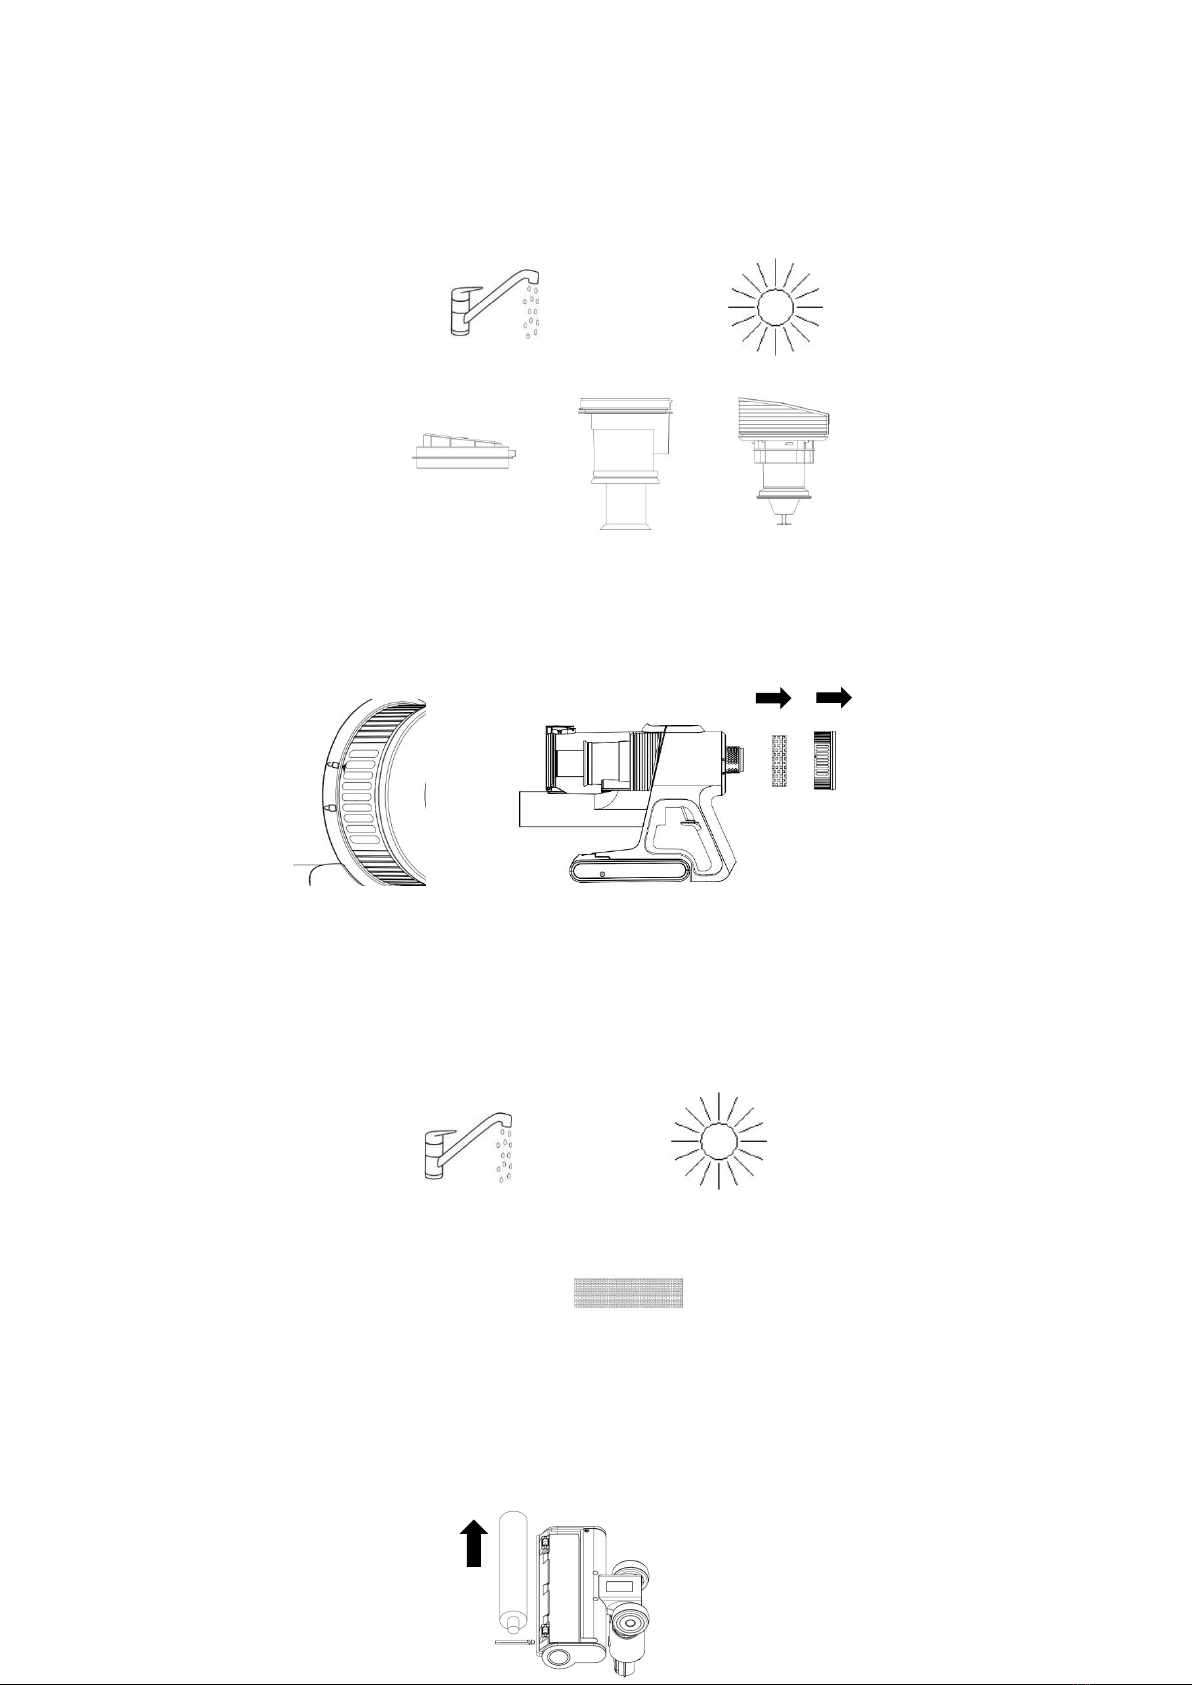
Post-Motor Filter Cleaning
1. Turn the outlet filter cover counter to remove it.
2. Lift out post-motor sponge.
Note: Clean the post-motor filter every month.
Floor Brush Cleaning
1. Remove the clip,Take out the roller brush.

11
2. Remove the hair and debris around the brush roller by fingers or knife.
3.Wash the brush roller under running water.
4.Completely dry the brush roller before assembling.
5. Put the roller brush back,Install the clip back.
12
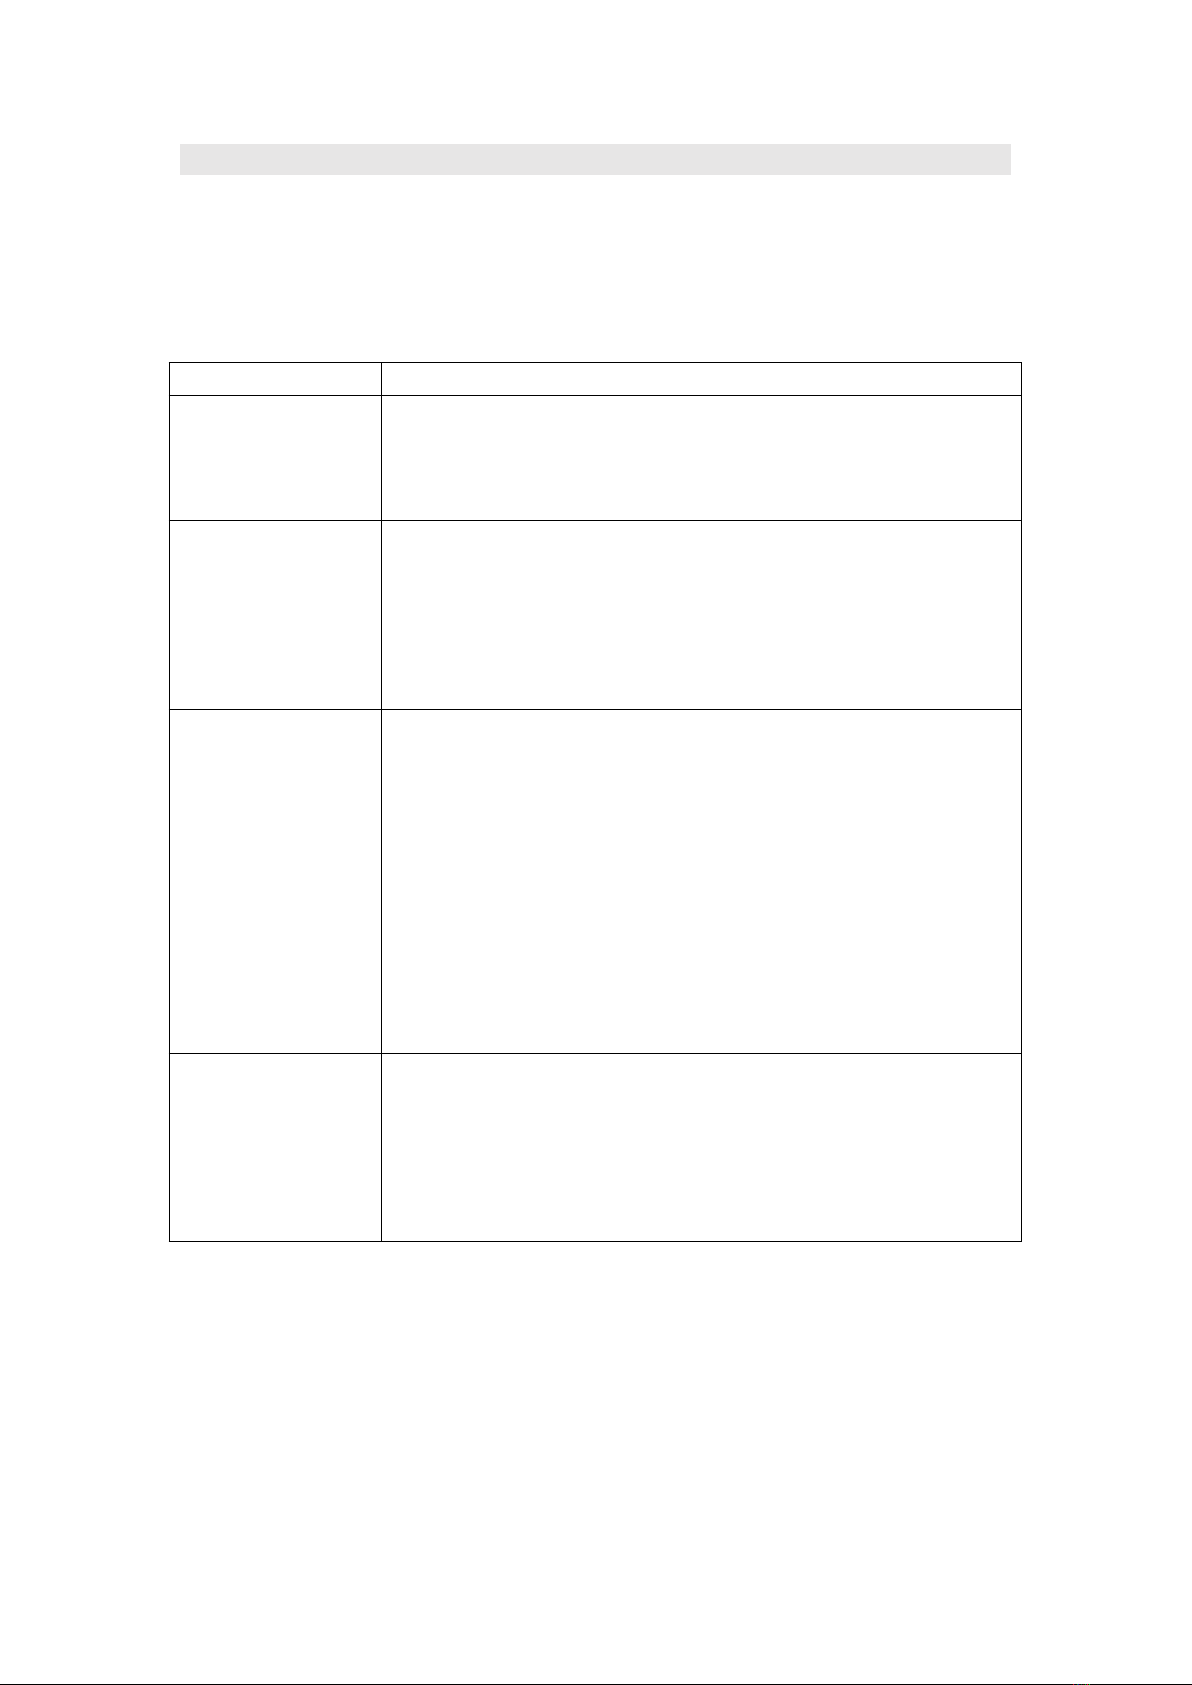
TROUBLESHOOTING
If you encounter a problem with your device or if you suspect the device is not
working properly, you can make a few simple checks before calling a
technician.
Problem
Solution
No power
Before using the appliance, check that it is fully charged,
empty the dust container and clean the filter.
Loss of aspiration
Check to see if the openings are clogged. Unplug and
clean if necessary.
Make sure the filter is correctly installed. Empty the dust
container and clean the filter.
The motorized
brush does not
turn
Unplug the unit, check for clogged hair or dirt. If
necessary, remove the rotating shaft from the power brush
by unlocking the latch, clean and reposition the shaft by
performing the reverse procedure.
Make sure that the axle has been properly inserted into
the power brush and the latch is in the locked position.
The device may need to be recharged. Connect the device
to the charger. The battery indicator will turn GREEN when
charging is complete.
The battery
indicator lights
flicker while in
Use
The motorized brush is blocked. Turn off the vacuum and
remove any object blocking the brush.
For any other problems occurring in your device:contact Customer Service.
CAUTION: The power brush contains electrical connections, do not immerse
in water for cleaning.

13
Display board status description
Charging
Display board status
Display the current battery percentage.
Battery indicator flashes.
The indicator light is always on when it is fully charged,
and it will shut down after unplugging.
Discharge state
Display board status
Display the current battery percentage.
At the same time, the outer ring lights change
colors according to different gears.
Error state
Error type
Error description
0
The battery is low and needs to be charged
E1
Dust induction is abnormal or needs cleaning
E2
Motor short circuit
E3
Motor overload
E4
Motor over temperature
E5
Battery voltage is low
E6
Charging overcurrent or overvoltage
E7
The main motor is not running.
Tips: Once E1 error code displays, pls remove the dust bin, and clean the dust
induction window.
14
TECHNICAL CHARACTERISTICS
-Power supply: Rechargeable battery
-Motor max. power: 450W
-Battery: Li-ion DC 28.8V 2500mAh
-Charging time: 5 hours
-Capacity of the dust bin: 0.5 L
-Speed levels: Auto & Manual (7 speed)
-Product Dimensions: 250 x 1160 x 230mm
-Net weight: 3.2 kg
Battery charging signal:
1. It may take you longer time for charging under the following circumstances:
a.Room temperature is higher than 30℃;
b.Recharge immediately after the vacuum cleaner has stopped operating.
2. Always recharge the vacuum cleaner after each usage no matter how long it
has been used.
3. Unplug when not charging.
4. When not in use for more than two months the vacuum cleaner should be
disconnected from the power supply. To ensure a longer service life, the
vacuum cleaner must be charged once every two months.
5. The vacuum cleaner or adapter may become hot during charging so take
the necessary precautions to avoid contact.
DISPOSAL:
1. The presence of this logo on the product means that disposal of
2012 on electrical and electronic equipment (WEEE).the device is
governed by Directive 2012/19 / EU dated 4 July.
Any hazardous substance in electrical or electronic equipment can
have a potential impact on the environment and health during
recycling. Consequently, at the end of useful life of the device, it should not be
disposed of with municipal unsorted waste.
Your role as final consumers is crucial in terms of reuse, recycling and
obtaining other types of value creation from this. You have the choice of
different collection systems and exchanges organized by local authorities
(recycling centers) and distributors. It is your duty to use these opportunities.
2.In the end of battery life:
This appliance contains battery that are non-replaceable.
Used batteries must be supported by a selective collection system in
orderto be recycled thus reducing the impact on the environment.
When the battery reaches its end of life, you must place it in an appropriate
selective collection system that will handle its destruction and / or recycling.

15
-If the battery acid has leaked, avoid contact with skin, eyes and mucous
membranes! The liquid that leaks from the battery can cause rashes. If
acid still had to contact with skin, immediately flush the affected areas
with clean water and consult a doctor immediately.
-The batteries must be installed with the correct polarity +/-.
-Do not recharge non-rechargeable batteries because of the risk of
explosion.
IMPORTANT:
Under no circumstances should you throw the device or battery on a
public road.
The warranty does not cover product wear parts, no problems or damage
resulting from:
1 . Surface damage due to normal wear of the product.
2. Defects or damage due to contact of the product with liquid and due to
corrosion caused by rust or the presence of insects.
3. Any incident, abuse, misuse, modification, unauthorized removal or repair.
4. Any improper maintenance operation, not in accordance with product
instructions or connection to improper voltage.
5. Any use of accessories not supplied or approved by the manufacturer.
The warranty is void if the elimination of plate and / or the product serial
number.
Thank you for choosing EIOEIR! We strive to provide you with the best quality
products and services in the industry. Should you have any issues, please
don't hesitate to contact us.
E-mail Support: eioeirservice@outlook.com
Made in China
This manual suits for next models
1
Table of contents


