EL EL-4703 User manual

EN
F
R
2-WAY WIRELESS SUPERVISED
PHOTOELECTRIC SMOKE DETECTOR
Model: EL-4703
INSTALLATION INSTRUCTIONS

2-Way Wireless Supervised Photoelectric Smoke Detector
2
EN

2-Way Wireless Supervised Photoelectric Smoke Detector 3
EN
GENERAL DESCRIPTION
Electronics Line's smoke detector is single station, photoelectric smoke detector
with a built-in supervised wireless transmitter.
When sufficient smoke is detected, or the test feature is operated, the detector will
sound its alarm horn and the transmitter will send an ALARM message. The Alarm
output in the receiver will remain activated until the alarm condition clears.
The smoke alarm base lock discourages unauthorized removal of the smoke alarm
by requiring a screwdriver to remove the alarm from the base.
The smoke alarm provides the following signals to the control panel:
♦Alarm
♦Alarm restore
♦Low battery
♦Tamper
♦Supervision
WARNINGS:
This smoke detector is designed for use in a single residential unit only, which means that it
should be used inside a single family home or apartment. It is not meant to be used in
lobbies, hallways, basements, or another apartment in multi-family buildings, unless there are
already working detectors in each family unit. Smoke detectors, placed in common areas
outside of the individual living unit, such as on porches or in hallways, may not provide early
warning to residents. In multi-family buildings, each family living unit should set up its own
detectors.
This detector is not to be used in non-residential buildings. Warehouses, industrial or
commercial buildings, and special purpose non-residential buildings require special fire
detection and alarm systems. This detector alone is not a suitable substitute for complete fire
detection systems for places where many people live or work, such as hotels or motels. The
same is true of dormitories, hospitals; nursing homes or group homes of any kind, even if
they were once single - family homes. Please refer NFPA 101, the Life Safety Code,
NFPA71, 72A, 72B, 72C, 72D, and 72E for smoke detector requirements for fire protection in
buildings not defined as “households”.

2-Way Wireless Supervised Photoelectric Smoke Detector
4
EN
SELECTING A LOCATION
Smoke detectors should be installed in accordance with the NFPA Standard 74
(National Fire Protection Association, Batterymarch Park, Quincy, MA 02169). For
complete coverage in residential units, smoke detectors should be installed in all
rooms, halls, storage areas, basements, and attics in each family living unit.
Minimum coverage is one detector on each floor and one in each sleeping area and
attics in each family living unit. Minimum coverage is one detector on each floor and
one in each sleeping area.
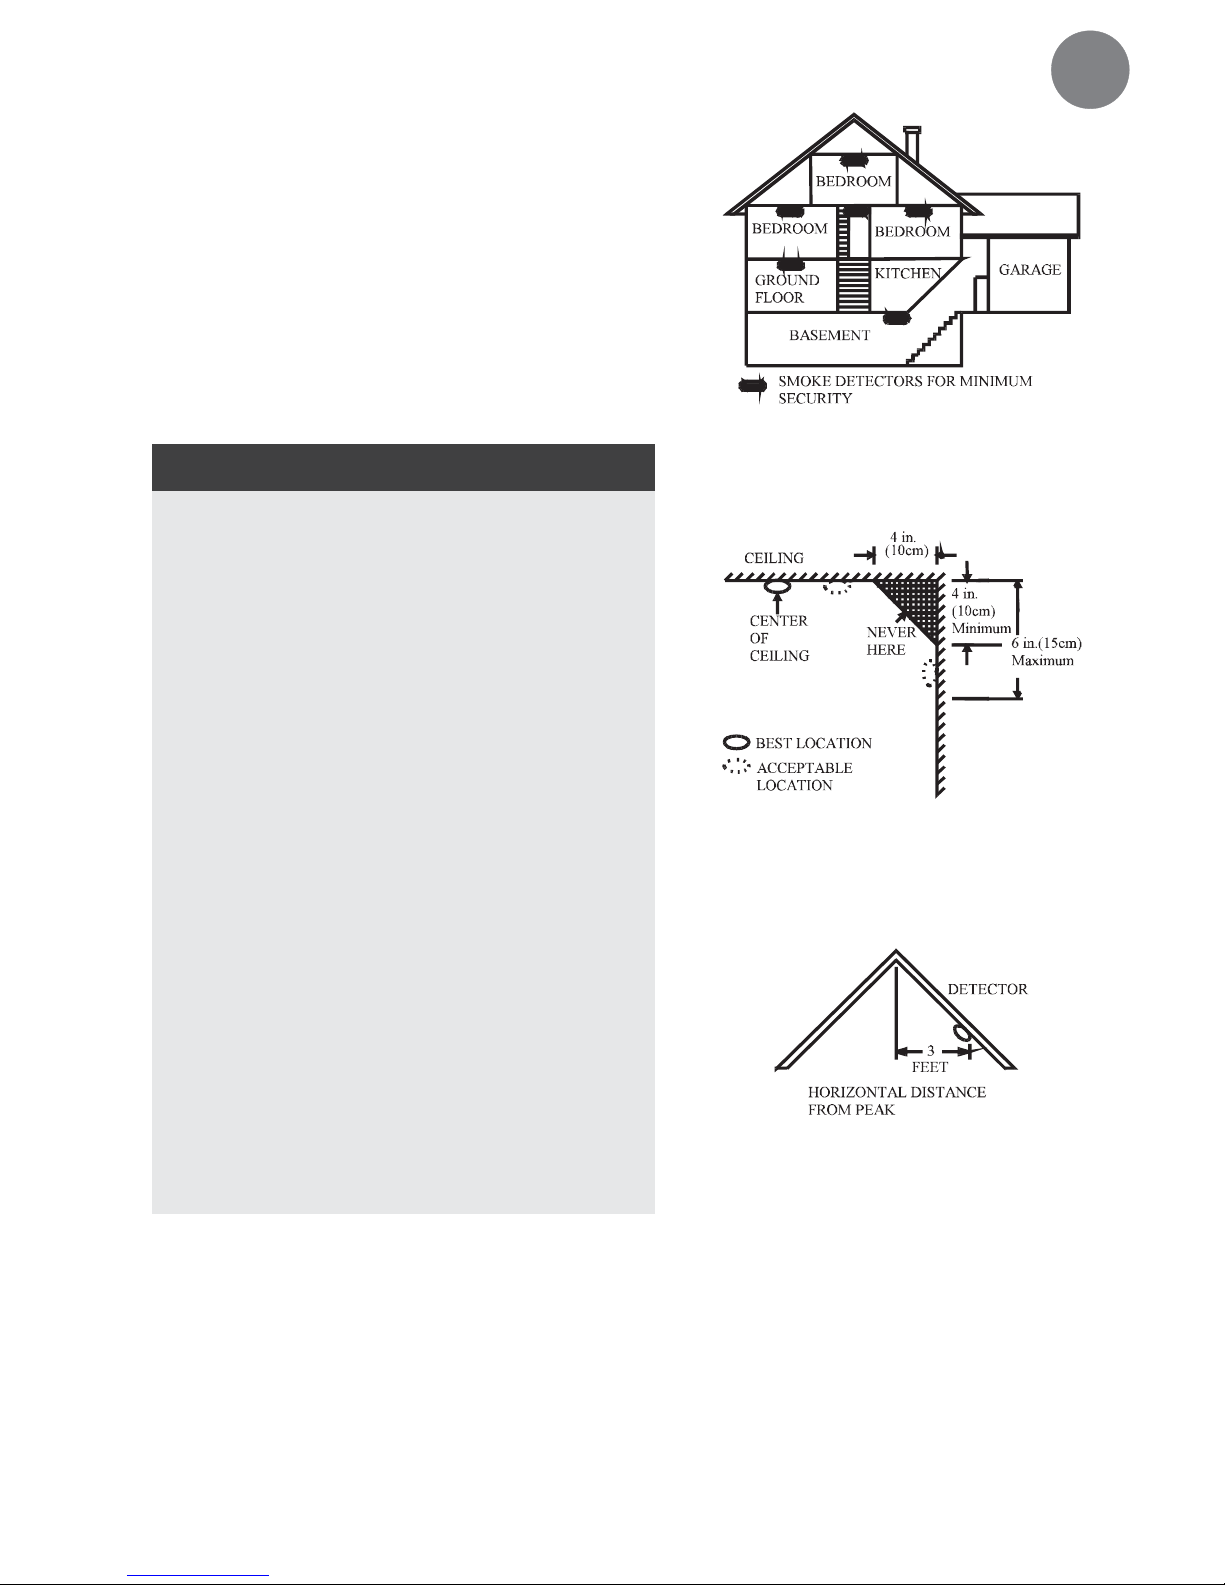
♦Install a smoke detector in the hallway
outside every separate bedroom area,
as shown in Figure 1. Two detectors are
required in homes with two bedroom
areas, as shown in Figure 2.
♦Install a smoke detector on every floor
of a multi-floor home or apartment, as
shown in Figure 3.
♦Install a minimum of two detectors in
any household.
♦Install a smoke detector inside every
bedroom.
♦Install smoke detectors at both ends of
a bedroom hallway if the hallway is
more than 40 feet (12 meters) long.
♦Install a smoke detector inside every
room where one sleeps with the door
partly or completely closed, since
smoke could be blocked by the closed
door and a hallway alarm may not wake
up the sleeper if the door is closed.
♦Install basement detectors at the bottom
of the basement stairwell.
♦Install second-floor detectors at the top
of the first-to-second floor stairwell.
♦Be sure no door or other obstruction
blocks the path of smoke to the
detector.
♦Install additional detectors in your living
room, dining room, family room, attic,
utility and storage rooms.
♦Install smoke detectors as close to the
center of the ceiling as possible. If this
is not practical, put the detector on the
ceiling, no closer than 4 inches (10 cm)
from any wall or corner, as shown in
Figure 4.
Figure 1: Locations for placing smoke
detectors for single residence with only
one sleeping area
Figure 2: Locations for placing smoke
detectors for single-floor residence with
more than one sleeping area
2-Way Wireless Supervised Photoelectric Smoke Detector 5
EN
♦If ceiling mounting is not possible and
wall mounting is permitted by your local
and state codes, put wall-mounted
detectors between 4 and 6 inches (10 ~
15 cm) from the ceiling, also see Figure
4.
♦If some of your rooms have sloped,
peaked, or gabled ceilings, try to mount
detectors 3 feet (0.9 meter) measured
horizontally from the highest point of the
ceiling as shown in Figure 5.
CAUTION:
(As required by the California State Fire Marshall)
“Early warning fire detection is best achieved by the
installation of fire detection equipment in all rooms
and areas of the household as follows: (1) A smoke
detector installed in each separate sleeping area (in
the vicinity, but outside of the bedrooms), and (2)
Heat or smoke detectors in the living rooms, dining
rooms, bedrooms, kitchens, hallways, attics, furnace
rooms, closets, utility and, storage rooms, basements
and attached garages.”
For your information, NFPA Standard 74, Section 2-4
reads as follows:
“2-4.1.1 Smoke detectors shall be installed outside of
each separate sleeping area in the immediate vicinity
of the bedrooms and on each additional story of the
family living unit including basements and excluding
crawl spaces and unfinished attics.
The provisions of 2-4.1.1 represent the minimum
number of detectors required by this standard. It is
recommended that the householder consider the use
of additional smoke detectors for increased
protection for those areas separated by a door from
the areas protected by the required smoke detectors
under 2-4.1.1 above. The recommended additional
areas are living room, dining room, bedroom(s),
kitchen, attic (finished or unfinished), furnace rooms,
utility room, basement, integral or attached garage,
and hallways not included in 2-4.1.1 above. However,
the use of additional detectors remains the option of
the householder.” We recommend complete
coverage and use of additional smoke detectors.
Figure 3: Location for placing smoke
detectors for a multi-floor residence
Figure 4: Recommended best and
acceptable locations to mount
smoke detectors
Figure 5: Recommended location to
mount smoke detectors in rooms with
sloped, gabled, or peaked ceiling

2-Way Wireless Supervised Photoelectric Smoke Detector
6
EN
Where to Install Your Smoke Detectors in Mobile
Homes and RVs
Mobile homes and RVs built after about 1978 were designed and insulated to be
energy-efficient. In mobile homes and RVs built after 1978, smoke detectors should
be installed as described above. Older mobile homes and RVs may have little or no
insulation compared to current standards. Outside walls and roofs are often made
of non-insulated metal, which can transfer thermal energy flow from outdoors. This
makes the air right next to them hotter or colder than the rest of the inside air.
These layers of hotter or colder air can keep smoke from reaching a smoke
detector. Thereby, install smoke detectors in such units only on inside walls. Place
them between 4 and 6 inches (10 ~ 15 cm) from the ceiling. If you are not sure how
much insulation is in your mobile home or RV, then install the detector on an inside
wall. If the walls or ceiling are unusually hot or cold, then install the detector on an
inside wall. Install one detector as close to the sleeping area as possible for
minimum security, or install one detector in each room for security. Before you
install any detector, please read the following section on “Where not to install your
smoke detectors”.
Where Not to Install Your Smoke Detectors
False alarms occur when smoke detectors are installed where they will not work
properly. To avoid false alarms, do not install smoke detectors in the following
situations:
♦Combustion particles are by-products of something burning. Do not install
smoke detectors in or near areas where combustion particles are present,
such as kitchens with few windows or poor ventilation, garages where there
may be vehicle exhaust, near furnaces, hot water heaters and space heaters.
♦Do not install smoke detectors less than 6 meters (20 feet) away from places
where combustion particles are normally present, like kitchens. If a 20-foot
distance is not possible, e.g. in a mobile home, try to install the detector as far
away from the combustion particles as possible, preferably on the wall. To
prevent false alarms, provide good ventilation in such places.
IMPORTANT:
Never try to avoid false alarms by disabling the detector.
♦Do not mount smoke detectors in the path of fresh air intake. The flow of fresh
air in and out can drive smoke away from the smoke detector; thus reducing its
efficiency. Figure 6 indicates the correct and incorrect locations concerning
this problem.
♦Near paint thinner fumes.
♦In close proximity to an automobile exhaust pipe; this will damage the detector.
♦In damp or very humid areas or near bathrooms with showers. Moisture in
humid air can enter the sensing chamber, then turns into droplets upon
cooling, which can cause false alarms. Install smoke detectors at least 3
meters (10 feet) away from bathrooms.

2-Way Wireless Supervised Photoelectric Smoke Detector 7
EN
♦In very cold or very hot areas, including unheated buildings or outdoor rooms.
If the temperature goes above or below the operating range of smoke detector,
it will not work properly. The temperature range for your smoke detector is 4°C
to 38°C (40°F to 100°F).
♦In very dusty or dirty areas, dirt and dust can build up on the detector's sensing
chamber, to make it overly sensitive.
♦Additionally, dust or dirt can block openings to the sensing chamber and keep
the detector from sensing smoke.
♦Near fresh air vents or very drafty areas like air conditioners, heaters or fans.
Fresh air vents and drafts can drive smoke away from smoke detectors.
♦Dead air spaces are often at the top of a peaked roof, or in the corners
between ceilings and walls. Dead air may prevent smoke from reaching a
detector. See Figures 8 and 9 for recommended mounting locations.
♦In insect-infested areas. If insects enter a detector's sensing chamber, they
may cause a false alarm. Where bugs are a problem, get rid of them before
putting up a detector.
♦Near fluorescent lights, electrical "noise" from fluorescent lights may cause
false alarms. Install smoke detectors at least 1.5 meters (5 feet) from such
lights.
Air EntryAir Return
Bath
Bedroom
Bedroom
Living
Room
Kitchen
Stove
Correct Location
Incorrect Location
Figure 6: Recommended Smoke Detector Locations

2-Way Wireless Supervised Photoelectric Smoke Detector
8
EN
INSTALLATION
The smoke detector is to be mounted on the ceiling or on the wall, if necessary. Since
the smoke detector is a single-station type, it cannot be linked to other detectors.
WARNING:
Do not connect the smoke detectors to any other alarm or auxiliary device.
Connecting anything else to this detector will prevent it from working properly.
Read the “Where To Install Your Smoke Detector” and “Where Not To Install Your
Smoke Detectors”sections in this Manual before installing. To install the detector,
perform the following steps (see Figure 7).
Registration
The EL-4703 must identify itself to the iConnect 2-Way receiver as follows:
1. Set the system to registration mode.
a. Go to the main menu and select [9]>[1]>[1]
(Programming > Devices > Zones)
b. Select a zone and press '√'.
2. Open the detector housing.
3. Apply battery power.. The detector will send a transmission. If the
transmission is successfully received by the system it will play a
confirmation sound. If no confirmation sound is heard send another
transmission by pressing and releasing the tamper switch of the
device.
NOTE:
Due to the occurrence of voltage delay in lithium batteries that have been in
storage, the batteries may initially appear to be dead. In this case, leave the unit
in Test mode for a few minutes until the battery voltage level is stabilized.
4. As soon as 'Save?' appears, press '√'

2-Way Wireless Supervised Photoelectric Smoke Detector 9
EN
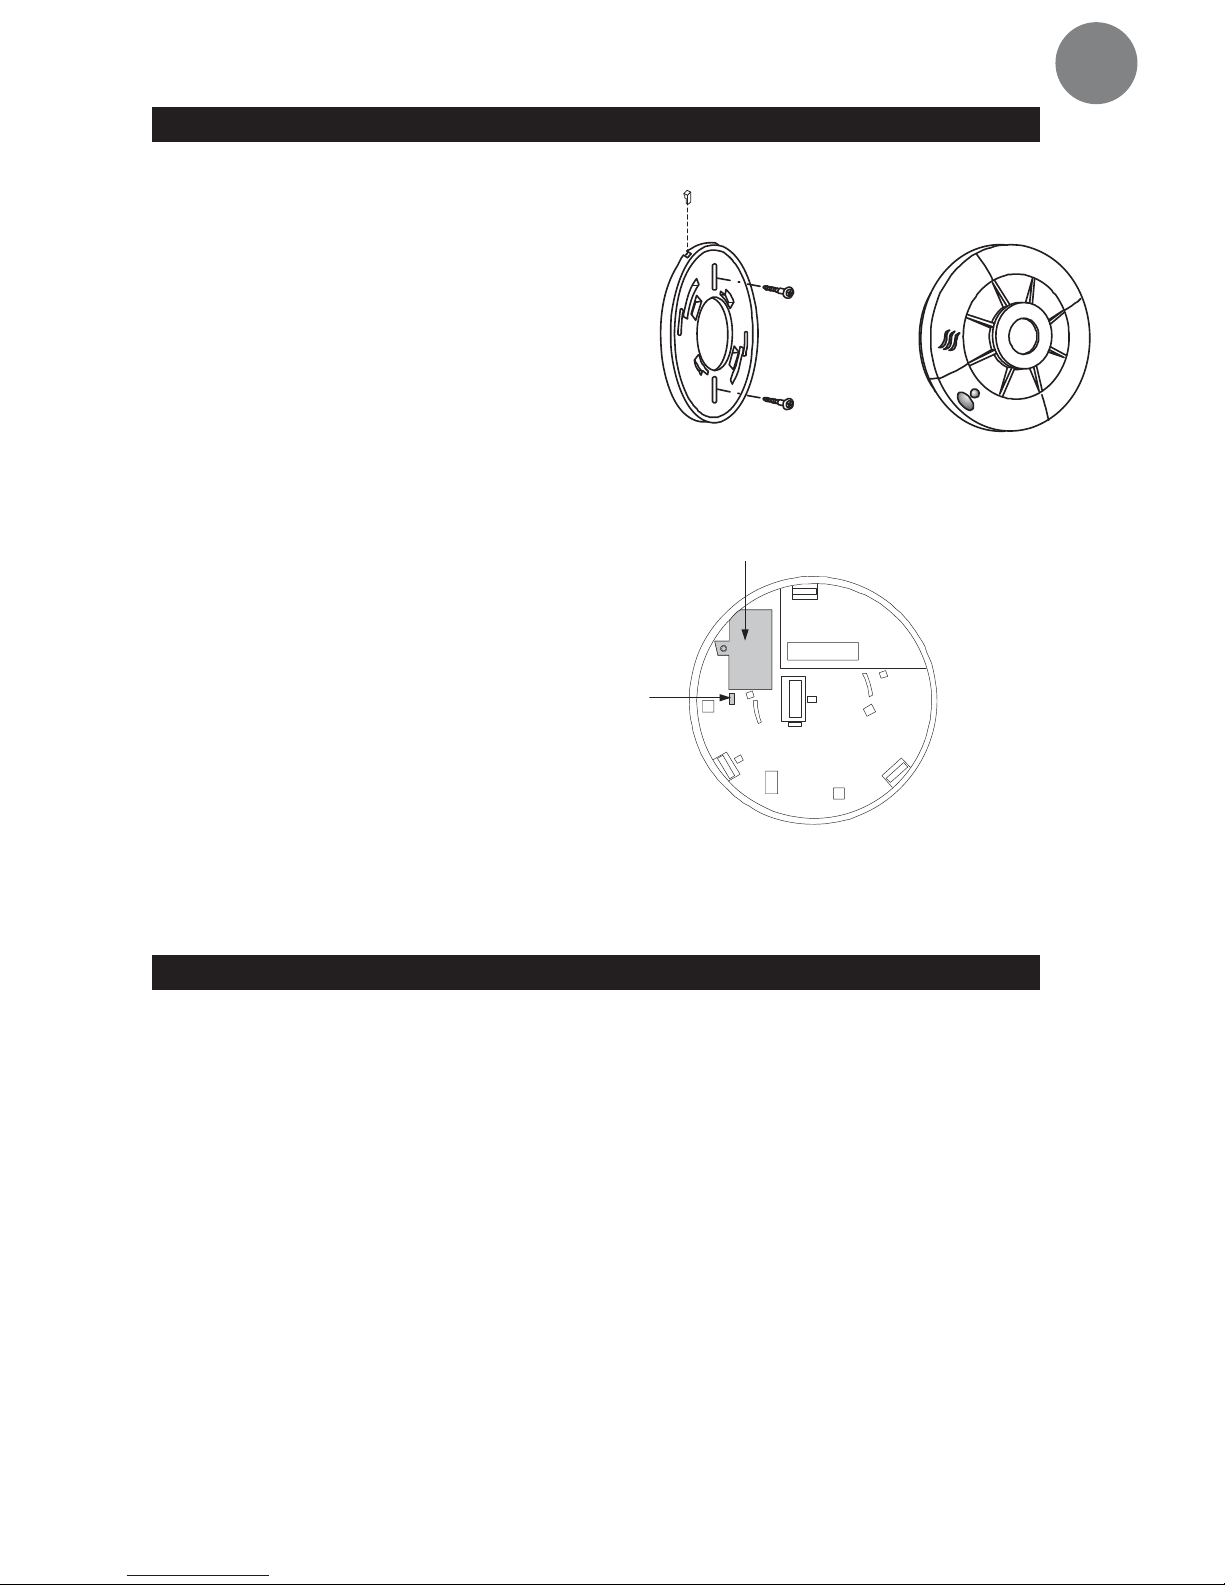
Mounting a Detector
♦Select the installation location.
♦Remove locking pin securing the
mounting bracket to the unit (see
Figure 7).
♦Remove the mounting bracket
from the unit by rotating it
counterclockwise.
♦Use the bracket as a template for
marking the mounting holes
♦Using an appropriate drill, drill two
holes at the marks and insert
anchors.
♦Using screws (supplied) attach the
bracket to the wall as in Figure 7.
♦Line up the side slot of the bracket
and the detector. Push the
detector onto the mounting
bracket and turn it clockwise to fix
it into place.
Insert the locking pin in order to
secure the mounting bracket to
the detector (see figure 7).
♦Pull the detector outward to make
sure it is securely attached to the
mounting bracket.
WARNING:
This detector is not suitable for installation in a
hazardous location, as defined in the national
electrical code. Do not use detector in an
outlet controlled by a wall switch.
Bracket
Screws
Detector
Locking Pin
Figure 7: Smoke Detector Installation
Battery Compartment
Tamper
Figure 8: Batteries Compartment/Tamper
Deleting a Smoke Detector
To delete a smoke detector from the system:
1. Set the system to Delete mode.
a. Go to the main menu and select [9]>[1]>[1] (Programming > Devices
> Zones).
b. Select a zone and press '√'
c. Press >12 >3.
2. Open the detector and take out the battery.
3. Press the tamper switch. While the tamper switch is being pressed insert
the battery. Within five seconds open the tamper and close it again

2-Way Wireless Supervised Photoelectric Smoke Detector
10
EN
RED INDICATOR
When the red LED indicator (see Figure 9) flashes once in 30 seconds, it indicates
the detector is under normal operation. When the red LED flashes very frequently
and an audible alarm sounds simultaneously, it indicates that the detector senses
smoke.
NOTE:
The red LED behaves according to one of the following set modes:
Mode 1: The red LED indicator will not reset automatically at the end of an alarm
event. This means that after the smoke chamber is cleared, the audible alarm will stop
automatically, but the red LED indicator will continue to flash, until it is manually
restored by the user. To restore – press the test button for 2-3 seconds, the LED will
stop flashing.
Mode 2 (Default): The red LED will reset automatically at the end of an alarm event.
The user can check to which mode the detector is defined and switch between modes.
• To check the mode, press the Test button. The red LED will light up. If the red LED
lights up continuously the detector is in Mode 1. If the red LED is blinking the
detector is in Mode 2.
• To switch from one mode to another, press the Test button for 8 seconds. The
buzzer will sound and the red LED will change its behavior either from a continuous
light to a blinking light or from a blinking light to a continuous light.
TESTING YOUR SMOKE DETECTOR
To be sure that detector is working
correctly test the detector weekly by
performing the following procedure:
Use your finger to firmly press the
test button. If the detector is
functioning correctly, the alarm horn
sounds. To stop the alarm horn,
press the test button again. If the
detector fails to test properly, have it
repaired or replaced immediately.
If the alarm horn begins to beep once
every 35 seconds, it means that the
detector’s batteries are weak.
Replace the batteries immediately.
Keep fresh batteries on hand for this
purpose.
Test / Silence
Button
LED Indicator (Red)
Detector
Buzzer
Openings
Figure 9: Smoke Detector Cover
NOTE:
Cooking smoke or a dusty furnace (sometimes called “friendly fires”)can cause the
alarm to sound. If this happens, open a window or fan the air to remove the smoke or
dust. The alarm will turn off as soon as the air is completely clear. Do not disconnect
the batteries from the detector. This will cancel your protection from fire.

2-Way Wireless Supervised Photoelectric Smoke Detector 11
EN
TAKING CARE OF YOUR SMOKE DETECTOR
To keep your detector in good working condition, you must test the detector weekly,
according to the “Testing Your Smoke Detector” section.
CLEANING THE SMOKE DETECTOR
Clean the housing with a dry or damp cloth to remove dust and dirt. If necessary,
open the smoke chamber and clean the interior of the detector.
1. Remove the detector from the detector base.
2. Remove the batteries.
3. Using a flat screwdriver release the smoke detector cover.
4. Using a flat screwdriver lift the smoke chamber housing slightly.
5. Use a fine paintbrush to remove dirt from the chamber.
6. After cleaning, close the smoke chamber, fix the housing and remount the
detector on the ceiling.
DO NOT FORGET TO REPLACE THE BATTERIES!
BATTERY REPLACEMENT
Replace the detector batteries once a year or immediately when the low battery
“beep” signal sounds once every 35 seconds. The low-battery "beep" should last at
least 30 days before the batteries die out completely.
NOTE:
If false alarms keep coming from the detector, you should check whether the detector’s
location is adequate. Refer to section “WHERE TO INSTALL SMOKE DETECTORS.” Have
your detector moved if it is not located properly. Clean the detector as described above.
WARNING! LIMITATIONS OF SMOKE ALARMS
Wireless smoke alarms are very reliable, but may not work under all conditions. No
fire alarm provides total protection of life or property. Smoke alarms are not a
substitute for life insurance.
Smoke alarms require a source of power to work.
This smoke alarm will not operate and the alarm will not sound if batteries are dead
or not installed properly.
Smoke alarms may not be heard. A sound sleeper or someone who has taken
drugs or alcohol may not awaken if the alarm is installed outside a bedroom. Closed
or partially closed doors and distance can block sound. This alarm is not designed
for the hearing impaired.
Smoke alarms may not always activate and provide warning early enough. Smoke
alarms only activate when enough smoke reaches the alarm. If a fire starts in a
chimney, wall, roof, on the other side of closed doors, or on a different level of the
property enough smoke may not reach the alarm for it to alarm.
Smoke alarms are a significant help in reducing loss, injury and even death.
However, no matter how good a detection device is, nothing works perfectly under
every circumstance and we must warn you that you cannot expect a smoke alarm to
ensure that you will never suffer any damage or injury.

2-Way Wireless Supervised Photoelectric Smoke Detector
12
EN
Specifications
In order to continue improving the product, Electronics Line reserves the right to
change specifications and/or designs without prior notice.
Note:
Smoke detectors are not to be used with detector guards unless the combination
has been evaluated and found suitable for that purpose.
Operating Voltage: 6VDC
Typical Average Standby
Current: 0.04mA
Typical Test Current: 55mA
Typical Alarm Current: 55mA
Peak Trouble Pulse Current: 4.73mA
Peak Pulse Current: 0.074mA
Battery Life: At least 1 year under normal conditions
with Lithium Batteries
Battery Type: 2xCR123 3V Lithium battery
Low Battery Threshold: 5.2VDC
Low Battery Beep rate: One beep every 30 seconds
Low Battery Life: At least 30 days from warning signal
Operating Temperature: -10°C to 40°C (14°F - 104°F)
Operating Humidity: 10% to 85% RH, no condensation or icing
Color: White
Dimensions: Diameter: 148 mm (5.83”)
Height: 53 mm (2”)
Alarm Sound Level: Exceeds 85dB at 3m (10 feet)
Transmitter Characteristics:
Nominal Center Frequency 868.35 MHz,
433.92 MHz,
Supervision Time 10 min
Catalog Number E8US206SMK0A @ 868.35 MHz
E4US206SMK0A @ 433.92 MHz

F
R
DÉTECTEUR DE FUMÉE 2-WAY
MODEL: EL-4703
INSTRUCTIONS POUR L'INSTALLATION

Détecteur de fumée 2-Way
2
F
R

Détecteur de fumée 2-Way 3
F
R
DESCRIPTION GÉNÉRALE
Le EL-4703 est un détecteur de fumée photoélectrique avec un émetteur radio
intégré permettant la supervision.
Lorsque suffisamment de fumée est détectée, ou la fonction de test est activé, le
détecteur déclenche sa sirène d'alarme et envoi un message à la centrale
d'alarme.
Un tournevis est nécessaire à l'ouverture du boîtier du EL 4703 ; l'alarme à partir de
la base.
Liste des alarmes possibles envoyées par le détecteur de fumées EL4703 à la
centrale:
♦Alarme
♦Rétablissement
♦Batterie faible
♦Autoprotection
♦Supervision

Détecteur de fumée 2-Way
4
F
R
SÉLECTION D'UN EMPLACEMENT
Les détecteurs de fumée doivent être installés conformément à la norme NFPA 74
(National Fire Protection Association, Batterymarch Park, Quincy, MA 02169). Pour
une couverture complète dans les unités résidentielles, des détecteurs de fumée
devraient être installés dans toutes les chambres, les couloirs, les aires
d'entreposage, les caves et les greniers, dans chaque unité de vie familiale.
Couverture minimale est d'un détecteur à chaque étage et un dans chaque
chambres et greniers dans chaque unité de vie familiale.
♦Installez un détecteur de
fumée dans le couloir
extérieur de chaque chambre
à coucher séparée.
♦Installez un détecteur de
fumée à chaque étage d'une
maison à plusieurs étages.
♦Installez un minimum de deux
détecteurs dans tous les
foyers.
♦Installez un détecteur de
fumée dans chaque chambre
à coucher.
♦Installez des détecteurs de
fumée à chaque extrémité
d'un couloir de chambre si le
couloir est de plus de 12
mètres.
♦Installez un détecteur de
fumée dans chaque pièce où
l'on dort la porte partiellement
ou complètement fermée .
♦Installez des détecteurs de
sous-sol au bas de la cage
d'escalier du sous-sol .
♦Installez des détecteurs du
deuxième étage au sommet
de la première à la deuxième
cage d'escalier de l' étage .
♦Assurez-vous qu'aucune
porte ou autre ne bloque le
chemin d'accès de la fumée
au détecteur.
♦Installez des détecteurs
supplémentaires dans votre
salon , salle à manger,
grenier, buanderie et salles
Figure 6: Positionnement des détecteurs de
fumée pour Résidence unique avec une
chambre à coucher
Figure 7: Positionnement des d étécteur de
fumée de résidence à un seul étage avec plus
d'une chambre à coucher

Détecteur de fumée 2-Way 5
F
R
d'entreposage.
♦Installez des détecteurs de
fumée au plus près du centre
du plafond que possible. Si
cela n'est pas possible ,
mettre le détecteur sur le
plafond, pas à moins de 10
cm à partir de n'importe quel
mur ou dans un coin .
♦Si le montage au plafond
n'est pas possible et montage
mural est autorisé par les
codes locaux et de l'Etat , mis
fixé au mur détecteurs entre
10 ~ 15 cm du plafond.
♦Si certaines de vos chambres
ont des plafonds en pente ,
pointus ou à pignon, essayer
de le monter au maximum.
Figure 8: Emplacement des détecteurs de
fumée pour une résidence à plusieurs étages
Figure 9: Emplacements les plus recommandés
pour les détécteurs de fumée
Figure 10: Emplacement recommandé pour les
détécteurs de fumée dans les chambres en
pente
Où ne pas installer vos détecteurs de fumée
Les fausses alertes se produisent lorsque les détecteurs de fumée sont installés là
où ils ne fonctionneront pas correctement . Pour éviter les fausses alarmes, ne pas
installer des détecteurs de fumée dans les situations suivantes :
♦Ne pas installer le EL4703 dans une cuisine, à proximité d'une ventilation, d'un
chauffage, dans un garages où il peut y avoir des gaz et fumées échappement
du véhicule, près d'un fours, d'un chauffe-eau et d'appareils de chauffage .
♦Ne pas installer de détecteurs à moins de 6 mètres de ces endroits.

Détecteur de fumée 2-Way
6
F
R
♦Ne jamais essayer d' éviter les fausses alertes en désactivant le détecteur.
♦Ne pas installer les détecteurs de fumée à proximité d'une ventilation cela
réduirait son efficacité
♦Près de vapeurs de peintures ou de solvants
♦Dans les zones humides près de salles de bains. L'humidité dans l'air humide
peut entrer dans la détection chambre, puis se transforme en gouttelettes lors
du refroidissement , ce qui peut provoquer de fausses alarmes. Installez des
détecteurs de fumée à au moins 3 mètres de salles de bains.
♦Dans les régions très froides ou très chaudes, y compris les bâtiments non
chauffés ou des salles de plein air.
♦Si la température monte au-dessus ou en dessous de la plage de
fonctionnement du détecteur de fumée, il ne fonctionnera pas correctement.
La plage de température pour le détecteur de fumée est de 4 ° C à 38 ° C.
♦Dans des endroits très poussiéreux ou sale, la saleté et la poussière peuvent
s'accumuler sur la chambre de détection du détecteur, pour le rendre trop
sensible. De plus, la poussière ou la saleté peuvent obstruer les ouvertures de
la chambre de détection et de garder le détecteur de détection fumer.
Air EntryAir Return
Bath
Bedroom
Bedroom
Living
Room
Kitchen
Stove
Correct Location
Incorrect Location
Figure 11: Emplacement recommandé pour le EL 4703
Procédure d'enregistrement
1. Régler le système en mode d'enregistrement.
a. Allez dans le menu principal et sélectionnez [9] > [1] > [1]
(Programmation>Appareil> Zones )
b. Sélectionnez une zone et appuyez sur √.
2. Ouvrez le boîtier du détecteur .
3. Insérez les piles dans le compartiment . Le détecteur enverra une
transmission. Si la transmission est réussi reçue par le système, il va émettre
un son de confirmation . Si aucun son de confirmation est entendu envoyer
en un autre en appuyant sur l'autoprotection.
4. Dès que 'Enregistrer ? apparaît, appuyez sur √
Détecteur de fumée 2-Way 7
F
R
Procédure d'installation
1. Sélectionnez l'emplacement
d'installation.
2. Retirez le socle arrière.
3. Retirez le support des piles.
4. Utilisez le socle arrière
comme gabarit pour
marquer les trous de
montage. Utiliser une
perceuse appropriée ,
percer deux trous dans les
marques et insérez les vis.
5. Fixez le support sur le mur.
6. Aligner la fente du côté du
support et le détecteur.
Poussez le détecteur sur le
support de montage et
tournez pour le mettre en
place.
Bracket
Screws
Detector
Locking Pin
Figure 7: Installation du EL4703
Battery Compartment
Tamper
Figure 8: Logement des batteries et
autoprotection
Effacement du EL4703:
1. Régler le système en mode Suppression d'éléments.
a. Allez dans le menu principal et sélectionnez [9] > [1] > [1] (
Programmation> Appareil> Zones ) .
b. Sélectionnez une zone et appuyez sur √
2. Presse> 12 > ' √.
3. Ouvrez le détecteur et retirez la batterie.
4. Appuyez sur l'autoprotection sans le lâcher insérez la batterie, attendre cinq
secondes puis relâcher l'autoprotection

Détecteur de fumée 2-Way
8
F
R
Test de votre détecteur de fumée
Pour être sûr que le détecteur
fonctionne correctement tester le
détecteur hebdomadaire en effectuant
la procédure suivante:
Utilisez votre doigt pour appuyer
fermement sur le bouton d'essai. Si le
détecteur fonctionne correctement,
l'alarme retentit . Pour arrêter l'
avertisseur sonore , appuyez de
nouveau sur le bouton de test .
Si la sirène d'alarme se met à retentir
une fois toutes les 35 secondes , cela
signifie que les piles du détecteur sont
faibles. remplacer le batteries
immédiatement
Test / Silence
Button
LED Indicator (Red)
Detector
Buzzer
Openings
Figure 9: Tester le EL4703
Voyant rouge
Lorsque le voyant rouge clignote une fois en 30 secondes, il indique que le
détecteur est en fonctionnement normal. Lorsque la LED rouge clignote très
fréquemment et une alarme sonore retentit en même temps , il indique une alarme.
Indications concernant les clignotements de la LED:
Mode 1: Le voyant rouge ne se réinitialise pas automatiquement à la fin d'un
événement d'alarme.
Cela signifie qu'après la détection de fumée il faut le désactivée, et l'alarme sonore
s'arrête automatiquement , mais le voyant rouge continue de clignoter , jusqu'à ce
qu'il soit remis manuellement l'utilisateur. Pour restaurer - appuyez sur le bouton de
test pendant 2-3 secondes , le voyant cesse de clignoter .
Mode 2 (par défaut): Le voyant rouge se réinitialise automatiquement à la fin d'un
événement d'alarme.
Pour vérifier le mode appuyer sur le bouton test la LED s'allume et reste fixe cela
signifie que le détecteur est en mode 1.Si la LED clignote cela signifie que le
détecteur est en mode 2 (mode normal).
Pour passer d'un mode à l'autre il suffit de rester appuyer sur le bouton TEST
pendant 8 secondes.
Table of contents


