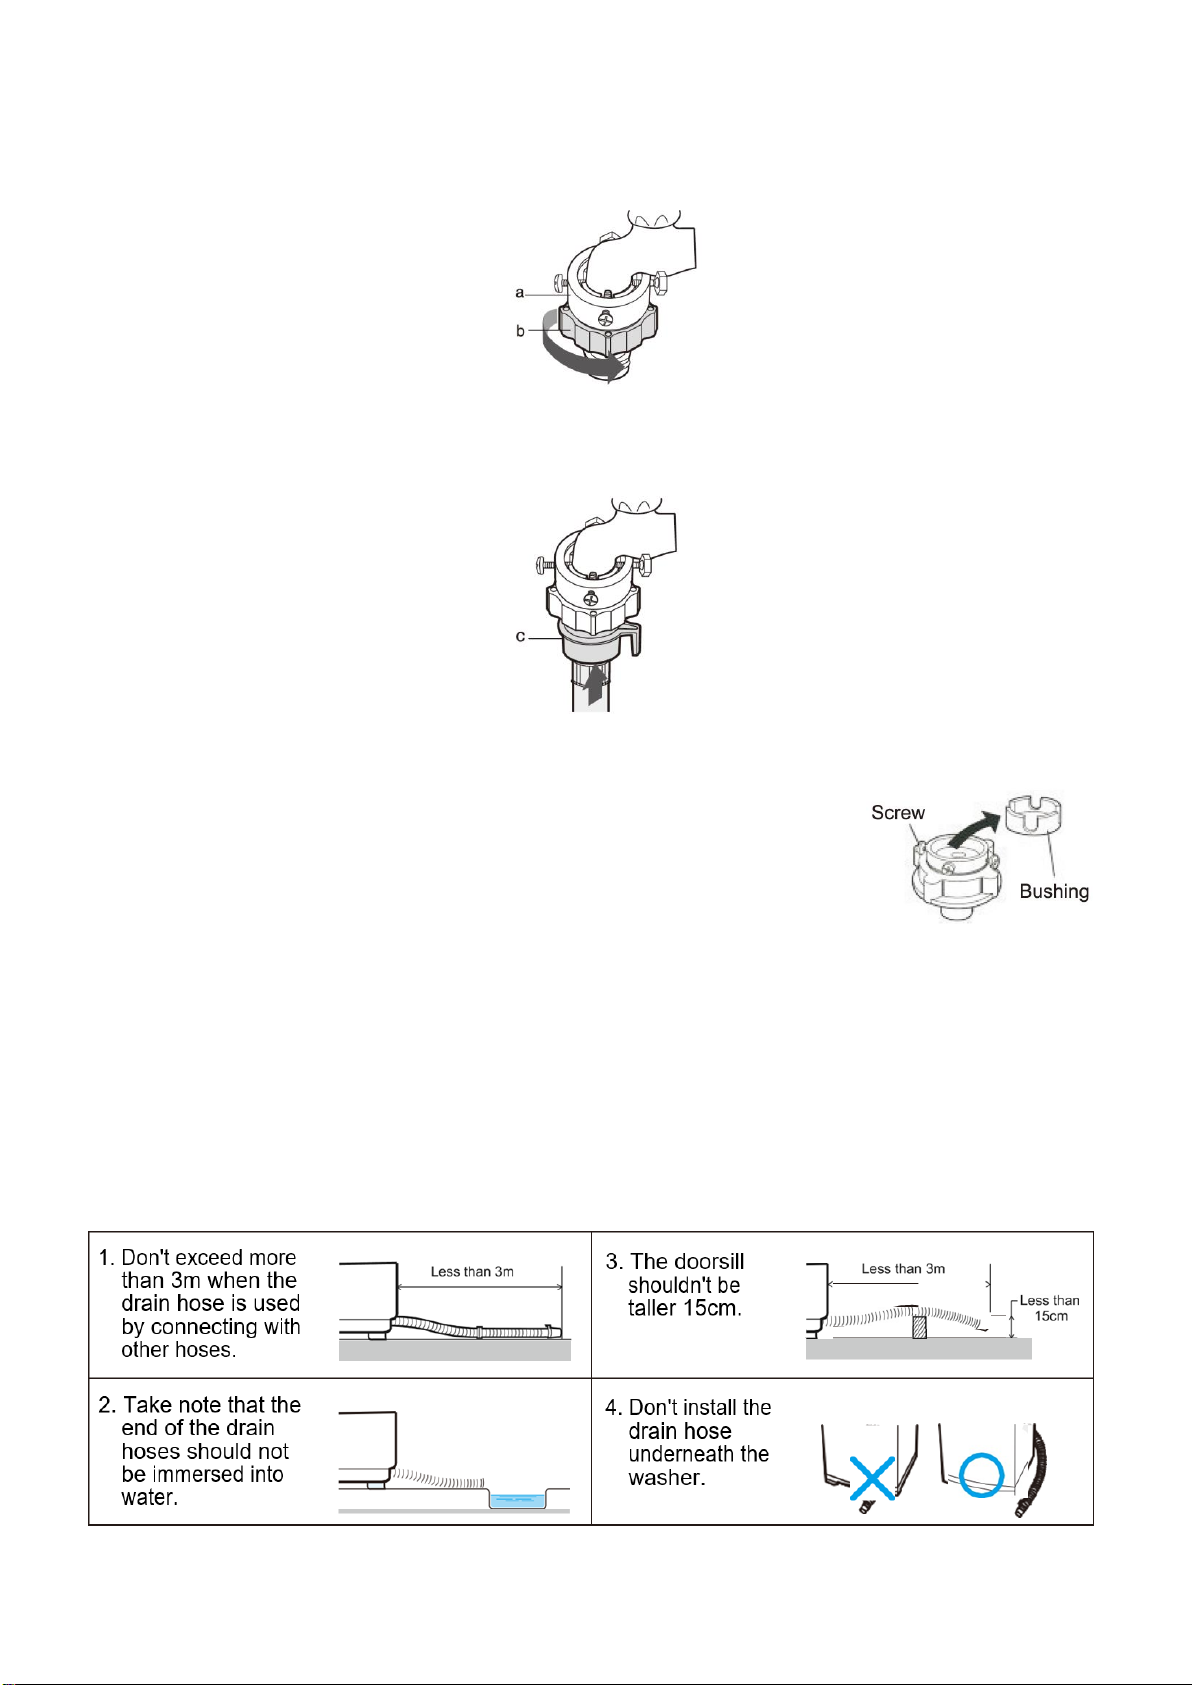
Elba EWF-N1287D(GR) User manual

For The Warranty Terms & Conditions, Please Refer To Warranty Certificate
Owner’s Manual
Please read this manual carefully before
operating your set.
Retain it for future reference.
Record model number and serial number
of the set.
See the label attached on the set and
quote this information to your dealer when
you require service.
WASHING MACHINE
MODEL: EWF-N1287D(GR)

1
We recommend that you read the instructions in this owner’s manual carefully before using
it for the best performance and to extend the lifespan of your appliance, as it will provide you
with all the instructions you require to ensure its safe installation, use and maintenance.
1. SAFETY PRECAUTIONS
•To ensure your safety, all electric appliances should only be installed or serviced by
qualified technician. If the supply cord is damaged, it must be replaced by the authorized
service center or similarly qualified technician in order to avoid hazard.
•Do not place supply cord on the edge of table and counter, or near any heating appliance.
•In order to avoid electric shock, do not immerse supply cord, plug or other parts into water.
•Do not place the appliance near electric stove, heated oven or other heat source.
•In order to avoid burning or risk of fire, combustibles or flammable material (curtains, cloth,
wallpaper and others) should be kept away from the appliance.
•When the appliance is not being used, everything should be removed from the drum.
•Accessible parts may become hazardous during use, please keep away from children.
•Disconnect the appliance from the power supply before cleaning or maintenance.
•When the appliance is faulty, please contact the authorized service center. Do not attempt
to repair by yourself.
•Never use metal scouring pads or sharp scrapers which will damage the appliance surface
or interior wall, leading to scratches of the enamel.
•In order to avoid hazard or electric shock, never put laundry exceeding the capacity.
•Please make sure the power has been switched off when the appliance is not in used.
•Unplug from the socket when you are planning not to use the appliance for long time.
2. ATTENTIONS
•In order to avoid electric shock, please make sure the appliance has been shut off before
carrying out the maintenance.
•Use only original accessories provided by ELBAor its authorized service center.
•Do not use wet parts of the body to touch the appliance.
•Do not pull the appliance by its supply cord.
•The appliance should not be exposed to rain or direct sunshine.
•Do not use or store flammable objects near to the appliance.
•Always pull out the plug and cut off the water supply after the operation.
•The appliance shall not be installed in bath room or wet rooms.
•Do not refill the water manually by hand while washing.
•After the washing cycle is completed, please wait for three minutes to open the door.
Distributors decline all liability for not following above instructions or some improper operations
which caused personal injury and property loss.

2
3. INSTALLATION
3.1 ENVIRONMENT
Leave some space
Maintain at least 10cm between the washer and the wall
Place the washer on a sturdy flat surface
If the washer is placed on an uneven surface, noise or vibration will occurs. (Max. tilt angle on
the supporting surface: 2°
Adjust the legs for even placement.
Never install the washer near water.
Do not place the washer in steamy rooms or where the washer is directly exposed to rain.
Moisture may destroy the electrical insulation causing an electrical shock hazard.
Avoid direct sunlight or heater
As plastic and electrical components are affected by direct heat, never place the washer near
furnaces, boilers, etc.
Do not place the washer under direct sunlight.
ASSEMBLING THE BOTTOM PLATE
1. Place the washing machine on the soft laying cloth, the front side of the machine is
towards the upper.
2. Insert the bottom plate into the slots on the base under, and then tighten it with screw.

3
LEVELING THE WASHER
If the washer is not leveled with the ground, it makes the machine tremble more or be out of
order. So, make sure that the washer is leveled properly.
SEE IF THE MACHINE IS PLACED LEVEL BY CHECK THE POSITION OF THE WASHING
TUB
Open the lid of the machine, pour water into the tub up to the level just below the pulsator, and
adjust the adjustable feet so that the pulsator is positioned at the center of the water as shown in
the figure.
ADJUST THE INSTALLATION POSITION
•If the floor is uneven, adjust the adjustable feet of the washing machine to level position.
Lift the adjustable feet up slightly and turn the feet to level position.
•The distance between the washing machine and wall: at least 10cm.
•Max. tilt angle on the supporting surface: 2°.
ATTENTION
•When installing the machine, it is required to remove two of the packing parts, include
base packing and tub support as shown in the figure. Otherwise, the washing machine
will not run normally.
•During the installation of the washer or during the first use, there may be some water flow
out from the drain hose, which is the residual water at the step of inspection by the
manufacturer.
•After washing, be sure to pull out the power plug and close the water faucet. This is to
avoid an electric shock, hazard fire or water leakage to take place.

4
3.2 BEFORE THE INSTALLATION
•Please check the products and make sure there is no damage on the appliance.
•The appliance door is level, and you can open and close the appliance door flexibly.
•Specification on the marking plate is in compliance with the regulations.
•If the appliance appears in an abnormal way, do not install and unplug the power supply
before contacting the authorized service center.
•Do not attempt to repair or service the appliance by yourself. Repair or maintenance
should only be carried out by a qualified technician or the authorized service center.
•This appliance must be installed only by qualified technician or the authorized service
center. Manufacturer declines all responsibility for improper installation, which may harm
persons and cause damage to the property.
•The AC power supply should be supplied with 220-240V, 50Hz with minimum 13A
distribution circuit fuse or circuit breaker.
NEVER CONNECT THE GROUND WIRE TO SUCH A THING
3.3 SUITABLE WATER FAUCET TYPES
Water faucet type, as shown in the below figure:
Type A: This type is suitable. It is a special faucet for washer using.
Type B: This type is suitable. It is required that the front end of the faucet shall be longer than
10mm. The exit end surface of the faucet must be flat and smooth. Otherwise it may leak water.
Please file the end surface to avoid leakage.
Type C: This type faucet is not suitable, there may be leakage in the place shown in the figure.
If the water faucet is not suitable, it is needed to replace a suitable water faucet before
connecting the water inlet hose.

5
3.4 CONNECTION OF THE WATER SUPPLY HOSE
Connect the other end of the water supply hose to the inlet water valve at the back of the washer.
Screw the hose clockwise tightly.
INSTALLATION TYPE 1
If the water tap is a screw type, assembly a water supply hose that fit to the tap
as shown.
INSTALLTION TYPE 2
1. Remove the adaptor from the water supply hose.
2. First, using a “+” type screw driver to loosen the four screws on the adaptor. Next, take
the adaptor and turn part (b) clockwise to leave a gap about 5mm between them.

6
3. Connect adaptor to the water tap by tightening the screws firmly. Then, turn part (b)
anti-clockwise and put part(a) and part(b) together.
4. Connect the water supply hose to the adaptor. Pull down the part (c) of the water supply
hose. When the part (c) is released, the hose is automatically connected to the adaptor
making a 'click’ sound.
NOTICE:
•After completing connection, if water leakage from the hose, then
repeat the same step.
•Use the most suitable type of faucet for water supply.
•If the end of the faucet is square or too big, please loosen the four
screws. Unscrew and take out the bushing in the adaptor before
inserting the end of the faucet into the adaptor.
3.5 WATER DRAINING CONNECTION
•Before operating your washer, install drain hose properly. The other end of the drain
should set as below.
•Never attempt to extend or modify the water drain hose.
•Do not put water drain hose from your appliance into a container, bucket or bathtub.
•Make sure that the water drain hose is not bent, buckled, crashed or extended.

7
4. PRODUCT DESCRIPTION
5. HOW TO USE YOUR WASHING MACHINE
Detergents
•Detergent or washing powder shall be selected according to fabric type, colors, washing
temperatures, dirty degree and types.
•Bleacher belongs to alkaline type can damage clothes.
•Powder detergents can easily leave the residues in the clothes so as to generate the bad
smell; hence they shall be sufficiently rinsed.
•Detergent cannot easily get dissolved completely if there is excessive or water
temperature is low. It can remain in clothes and pipes to pollute the clothes.
•Washing shall follow the weight of clothes, dirtiness, local water hardness as well as the
recommendations from the detergent manufacturers.
•Keep detergents and additives in a safe and dry place out of reach of children.
Care on the garment
•Please check the pockets of the clothes to be washed, empty the rigid items such as
decorations and coins, otherwise the appliance may be damaged.
•The clothes to be washed are classified into cotton, blended fibre, synthetic fibre, silk,
wool and artificial fiber. Follow the symbol type and make sure the clothes are suitable to
wash in the washing machine.
•White and colorful garments shall be identified. All new colorful articles shall be washed
in a separate cycle.

8
•The articles of different sizes are washed together to increase the washing effects.
•Soft articles shall be washed separately. As for new pure wool textiles, curtains and silks,
the soft washing procedure shall be selected. Check the labels in all washing articles.
•The clothes shall be sorted before being put into washing machine. As for the curtains
with hooks, the hooks shall be removed before being washed.
•The decorations on the clothes may damage the washing machine. As for the clothes
with buttons or embroideries, they shall be turned over before being washed.
•Zips shall be zipped close and buttons or hooks shall be fixed. The loose band or ribbon
shall be bound together.
Confirm the washing capacity
•Do not put excessive load into the washing machine. It may affect the washing effects.
•Please confirm the maximum affordable washing quantity.
•Washing machine shall not wash water-proof materials (ski suits, napkin pads, curtains).
•Do not wash the fiber products that water cannot get soaked easily into such as
water-proof cushions and clothes. Otherwise there will be water bursting out or abnormal
vibration to cause danger and that the clothes also may be damaged. (Such as outside
napkin pads, raincoats, umbrella, ski suits, car covers, sleeping sacks etc.)
5.1 SORTING LAUNDRY BEFORE START
•Sort your laundry according to their type (cotton, synthetic, delicates, wool, etc),
quantities, and dirtiness of the clothes to be washed.
•Never wash colored and white laundry together.
•Dark textiles may contain excess dye and should be washed separately several times
before being included in a mixed load.
•Ensure that there are no metallic materials on your laundry or in the pockets; if so,
remove them.
•Close zips and fasten any hooks and eyes.
•Remove the metallic or plastic hooks of curtains or place them in a washing net or
bag.
•Reverse textiles such as pants, knitwear, t-shirts and sweatshirts.
•Wash socks, handkerchiefs and other small items in a washing net.
•The surfaces of delicate textiles will have wrinkles and the working life of washing
machine will be shortened.
NOTE:
Any malfunction occurred due to foreign materials damaging your machine or overloading of
laundry are not covered by the warranty.

9
5.2 WASHING CLOTHES FOR THE FIRST TIME
Before washing clothes for the first time, you must run a complete cycle without clothes. To do
this:
1. Press the button.
2. Pour a little detergent into detergent box or the inner tub.
3. Turn on the water supply faucet to the washing machine.
4. Press the PROGRAM button, select TUB CLEAN program.
5. Press the button.
5.3 PUT IN LAUNDRY
•The capacity of washing and spinning of the washer refers to the largest weight of the
load that can be washed or spinning in one time. One time washing quantity shall be
lower than the rated capacity.
•The thickness, size and type of the clothes will influence the actual capacity. It is suitable
for one time washing to put in reasonable amount of laundries.
5.4 HOW TO PUT DETERGENT
Washing Powder Inlet
•Please put in the appropriate amount of washing powder according to the washing
volume and select the amount of water.
•When choosing the quick wash program, it is recommended to use liquid detergent for
better washing result.
•Detergent powder that is of poor quality or exposed for a long time may agglomerate.
Please clean the detergent box frequently.
5.5 AUTOMATIC SENSING FUNCTION
•At every program the amount of laundry is automatically sensed while appropriate water
level, washing time, rinsing cycle, and spinning time will be selected automatically.
•After the power has turned on, a program is selected and button is pressed. The
pulsator starts spinning without water, this action senses how much laundry is in the tub.
After this sensing process, water will start to fill automatically.
5.6 ADDING DETERGENT
•The washing machine senses the amount of laundry and indicates the water level. Then,
it starts water supply right away.
•When washing program started, water supply will flow into detergent inlet. You are able to
add detergent during this process but it is required to press button to stop water
supply in order to add detergent. Close the lid and press button again to continue.
NOTICE:
Be careful not to overload. Use right detergent for the laundry you are washing.
If the lid is open while running, the washing machine will be stopped automatically for safety.
(Except, water supply continues while the lid is open).

10
6. PROGRAM SETTING
Cotton
You can select this program to wash the daily washable clothes. The washing period is longer
with strong washing intensions. It is recommended to wash the daily cotton articles, for example:
daily laundry, bed sheets, quilt covers, pillowcases, gowns, underwear etc.
Quick Wash
You can select this program on lightly soiled, cotton, colored and linen textiles. Due to the short
washing time of this program, we recommend that less detergent is used. The program may last
longer than 18 minutes if the washing machine detects an uneven load.
Extra Clean
You can select this program on dirty cotton, synthetic and synthetic-mixed shirts and blouses.
The washing time is longer and having better washing result.
Baby Care
You can select this program for babies clothes, towels and bedding. This program is designed
with added rinse time and washing time in order to have better washing result.
Heavy Duty
You can select this program for washing heavy stained laundry. This program is designed with
added soaking time.
Tub Clean
This program is to clean the inner tub, please remove all the laundry before start.
Spin
This program is for spin only. Soap water or rinse water will be drained out before spinning.
Delay End
Delay end function will put the appliance to stop after the desire time has been elapsed.
Child Lock
This function is to lock the washing program to prevent misused by children. All buttons will be
disabled except button.

11
6.1 PROGRAM SELECTION
Once the washer is turned ON, press this program button the select desired program. With
every press of this button, the washing program changes. Washing program will follow this
sequence: Cotton > Quick Wash > Extra Clean > Baby Care > Heavy Duty > Tub Clean.
Press button to start. Water level will be selected automatically. Washing cycle, rinsing, and
spinning will follow according to the program that has been selected. If you want to pause, press
the button again. It is unable to change the program when paused. Close the lid and washer
will start to operate automatically.
6.2 WATER LEVEL SELECTION
For each washing program, the water level can be changed manually.
1. Press button and select the washing program.
2. All the program will automatically adjust the water level by sensing the laundry load. If
you wish to have different water level, you can click “Water Level” button to your desired
level.
3. The correspond water level will show in display screen.
4. Press button to start and then close the lid.
5. The washing program will operate based on the water level you have selected.
6.3 I-SMART WASH
There are three methods to select i-Smart Wash program.
Method 1:
When button is not pressed, press this button and hold for 3 seconds, the washer will sense
the laundry automatically. The water level will be set automatically and start the washing
program immediately.

12
Method 2:
Firstly, press the button. Press this button and hold for 3 seconds, the washer will sense the
laundry automatically. The water level will be set automatically and start the washing program
immediately.
Method 3:
Firstly, press the button. Press this button and then press button, the washer will sense
the laundry automatically. The water level will be set automatically and start the washing
program immediately.
6.4 SPIN ONLY
There are three methods to select “Spin”program.
Method 1:
When button is not pressed, press this button and hold for 3 seconds, the washer will
operate Spin program immediately.
Method 2:
Firstly, press button, then press this button and hold for 3 seconds, the washer will operate
Spin program immediately.
Method 3:
Firstly, press the button, then press this button, and then press button, the washer will
operate Spin program immediately.
6.5DELAY END
Press the “Water Level” button and hold for 3 seconds to activate the delay end function.
•The delay end timer will appear on the electronic display.
•Press the “Water Level” button until the desired delayed time appears on the display
(from 0 to 24 hours).
•If you have skipped the delay time you wanted to set, keep pressing the Delay Start
button until the desired delay time is displayed again.
•Select the program and then press button to start. After that close the lid. The
washing cycle will start by the time you reserved. For example, you have preset the delay
end function for 2 hours and select the cotton program (49 minutes washing duration),
the appliance will start on 1 hour 11 minutes later. The total end time for whole washing
cycle will complete on 2 hours (which is preset delay end desired time).

13
6.6 CHILD LOCK
Once the washing program is running, press the “Water Level” button & “Program”button
simultaneously and hold for 3 seconds to activate the child-lock function. All the button will be
locked except the power button. The child lock indicator will appear on the display screen once it
is activated. To release the child-lock function, press the “Water Level” button & “Program”
button simultaneously and hold for 3 seconds again to cancel the function.
6.7 TUB CLEAN
To activate this function, press the program button to select “Tub Clean”. The self-cleaning
function is used to clean the tub. This function performs sterilization to remove the stains and
dirt from the inner wall of the tub to avoid the bacteria growth. Before activating this function,
please do not put any clothes and detergent.
NOTE: It’s recommended to perform this program once a month.
6.8 START/PAUSE BUTTON
After selecting the program, press the button and then close the lid to start the program.
Press the button again if you wish to pause the program.

14
6.9 TABLE OF WASHING PROGRAM
Program
Recommended
Capacity
Water Level
Duration
(Hours)
Laundry Type
Cotton
12 kg
Automatic Sensing
(Leve 1 –8)
0:49
Lightly soiled, cottons and
linen textiles
Quick Wash
1 kg
Automatic Sensing
(Leve 1 –8)
0:18
Lightly, soiled, cotton,
colored and linen textiles.
Due to short washing time of
this program, it is
recommend that less
detergent is used. The
program may last longer than
18 minutes if your washing
machine detects an uneven
load.
Extra Clean
6 kg
Automatic Sensing
(Leve 1 –8)
0:52
Dirty cotton, synthetic and
synthetic-mixed shirts and
blouses can be washed
together. The wash time is
longer and better washing
effect.
Baby Care
5 kg
Automatic Sensing
(Leve 1 –8)
1:03
Recommended for babies
clothes, towels and bedding.
Heavy Duty
6 kg
Automatic Sensing
(Leve 1 –8)
1:05
Suitable to wash heavy
stained or wearable clothes.
This program design with
more soaking time.
Tub Clean
-
8
0:38
To perform the self-cleaning
function to remove the stains
and dirt from the inner wall.
Do not put any clothes and
detergent when activate.
Spin
6 kg
-
0:08
This cycle uses a spin to
shorten drying times for
heavy fabrics or special care
items washed by hand.
i-Smart Wash
6 kg
Automatic Sensing
(Leve 1 –8)
0:49
Intelligent wash by auto
sensing the laundry and
water level will select
automatically.
NOTE:
PROGRAM DURATION MAY VARY DEPENDING ON THE AMOUNT OF LAUNDRY, TAP
WATER PRESSURE, AMBIENT TEMPERATURE AND SELECTED PROGRAMS.
Do not mix dry towels, cotton and linen textiles, synthetic and synthetic blended laundry
together.

15
6.10 CANCELLING A PROGRAM
To cancel a running program at any time:
1. Press the button to pause the program.
2. Press button.
3. Your machine will stop the washing operation and the program will be interrupted.
4. Select any other program to drain the machine.
5. Your machine will perform the necessary draining operation and cancel the program.
6. You can now select and run a new program.
6.11 FINISHING PROGRAM
Your machine will stop by itself as soon as the program you have selected has completed.
•You can open the lid and remove the laundry.
•Leave the door of your machine open to allow the inner part of your machine to dry.
•Unplug your machine.
•Turn the water tap off.

16
7. CLEANING AND MAINTENANCE
Before cleaning or performing maintenance on your appliance, disconnect the
appliance from the power supply. To extend the lifespan of your appliance, it must be
cleaned frequently.
The enamel or stainless steel parts should be cleaned without using any abrasive powders or
corrosive substances which could damage the surface. If the stains are difficult to be removed,
use mild cleaner to clean the area.
7.1 CLEAN THE LINT FILTER
Clean the lint filter often to keep your washer clean.
7.2 CLEANING THE WATER INLET FILTER

17
8. TROUBLESHOOTING
Troubles
Reason
Solution
Appliance cannot
start up
Door is not closed properly.
No power supplied.
No water supplied.
Function not set.
Check if the door is closed tightly.
Check if power plug is inserted well.
Check if water supply tap is opened.
Check if button “Start/Pause” is pressed.
Check if button “On/Off” is pressed.
Water leakage
The connection between inlet
pipe or outlet hose and tap or
washing machine is not tight.
Drain pipe in the room is
blocked.
Check and fasten water pipes connection.
Clean up outlet hose and ask a specialized
person for repair when necessary.
Make sure the height of the piping is properly
adjusted.
Indicator or display
does not light.
Power is disconnected.
PC board has problems.
Check if the power has turned on and power
plug is connected correctly.
Please contact service center for repair.
Detergent residues
in the detergent
compartment
Washing powder is dampened
and agglomerated.
Clean and wipe the detergent compartment.
Use liquid detergents or the detergents special
for front loading washer.
Washing effects are
not good
The clothes are too dirty.
Insufficient detergent quantity.
Wrong program chosen.
Select a proper washing program.
Add the proper detergent quantity according to
the instructions in detergent package.
Abnormal noise and
vibration
Legs under the appliance have
not adjusted in level.
Check if the appliance is installed on the solid
and level floor.
Check if the legs in the washing machine are
adjusted level.
9. ERROR CODE
Faulty Code
Phenomenon
Inspection Point
Solution
E1
Spinning
does not
work
Does the washer put on a flat surface?
Are the cloths too heavy or too large?
Reduce the number of clothes
and press the start button again.
E2
No Water
Check if the tap is on/off.
Ensure the filter has no blockage.
Check if the pressure of water supply too
low.
Check if the water supply is continued.
If the inspection point is done.
Press the start button again.
E3
Undrained
Ensure the drain pipe in the right place.
Drain pipe height over 15cm
Check if the drain pipe has been blocked?
If the inspection point is done.
Press the start button again.
E4
Not Working
Check if the lid is open.
Please ensure the lid is closed.
Press the start button again.
EL
Not Working
Check if the child lock function is activate
and the lid is open.
If the child lock function is
activated and the lid is open, the

18
washer will not work. Please
ensure the lid is closed. Press
the start button again.
EA / EC
Alarm
-
Press the start button to
reoperation. If still unable to
solve the problem, please
contact the after sales service
center.
Electrical Warning
•To avoid the risk of fire, electrical shock and other accidents, please take note on the following:
i. Only the voltage indicated in power label can be used.
ii. Protect the power cord properly. Power cord shall be fixed well so that it will not trip the people or
other things and be damaged. Special attention shall be paid to the socket. It shall be plugged into
the sockets completely and attention shall be paid to the plug location.
iii. Do not make the wall-mounted socket overloaded or cable extended. Overloading of the wiring
may cause fire or electrical shock. Do not pull out power plug with wet hand.
iv. To ensure your safety, power plug shall be inserted into an earthed three-pole socket. Carefully
check and ensure that your socket is properly earthed.
10. TECHNICAL SPECIFICATION
NOTICE
This product must not be disposed together with domestic waste. It has to be disposed at an authorized place for
recycling of electrical and electronic appliances. By collecting and recycling waste, you help to save natural
resources and make sure the product is disposed in an environmental friendly and healthy way.
Model
EWT-N1287D(GR)
Washing Capacity
12.0KG
Voltage
220–240V~
Frequency
50Hz
Rated Power
540W
Washing Container Capacity
74 L
Water inlet pressure (Mpa)
0.03 ~ 0.8
Gross Weight/Net Weight
42.5KGS/38.0KGS
Product Dimension (mm)
580 (W) x 960 (H) x 625 (D)

19
Table of contents
Other Elba Washer manuals

Elba
Elba EWF 1076 A User manual

Elba
Elba EWF 1075 VT User manual

Elba
Elba EWF 1077 A User manual

Elba
Elba WD 7512 VT User manual

Elba
Elba EWF 9141 IA User manual

Elba
Elba Smart Drive Mounting instructions

Elba
Elba WM EA 15100-A User manual

Elba
Elba EWF-8120 User manual

Elba
Elba HWD100-BD14756 User manual

Elba
Elba EWF 0861 A User manual